2006 BMW 325XI TOURING display
[x] Cancel search: displayPage 79 of 160
Reference
At a glance
Controls
Driving tips
Mobility
77
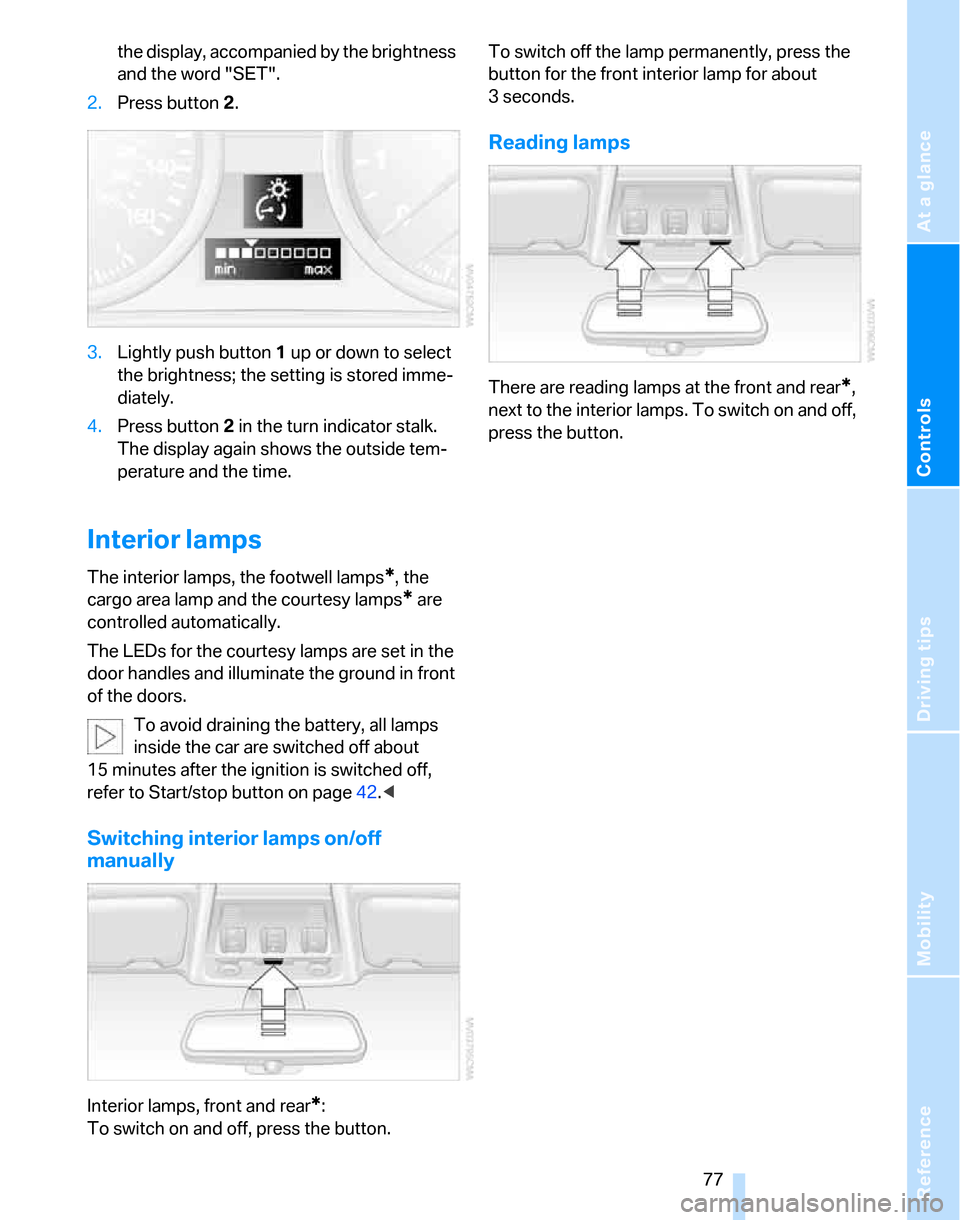
the display, accompanied by the brightness
and the word "SET".
2.Press button 2.
3.Lightly push button 1 up or down to select
the brightness; the setting is stored imme-
diately.
4.Press button 2 in the turn indicator stalk.
The display again shows the outside tem-
perature and the time.
Interior lamps
The interior lamps, the footwell lamps*, the
cargo area lamp and the courtesy lamps
* are
controlled automatically.
The LEDs for the courtesy lamps
are set in the
door handles and illuminate the ground in front
of the doors.
To avoid draining the battery, all lamps
inside the car are switched off about
15 minutes after the ignition is switched off,
refer to Start/stop button on page42.<
Switching interior lamps on/off
manually
Interior lamps, front and rear*:
To switch on and off, press the button.To switch off the lamp permanently, press the
button for the front interior lamp for about
3seconds.
Reading lamps
There are reading lamps at the front and rear*,
next to the interior lamps. To switch on and off,
press the button.
Page 82 of 160
Climate
80
Defrosting windows and removing
condensation
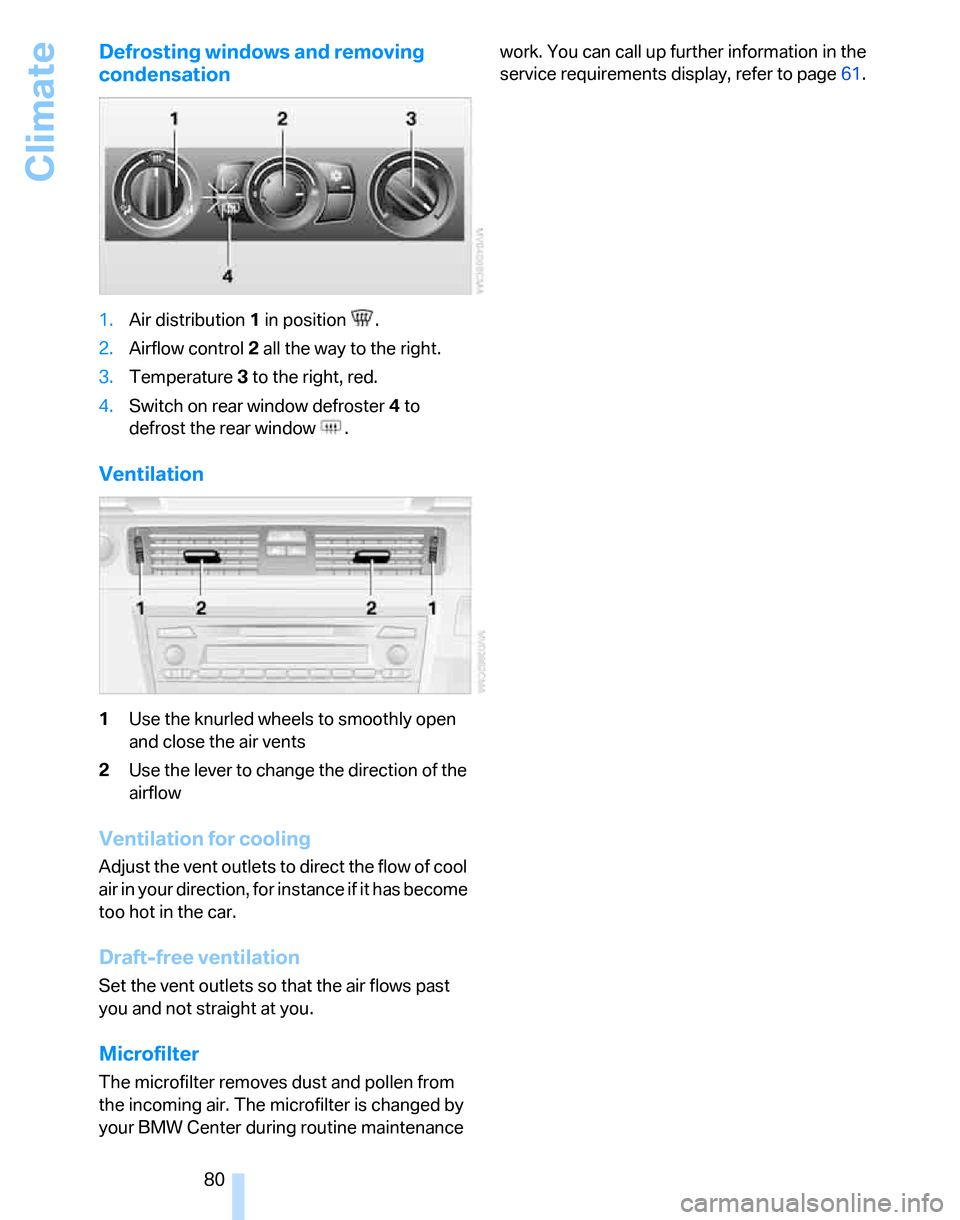
1.Air distribution1 in position .
2.Airflow control2 all the way to the right.
3.Temperature3 to the right, red.
4.Switch on rear window defroster 4 to
defrost the rear window .
Ventilation
1Use the knurled wheels to smoothly open
and close the air vents
2Use the lever to change the direction of the
airflow
Ventilation for cooling
Adjust the vent outlets to direct the flow of cool
air in your direction, for instance if it has become
too hot in the car.
Draft-free ventilation
Set the vent outlets so that the air flows past
you and not straight at you.
Microfilter
The microfilter removes dust and pollen from
the incoming air. The microfilter is changed by
your BMW Center during routine maintenance work. You can call up further information in the
service requirements display, refer to page61.
Page 85 of 160
Reference
At a glance
Controls
Driving tips
Mobility
83
Defrosting windows and removing
condensation
Quickly removes ice and conden-
sation from the windshield and
front side windows.
Switching cooling function on/off
The cooling function cools and
dehumidifies the incoming air
before also reheating it as
required, according to the temperature setting.
Depending on the weather, the windshield may
fog over briefly when the engine is started.
The cooling function is automatically switched
on along with the AUTO program. The passen-
ger compartment can only be cooled while the
engine is running.
Rear window defroster
The defroster switches off auto-
matically after a certain time.
Ventilation
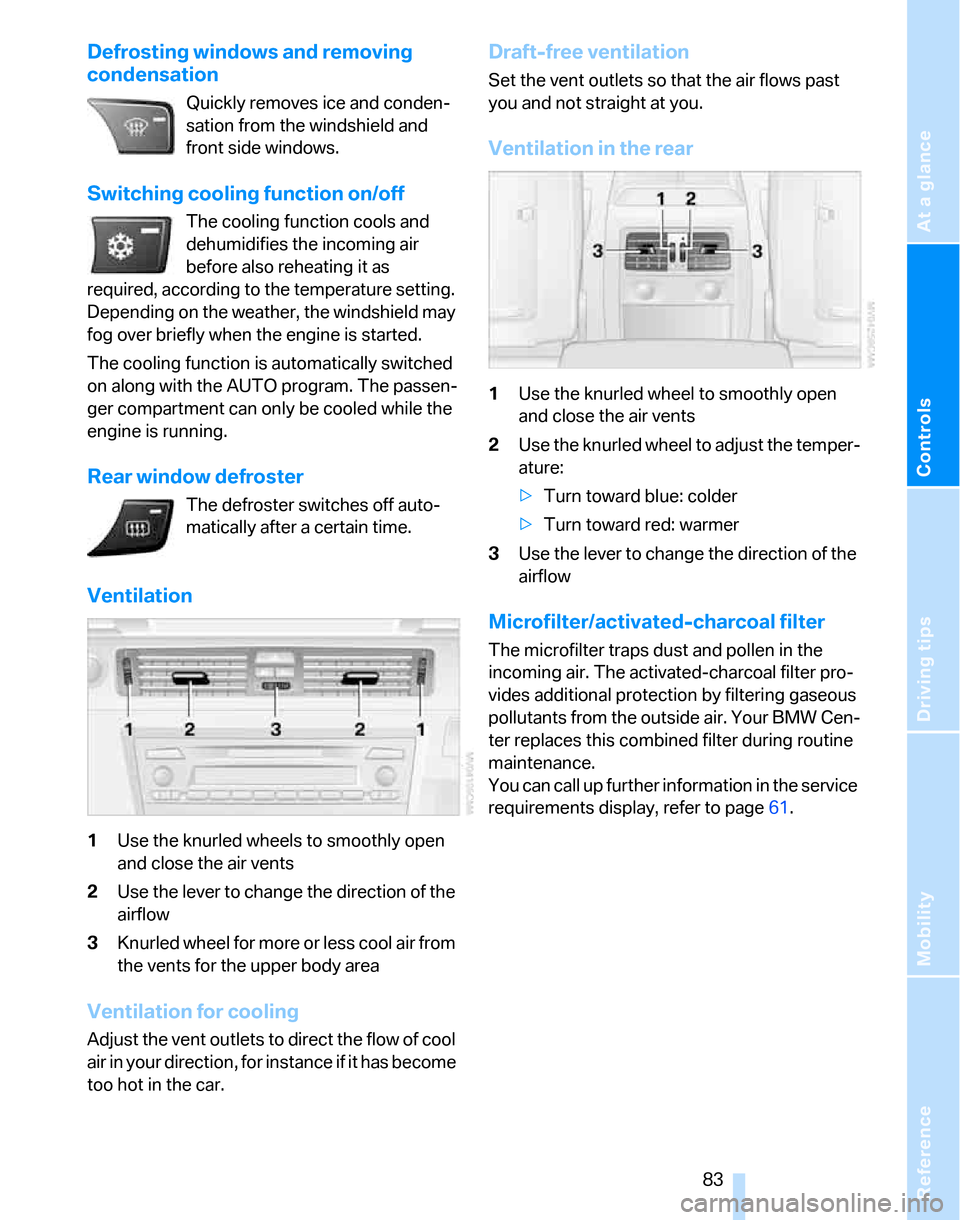
1Use the knurled wheels to smoothly open
and close the air vents
2Use the lever to change the direction of the
airflow
3Knurled wheel for more or less cool air from
the vents for the upper body area
Ventilation for cooling
Adjust the vent outlets to direct the flow of cool
air in your direction, for instance if it has become
too hot in the car.
Draft-free ventilation
Set the vent outlets so that the air flows past
you and not straight at you.
Ventilation in the rear
1Use the knurled wheel to smoothly open
and close the air vents
2Use the knurled wheel to adjust the temper-
ature:
>Turn toward blue: colder
>Turn toward red: warmer
3Use the lever to change the direction of the
airflow
Microfilter/activated-charcoal filter
The microfilter traps dust and pollen in the
incoming air. The activated-charcoal filter pro-
vides additional protection by filtering gaseous
pollutants from the outside air. Your BMW Cen-
ter replaces this combined filter during routine
maintenance.
You can call up further information in the service
requirements display, refer to page61.
Page 87 of 160

Reference
At a glance
Controls
Driving tips
Mobility
85
The corresponding memory button 1 is now
programmed with the signal of the original
hand-held transmitter.
You can operate the system when the engine is
running or when the ignition is switched on.
If the system fails to function even after
repeated programming, check whether
the original hand-held transmitter uses an alter-
nating-code system. To do so, either read the
instructions for the original hand-held transmit-
ter or hold down the programmed memory
button1 of the integrated universal remote
control. If the LED2 on the integrated universal
remote control flashes rapidly for a short while
and then remains lit for about two seconds, the
original hand-held transmitter uses an alternat-
ing-code system. If it uses an alternating-code
system, program the memory buttons1 as
described under Alternating-code hand-held
transmitters.<
Alternating-code hand-held
transmitters
To program the integrated universal remote
control, consult the operating instructions for
the device to be set. You will find information
there on the possibilities for synchronization.
When programming hand-held transmitters that employ an alternating code, please observe
the following supplementary instructions:
Programming will be easier with the aid of
a second person.<
1.Park your vehicle within the range of the
remote-controlled device.
2.Program the integrated universal remote
control as described above in the section
Fixed-code hand-held transmitters.
3.Locate the button on the receiver of the
device to be set, e.g. on the drive unit.
4.Press the button on the receiver of the
device to be set. After step 4, you have
approx. 30 seconds for step 5.
5.Press the programmed memory button1 of
the integrated universal remote control
three times.
The corresponding memory button 1 is now
programmed with the signal of the original
hand-held transmitter.
If you have any questions, please contact
your BMW Center.<
Deleting stored programs
Press both outer memory buttons1 for approx.
20 seconds until the LED2 flashes: all stored
programs are cleared.
It is not possible to clear individual programs.
Interior rearview mirror with digital compass*
1Adjustment button
2Display
The display shows you the main or secondary
direction in which you are driving.
Setting compass zones
Depending on the vehicle's geographic loca-
tion, the relevant compass zone must be set.
Page 88 of 160
Practical interior accessories
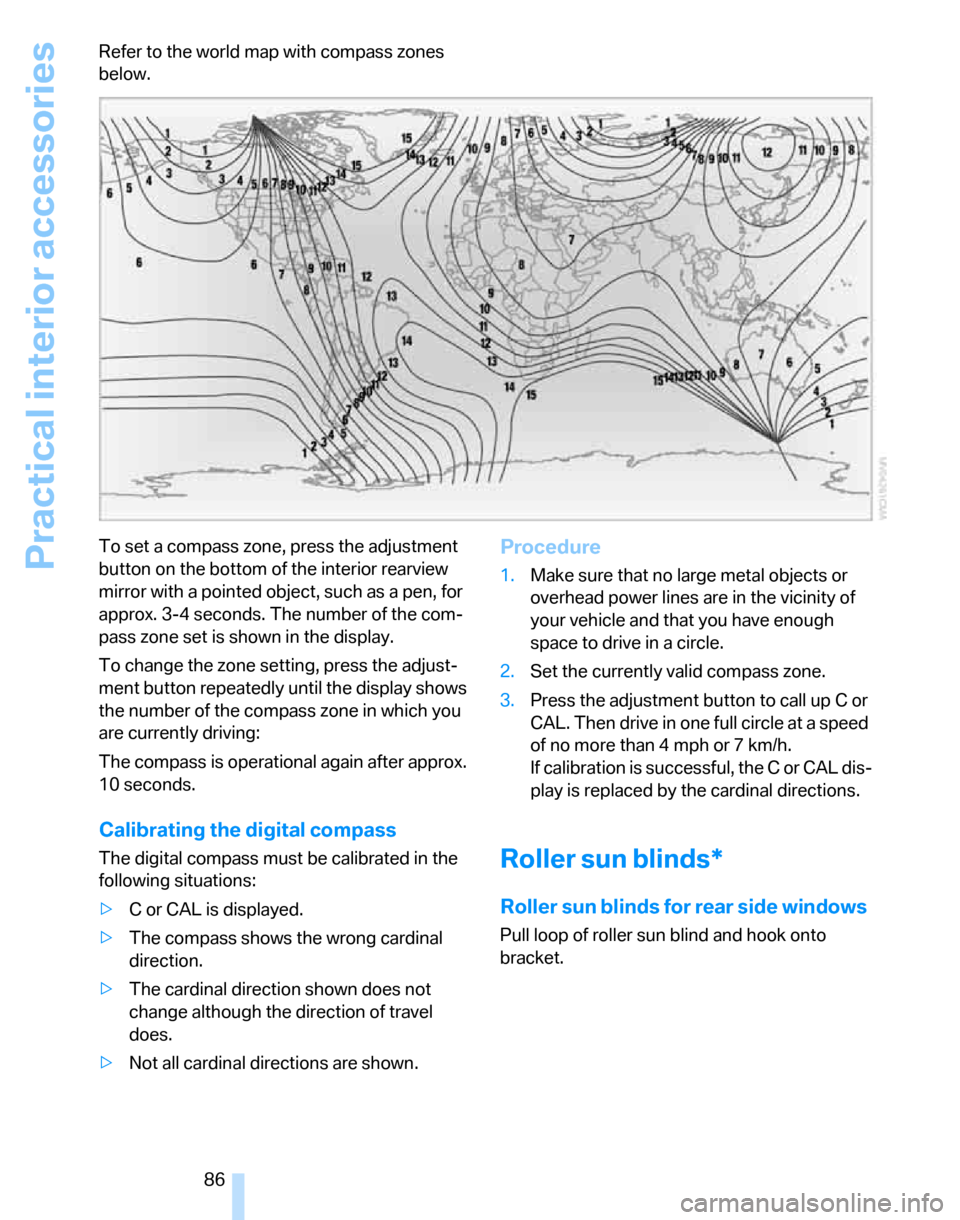
86 Refer to the world map with compass zones
below.
To set a compass zone, press the adjustment
button on the bottom of the interior rearview
mirror with a pointed object, such as a pen, for
approx. 3-4 seconds. The number of the com-
pass zone set is shown in the display.
To change the zone setting, press the adjust-
ment button repeatedly until the display shows
the number of the compass zone in which you
are currently driving:
The compass is operational again after approx.
10 seconds.
Calibrating the digital compass
The digital compass must be calibrated in the
following situations:
>C or CAL is displayed.
>The compass shows the wrong cardinal
direction.
>The cardinal direction shown does not
change although the direction of travel
does.
>Not all cardinal directions are shown.
Procedure
1.Make sure that no large metal objects or
overhead power lines are in the vicinity of
your vehicle and that you have enough
space to drive in a circle.
2.Set the currently valid compass zone.
3.Press the adjustment button to call up C or
CAL. Then drive in one full circle at a speed
of no more than 4mph or 7km/h.
If calibration is successful, the C or CAL dis-
play is replaced by the cardinal directions.
Roller sun blinds*
Roller sun blinds for rear side windows
Pull loop of roller sun blind and hook onto
bracket.
Page 106 of 160
Refueling
104
Refueling
Always switch off the engine before refu-
eling, otherwise, fuel cannot be added to
the tank and a message will be displayed.<
Take all precautionary measures and
observe all applicable regulations when
handling fuel. Do not carry any spare fuel con-
tainers in your vehicle. They can develop a leak
and cause an explosion or cause a fire in the
event of an accident.<
Gas cap
Opening
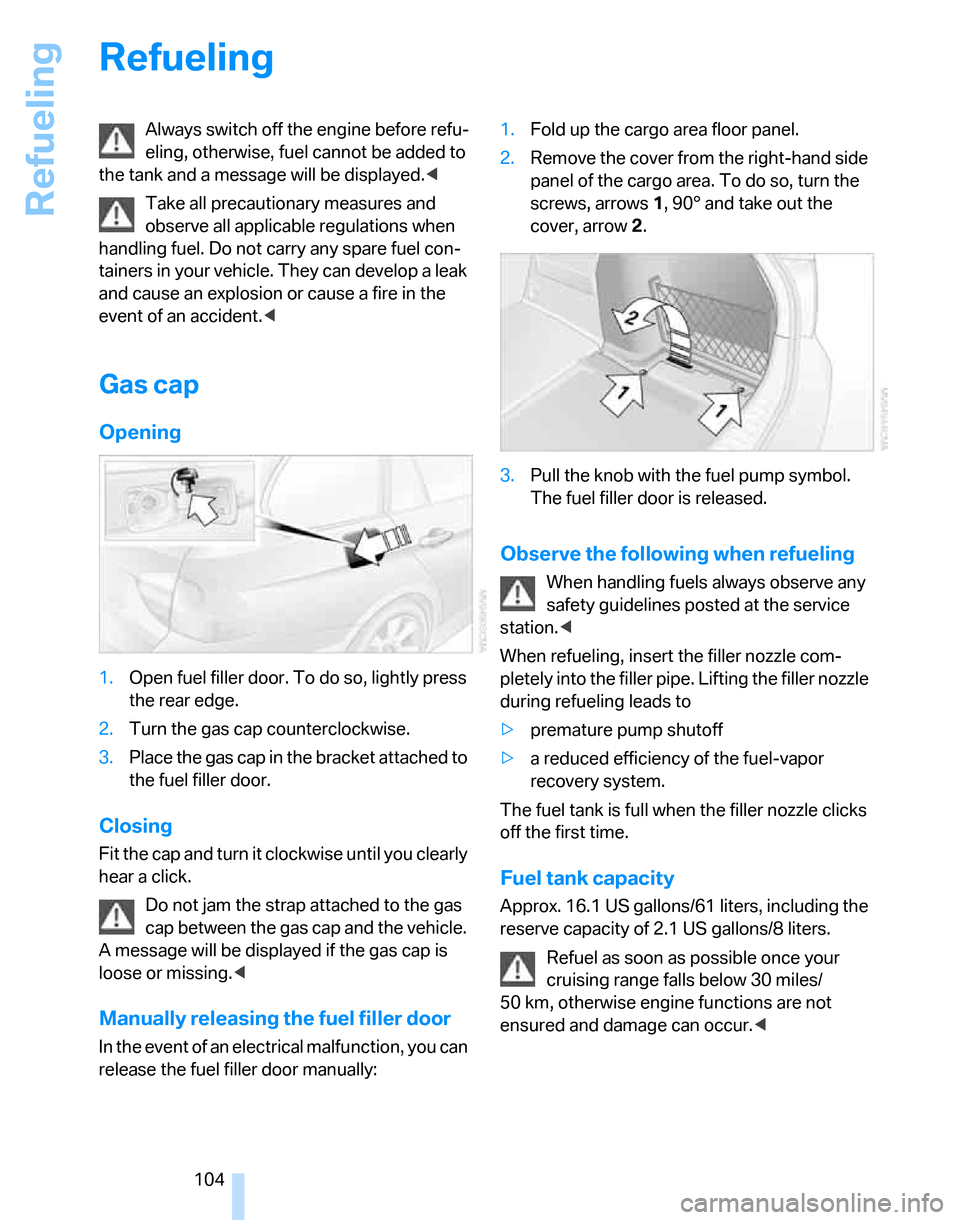
1.Open fuel filler door. To do so, lightly press
the rear edge.
2.Turn the gas cap counterclockwise.
3.Place the gas cap in the bracket attached to
the fuel filler door.
Closing
Fit the cap and turn it clockwise until you clearly
hear a click.
Do not jam the strap attached to the gas
cap between the gas cap and the vehicle.
A message will be displayed if the gas cap is
loose or missing.<
Manually releasing the fuel filler door
In the event of an electrical malfunction, you can
release the fuel filler door manually:1.Fold up the cargo area floor panel.
2.Remove the cover from the right-hand side
panel of the cargo area. To do so, turn the
screws, arrows 1, 90° and take out the
cover, arrow 2.
3.Pull the knob with the fuel pump symbol.
The fuel filler door is released.
Observe the following when refueling
When handling fuels always observe any
safety guidelines posted at the service
station.<
When refueling, insert the filler nozzle com-
pletely into the filler pipe. Lifting the filler nozzle
during refueling leads to
>premature pump shutoff
>a reduced efficiency of the fuel-vapor
recovery system.
The fuel tank is full when the filler nozzle clicks
off the first time.
Fuel tank capacity
Approx. 16.1 US gallons/61 liters, including the
reserve capacity of 2.1 US gallons/8 liters.
Refuel as soon as possible once your
cruising range falls below 30 miles/
50 km, otherwise engine functions are not
ensured and damage can occur.<
Page 113 of 160
Reference
At a glance
Controls
Driving tips
Mobility
111
Run-Flat Tires
When mounting new tires or changing over
from summer to winter tires and vice versa,
mount Run-Flat Tires for your own safety. In the
event of a flat, moreover, no spare wheel is
available. Your BMW Center will be glad to
advise you.
For safety reasons, BMW recommends
that damaged Run-Flat Tires be replaced
rather than repaired.<
Special characteristics of winter tires
BMW recommends winter tires for use in cold
winter driving conditions. Although all-season
M+S tires provide better winter traction than
summer tires, they generally fail to provide the
same levels of cold-weather performance as
winter tires.
Pay attention to speed
Always comply with the speed limit for the
winter tires mounted on your car; failure
to do so could result in tire damage and acci-
dents.<
If the car is capable of speeds higher than that
permitted for the winter tires, a label stating the
maximum permitted speed for the mounted
tires must be displayed in your field of view.
Specialist tire dealers and your BMW Center
can supply these labels.
Storage
Always store wheels and tires in a cool, dry
place with as little exposure to light as possible.
Always protect tires against all contact with oil,
grease and fuels. Do not exceed the maximum
tire inflation pressure indicated on the sidewall
of the tire.
Snow chains*
Only certain fine-link snow chains have been
tested by BMW, classified as safe for use and
recommended. Consult your BMW Center for
more information. Attach snow chains in pairs
and only to the rear wheels. Observe the manu-facturer's instructions when mounting snow
chains. Do not exceed a speed of 30 mph or
50 km/h.
You are not permitted to mount snow chains to
tires of the following sizes:
>255/40 R 17
>255/35 R 18
>255/30 R 19
Do not initialize the Flat Tire Monitor if
snow chains are mounted, otherwise the
instrument might issue an incorrect reading.
When driving with snow chains, you may find it
helpful to activate DTC temporarily, refer to
page66.<
Page 115 of 160
Reference
At a glance
Controls
Driving tips
Mobility
113
Important parts of the engine compartment
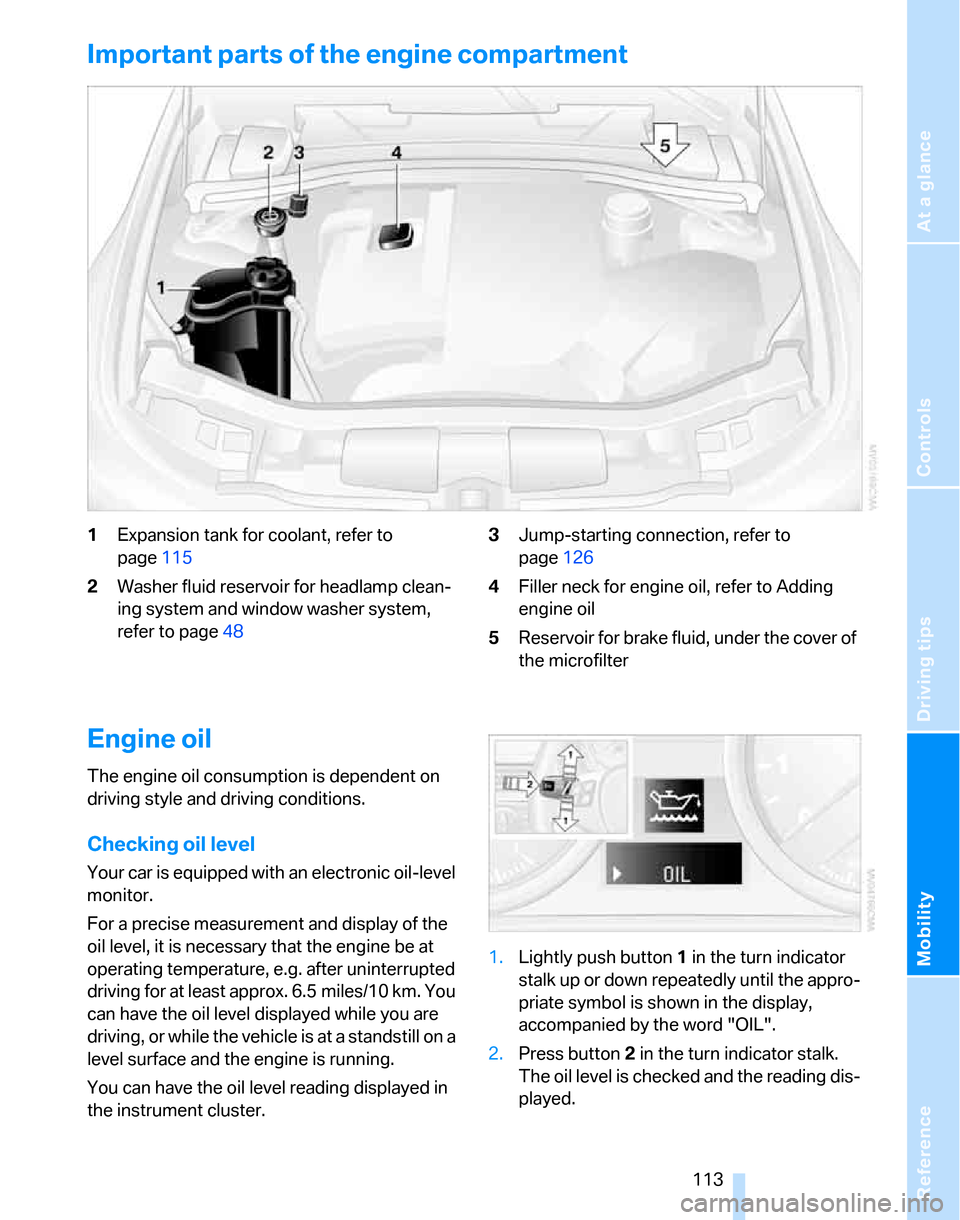
1Expansion tank for coolant, refer to
page115
2Washer fluid reservoir for headlamp clean-
ing system and window washer system,
refer to page483Jump-starting connection, refer to
page126
4Filler neck for engine oil, refer to Adding
engine oil
5Reservoir for brake fluid, under the cover of
the microfilter
Engine oil
The engine oil consumption is dependent on
driving style and driving conditions.
Checking oil level
Your car is equipped with an electronic oil-level
monitor.
For a precise measurement and display of the
oil level, it is necessary that the engine be at
operating temperature, e.g. after uninterrupted
driving for at least approx. 6.5 miles/10 km. You
can have the oil level displayed while you are
driving, or while the vehicle is at a standstill on a
level surface and the engine is running.
You can have the oil level reading displayed in
the instrument cluster.1.Lightly push button 1 in the turn indicator
stalk up or down repeatedly until the appro-
priate symbol is shown in the display,
accompanied by the word "OIL".
2.Press button 2 in the turn indicator stalk.
The oil level is checked and the reading dis-
played.