2006 BMW 325XI SPORTS WAGON low beam
[x] Cancel search: low beamPage 11 of 236

Cockpit
10
Cockpit
Around the steering wheel: controls and displays
3Adjusting exterior mirrors, automatic curb
monitor
*46
1Safety switch for electric rear
windows38
2
Opening and closing windows37 4
Parking lamps90
Low beams90
Automatic headlamp control
*90
Adaptive Head Light
*92
5
Fog lamps
*92
Page 14 of 236

At a glance
13Reference
Controls
Driving tips
Communications
Navigation
Entertainment
Mobility
Indicator and warning lamps
The concept
Indicator and warning lamps can light up in var-
ious combinations and colors in both the indica-
tor area 1 and the display 2.
Some lamps are checked for proper functioning
and thus come on briefly when the engine is
started or the ignition is switched on.
Explanatory text messages
Text messages at the lower edge of the Control
Display explain the meaning of the displayed
indicator and warning lamps.
You can call up more information, e.g. on the
cause of a malfunction and on how to respond,
via Check Control, refer to page77.In urgent cases, this information will be shown
immediately as soon as the corresponding lamp
comes on.
Indicator lamps without text messages
The following indicator lamps in the indicator
area1 signal that the associated functions are
activated:
High beams/headlamp flasher92
Fog lamps
*92
Lamp flashes:
DSC or DTC is regulating the propul-
sive forces in order to maintain driving
stability83
Handbrake engaged55
Page 36 of 236

Controls
35Reference
At a glance
Driving tips
Communications
Navigation
Entertainment
Mobility
>An acoustic alarm
>Switching on the hazard warning flashers
>Flashing the high beams
Arming and disarming
When you lock or unlock the vehicle, either with
the remote control or at the door lock, the alarm
system is armed or disarmed at the same time.
Even when the alarm system is armed, you can
open the tailgate by means of the button on
the remote control, refer to page31. When you
subsequently close the tailgate it is again
locked and monitored.
Switching off an alarm
>Unlock the car with the remote control, refer
to page30, or
>insert the remote control all the way into the
ignition lock.
Indicator lamp displays
>The indicator lamp under the inside rear-
view mirror flashes continuously: the sys-
tem is armed.
>The indicator lamp flashes after locking:
doors, hood or tailgate are not properly
closed. Even if you do not close the alerted
area, the system begins to monitor the
remaining areas, and the indicator lamp
flashes continuously after approx. 10 sec-
onds. However, the interior motion sensor
is not activated.
>The indicator lamp goes out after unlocking:
your vehicle has not been disturbed while
you were away.>If the indicator lamp flashes after unlocking
until the remote control is inserted in the
ignition, but for no longer than approx.
5 minutes: your vehicle has been disturbed
while you were away.
Tilt alarm sensor
The tilt of the vehicle is monitored. The alarm
system reacts, e.g. to attempts to steal a wheel
or tow the vehicle.
Interior motion sensor
In order for the interior motion sensor to func-
tion properly, the windows and glass sunroof
must be completely closed.
Avoiding unintentional alarms
The tilt alarm sensor and interior motion sensor
may be switched off at the same time. This pre-
vents unintentional alarms, e.g. in the following
situations:
>In duplex garages
>When transporting on car-carrying trains
>When animals are to remain in the vehicle
Switching off tilt alarm sensor and
interior motion sensor
Press the button on the remote control
twice in a row.
The indicator lamp comes on for approx. two
seconds, then begins to flash steadily. The tilt
alarm sensor and the interior motion sensor are
switched off until the next time the vehicle is
unlocked and subsequently locked again.
Convenient access*
Convenient access enables you to enter your
vehicle without needing to hold the remote con-
trol in your hand. All you need to do is wear the
remote control close to your body, e.g. in your
jacket pocket. The vehicle automatically
detects the corresponding remote control
within the immediate vicinity or in the passen-
ger compartment.
Page 58 of 236
Controls
57Reference
At a glance
Driving tips
Communications
Navigation
Entertainment
Mobility
gear selected appears briefly in the instrument
cluster, followed by the gear actually in use.
To use the automatic function again, move the
selector lever to the right into position D.
Overriding selector lever lock
Should the selector lever refuse to move out of
position P although the button on the selector
lever is pressed, the selector lever lock can be
overridden:
1.Unclip the sleeve of the selector lever.
2.Pull the sleeve up over the selector lever
until the sleeve is inside out.
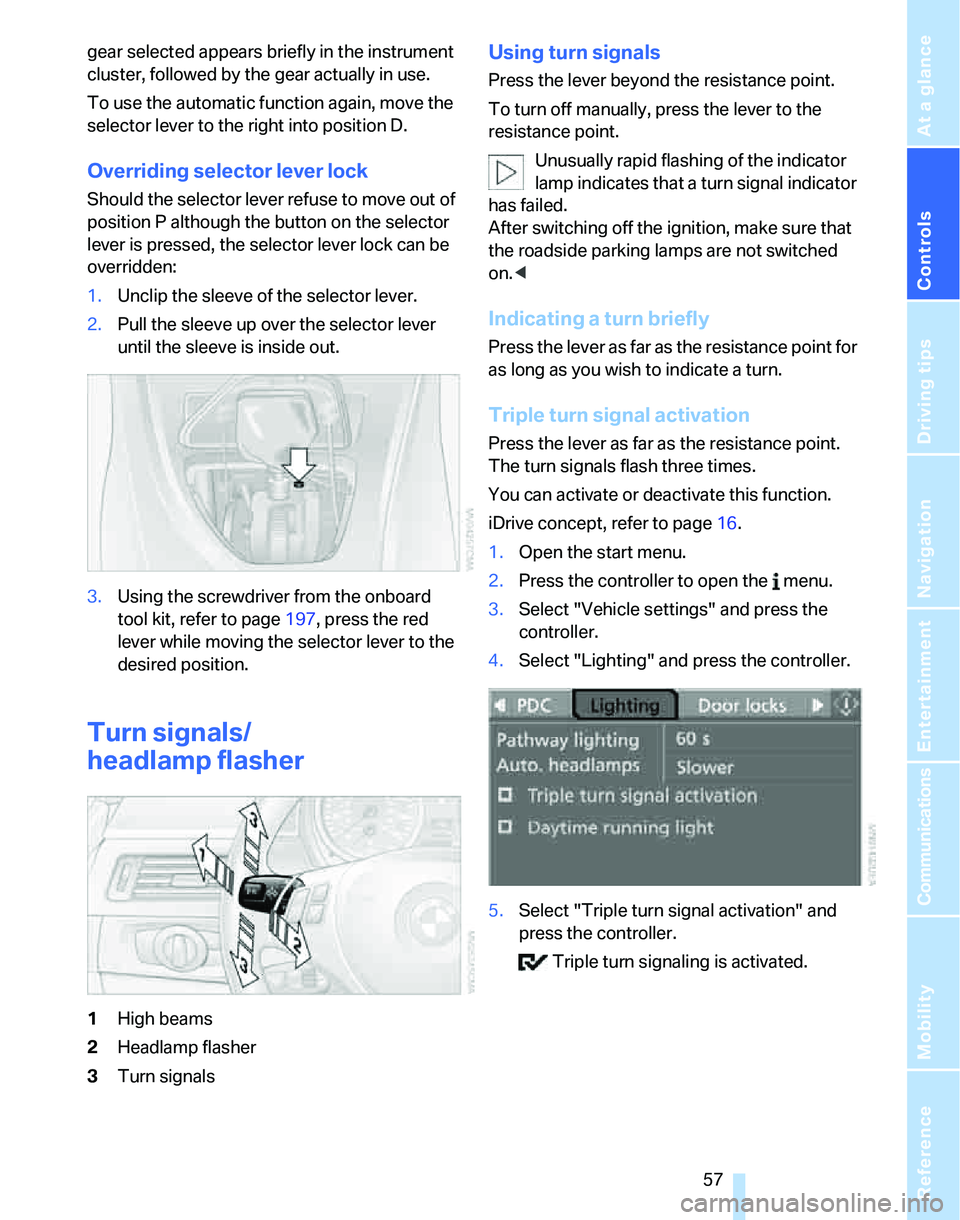
3.Using the screwdriver from the onboard
tool kit, refer to page197, press the red
lever while moving the selector lever to the
desired position.
Turn signals/
headlamp flasher
1High beams
2Headlamp flasher
3Turn signals
Using turn signals
Press the lever beyond the resistance point.
To turn off manually, press the lever to the
resistance point.
Unusually rapid flashing of the indicator
lamp indicates that a turn signal indicator
has failed.
After switching off the ignition, make sure that
the roadside parking lamps are not switched
on.<
Indicating a turn briefly
Press the lever as far as the resistance point for
as long as you wish to indicate a turn.
Triple turn signal activation
Press the lever as far as the resistance point.
The turn signals flash three times.
You can activate or deactivate this function.
iDrive concept, refer to page16.
1.Open the start menu.
2.Press the controller to open the menu.
3.Select "Vehicle settings" and press the
controller.
4.Select "Lighting" and press the controller.
5.Select "Triple turn signal activation" and
press the controller.
Triple turn signaling is activated.
Page 81 of 236
Everything under control
80
Starting, stopping or resetting
>Select "Start" and press the controller.
The stopwatch starts at the displayed time.
>Select "Reset" and press the controller.
The stopwatch is reset and restarts if it was
running beforehand.
>Select "Stop" and press the controller.
This stops the timer.
Taking an interim time reading
Select "Interim time" and press the controller.
The interim time appears below the ongoing
primary stopwatch count.
All of the remaining functions remain
available at all times while the stopwatch
is running. The stopwatch continues operation
in the background.<
Altering settings
Language on the Control Display
The language on the Control Display can be set,
refer to the concept on page16. The setting is
stored for the remote control currently in use.
1.Open the start menu.
2.Press the controller to open the menu.
3.Select "Display settings" and press the
controller.
4.If necessary, move the highlight marker to
the uppermost field. Turn the controller
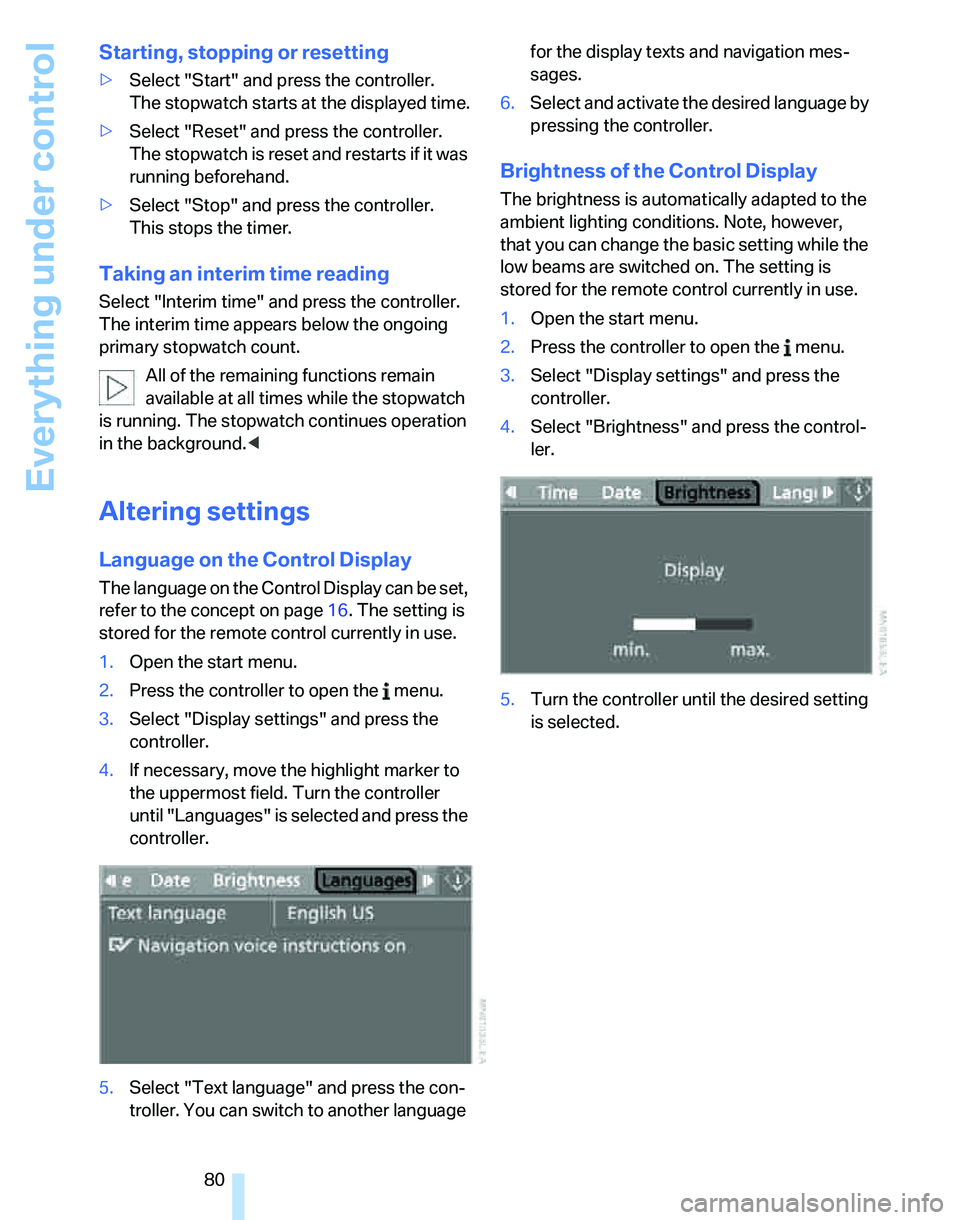
until "Languages" is selected and press the
controller.
5.Select "Text language" and press the con-
troller. You can switch to another language for the display texts and navigation mes-
sages.
6.Select and activate the desired language by
pressing the controller.
Brightness of the Control Display
The brightness is automatically adapted to the
ambient lighting conditions. Note, however,
that you can change the basic setting while the
low beams are switched on. The setting is
stored for the remote control currently in use.
1.Open the start menu.
2.Press the controller to open the menu.
3.Select "Display settings" and press the
controller.
4.Select "Brightness" and press the control-
ler.
5.Turn the controller until the desired setting
is selected.
Page 91 of 236
Lamps
90
Lamps
Parking lamps/low beams
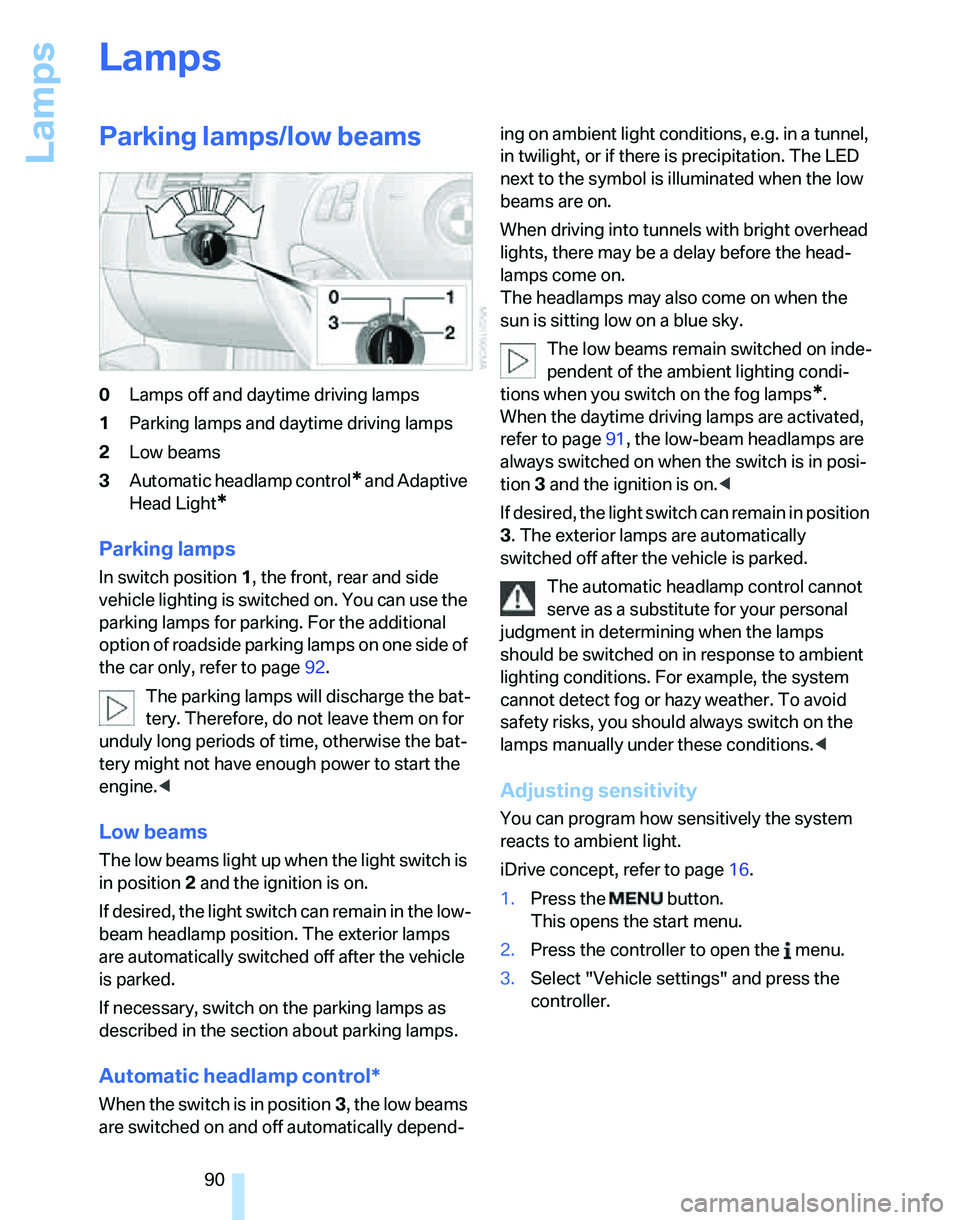
0Lamps off and daytime driving lamps
1Parking lamps and daytime driving lamps
2Low beams
3Automatic headlamp control
* and Adaptive
Head Light
*
Parking lamps
In switch position1, the front, rear and side
vehicle lighting is switched on. You can use the
parking lamps for parking. For the additional
option of roadside parking lamps on one side of
the car only, refer to page92.
The parking lamps will discharge the bat-
tery. Therefore, do not leave them on for
unduly long periods of time, otherwise the bat-
tery might not have enough power to start the
engine.<
Low beams
The low beams light up when the light switch is
in position 2 and the ignition is on.
If desired, the light switch can remain in the low-
beam headlamp position. The exterior lamps
are automatically switched off after the vehicle
is parked.
If necessary, switch on the parking lamps as
described in the section about parking lamps.
Automatic headlamp control*
When the switch is in position3, the low beams
are switched on and off automatically depend-ing on ambient light conditions, e.g. in a tunnel,
in twilight, or if there is precipitation. The LED
next to the symbol is illuminated when the low
beams are on.
When driving into tunnels with bright overhead
lights, there may be a delay before the head-
lamps come on.
The headlamps may also come on when the
sun is sitting low on a blue sky.
The low beams remain switched on inde-
pendent of the ambient lighting condi-
tions when you switch on the fog lamps
*.
When the daytime driving lamps are activated,
refer to page91, the low-beam headlamps are
always switched on when the switch is in posi-
tion 3 and the ignition is on.<
If desired, the light switch can remain in position
3. The exterior lamps are automatically
switched off after the vehicle is parked.
The automatic headlamp control cannot
serve as a substitute for your personal
judgment in determining when the lamps
should be switched on in response to ambient
lighting conditions. For example, the system
cannot detect fog or hazy weather. To avoid
safety risks, you should always switch on the
lamps manually under these conditions.<
Adjusting sensitivity
You can program how sensitively the system
reacts to ambient light.
iDrive concept, refer to page16.
1.Press the button.
This opens the start menu.
2.Press the controller to open the menu.
3.Select "Vehicle settings" and press the
controller.
Page 92 of 236
Controls
91Reference
At a glance
Driving tips
Communications
Navigation
Entertainment
Mobility
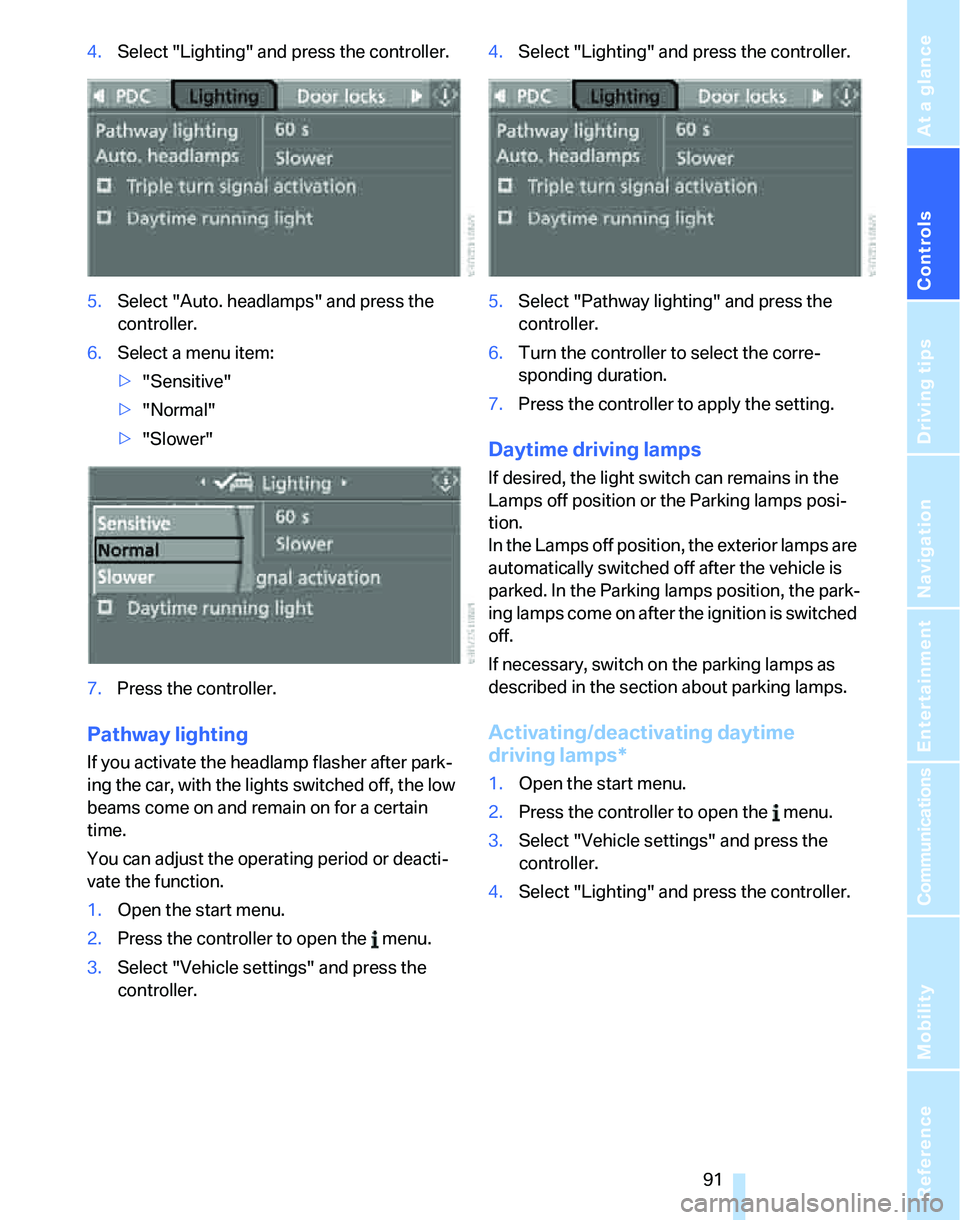
4.Select "Lighting" and press the controller.
5.Select "Auto. headlamps" and press the
controller.
6.Select a menu item:
>"Sensitive"
>"Normal"
>"Slower"
7.Press the controller.
Pathway lighting
If you activate the headlamp flasher after park-
ing the car, with the lights switched off, the low
beams come on and remain on for a certain
time.
You can adjust the operating period or deacti-
vate the function.
1.Open the start menu.
2.Press the controller to open the menu.
3.Select "Vehicle settings" and press the
controller.4.Select "Lighting" and press the controller.
5.Select "Pathway lighting" and press the
controller.
6.Turn the controller to select the corre-
sponding duration.
7.Press the controller to apply the setting.
Daytime driving lamps
If desired, the light switch can remains in the
Lamps off position or the Parking lamps posi-
tion.
In the Lamps off position, the exterior lamps are
automatically switched off after the vehicle is
parked. In the Parking lamps position, the park-
ing lamps come on after the ignition is switched
off.
If necessary, switch on the parking lamps as
described in the section about parking lamps.
Activating/deactivating daytime
driving lamps*
1.Open the start menu.
2.Press the controller to open the menu.
3.Select "Vehicle settings" and press the
controller.
4.Select "Lighting" and press the controller.
Page 93 of 236
Lamps
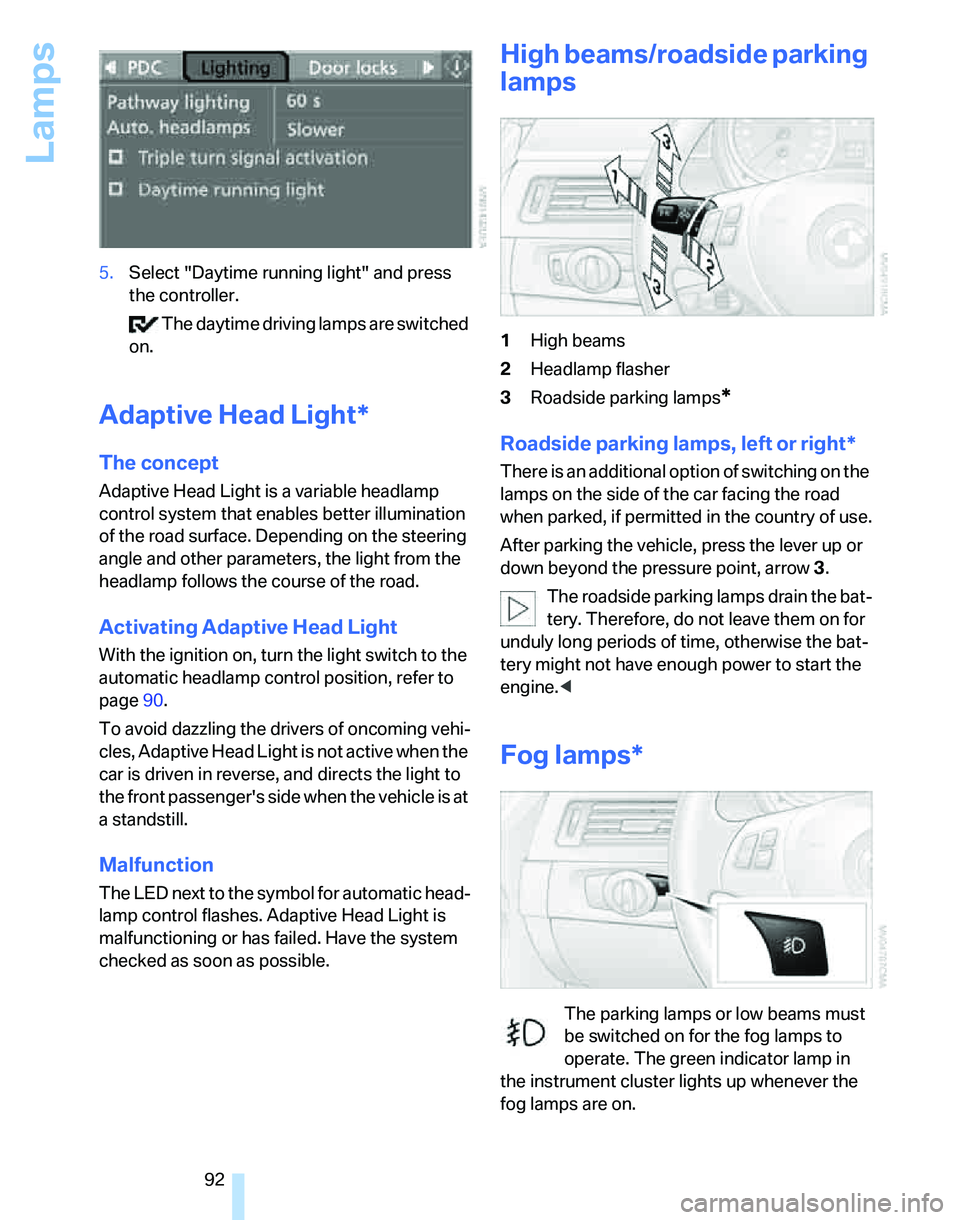
92 5.Select "Daytime running light" and press
the controller.
The daytime driving lamps are switched
on.
Adaptive Head Light*
The concept
Adaptive Head Light is a variable headlamp
control system that enables better illumination
of the road surface. Depending on the steering
angle and other parameters, the light from the
headlamp follows the course of the road.
Activating Adaptive Head Light
With the ignition on, turn the light switch to the
automatic headlamp control position, refer to
page90.
To avoid dazzling the drivers of oncoming vehi-
cles, Adaptive Head Light is not active when the
car is driven in reverse, and directs the light to
the front passenger's side when the vehicle is at
a standstill.
Malfunction
The LED next to the symbol for automatic head-
lamp control flashes. Adaptive Head Light is
malfunctioning or has failed. Have the system
checked as soon as possible.
High beams/roadside parking
lamps
1High beams
2Headlamp flasher
3Roadside parking lamps
*
Roadside parking lamps, left or right*
There is an additional option of switching on the
lamps on the side of the car facing the road
when parked, if permitted in the country of use.
After parking the vehicle, press the lever up or
down beyond the pressure point, arrow 3.
The roadside parking lamps drain the bat-
tery. Therefore, do not leave them on for
unduly long periods of time, otherwise the bat-
tery might not have enough power to start the
engine.<
Fog lamps*
The parking lamps or low beams must
be switched on for the fog lamps to
operate. The green indicator lamp in
the instrument cluster lights up whenever the
fog lamps are on.