2006 BMW 325XI SPORTS WAGON jump start
[x] Cancel search: jump startPage 192 of 236
Mobility
191Reference
At a glance
Controls
Driving tips
Communications
Navigation
Entertainment
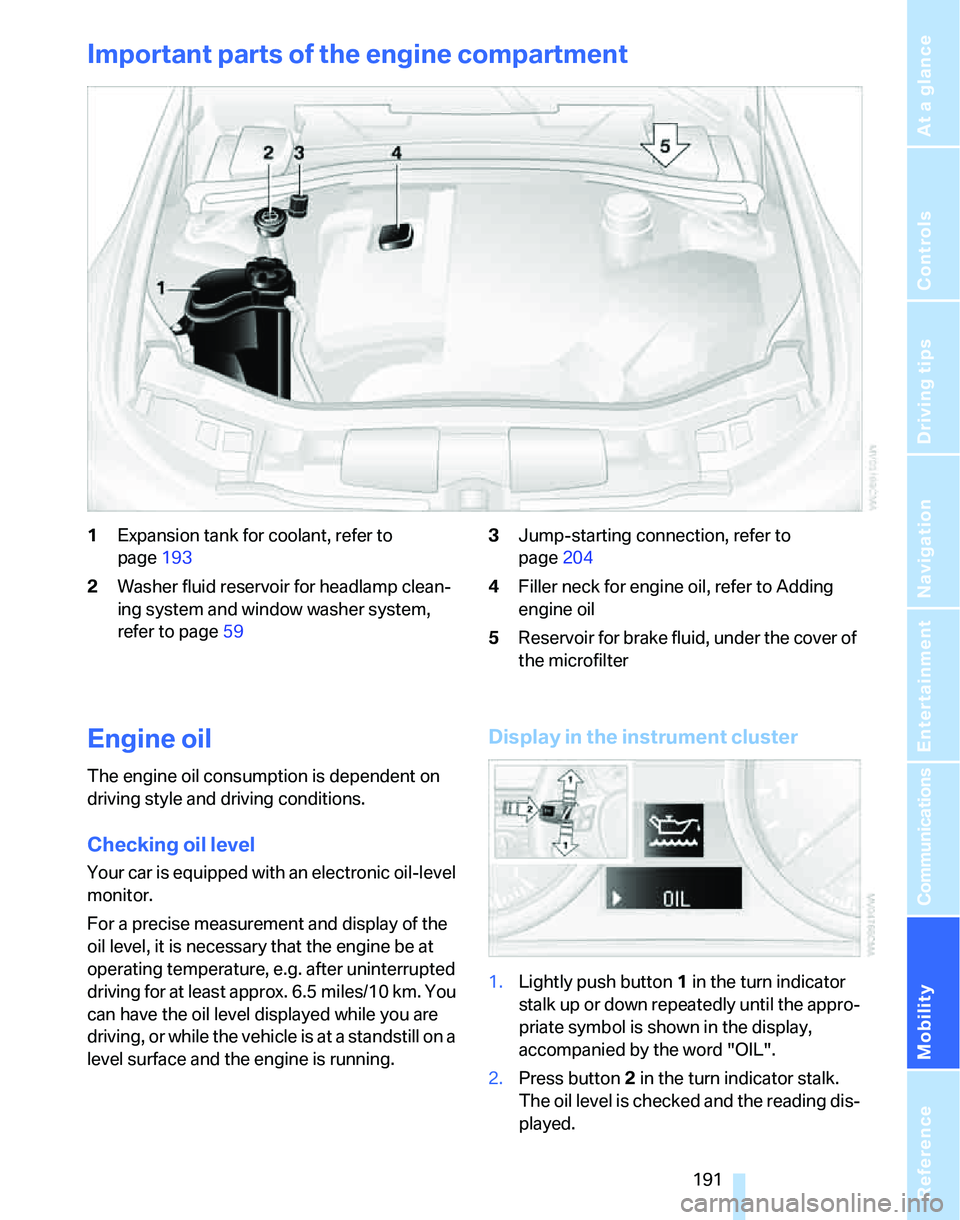
Important parts of the engine compartment
1Expansion tank for coolant, refer to
page193
2Washer fluid reservoir for headlamp clean-
ing system and window washer system,
refer to page593Jump-starting connection, refer to
page204
4Filler neck for engine oil, refer to Adding
engine oil
5Reservoir for brake fluid, under the cover of
the microfilter
Engine oil
The engine oil consumption is dependent on
driving style and driving conditions.
Checking oil level
Your car is equipped with an electronic oil-level
monitor.
For a precise measurement and display of the
oil level, it is necessary that the engine be at
operating temperature, e.g. after uninterrupted
driving for at least approx. 6.5 miles/10 km. You
can have the oil level displayed while you are
driving, or while the vehicle is at a standstill on a
level surface and the engine is running.
Display in the instrument cluster
1.Lightly push button 1 in the turn indicator
stalk up or down repeatedly until the appro-
priate symbol is shown in the display,
accompanied by the word "OIL".
2.Press button 2 in the turn indicator stalk.
The oil level is checked and the reading dis-
played.
Page 202 of 236
Mobility
201Reference
At a glance
Controls
Driving tips
Communications
Navigation
Entertainment
4.Apply gentle pressure to the bulb while
turning it to the left for removal and replace-
ment.
5.Re-engage the bulb holder so that it audibly
clicks into place.
6.Reattach the trim of the tailgate.
License plate lamp
5 watt bulb, C 5 W
1.Using a screwdriver, push the lamp to the
right in the flap of the lamp housing.
2.Take out the lamp towards the left and
change the bulb.
3.Insert the lamp.
Center brake lamp
This lamp uses LED technology for operation.
In the event of a malfunction, please contact
your BMW Center or a workshop that works
according to BMW repair procedures with cor-
respondingly trained personnel.
Changing wheels
Your BMW is equipped with Run-Flat Tires as
standard. This removes the need to change a
wheel immediately in the event of a puncture.
The symbol identifying Run-Flat Tires is a circle
with the letters RSC on the sidewall, refer to
Run-Flat Tires, page188.
When mounting new tires or changing over
from summer to winter tires and vice versa,
mount Run-Flat Tires for your own safety. In the
event of a flat, moreover, no spare wheel is
available. Your BMW Center will be glad to advise you. Refer also to New wheels and tires,
page188.
The tools for changing wheels are avail-
able as optional accessories from your
BMW Center.<
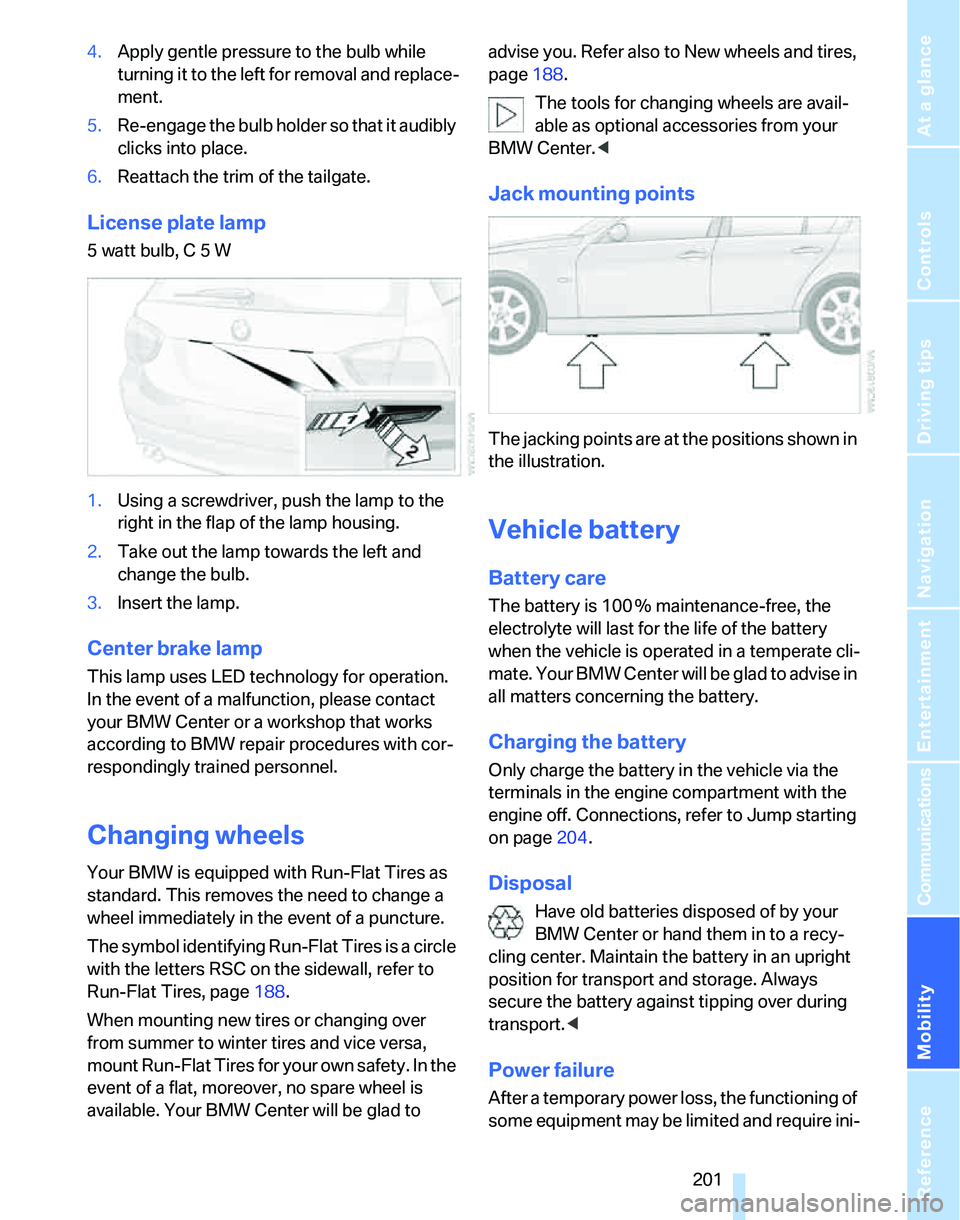
Jack mounting points
The jacking points are at the positions shown in
the illustration.
Vehicle battery
Battery care
The battery is 100 % maintenance-free, the
electrolyte will last for the life of the battery
when the vehicle is operated in a temperate cli-
mate. Your BMW Center will be glad to advise in
all matters concerning the battery.
Charging the battery
Only charge the battery in the vehicle via the
terminals in the engine compartment with the
engine off. Connections, refer to Jump starting
on page204.
Disposal
Have old batteries disposed of by your
BMW Center or hand them in to a recy-
cling center. Maintain the battery in an upright
position for transport and storage. Always
secure the battery against tipping over during
transport.<
Power failure
After a temporary power loss, the functioning of
some equipment may be limited and require ini-
Page 205 of 236
Giving and receiving assistance
204 Some of the articles contained in the first aid
pouch have a limited service life. Therefore,
check the expiration dates of the contents reg-
ularly and replace any items in good time, if nec-
essary.
Warning triangle*
The warning triangle is located behind the left-
hand trim in the cargo area. Press the tab to take
it out.
Jump starting
If the car's own battery is flat, your BMW's
engine can be started by connecting two
jumper cables to another vehicle's battery. You
can also use the same method to help start
another vehicle. Only use jumper cables with
fully-insulated clamp handles.
Do not touch any electrically live parts
when the engine is running, or a fatal acci-
dent may occur. Carefully adhere to the follow-
ing sequence, both to prevent damage to one or
both vehicles, and to guard against possible
personal injuries.<
Preparation
1.Check whether the battery of the other
vehicle has a voltage of 12 volts and
approximately the same capacitance in Ah.
This information can be found on the bat-
tery.
2.Switch off the engine of the assisting vehi-
cle.
3.Switch off any consumers in both vehicles.There must not be any contact between
the bodies of the two vehicles, otherwise
there is a danger of shorting.<
Connecting jumper cables
Connect the jumper cables in the correct
order, so that no sparks which could
cause injury occur at the battery.<
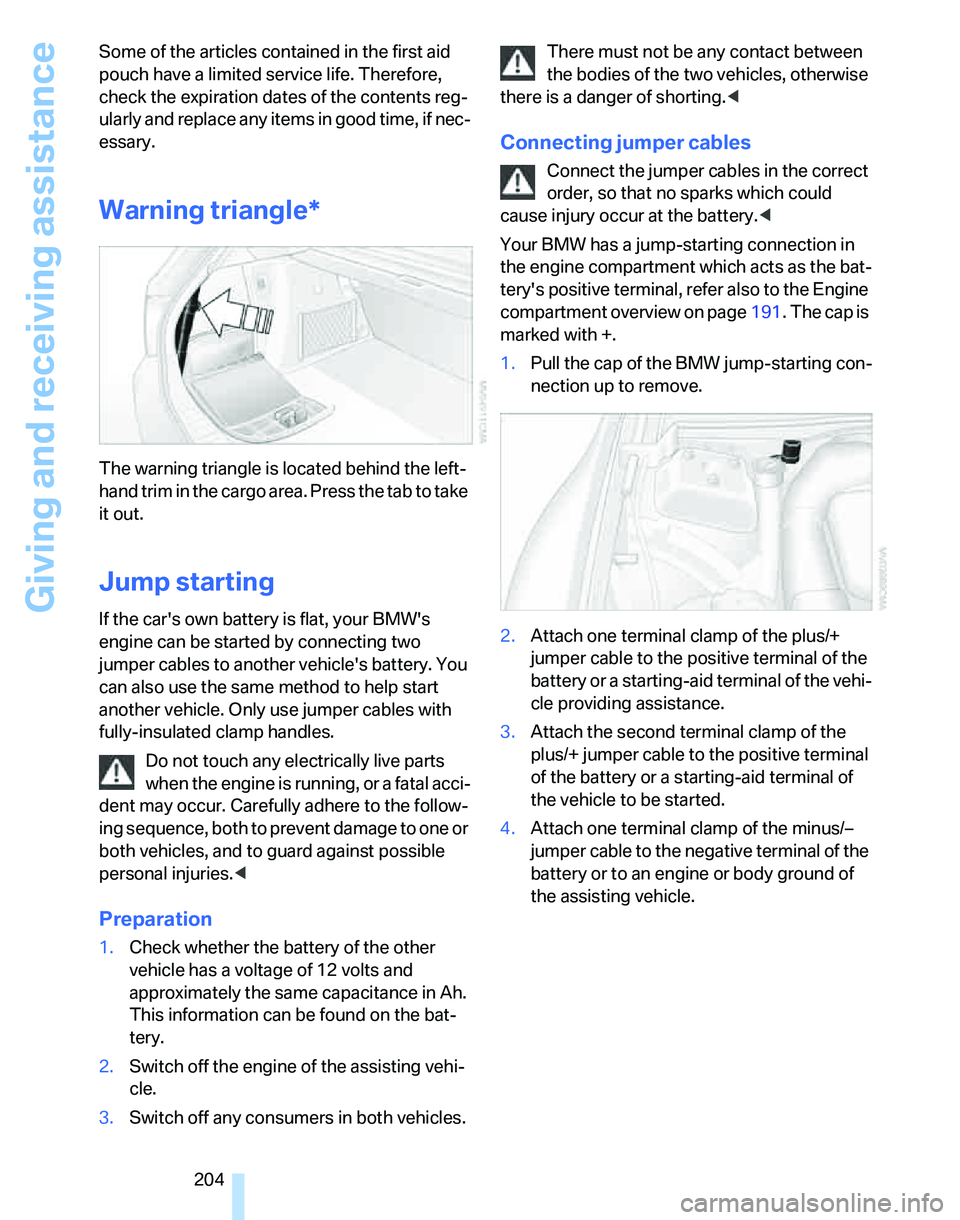
Your BMW has a jump-starting connection in
the engine compartment which acts as the bat-
tery's positive terminal, refer also to the Engine
compartment overview on page191. The cap is
marked with +.
1.Pull the cap of the BMW jump-starting con-
nection up to remove.
2.Attach one terminal clamp of the plus/+
jumper cable to the positive terminal of the
battery or a starting-aid terminal of the vehi-
cle providing assistance.
3.Attach the second terminal clamp of the
plus/+ jumper cable to the positive terminal
of the battery or a starting-aid terminal of
the vehicle to be started.
4.Attach one terminal clamp of the minus/–
jumper cable to the negative terminal of the
battery or to an engine or body ground of
the assisting vehicle.
Page 206 of 236
Mobility
205Reference
At a glance
Controls
Driving tips
Communications
Navigation
Entertainment
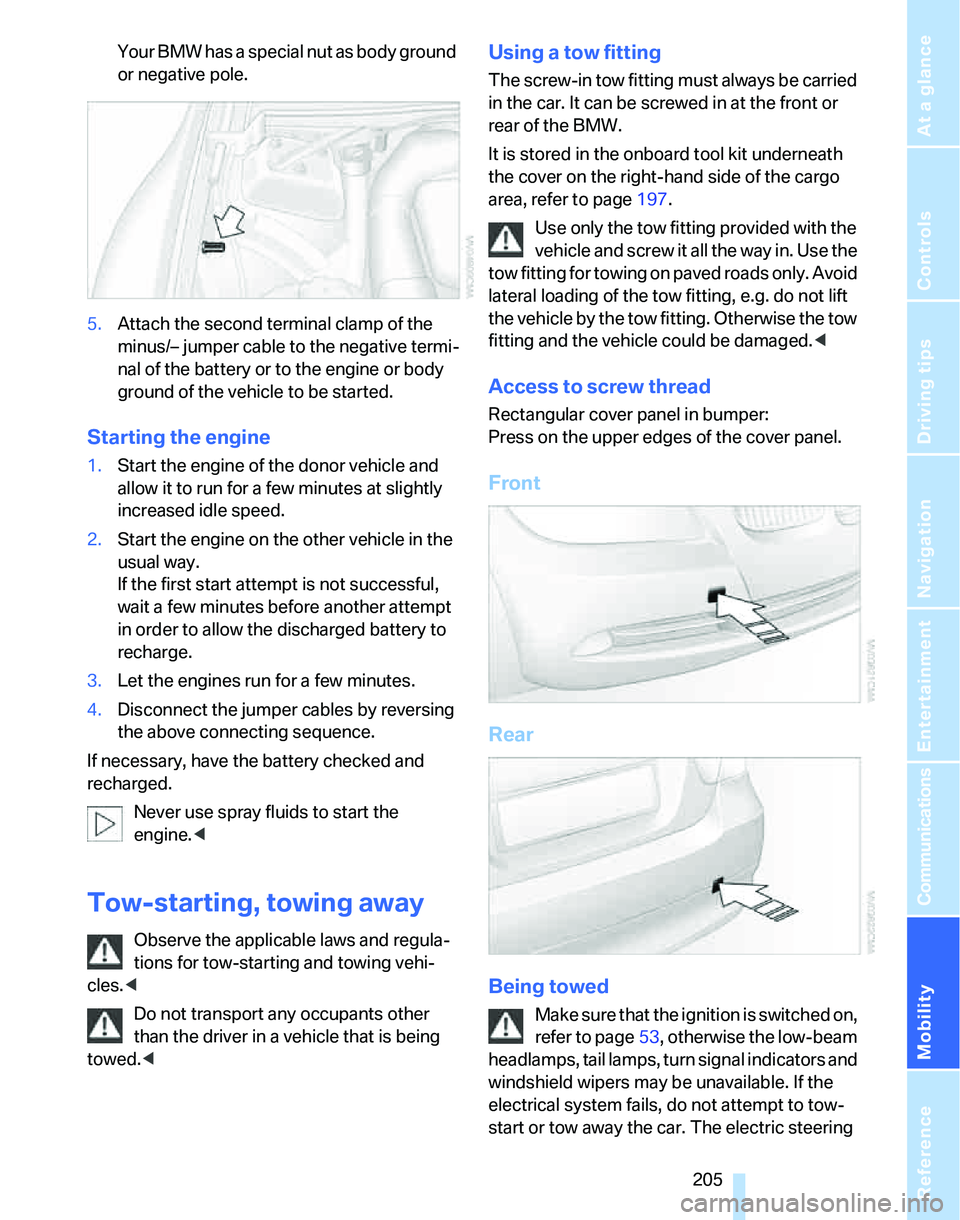
Your BMW has a special nut as body ground
or negative pole.
5.Attach the second terminal clamp of the
minus/– jumper cable to the negative termi-
nal of the battery or to the engine or body
ground of the vehicle to be started.
Starting the engine
1.Start the engine of the donor vehicle and
allow it to run for a few minutes at slightly
increased idle speed.
2.Start the engine on the other vehicle in the
usual way.
If the first start attempt is not successful,
wait a few minutes before another attempt
in order to allow the discharged battery to
recharge.
3.Let the engines run for a few minutes.
4.Disconnect the jumper cables by reversing
the above connecting sequence.
If necessary, have the battery checked and
recharged.
Never use spray fluids to start the
engine.<
Tow-starting, towing away
Observe the applicable laws and regula-
tions for tow-starting and towing vehi-
cles.<
Do not transport any occupants other
than the driver in a vehicle that is being
towed.<
Using a tow fitting
The screw-in tow fitting must always be carried
in the car. It can be screwed in at the front or
rear of the BMW.
It is stored in the onboard tool kit underneath
the cover on the right-hand side of the cargo
area, refer to page197.
Use only the tow fitting provided with the
vehicle and screw it all the way in. Use the
tow fitting for towing on paved roads only. Avoid
lateral loading of the tow fitting, e.g. do not lift
the vehicle by the tow fitting. Otherwise the tow
fitting and the vehicle could be damaged.<
Access to screw thread
Rectangular cover panel in bumper:
Press on the upper edges of the cover panel.
Front
Rear
Being towed
Make sure that the ignition is switched on,
refer to page53, otherwise the low-beam
headlamps, tail lamps, turn signal indicators and
windshield wipers may be unavailable. If the
electrical system fails, do not attempt to tow-
start or tow away the car. The electric steering
Page 207 of 236
Giving and receiving assistance
206 wheel lock cannot be disengaged and the car is
not steerable. Jump starting, refer to page204.
Power steering assistance is not available when
the engine is not running. Thus, braking and
steering will require increased effort.<
Switch on the hazard warning flashers, depend-
ing on local regulations.
Manual transmission
Gearshift lever in idle position.
Automatic transmission
Selector lever in position N.
Changing selector lever positions, refer to
page56.
Do not exceed a towing speed of 45 mph
or 70 km/h and a towing distance of
90 miles/150 km, otherwise the automatic
transmission may be damaged.<
Towing with a tow bar
The towing vehicle must not be lighter
than the towed vehicle, otherwise it may
be impossible to maintain control.<
The tow fittings used should be on the same
side on both vehicles. Should it prove impossi-
ble to avoid mounting the tow bar at an angle,
please observe the following:
>Clearance and maneuvering capability will
be sharply limited during cornering.
>The tow bar will generate lateral forces if it is
attached offset.
Attach the tow bar to the tow fittings only,
as attaching it to other parts of the vehicle
could result in damage.<
Towing with a tow rope
When starting off in the towing vehicle, make
sure that the tow rope is taut.
To avoid jerking and the associated
stresses on vehicle components when
towing, always use nylon ropes or nylon straps.
Attach the tow rope to the tow fittings only, as
attaching it to other parts of the vehicle could
result in damage.<
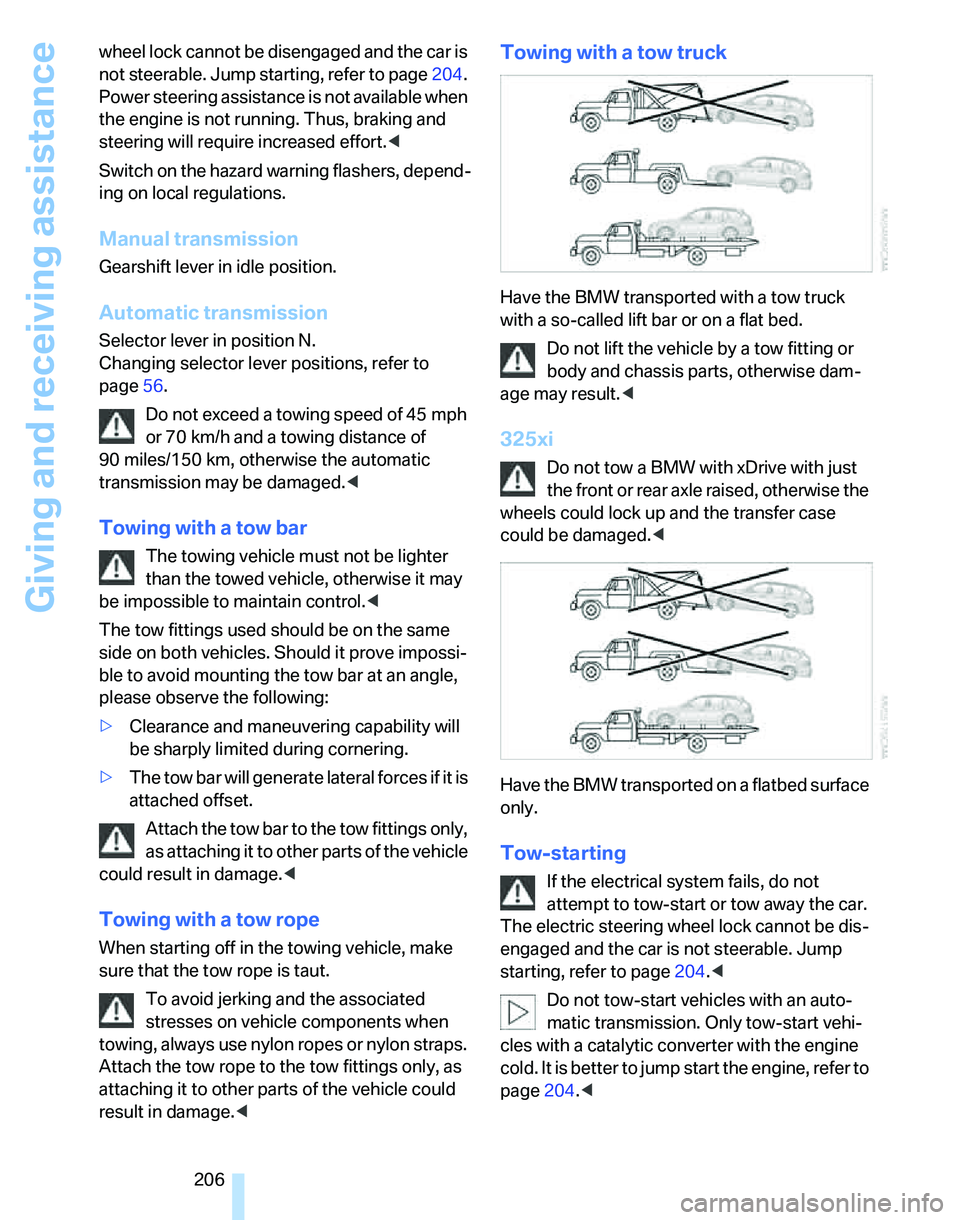
Towing with a tow truck
Have the BMW transported with a tow truck
with a so-called lift bar or on a flat bed.
Do not lift the vehicle by a tow fitting or
body and chassis parts, otherwise dam-
age may result.<
325xi
Do not tow a BMW with xDrive with just
the front or rear axle raised, otherwise the
wheels could lock up and the transfer case
could be damaged.<
Have the BMW transported on a flatbed surface
only.
Tow-starting
If the electrical system fails, do not
attempt to tow-start or tow away the car.
The electric steering wheel lock cannot be dis-
engaged and the car is not steerable. Jump
starting, refer to page204.<
Do not tow-start vehicles with an auto-
matic transmission. Only tow-start vehi-
cles with a catalytic converter with the engine
cold. It is better to jump start the engine, refer to
page204.<
Page 220 of 236
Reference 219
At a glance
Controls
Driving tips
Communications
Navigation
Entertainment
Mobility
Automatic
– air distribution95
– air flow rate95
– cruise control59,61
– headlamp control90
– service notification175
– storing of stations145
Automatic climate control94
– automatic air distribution95
– settings via iDrive95
Automatic curb monitor47
"Automatic programs" with
automatic climate control96
Automatic recirculated-air
control AUC96
Automatic station search145
Automatic transmission with
Steptronic55
– interlock55,56
– overriding selector lever
lock57
– shiftlock56
– sport program56
"Automatic ventilation"98
AUTO program for automatic
climate control95
"Autostore"
– on the radio146
AUX-IN158
– port103
Average fuel consumption69
– setting the units71
Average speed68
"Avoid ferries" in
navigation131
"Avoid highways" in
navigation131
Avoid highways in
navigation131
Avoiding unintentional
alarms35
"Avoid tollroads" in
navigation131
Axle loads, refer to
Weights212
"A - Z"168B
Backrests, refer to Seats41
Backrest width adjustment43
Back seats
– refer to Rear seats
Backup lamps
– replacing bulbs200
Backup lamps, refer to Tail
lamps200
Balance, tone control141
Band-aids, refer to First-aid
pouch203
Bar, refer to Tow-starting,
towing away206
Bass, tone control141
Bass sounds, refer to Tone
control141
Bass sounds, refer to Treble
and bass141
Battery201
– charging201
– disposal37,201
– jump starting204
– temporary power failure201
Battery renewal
– remote control37
Being towed205
Belts, refer to Safety belts46
Belt tensioner, refer to Safety
belts46
Beverage holders, refer to
Cup holders104
Black ice, refer to Outside
temperature warning67
Blower, refer to Air flow
rate96
BMW Assist174
– enabling174
– services offered175
"BMW Contact"178
"BMW Contact
Numbers"178
BMW Homepage4
BMW Maintenance
System195
"BMW Service"176
"BMW Service settings"175
BMW webpage4Bottle holders, refer to Cup
holders104
Brake assist, refer to Dynamic
Brake Control82
Brake fluid194
– level too low194
– warning lamp194
Brake fluid, refer to Service
requirements72
Brake Force Display87
Brake hydraulics, refer to
Brakes194
Brake lamps
– Brake Force Display
87
– replacing bulbs200
Brake pads, breaking in112
Brake rotors114
– brakes112
– breaking in112
Brakes
– ABS82
– BMW Maintenance
System195
– brake fluid194
– brake pads194
– breaking in112
– handbrake55
– service requirements72
Brakes, refer to Braking
safely113
Brake system112
– BMW Maintenance
System195
– brake fluid194
– brake pads194
– breaking in112
– disc brakes114
Breakdown services, refer to
Roadside Assistance203
Breaking in the clutch112
Breaking in the
differential112
Break-in period112
"Brightness"on the control
display80
Bulb changing, refer to Lamps
and bulbs197
Page 226 of 236
Reference 225
At a glance
Controls
Driving tips
Communications
Navigation
Entertainment
Mobility
iDrive16
– adjusting brightness80
– assistance window20
– automatic climate control95
– changing language80
– date and time, setting75
– displays, menus17
– menu guidance17
– operating principle16
– overview16
– selecting a menu item19
– status information20
– switching menu pages19
– symbols18
Ignition53
– switched off53
– switched on53
Ignition key, refer to
Integrated key/remote
control28
Ignition key position 1, refer to
Radio readiness53
Ignition key position 2, refer to
Ignition on53
Ignition lock53
Indicator and warning
lamps13
Individual air distribution95
Individually programmable
buttons on steering
wheel48
Individual settings, refer to
Personal Profile29
Information
– on another location126
– on country126
– on current position126
– on destination location126
"Information" in
navigation127
"Information on
destination"128
Initializing
– compass, refer to
Calibrating102
– Flat Tire Monitor FTM86
– panorama glass roof39
"Input map"126Installation location
– CD changer156
Instructions for navigation
system, refer to Voice
instructions135
Instrument cluster12
Instrument lighting93
Instrument panel, refer to
Cockpit10
Integrated key28
Integrated universal remote
control
100
Interesting destination for
navigation126
"Interim time"80
Interior lamps93
– remote control30
Interior motion sensor35
Interior rearview mirror47
– automatic dimming
feature113
Interior rearview mirror with
digital compass101
Interlock56
Intermittent mode of the
wipers58
J
Jacking points201
Joystick, refer to iDrive16
Jumpering, refer to Jump
starting204
Jump starting204
K
Key, refer to Integrated key/
remote control28
Keyless Go, refer to
Convenient access35
Keyless opening and closing,
refer to Convenient
access35
Key Memory, refer to Personal
Profile29
"Keypad"169Kick-down56
– automatic transmission with
Steptronic56
Knock control183
L
Lamps, refer to Parking lamps/
low beams90
Lamps and bulbs, replacing
bulbs197
"Languages" in
navigation135
"Languages"on the control
display80
Lap-and-shoulder safety
belt46
Lashing eyes, refer to
Securing cargo115
Last destinations, refer to
Destination list127
"Last seat pos."45
LATCH child-restraint fixing
system51
LEDs light-emitting
diodes198
Length, refer to
Dimensions211
License plate lamp, replacing
bulbs201
Light-emitting diodes
LEDs198
Lighter104
"Lighting"91
Lighting
– instruments93
– lamps and bulbs197
– of the vehicle, refer to
Lamps90
Light switch90
"Limit"79
Limit, refer to Speed limit79
Loading
– securing cargo115
Load securing equipment,
refer to Securing cargo115
Location
– drive for navigation DVD and
audio CD120
Page 231 of 236
Everything from A - Z
230 Selector lever
– automatic transmission with
Steptronic56
Selector lever lock, refer to
Shiftlock
– automatic transmission with
Steptronic56
Selector lever positions
– automatic transmission with
Steptronic56
Sequential manual gearbox
SMG
– tow-starting206
"Service"78,175,192
Service, refer to Roadside
Assistance203
Service car, refer to Roadside
Assistance203
Service data in the remote
control195
Service Interval Display, refer
to Condition Based Service
CBS195
"Service notification"175
"Service Request"176,178
Service requirement display,
refer to Condition Based
Service CBS195
"Service
requirements"73,175,192
Service requirements72
"Service Status"175
"Set date"77
"Set" for audio mode140
"Set time"76
Settings
– clock, 12h/24h mode76
– date format77
Setting times, refer to
Preselecting switch-on
times98
"Set tire pressure"86
Shifting gears
– automatic transmission with
Steptronic56
Shiftlock
– automatic transmission,
refer to Changing selector
lever positions56Short commands of voice
command system214
Shortest route in navigation,
refer to Selecting route130
"Short route" in
navigation131
"Show current position"126
"Show destination
position"126
Shuffled, refer to Random
– CD changer155
– CD player
155
Side airbags88
Side-mounted turn signals
– replacing bulbs199
Side window blind, refer to
Roller sun blinds102
Side windows, refer to
Windows37
Signal horn, refer to Horn10
Sitting safely41
– airbags41
– safety belt41
– with head restraint41
Ski bag107
Ski sack, refer to Ski bag107
Sliding/tilt sunroof
– refer to Panorama glass
roof38
Slot for remote control53
Smokers' package, refer to
Ashtray104
Snap-in adapter, refer to
Center armrest storage
compartment103
Socket, refer to Connecting
electrical appliances105
Socket for On-Board
Diagnosis OBD196
Song search, refer to Playing a
track154
Sound output for
entertainment on/off140
Spare fuses202
Spare fuses, refer to
Fuses202
Spare key28
– adapter28Spark plugs, refer to Service
requirements72
Speaking, refer to Voice
instructions for navigation
system135
Speed
– with winter tires189
Speed-dependent
volume141
Speed limit79
– setting79
Speed limit warning, refer to
Speed limit79
Speedometer12
"Speed volume", refer to Tone
control142
Split rear seat back, refer to
Expanding the cargo
area106
Sports seat43
Stability control, refer to
Driving stability control
systems82
Start/stop button53
– starting the engine54
– switching off the engine54
"Start guid-
ance"124,128,129,132
Starting
– difficulties, temperature54
Starting, refer to Starting the
engine54
Starting assistance, refer to
Jump starting204
Starting the engine
– start/stop button53
Start menu17
"State / Province" in
destination entry122
Station, refer to Radio144
"Status"73
Status of this Owner's Manual
at time of printing5