2006 BMW 325XI SPORTS WAGON light
[x] Cancel search: lightPage 11 of 236

Cockpit
10
Cockpit
Around the steering wheel: controls and displays
3Adjusting exterior mirrors, automatic curb
monitor
*46
1Safety switch for electric rear
windows38
2
Opening and closing windows37 4
Parking lamps90
Low beams90
Automatic headlamp control
*90
Adaptive Head Light
*92
5
Fog lamps
*92
Page 12 of 236
At a glance
11Reference
Controls
Driving tips
Communications
Navigation
Entertainment
Mobility
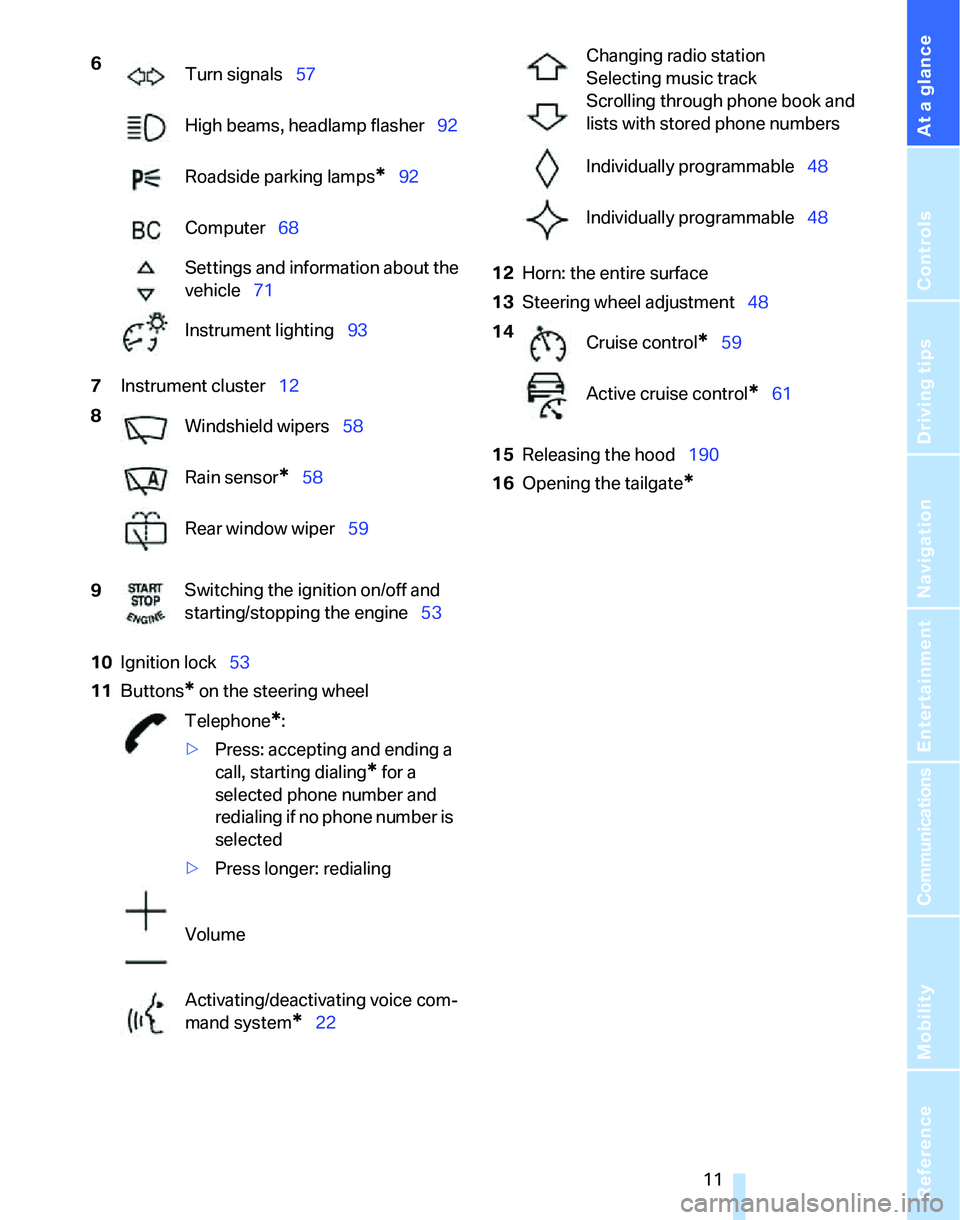
7Instrument cluster12
10Ignition lock53
11Buttons
* on the steering wheel12Horn: the entire surface
13Steering wheel adjustment48
15Releasing the hood190
16Opening the tailgate
*
6
Turn signals57
High beams, headlamp flasher92
Roadside parking lamps
*92
Computer68
Settings and information about the
vehicle71
Instrument lighting93
8
Windshield wipers58
Rain sensor
*58
Rear window wiper59
9Switching the ignition on/off and
starting/stopping the engine53
Telephone
*:
>Press: accepting and ending a
call, starting dialing
* for a
selected phone number and
redialing if no phone number is
selected
>Press longer: redialing
Volume
Activating/deactivating voice com-
mand system
*22
Changing radio station
Selecting music track
Scrolling through phone book and
lists with stored phone numbers
Individually programmable48
Individually programmable48
14
Cruise control
*59
Active cruise control
*61
Page 14 of 236

At a glance
13Reference
Controls
Driving tips
Communications
Navigation
Entertainment
Mobility
Indicator and warning lamps
The concept
Indicator and warning lamps can light up in var-
ious combinations and colors in both the indica-
tor area 1 and the display 2.
Some lamps are checked for proper functioning
and thus come on briefly when the engine is
started or the ignition is switched on.
Explanatory text messages
Text messages at the lower edge of the Control
Display explain the meaning of the displayed
indicator and warning lamps.
You can call up more information, e.g. on the
cause of a malfunction and on how to respond,
via Check Control, refer to page77.In urgent cases, this information will be shown
immediately as soon as the corresponding lamp
comes on.
Indicator lamps without text messages
The following indicator lamps in the indicator
area1 signal that the associated functions are
activated:
High beams/headlamp flasher92
Fog lamps
*92
Lamp flashes:
DSC or DTC is regulating the propul-
sive forces in order to maintain driving
stability83
Handbrake engaged55
Page 19 of 236
iDrive
18
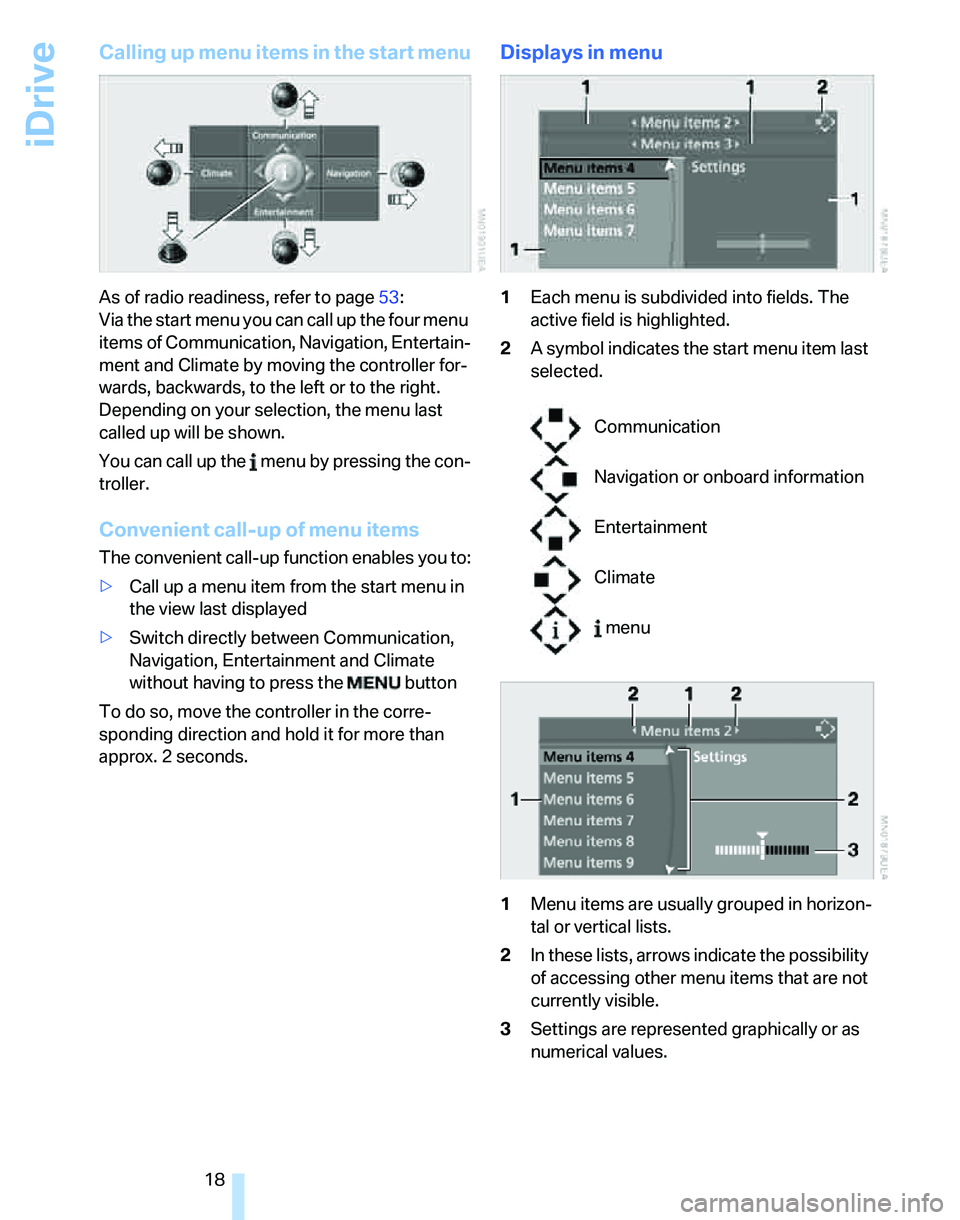
Calling up menu items in the start menu
As of radio readiness, refer to page53:
Via the start menu you can call up the four menu
items of Communication, Navigation, Entertain-
ment and Climate by moving the controller for-
wards, backwards, to the left or to the right.
Depending on your selection, the menu last
called up will be shown.
You can call up the menu by pressing the con-
troller.
Convenient call-up of menu items
The convenient call-up function enables you to:
>Call up a menu item from the start menu in
the view last displayed
>Switch directly between Communication,
Navigation, Entertainment and Climate
without having to press the button
To do so, move the controller in the corre-
sponding direction and hold it for more than
approx. 2 seconds.
Displays in menu
1Each menu is subdivided into fields. The
active field is highlighted.
2A symbol indicates the start menu item last
selected.
1Menu items are usually grouped in horizon-
tal or vertical lists.
2In these lists, arrows indicate the possibility
of accessing other menu items that are not
currently visible.
3Settings are represented graphically or as
numerical values.
Communication
Navigation or onboard information
Entertainment
Climate
menu
Page 20 of 236
At a glance
19Reference
Controls
Driving tips
Communications
Navigation
Entertainment
Mobility
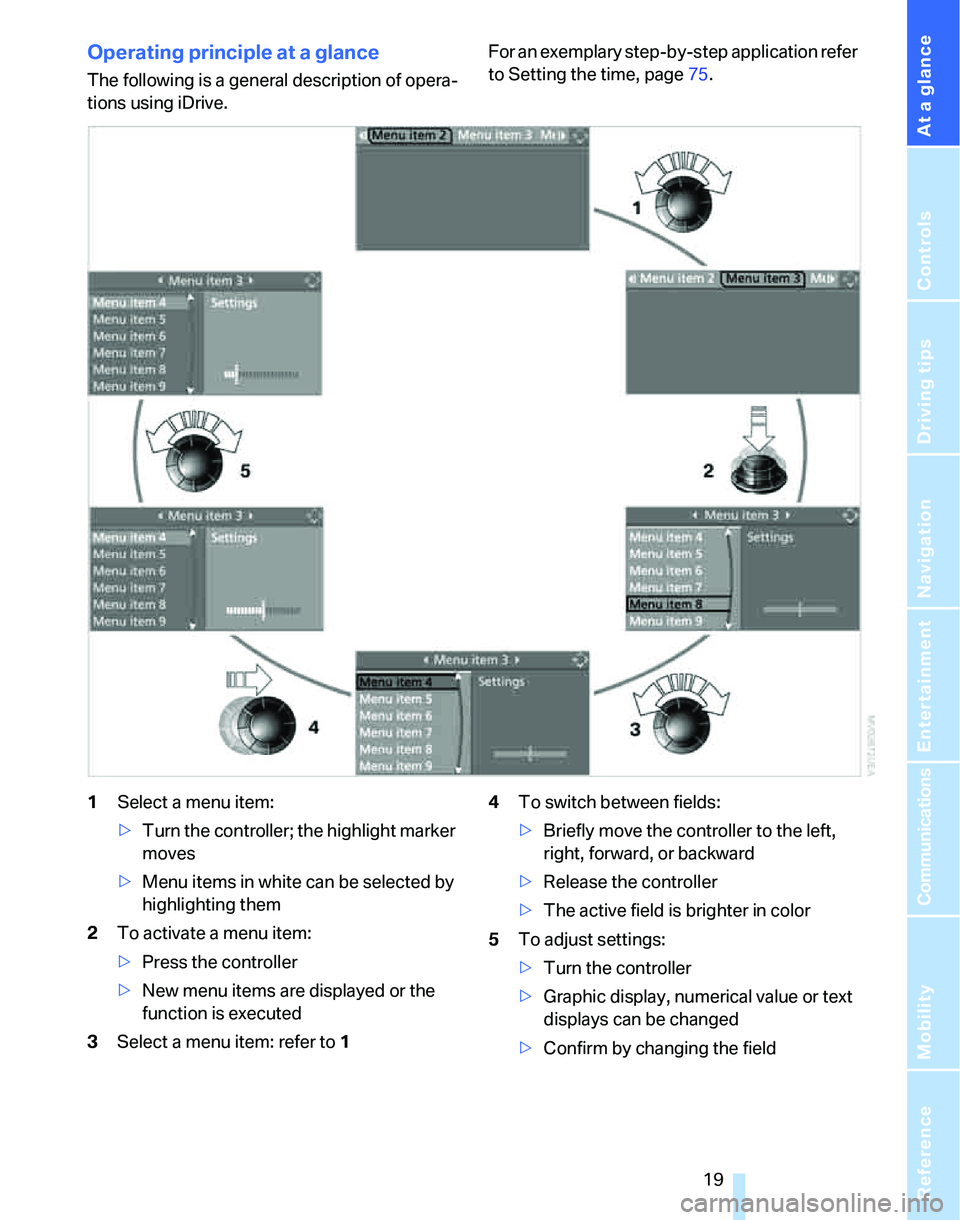
Operating principle at a glance
The following is a general description of opera-
tions using iDrive.For an exemplary step-by-step application refer
to Setting the time, page75.
1Select a menu item:
>Turn the controller; the highlight marker
moves
>Menu items in white can be selected by
highlighting them
2To activate a menu item:
>Press the controller
>New menu items are displayed or the
function is executed
3Select a menu item: refer to14To switch between fields:
>Briefly move the controller to the left,
right, forward, or backward
>Release the controller
>The active field is brighter in color
5To adjust settings:
>Turn the controller
>Graphic display, numerical value or text
displays can be changed
>Confirm by changing the field
Page 34 of 236
Controls
33Reference
At a glance
Driving tips
Communications
Navigation
Entertainment
Mobility
cally locks the vehicle as soon as you
start to drive.
7.Press the controller.
The setting is selected.
The setting is stored for the remote control cur-
rently in use.
Unlocking and opening doors
>Either unlock the doors together using the
button for the central locking system and
then pull the door handle above the armrest
or
>pull on the door handle of each door twice:
the first time unlocks the door, the second
time opens it.
Locking
>Use the central locking button to lock all of
the doors simultaneously, or
>press down the safety lock button of a door.
To prevent you from being locked out, the
open driver's door cannot be locked using
the lock button.
Persons or animals in a parked vehicle
could lock the doors from the inside. You
should therefore take the remote control with
you so that the car can be opened from the out-
side.<
Tailgate
In order to avoid damage, make sure there
is sufficient clearance in all directions
before opening the tailgate.<
Opening from inside
Press the button: the tailgate opens unless it
has been locked.
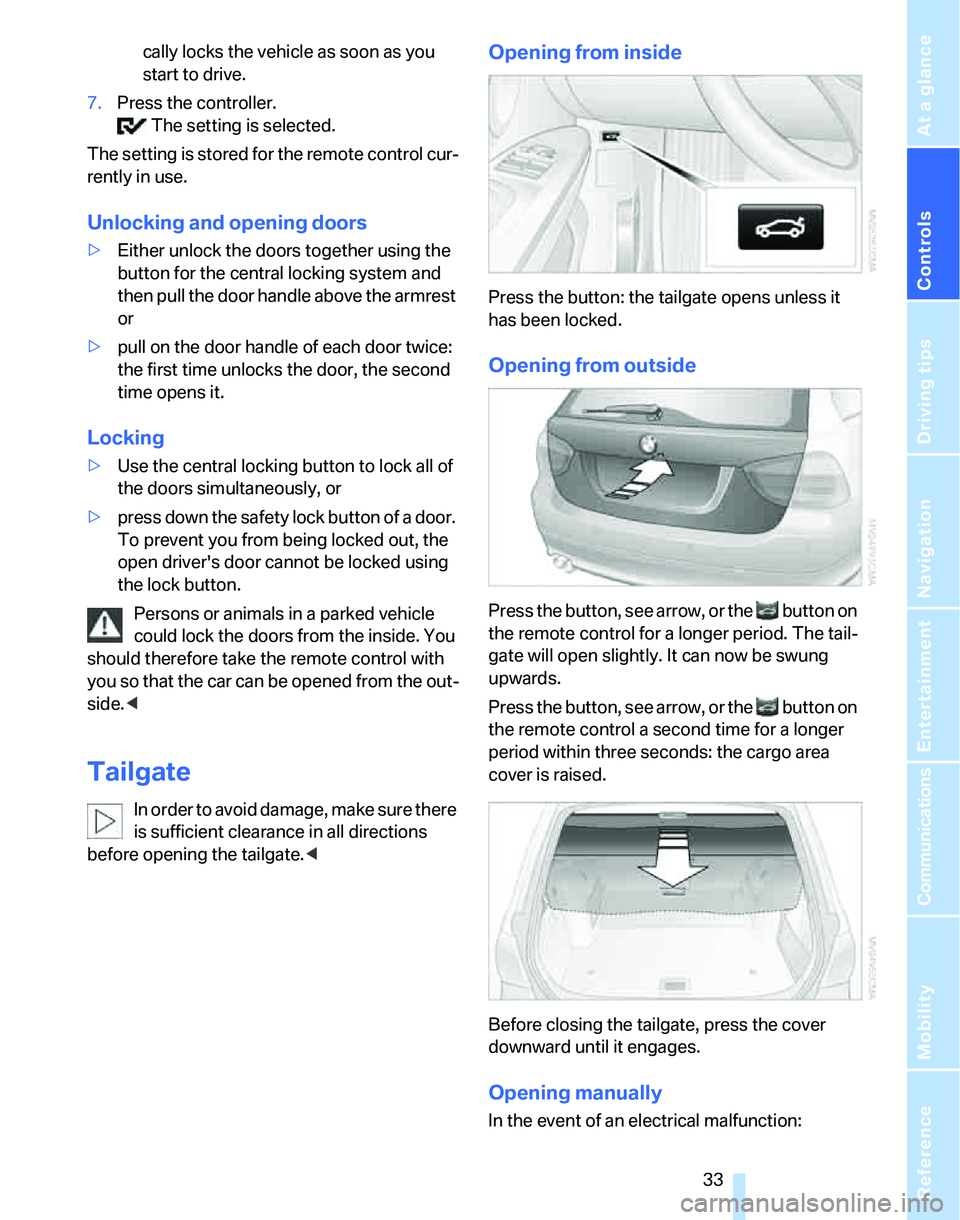
Opening from outside
Press the button, see arrow, or the button on
the remote control for a longer period. The tail-
gate will open slightly. It can now be swung
upwards.
Press the button, see arrow, or the button on
the remote control a second time for a longer
period within three seconds: the cargo area
cover is raised.
Before closing the tailgate, press the cover
downward until it engages.
Opening manually
In the event of an electrical malfunction:
Page 35 of 236
Opening and closing
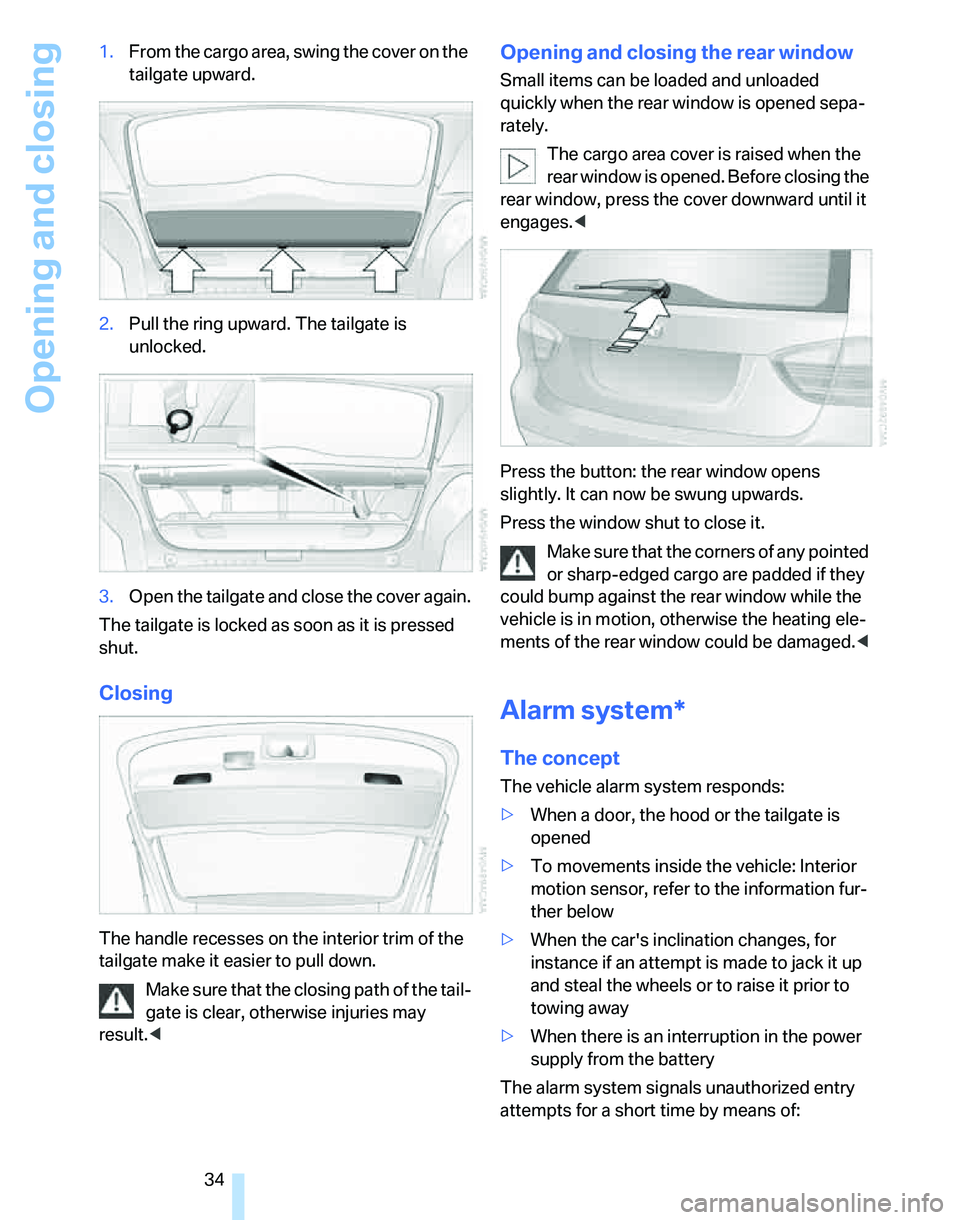
34 1.From the cargo area, swing the cover on the
tailgate upward.
2.Pull the ring upward. The tailgate is
unlocked.
3.Open the tailgate and close the cover again.
The tailgate is locked as soon as it is pressed
shut.
Closing
The handle recesses on the interior trim of the
tailgate make it easier to pull down.
Make sure that the closing path of the tail-
gate is clear, otherwise injuries may
result.<
Opening and closing the rear window
Small items can be loaded and unloaded
quickly when the rear window is opened sepa-
rately.
The cargo area cover is raised when the
rear window is opened. Before closing the
rear window, press the cover downward until it
engages.<
Press the button: the rear window opens
slightly. It can now be swung upwards.
Press the window shut to close it.
Make sure that the corners of any pointed
or sharp-edged cargo are padded if they
could bump against the rear window while the
vehicle is in motion, otherwise the heating ele-
ments of the rear window could be damaged.<
Alarm system*
The concept
The vehicle alarm system responds:
>When a door, the hood or the tailgate is
opened
>To movements inside the vehicle: Interior
motion sensor, refer to the information fur-
ther below
>When the car's inclination changes, for
instance if an attempt is made to jack it up
and steal the wheels or to raise it prior to
towing away
>When there is an interruption in the power
supply from the battery
The alarm system signals unauthorized entry
attempts for a short time by means of:
Page 37 of 236

Opening and closing
36 Convenient access supports the following
functions:
>Unlocking/locking the vehicle
>Unlocking the tailgate separately
>Engine starting
>Convenient closure
Functional requirement
>The vehicle or the tailgate can only be
locked when the vehicle detects that the
remote control currently in use is outside of
the vehicle.
>The vehicle cannot be locked or unlocked
again until after approx. 2 seconds.
>The engine can only be started when the
vehicle detects that the remote control cur-
rently in use is inside the vehicle.
Special features in comparison to
conventional remote controls
In general, there is no difference between using
convenient access or pressing the buttons on
the remote control to carry out the functions
mentioned above. You should therefore first
familiarize yourself with the instructions on
opening and closing starting on page28.
Special features regarding the use of conve-
nient access are described below.
Unlocking
Grasp the handle on the driver's or front pas-
senger's door completely, arrow 1. This corre-
sponds to pressing the button.
If a remote control is detected inside the car
after the vehicle is unlocked, the electric steer-
ing wheel lock is released, refer to page53.
Locking
Touch the surface, arrow 2, with your finger for
approx. 1 second. This corresponds to pressing
the button.
For convenient closure, keep your finger on the
surface, arrow 2.
If the vehicle detects that a remote con-
trol has been accidentally left inside the
locked vehicle's cargo area after the tailgate is
closed, the tailgate will reopen slightly. The haz-
ard warning flashers flash and an acoustic sig-
nal
* sounds.<
Unlocking just the tailgate
Press the button on the outside of the tailgate.
This corresponds to pressing the button.
Switching on radio readiness
Radio readiness is switched on by pressing the
start/stop button, refer to page53.
Do not depress the brake or the clutch,
otherwise the engine will start immedi-
ately.<
Starting the engine
You can start the engine or switch on the igni-
tion when a remote control is inside the vehicle.
It is not necessary to insert a remote control into
the ignition switch, refer to page53.
Switching off the engine in vehicles
with automatic transmission
The engine can only be switched off when the
selector lever is in position P, refer to page54.
To switch the engine off when the selector lever
is in position N, the remote control must be in
the ignition switch.
Before driving a vehicle with automatic
transmission into a car wash
1.Insert remote control into ignition switch.
2.Depress the brake.
3.Move the selector lever to position N.
4.Switch off the engine.
The vehicle can roll.