Page 1451 of 2893
����
��������
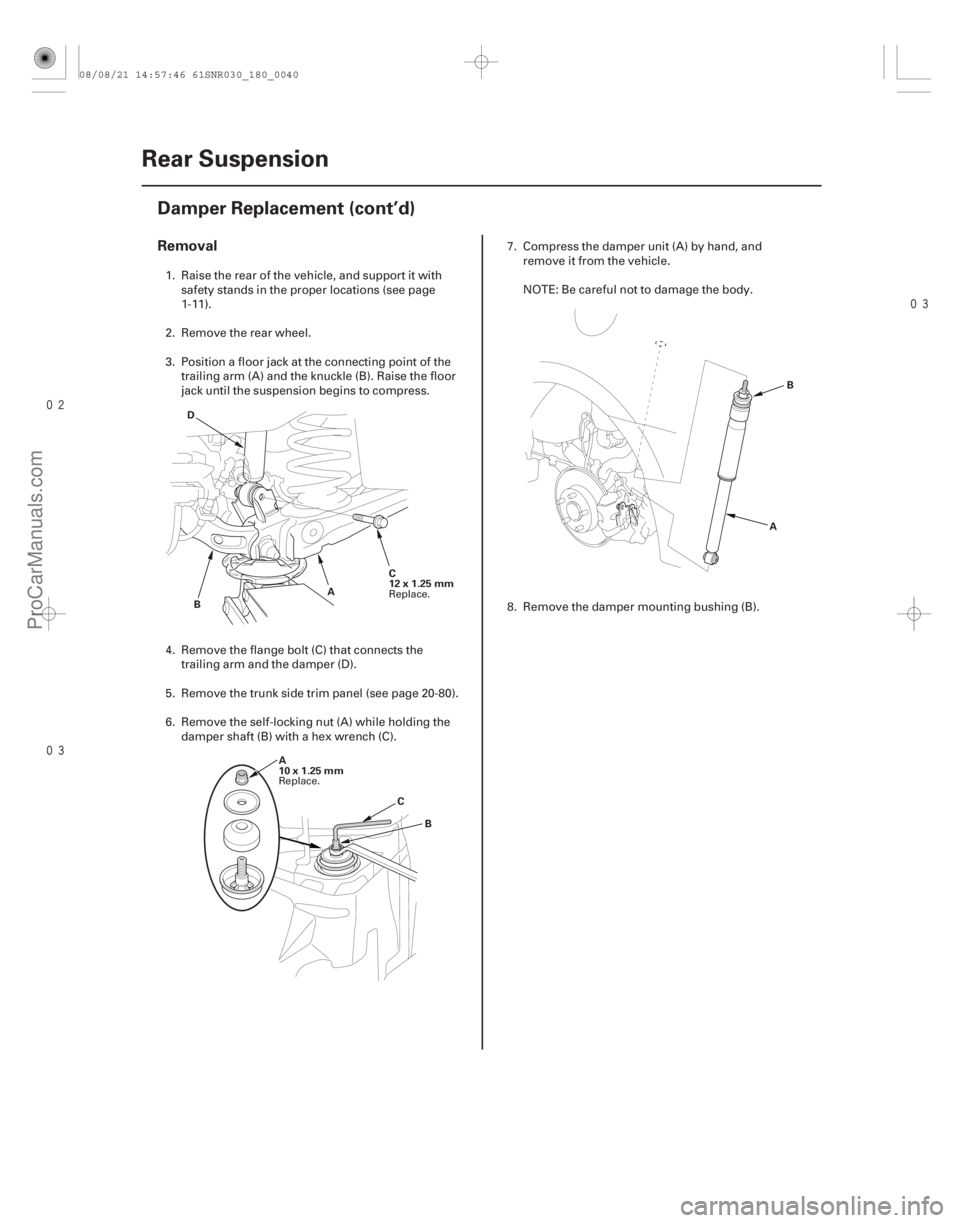
Removal
18-40Rear Suspension
Damper Replacement (cont’d)
C
12x1.25mm
A
B
D
A
10x1.25mm B
C A
B
1. Raise the rear of the vehicle, and support it with
safety stands in the proper locations (see page
1-11).
2. Remove the rear wheel.
3. Position a floor jack at the connecting point of the trailing arm (A) and the knuckle (B). Raise the floor
jack until the suspension begins to compress.
4. Remove the flange bolt (C) that connects the trailing arm and the damper (D).
5. Remove the trunk side trim panel (see page 20-80).
6. Remove the self-locking nut (A) while holding the damper shaft (B) with a hex wrench (C). 7. Compress the damper unit (A) by hand, and
remove it from the vehicle.
NOTE: Be careful not to damage the body.
8. Remove the damper mounting bushing (B).
Replace.
Replace.
08/08/21 14:57:46 61SNR030_180_0040
ProCarManuals.com
DYNOMITE -2009-
Page 1452 of 2893

Type S model:
12x1.25mm
69 N·m (7.0 kgf·m, 51 lbf·ft)
1. Push on the damper as shown")
��������
���
InspectionInstallation
18-41
A
B
A
Except Type S model:
12x1.25mm
59 N·m (6.0 kgf·m, 43 lbf·ft)
Type S model:
12x1.25mm
69 N·m (7.0 kgf·m, 51 lbf·ft)
1. Push on the damper as shown.
2. Compress the damper assembly by hand, and check for smooth operation through a full stroke,
both compression and extension. The damper
should extend smoothly and constantly when
compression is released. If it does not, the gas is
leaking and the damper should be replaced.
3. Check for oil leaks, abnormal noises, or binding during these tests. 1. Install the damper mounting bushing (A) onto the
damper unit. Position the damper assembly (B)
between the body and tra iling arm.
NOTE: Be careful not to damage the body.
2. Position a floor jack under the tra iling arm to
support the suspension, then install the new
damper mounting bolt (A).
3. Loosely tighten the damper mounting bolt.
4. Raise the rear suspension with the jack until the vehicle just lifts off the safety stands, then tighten
the damper mounting bolt to the specified torque
value.
(cont’d)
Replace.
Replace.
08/08/21 14:58:17 61SNR030_180_0041
ProCarManuals.com
DYNOMITE -2009-
Page 1453 of 2893
����
�������
�(�#�'���������������
���������������
� �����)����
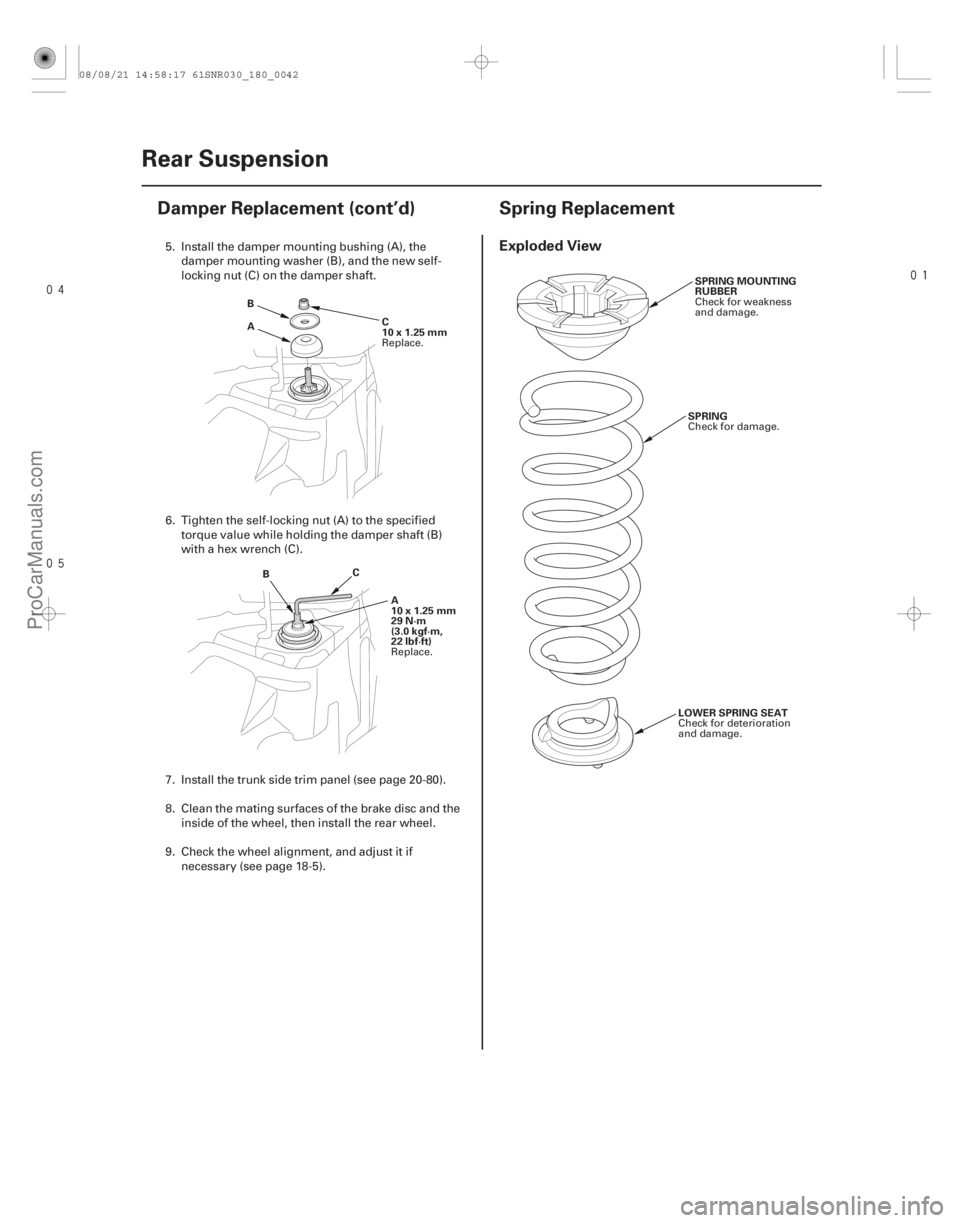
Exploded View
18-4218-42 Rear Suspension
Damper Replacement (cont’d) Spring Replacement
A
B
C
10x1.25mm
B C
A
10x1.25mm
29 N·m
(3.0 kgf·m,
22 lbf·ft) SPRING MOUNTING
RUBBER
SPRING
LOWER SPRING SEAT
5. Install the damper mounting bushing (A), the damper mounting washer (B), and the new self-
locking nut (C) on the damper shaft.
6. Tighten the self-locking nut (A) to the specified torque value while holding the damper shaft (B)
with a hex wrench (C).
7. Install the trunk side trim panel (see page 20-80).
8. Clean the mating surfaces of the brake disc and the inside of the wheel, then install the rear wheel.
9. Check the wheel alignment, and adjust it if necessary (see page 18-5).
Replace.
Replace. Check for weakness
and damage.
Check for damage.
Check for deterioration
and damage.
08/08/21 14:58:17 61SNR030_180_0042
ProCarManuals.com
DYNOMITE -2009-
Page 1454 of 2893
����
�������
�(�#�'���������������
���������������
� �����)����
Exploded View
18-4218-42 Rear Suspension
Damper Replacement (cont’d) Spring Replacement
A
B
C
10x1.25mm
B C
A
10x1.25mm
29 N·m
(3.0 kgf·m,
22 lbf·ft) SPRING MOUNTING
RUBBER
SPRING
LOWER SPRING SEAT
5. Install the damper mounting bushing (A), the damper mounting washer (B), and the new self-
locking nut (C) on the damper shaft.
6. Tighten the self-locking nut (A) to the specified torque value while holding the damper shaft (B)
with a hex wrench (C).
7. Install the trunk side trim panel (see page 20-80).
8. Clean the mating surfaces of the brake disc and the inside of the wheel, then install the rear wheel.
9. Check the wheel alignment, and adjust it if necessary (see page 18-5).
Replace.
Replace. Check for weakness
and damage.
Check for damage.
Check for deterioration
and damage.
08/08/21 14:58:17 61SNR030_180_0042
ProCarManuals.com
DYNOMITE -2009-
Page 1455 of 2893
����
��������
����
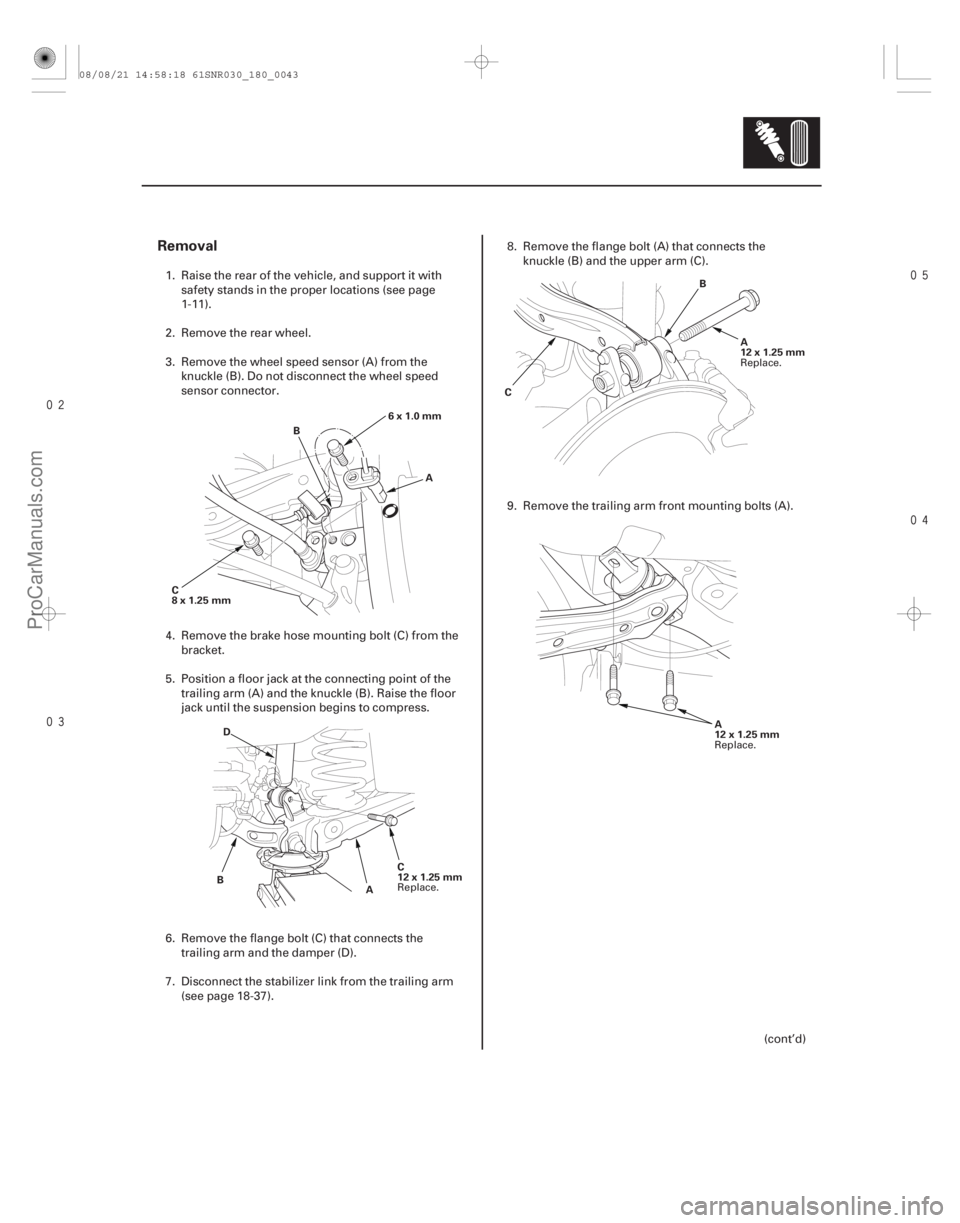
Removal
18-43
A
B
6x1.0mm
C
8x1.25mm
AC
12x1.25mm
D
B B
C A
12x1.25mm
A
12x1.25mm
1. Raise the rear of the vehicle, and support it with safety stands in the proper locations (see page
1-11).
2. Remove the rear wheel.
3. Remove the wheel speed sensor (A) from the knuckle (B). Do not disconnect the wheel speed
sensor connector.
4. Remove the brake hose mounting bolt (C) from the bracket.
5. Position a floor jack at the connecting point of the trailing arm (A) and the knuckle (B). Raise the floor
jack until the suspension begins to compress.
6. Remove the flange bolt (C) that connects the trailing arm and the damper (D).
7. Disconnect the stab ilizer link from the trailing arm
(see page 18-37). 8. Remove the flange bolt (A) that connects the
knuckle (B) and the upper arm (C).
9. Remove the trailing arm front m ounting bolts (A).
(cont’d)
Replace. Replace.
Replace.
08/08/21 14:58:18 61SNR030_180_0043
ProCarManuals.com
DYNOMITE -2009-
Page 1456 of 2893
��������
����
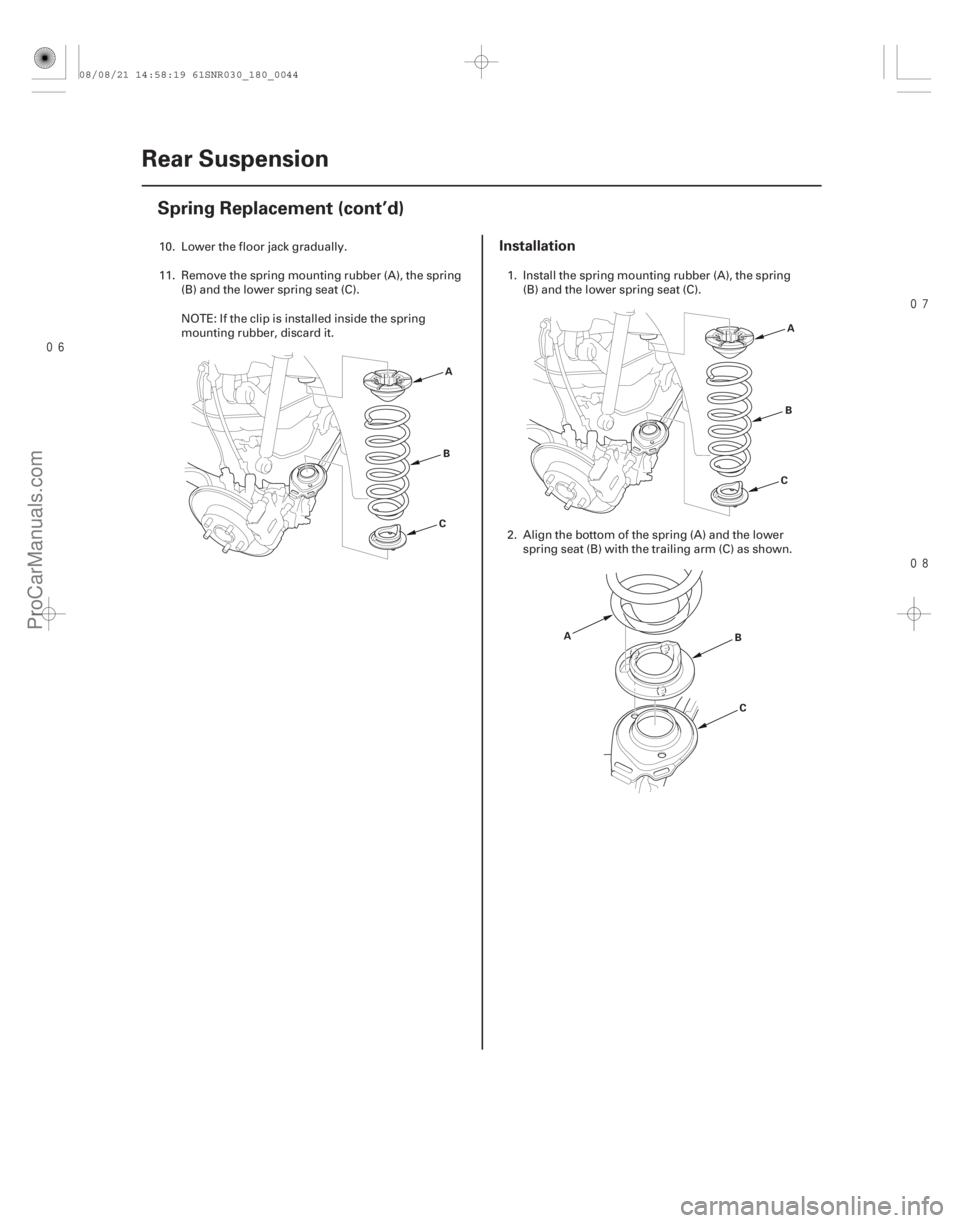
Installation
18-44Rear Suspension
Spring Replacement (cont’d)
A
B
C A
B
C
A B
C
10. Lower the floor jack gradually.
11. Remove the spring mounting rubber (A), the spring (B) and the lower spring seat (C).
NOTE: If the clip is installed inside the spring
mounting rubber, discard it. 1. Install the spring mounting rubber (A), the spring
(B) and the lower spring seat (C).
2. Align the bottom of the spring (A) and the lower spring seat (B) with the trailing arm (C) as shown.
08/08/21 14:58:19 61SNR030_180_0044
ProCarManuals.com
DYNOMITE -2009-
Page 1457 of 2893

’07-08 except Type S models:
12x1.25mm
110N·m(11.2kgf·m,81.0lbf·ft)
’07-08 Type S models:
12x1.25mm
115N·m(11.7k")
����
���� ����
18-45
A
’06 model:
12x1.25mm
108N·m(11.0kgf·m,79.6lbf·ft)
’07-08 except Type S models:
12x1.25mm
110N·m(11.2kgf·m,81.0lbf·ft)
’07-08 Type S models:
12x1.25mm
115N·m(11.7kgf·m,84.6lbf·ft)
’09 model:
12x1.25mm
115N·m(11.7kgf·m,84.6lbf·ft)
A
12x1.25mm
108 N·m
(11.0 kgf·m,
79.6 lbf·ft)
B
C A
B
C
Except Type S model:
12x1.25mm
59 N·m
(6.0 kgf·m, 43 lbf·ft)
Type S model:
12x1.25mm
69 N·m
(7.0 kgf·m, 51 lbf·ft)
3. Loosely install new trailing arm front m ounting
bolts (A).
4. Loosely install the new flange bolt (A) that connects the knuckle (B) and the upper arm (C). 5. Slowly raise the jack until you can align the bolt
hole with the holes in the trailing arm (A) and the
damper (B), and install the new flange bolt (C).
6. Install the stabilizer link on the trailing arm (see page 18-37).
7. Raise the rear suspension with a floor jack to load the vehicle weight.
8. Tighten all mounting hardware to the specified torque values.
(cont’d)
Replace.
Replace.
Replace.
Replace.Replace. Replace.
Replace.
08/08/21 14:58:19 61SNR030_180_0045
ProCarManuals.com
DYNOMITE -2009-
Page 1458 of 2893
�����
18-46Rear Suspension
Spring Replacement (cont’d)
A
B
6x1.0mm
9.8 N·m
(1.0 kgf·m,
7.2 lbf·ft)
8x1.25mm
22 N·m
(2.2 kgf·m, 16 lbf·ft) (Multipurpose)
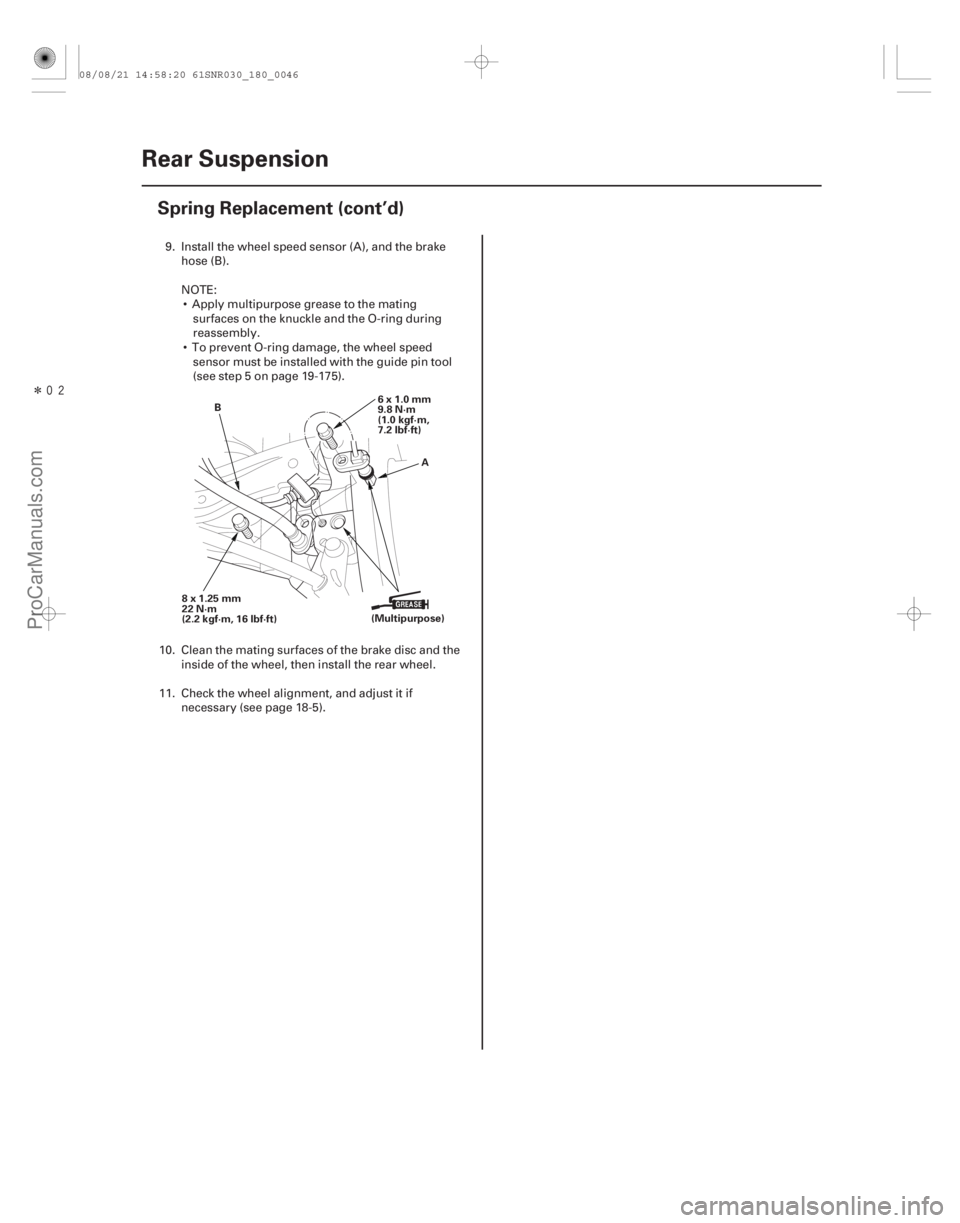
9. Install the wheel speed sensor (A), and the brake
hose (B).
NOTE: Apply multipurpose grease to the mating surfaces on the knuckle and the O-ring during
reassembly.
To prevent O-ring damage, the wheel speed sensor must be installed with the guide pin tool
(see step 5 on page 19-175).
10. Clean the mating surfaces of the brake disc and the inside of the wheel, then install the rear wheel.
11. Check the wheel alignment, and adjust it if necessary (see page 18-5).
08/08/21 14:58:20 61SNR030_180_0046
ProCarManuals.com
DYNOMITE -2009-