Page 253 of 2893
����
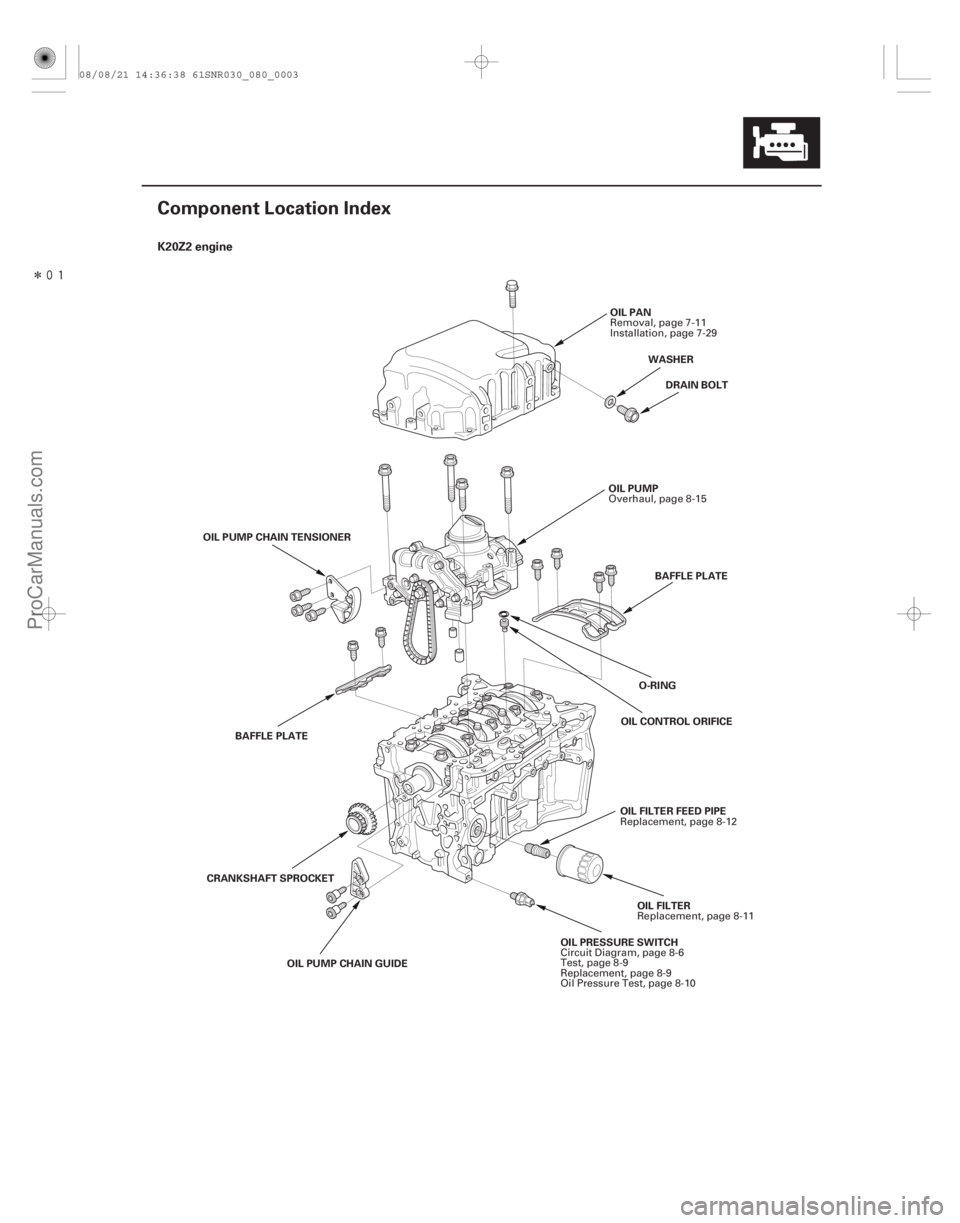
�(�#�'���������������������������������������)���� K20Z2 engine
8-3
Component Location Index
OIL PRESSURE SWITCHOIL FILTER
OIL PUMP
DRAIN BOLT
O-RING
OIL PAN
BAFFLE PLATE
OIL CONTROL ORIFICE
OIL PUMP CHAIN GUIDE
CRANKSHAFT SPROCKET
OIL PUMP CHAIN TENSIONER
BAFFLE PLATE OIL FILTER FEED PIPEWASHER
Circuit Diagram, page 8-6
Test, page 8-9
Replacement, page 8-9
Oil Pressure Test, page 8-10 Replacement, page 8-11
Overhaul, page 8-15
Removal, page 7-11
Installation, page 7-29
Replacement, page 8-12
08/08/21 14:36:38 61SNR030_080_0003
ProCarManuals.com
DYNOMITE -2009-
Page 254 of 2893
����
�(�#�'���������������������������������������)���
K20Z3 engine
8-4Engine Lubrication
Component Location Index (cont’d)
OIL PRESSURE SWITCH
OIL FILTER
OIL PUMP
DRAIN BOLT
O-RING OIL PAN
BAFFLE PLATE
OIL CONTROL ORIFICE
OIL PUMP CHAIN GUIDE
CRANKSHAFT SPROCKET OIL PUMP CHAIN TENSIONER
BAFFLE PLATE
OIL COOLERWASHER
OIL COOLER CENTER BOLT OIL JETS
Circuit Diagram, page 8-6
Test, page 8-9
Replacement, page 8-9
Oil Pressure Test, page 8-10 Replacement, page 8-11
Overhaul, page 8-15
Removal, page 7-11
Installation, page 7-29
Replacement, page 8-13 Inspection, page 8-14
08/08/21 14:36:41 61SNR030_080_0004
ProCarManuals.com
DYNOMITE -2009-
Page 255 of 2893
���
Symptom Diagnostic procedure Also check for
8-5
Symptom Troubleshooting Index
Excessive engine oil
consumption
1.
2.
3.
4.
5.Verify that the engine oi")
�(�#�'���������������������������������������)���
Symptom Diagnostic procedure Also check for
8-5
Symptom Troubleshooting Index
Excessive engine oil
consumption
1.
2.
3.
4.
5.Verify that the engine oil filler cap, the oil drain
bolt, and the oil filter are tight.
Check for oil leaks.
Check for worn valve guide(s) (see page 6-55) or
worn valve stem seal(s) (see page 6-54).
Check for damaged or worn piston ring(s)
(see page 7-21).
Check for damaged or worn engine internal parts
(cylinder wall, pistons, etc.) (see page 7-16).
Low oil pressure indicator does
not come on with the ignition
switch in ON (II) 1.
2.Do the low oil pressure indicator circuit
troubleshooting (Open) (see page 8-7).
Test the oil pressure switch (see page 8-9). An open in the wire
between the engine
control module (ECM)/
powertrain control
module (PCM) and the
oil pressure switch
Low oil pressure indicator stays
on 1.
2.
3.
4.
5.
6.
7.
8.Check the engine oil level.
Do the low oil pressure indicator circuit
troubleshooting (Short) (see page 8-8).
Test the oil pressure switch (see page 8-9).
Check the engine oil pressure (see page 8-10).
Check the oil filter for clogging.
Check the oil screen for clogging.
Check the relief valve (see page 8-15).
Testtheoilpump(seepage8-17). A wire shorted to
ground between the
ECM/PCM and the oil
pressure switch
08/08/21 14:36:41 61SNR030_080_0005
ProCarManuals.com
DYNOMITE -2009-
Page 260 of 2893
���� ���
����
�(�#��������������������������������
� �����)����
Engine Oil Temperature: 80 °C (176 °F)
Engine Oil Pressure:
At Idle: 70 kPa (0.7 k")
���
�(�#�'���������������������������������������)���� ���
����
�(�#�'�������������������������������
� �����)����
Engine Oil Temperature: 80 °C (176 °F)
Engine Oil Pressure:
At Idle: 70 kPa (0.7 kgf/cm , 10 psi) min.
At 3,000 rpm: 300 kPa (3.1 kgf/cm , 44 psi) min.
K20Z2 engine
Capacity
AtOilChange:4.0L(4.2USqt)
At Oil Change including Filter: 4.2 L (4.4 US qt)
After Engine Overhaul: 5.3 L (5.6 US qt)
K20Z3 engine
Capacity
AtOilChange:4.2L(4.4USqt)
At Oil Change including Filter: 4.4 L (4.6 US qt)
After Engine Overhaul: 5.5 L (5.8 US qt)
2
2
8-108-10Engine Lubrication
Oil Pressure Test
Engine Oil Replacement
A A
39 N·m
(4.0 kgf·m, 29 lbf·ft)
B
NOTE: If the oil pressure warning indicator stays on
with the engine running, check the engine oil l
evel. If
the oil level is correct do the following test:
1. With the engine stopped, remove the oil pressure switch (see page 8-9), then install an oil pressure
gauge (A).
2. Start the engine. Shut it off immediately if the gauge registers no oil pressure. Repair the problem
before continuing.
3. Allow the engine to reach operating temperature (fan comes on at least twice). The pressure should
be:
4. If the oil pressure is out of specifications, inspect these items:
Blocking of oil filter (see page 8-11).
Blocking of oil screen.
Inspect the oil pressure relief valve (see page 8-15).
Inspect the oil pump (see page 8-17). 1. Warm up the engine.
2. Remove the drain bolt (A), and drain the engine oil.
3. Reinstall the drain bolt with a new washer (B).
4. Refill the engine with the recommended oil
(see page 3-2).
Do not overtighten.
08/08/21 14:36:43 61SNR030_080_0010
ProCarManuals.com
DYNOMITE -2009-
Page 261 of 2893
�
�� Special Tools Required
Tighten: 3/4 Turn Clockwise
Tightening Torque: 12 N·m (1.2 kgf·m, 8.7 lbf·ft)
8-118-11
Engine Oil Filter Replacem")
���
���
�(�#�'�������������������������������
� �����)�
�� Special Tools Required
Tighten: 3/4 Turn Clockwise
Tightening Torque: 12 N·m (1.2 kgf·m, 8.7 lbf·ft)
8-118-11
Engine Oil Filter Replacement
A
B
07HAA-PJ70101
5. Run the engine for more than 3 minutes, then checkfor oil leakage.
6. Turn the ignition switch to LOCK (0).
7. Connect the Honda Diagnostic System (HDS) to the data link connector (DLC) (see step 2 on page 11-3).
8. Turn the ignition switch to ON (II).
9. Make sure the HDS communicates with the vehicle and the engine control module (ECM)/powertrain
control module (PCM). If it does not communicate,
troubleshoot the DLC circuit (see page 11- 204).
10. Select GAUGES in the BODY ELECTRICAL menu with the HDS.
11. Select ADJUSTMENT in the GAUGES menu with the HDS.
12. Select SERVICE REMINDER in the ADJUSTMENT menu with the HDS.
13. Select RESET in the SERVICE REMINDER menu with the HDS.
14. Select RESETTING THE ENGINE OIL LIFE with the HDS.
NOTE: If you changed the automatic transmission
fluid (ATF) at the same time with the engine oil,
select RESETTING THE ENGINE OIL LIFE AND ATF
with the HDS instead. Oil filter wrench 07HAA-PJ70101
1. Remove the oil filter with the oil filter wrench.
2. Inspect the filter to make sure the rubber seal is not stuck to the oil filter seating surface of the engine.
3. Inspect the threads (A) and rubber seal (B) on the new filter. Clean the seat on the engine block, then
apply a light coat of new engine oil to the filter
rubber seal. Use only filters with a built-in bypass
system.
4. Install the oil filter by hand.
5. After the rubber seal seats, tighten the oil filter clockwise with the oil filter wrench.
(cont’d)
08/08/21 14:36:43 61SNR030_080_0011
ProCarManuals.com
DYNOMITE -2009-
Page 262 of 2893
�
�� Special Tools Required
Tighten: 3/4 Turn Clockwise
Tightening Torque: 12 N·m (1.2 kgf·m, 8.7 lbf·ft)
8-118-11
Engine Oil Filter Replacem")
���
���
�(�#�'�������������������������������
� �����)�
�� Special Tools Required
Tighten: 3/4 Turn Clockwise
Tightening Torque: 12 N·m (1.2 kgf·m, 8.7 lbf·ft)
8-118-11
Engine Oil Filter Replacement
A
B
07HAA-PJ70101
5. Run the engine for more than 3 minutes, then checkfor oil leakage.
6. Turn the ignition switch to LOCK (0).
7. Connect the Honda Diagnostic System (HDS) to the data link connector (DLC) (see step 2 on page 11-3).
8. Turn the ignition switch to ON (II).
9. Make sure the HDS communicates with the vehicle and the engine control module (ECM)/powertrain
control module (PCM). If it does not communicate,
troubleshoot the DLC circuit (see page 11- 204).
10. Select GAUGES in the BODY ELECTRICAL menu with the HDS.
11. Select ADJUSTMENT in the GAUGES menu with the HDS.
12. Select SERVICE REMINDER in the ADJUSTMENT menu with the HDS.
13. Select RESET in the SERVICE REMINDER menu with the HDS.
14. Select RESETTING THE ENGINE OIL LIFE with the HDS.
NOTE: If you changed the automatic transmission
fluid (ATF) at the same time with the engine oil,
select RESETTING THE ENGINE OIL LIFE AND ATF
with the HDS instead. Oil filter wrench 07HAA-PJ70101
1. Remove the oil filter with the oil filter wrench.
2. Inspect the filter to make sure the rubber seal is not stuck to the oil filter seating surface of the engine.
3. Inspect the threads (A) and rubber seal (B) on the new filter. Clean the seat on the engine block, then
apply a light coat of new engine oil to the filter
rubber seal. Use only filters with a built-in bypass
system.
4. Install the oil filter by hand.
5. After the rubber seal seats, tighten the oil filter clockwise with the oil filter wrench.
(cont’d)
08/08/21 14:36:43 61SNR030_080_0011
ProCarManuals.com
DYNOMITE -2009-
Page 263 of 2893
���
�Ý�Ý�Ý�Ý
�Ý�Ý�Ý�Ý
K20Z2 engine
8-128-12 Engine Lubrication
Engin")
�Ý �Ý�Ý�Ý�Ý
�Ý �Ý�Ý �Ý�Ý�Ý �Ý �Ý�Ý �Ý�Ý�Ý
����
���
����
�(�#�'�����������������������������
�
� �����)���
�Ý�Ý�Ý�Ý
�Ý�Ý�Ý�Ý
K20Z2 engine
8-128-12 Engine Lubrication
Engine Oil Filter Replacement
(cont’d)
Oil Filter Feed Pipe Replacement
A
6. If four numbers or marks (1 to 4 or to )
are printed around the outside of the filter, use the
following procedure to tighten the filter.
Spin the filter on until its seal lightly seats against the engine block, and note which number or
mark is at the bottom.
Tighten the filter by turning it clockwise three numbers or marks from the one you noted. For
example, if number 2 is at the bottom when the
seal is seated, tighten the filter until the number 1
comes around the bottom.
Number or
Mark when
rubber seal
is seated 1
or 2
or 3
or 4
or
Number or
Mark after
tightening 4
or 1
or 2
or 3
or
7. After installation, fill the engine with oil up to the specified level, run the engine for more than
3 minutes, then check for oil leakage. 1. Remove the oil filter (see page 8-11).
2. Remove the oil filter feed pipe.
3. Install the two 20 x 1.5 mm nuts (A) onto the new oil
filter feed pipe. Hold one nut with a wrench, then
use a second wrench to tighten the other nut.
4. Tighten the oil filter feed pipe to the block to 49 N·m (5.0 kgf·m, 36 lbf·ft), then remove the nuts
from the oil filter feed pipe.
5. Install the oil filter (see page 8-11).
Mark when rubber
seal is seated. Mark after tightening.
08/08/21 14:36:44 61SNR030_080_0012
ProCarManuals.com
DYNOMITE -2009-
Page 264 of 2893
���
�(�#�'���������������������������
���
� �����)���
����
�(�#�'�������������������������������
� �����)����
K20Z3 engine K20Z3 engine
8-138-13
Oil Cooler ReplacementOil Jet Replacement
A
D
B
C A
8x0.75mm
16N·m(1.6kgf·m,12lbf·ft)
B
1. Remove the oil filter (see page 8-11).
2. Disconnect the oil cooler bypass hoses (A) and
remove the oil cooler center bolt (B), then remove
the oil cooler (C).
3. Install the oil cooler using a new O-ring (D). Tighten the oil cooler center bolt to 74 N·m (7.5 kgf·m,
54 lbf·ft).
4. Connect the oil cooler bypass hoses.
5. Install the oil filter (see page 8-11). 1. Remove the oil pump (see page 8-16).
2. Remove the baffle plate (see step 8 on page 7-13).
3. Remove the oil jet bolt (A), then remove the oil jet
(B).
4. Carefully install the oil jet, and tighten the oil jet bolt.
5. Install the baffle plate (see step 26 on page 7-28).
6. Install the oil pump (see page 8-21).
08/08/21 14:36:44 61SNR030_080_0013
ProCarManuals.com
DYNOMITE -2009-