Page 2362 of 2893
����
��������
�(�#�'�����#�����
�����
�
�
���������
� �����)���
’08 model with navigation
23-8223-82 Audio System
Audio Unit Removal/Installation
(cont’d)
XM Receiver Removal/Installation
A
A
A B
A
C A
A
B
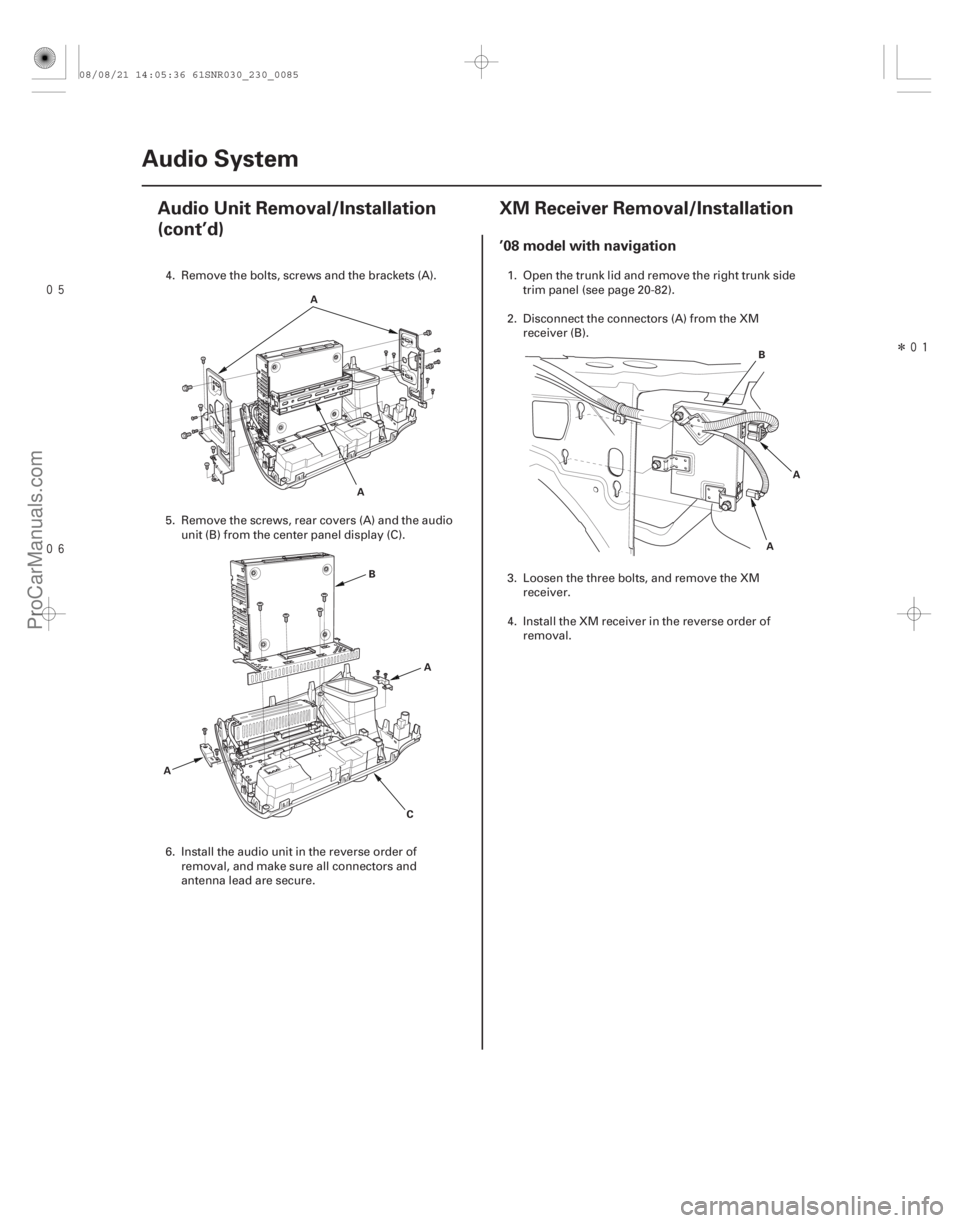
4. Remove the bolts, screws and the brackets (A).
5. Remove the screws, rear covers (A) and the audio
unit (B) from the center panel display (C).
6. Install the audio unit in the reverse order of removal, and make sure all connectors and
antenna lead are secure. 1. Open the trunk lid and remove the right trunk side
trim panel (see page 20-82).
2. Disconnect the connectors (A) from the XM receiver (B).
3. Loosen the three bolts, and remove the XM receiver.
4. Install the XM receiver in the reverse order of removal.
08/08/21 14:05:36 61SNR030_230_0085
ProCarManuals.com
DYNOMITE -2009-
Page 2363 of 2893
����
��������
�(�#�'�����#�����
�����
�
�
���������
� �����)���
’08 model with navigation
23-8223-82 Audio System
Audio Unit Removal/Installation
(cont’d)
XM Receiver Removal/Installation
A
A
A B
A
C A
A
B
4. Remove the bolts, screws and the brackets (A).
5. Remove the screws, rear covers (A) and the audio
unit (B) from the center panel display (C).
6. Install the audio unit in the reverse order of removal, and make sure all connectors and
antenna lead are secure. 1. Open the trunk lid and remove the right trunk side
trim panel (see page 20-82).
2. Disconnect the connectors (A) from the XM receiver (B).
3. Loosen the three bolts, and remove the XM receiver.
4. Install the XM receiver in the reverse order of removal.
08/08/21 14:05:36 61SNR030_230_0085
ProCarManuals.com
DYNOMITE -2009-
Page 2365 of 2893
����
����
����
����
Tweeter
Rear Speaker
23-84Audio System
Speaker Replacement (cont’d)
A
B
A A
A
C
B
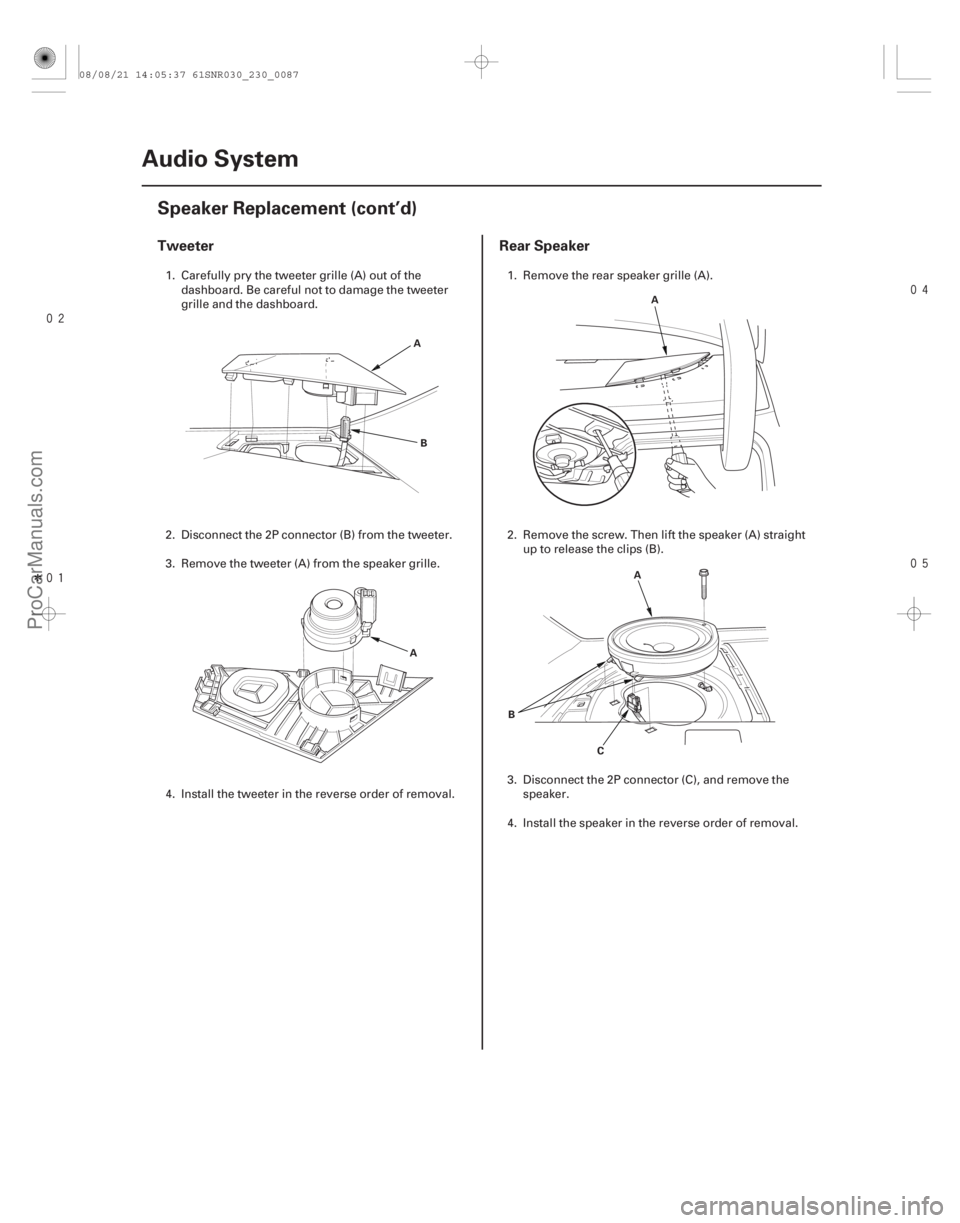
1. Carefully pry the tweeter grille (A) out of the
dashboard. Be careful not to damage the tweeter
grille and the dashboard.
2. Disconnect the 2P connector (B) from the tweeter.
3. Remove the tweeter (A) from the speaker grille.
4. Install the tweeter in the reverse order of removal. 1. Remove the rear speaker grille (A).
2. Remove the screw. Then lift the speaker (A) straight
up to release the clips (B).
3. Disconnect the 2P connector (C), and remove the speaker.
4. Install the speaker in the reverse order of removal.
08/08/21 14:05:37 61SNR030_230_0087
ProCarManuals.com
DYNOMITE -2009-
Page 2366 of 2893
���
���
�(�#�'�����������
�����������
�������
� �����)����
Subwoofer (Type S model) ’07-08 models
23-8523-85
Auxiliary Jack Assembly
Replacement
A
B A
B
1. Remove the rear tray (see page 20-78).
2. Remove the four mounting bolts from the
subwoofer (A).
3. Disconnect the 2P connector (B), and remove the subwoofer.
4. Install the subwoofer in the reverse order of removal. 1. With navigation: Remove the navigation unit
(see page 23-155).
Without navigation: Remove the audio unit
(see page 23-80).
2. Carefully pull out the auxiliary jack assembly (A), then disconnect the 5P connector (B).
3. Install the auxiliary jack assembly in the reverse order of removal.
08/08/21 14:05:38 61SNR030_230_0088
ProCarManuals.com
DYNOMITE -2009-
Page 2367 of 2893
���
���
�(�#�'�����������
�����������
�������
� �����)����
Subwoofer (Type S model) ’07-08 models
23-8523-85
Auxiliary Jack Assembly
Replacement
A
B A
B
1. Remove the rear tray (see page 20-78).
2. Remove the four mounting bolts from the
subwoofer (A).
3. Disconnect the 2P connector (B), and remove the subwoofer.
4. Install the subwoofer in the reverse order of removal. 1. With navigation: Remove the navigation unit
(see page 23-155).
Without navigation: Remove the audio unit
(see page 23-80).
2. Carefully pull out the auxiliary jack assembly (A), then disconnect the 5P connector (B).
3. Install the auxiliary jack assembly in the reverse order of removal.
08/08/21 14:05:38 61SNR030_230_0088
ProCarManuals.com
DYNOMITE -2009-
Page 2368 of 2893
�´
�µ
�Û
�Ý
���
�(�#�'������� ���
�����
�
�
�
���
�����������)���� �(�#�'������� ���
�����
�
�
�
���
����� �����)����Position Resistance
23-8623-86
Audio System
Audio Remote Switch Test
Audio Remote Switch Replacement
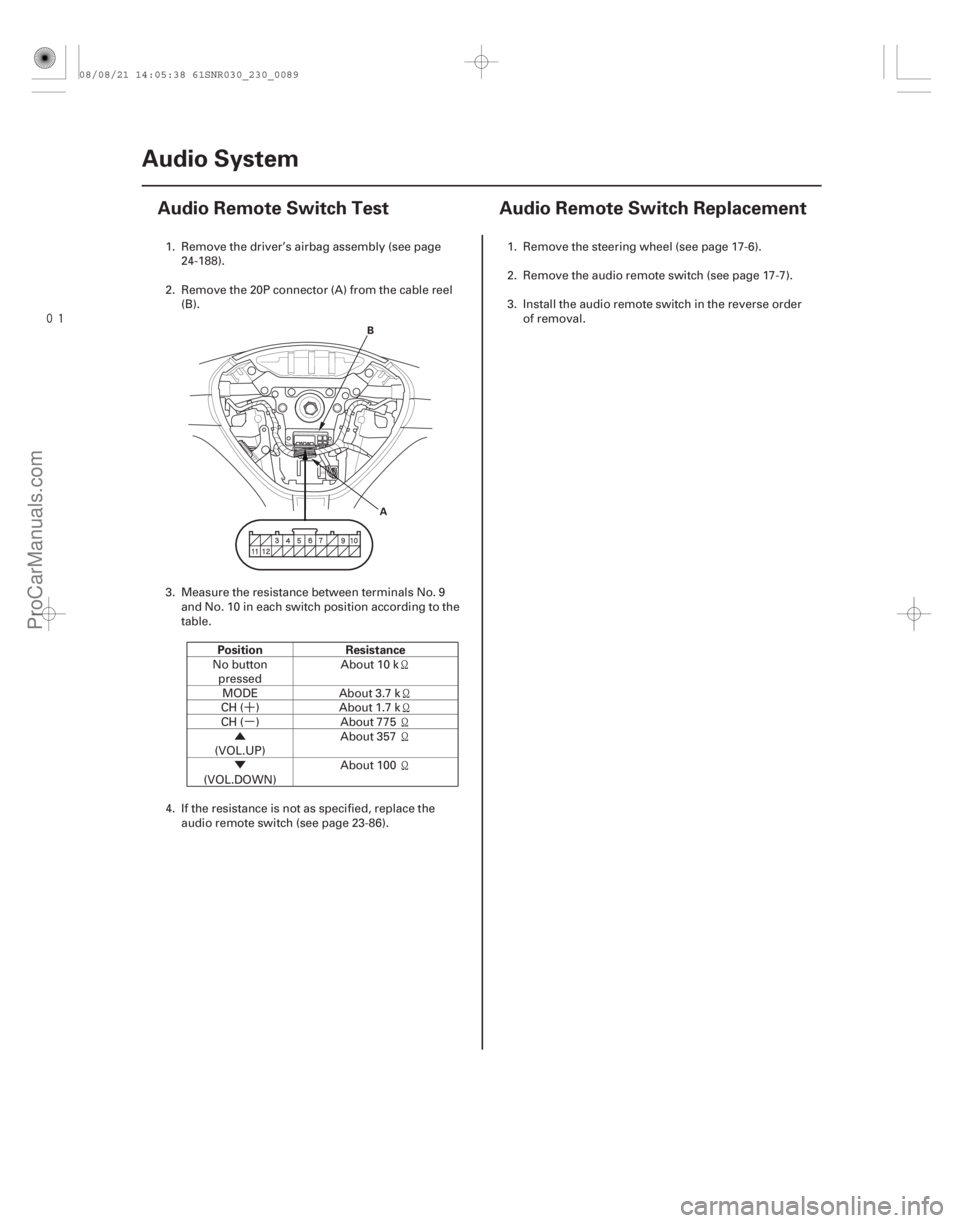
A
B
1. Remove the driver’s airbag assembly (see page
24-188).
2. Remove the 20P connector (A) from the cable reel (B).
3. Measure the resistance between terminals No. 9 andNo.10ineachswitchpositionaccordingtothe
table.
No buttonpressed About 10 k
MODE About 3.7 k
CH ( ) About 1.7 k
CH ( ) About 775
(VOL.UP) About 357
(VOL.DOWN) About 100
4. If the resistance is not as specified, replace the audio remote switch (see page 23-86). 1. Remove the steering wheel (see page 17-6).
2. Remove the audio remote switch (see page 17-7).
3. Install the audio remote switch in the reverse order
of removal.
08/08/21 14:05:38 61SNR030_230_0089
ProCarManuals.com
DYNOMITE -2009-
Page 2370 of 2893
���
�(�#�'�����#�����
�����
�
�����������
� �����)����
’08 model with navigation
23-88Audio System
XM Antenna Replacement
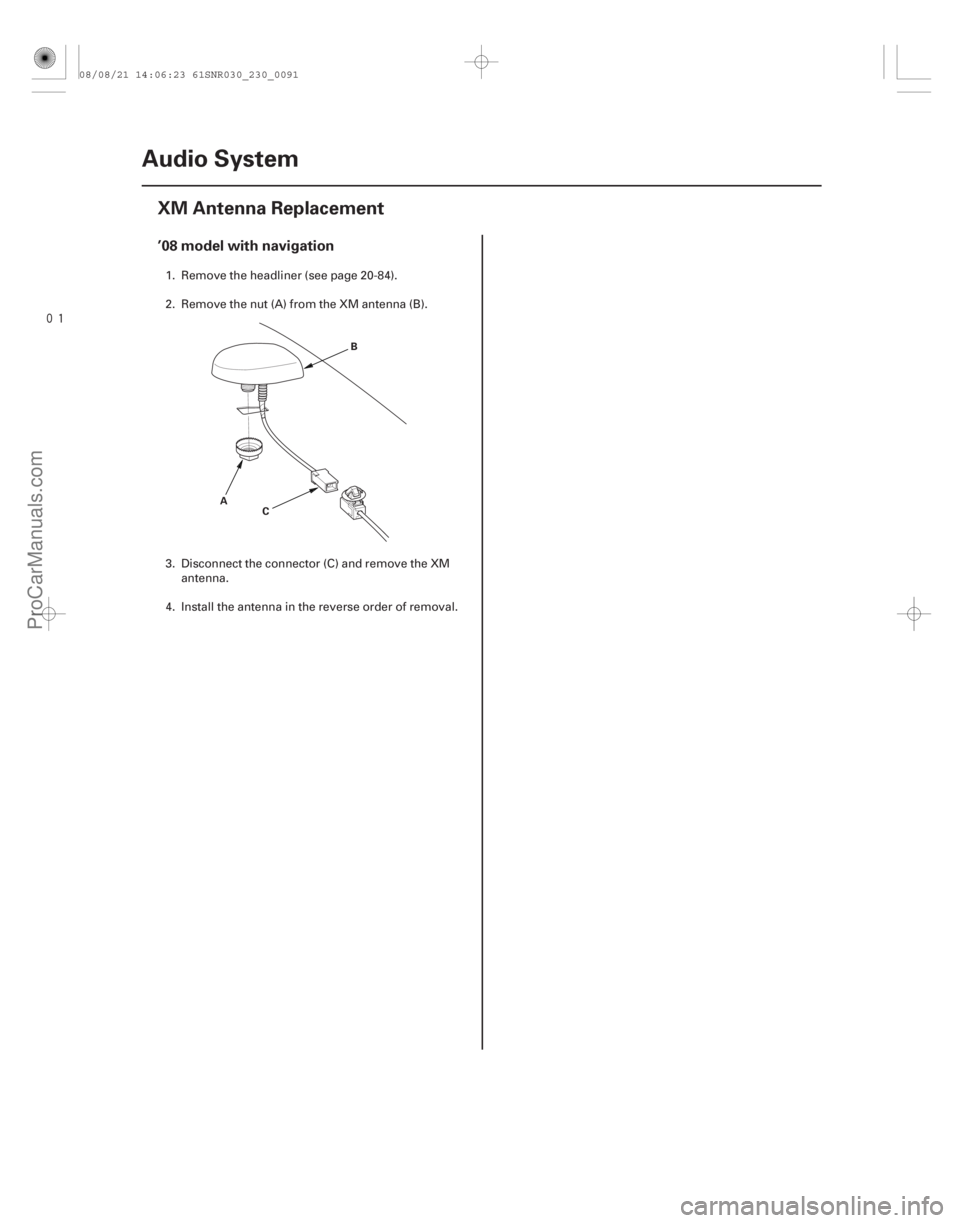
A
B
C
1. Remove the headliner (see page 20-84).
2. Remove the nut (A) from the XM antenna (B).
3. Disconnect the connector (C) and remove the XM antenna.
4. Install the antenna in the reverse order of removal.
08/08/21 14:06:23 61SNR030_230_0091
ProCarManuals.com
DYNOMITE -2009-
Page 2374 of 2893

If you can duplicate the symptom, compare it to a
known-good vehic")
Symptom DuplicationService Precautions
System Initialization
23-92 Navigation System
General Troubleshooting Information (cont’d)
If you can duplicate the symptom, compare it to a
known-good vehicle. Only use a vehicle of the same
model, same year, same trim, and same software
version. If you can duplicate the symptom in the
known-good vehicle, then it is a characteristic of the
system.
When the symptom can be duplicated, follow the self- diagnostic procedures and the appropriate
troubleshooting procedures.
When the symptom does not reappear or only reappears intermittently, ask the client about the
conditions when the symptom occurred.
– Try to establish if outside interference may be the cause.
– Try to duplicate the symptom under the same conditions the client experienced.
– Vibration, temperature extremes, and moisture (dew, humidity) are factors that are difficult to
duplicate.
– Inspect the vehicle for aftermarket electronic devices (vehicle locators, radar detector amps, etc.)
that may be hidden.
When troubleshooting navigation system problems,
ensure that the known-good vehicle is the same
software version year and model as the vehicle being
serviced. Mixing incompatible navigation DVDs or
other system components can delay the
troubleshooting process by creating effects unrelated to
the original problem. If you need to replace the navigation unit, inform the
customer that personal information in the navigation
system may be lost. If possible, have the client record
their personal information before the unit is replaced
On ’07-08 models you can back-up the navigation
data and transfer it to a new navigation unit. See save
users memory (see page 23-150).
Before disconnecting the battery, make sure you have the anti-theft codes for the audio and the
navigation system, and write down the audio presets.
Also obtain any PGM-FI or transmission DTCs and
freeze frame date (which are lost when the ECM/PCM
loses power).
When the battery is disconnected, the internal GPS clock is reset to 0:00. The clock will reset to the
correct time after the system finishes GPS
initialization.
After reconnecting the battery, you have to wait to get the initial signal from the satellite. It will take from 10
to 45 minutes.
Before returning the vehicle to the client, enter the audio and navigation anti-theft security code, then
enter the audio presets.
Adjust the setup clock settings (time zone and daylight savings) in the navigation system.
If the navigation system loses power (like the battery
was disconnected), the navigation system requires
initialization. Once completed, your system is ready to
use.
This initialization requires the following: Entering the 4-digit anti-theft security code to unlock the system
GPS initialization (may not be needed depending of the length of time the system was without power)
Map matching to align the GPS to a location on the map
08/08/21 14:06:25 61SNR030_230_0095
ProCarManuals.com
DYNOMITE -2009-