Page 115 of 687

Downloaded from www.Manualslib.com manuals search engine 3-6 STEERING, SUSPENSION, WHEELS AND TIRES
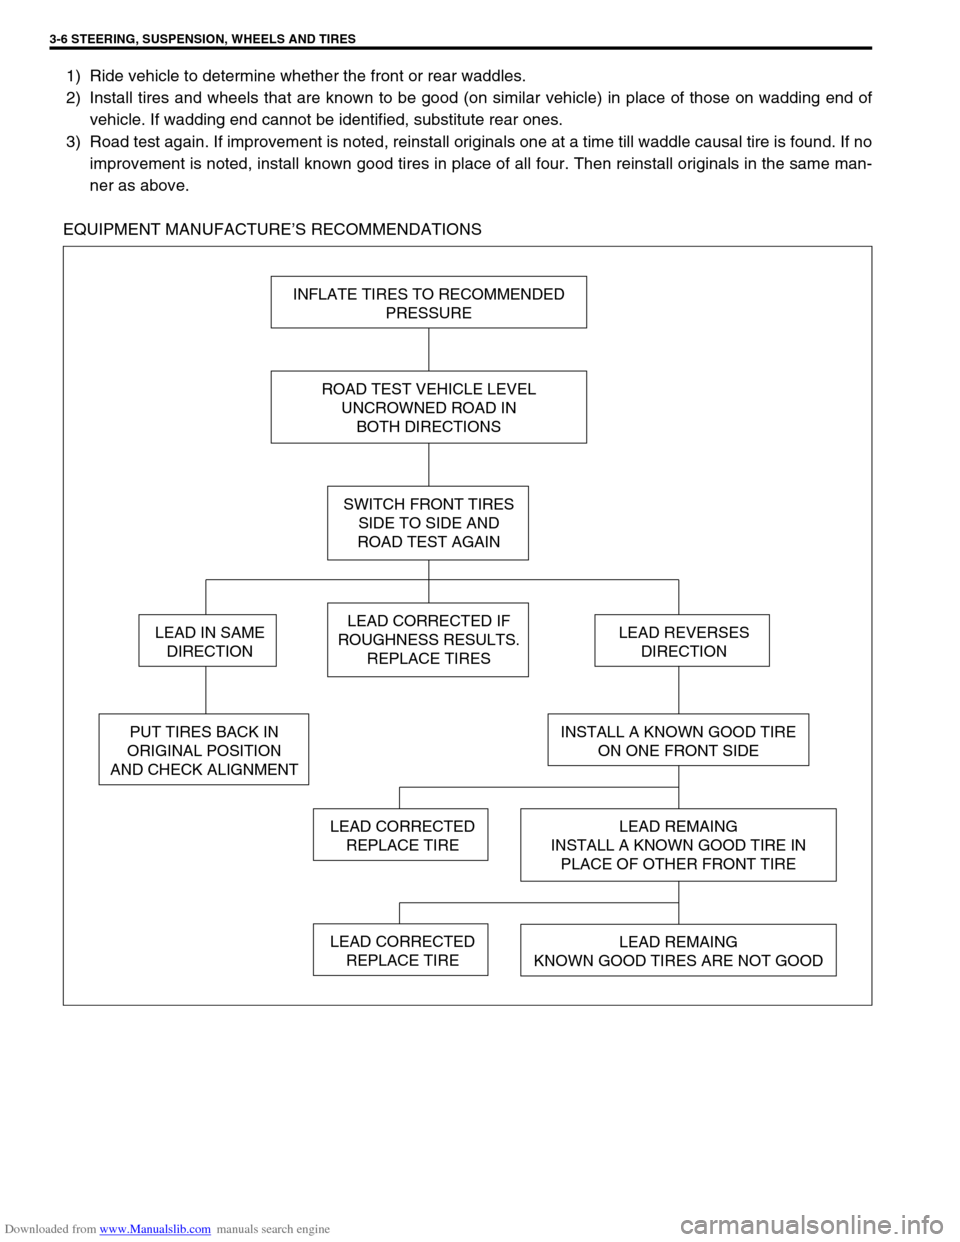
1) Ride vehicle to determine whether the front or rear waddles.
2) Install tires and wheels that are known to be good (on similar vehicle) in place of those on wadding end of
vehicle. If wadding end cannot be identified, substitute rear ones.
3) Road test again. If improvement is noted, reinstall originals one at a time till waddle causal tire is found. If no
improvement is noted, install known good tires in place of all four. Then reinstall originals in the same man-
ner as above.
EQUIPMENT MANUFACTURE’S RECOMMENDATIONS
INFLATE TIRES TO RECOMMENDED
PRESSURE
ROAD TEST VEHICLE LEVEL
UNCROWNED ROAD IN
BOTH DIRECTIONS
SWITCH FRONT TIRES
SIDE TO SIDE AND
ROAD TEST AGAIN
LEAD CORRECTED IF
ROUGHNESS RESULTS.
REPLACE TIRES
INSTALL A KNOWN GOOD TIRE
ON ONE FRONT SIDE
LEAD REMAING
INSTALL A KNOWN GOOD TIRE IN
PLACE OF OTHER FRONT TIRE
LEAD REMAING
KNOWN GOOD TIRES ARE NOT GOOD
LEAD CORRECTED
REPLACE TIRE
LEAD REVERSES
DIRECTION
PUT TIRES BACK IN
ORIGINAL POSITION
AND CHECK ALIGNMENT
LEAD IN SAME
DIRECTION
LEAD CORRECTED
REPLACE TIRE
Page 116 of 687

Downloaded from www.Manualslib.com manuals search engine STEERING, SUSPENSION, WHEELS AND TIRES 3-7
Radial Tire Lead
“Lead” is the deviation of the vehicle from a straight path on a level rod even with no pressure on the steering
wheel.
Lead is usually caused by:
1) Incorrect alignment.
2) Uneven brake adjustment.
3) Tire construction.
The way in which a tire is built can produce lead in a vehicle. An example of this is placement of the belt. Off
center belts on radial tires can cause the tire to develop a side force while rolling straight down the road. If one
side of the tire has a little larger diameter than the other, the tire will tend to roll to one side. This will develop a
side force which can produce vehicle lead.
The procedure in above figure (Lead Diagnosis) should be used to make sure that front alignment is not mis-
taken for tire lead.
1) Part of the lead diagnosis procedure is different from the proper tire rotation pattern currently in the owner
and service manuals. If a medium to high mileage tire is moved to the other side of the vehicle, be sure to
check that ride roughness has not developed.
2) Rear tires will not cause lead.
Vibration Diagnosis
Wheel unbalance causes most of the highway speed vibration problems. If a vibration remains after dynamic
balancing, its possible causes are as follows.
1) Tire runout.
2) Wheel runout.
3) Tire stiffness variation.
Measuring tire and/or wheel free runout will uncover only part of the problem. All three causes, known as loaded
radial runout, must be checked by using a Tire Problem Detector (TPD). If TPD is not available, alternative
method of substituting known good tire and wheel assemblies on the problem vehicle can be used, although it
takes a longer time.
[A] : Tire out of round 1. Smooth road
[B] : Tire stiffness variation 2. Suspension movement (loaded runout)
[C] : Rim bent or out of round
Page 118 of 687
Downloaded from www.Manualslib.com manuals search engine FRONT WHEEL ALIGNMENT 3A-1
6F1
6F2
6G
6H
7A
3A
7B1
7C1
7D
7C1
7D
7E
7F
8A
8B
8C
8D
8E
9
10
10A
10B
SECTION 3A
FRONT WHEEL ALIGNMENT
CONTENTS
General Description ........................................3A-2
Toe Setting .................................................... 3A-2
Camber ......................................................... 3A-2
Alignment Service Data (Reference) ............. 3A-2
Diagnosis .........................................................3A-3
Diagnosis Table ............................................ 3A-3
Preliminary Checks Prior To Adjusting Front
Wheel Alignment ........................................... 3A-3Toe Adjustment ............................................. 3A-3
Camber And Caster Check And
Adjustment .................................................... 3A-4
Steering Angle Check And Adjustment ......... 3A-4
Side Slip(Reference) ..................................... 3A-4
Page 119 of 687

Downloaded from www.Manualslib.com manuals search engine 3A-2 FRONT WHEEL ALIGNMENT
General Description
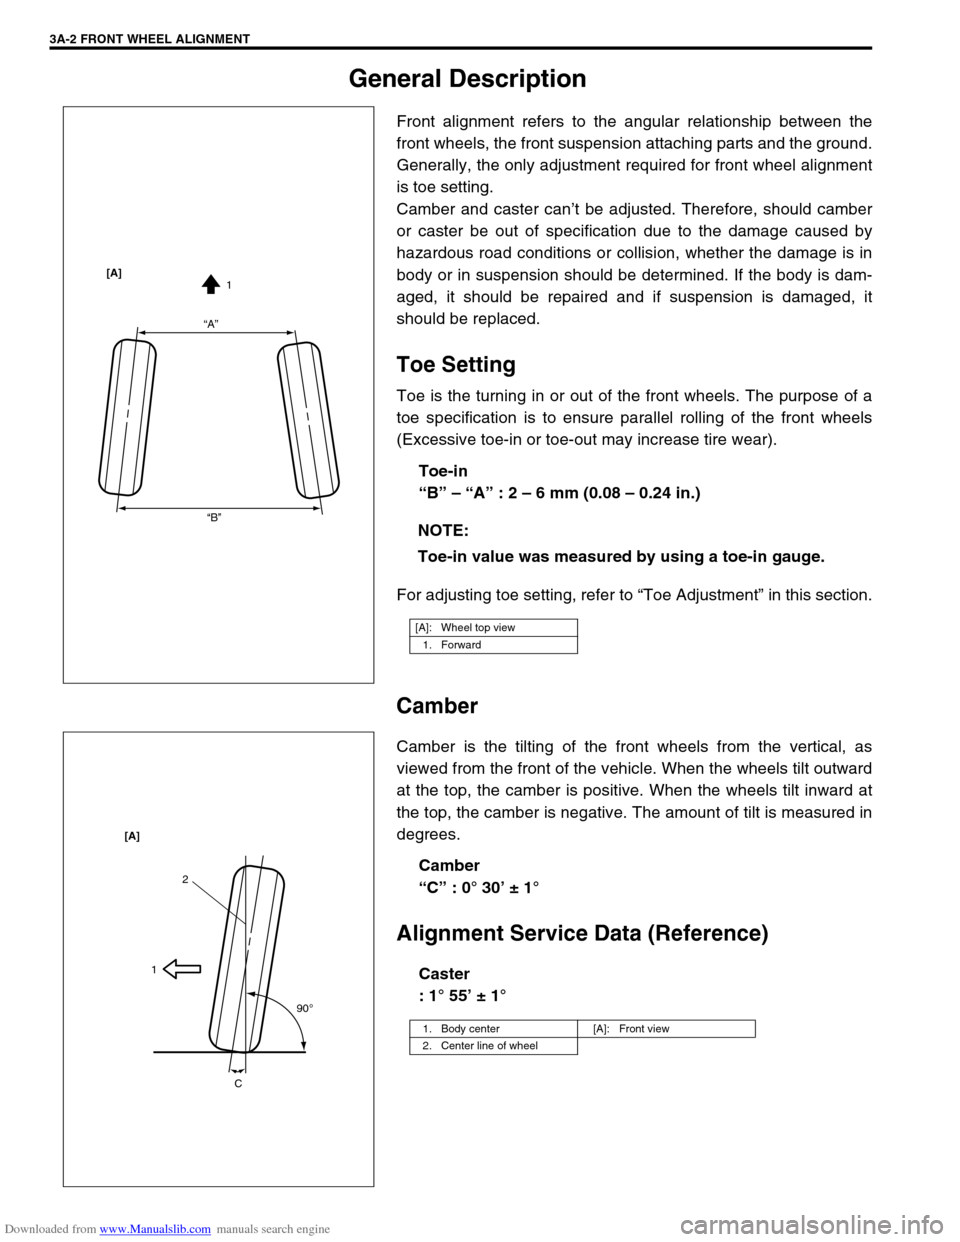
Front alignment refers to the angular relationship between the
front wheels, the front suspension attaching parts and the ground.
Generally, the only adjustment required for front wheel alignment
is toe setting.
Camber and caster can’t be adjusted. Therefore, should camber
or caster be out of specification due to the damage caused by
hazardous road conditions or collision, whether the damage is in
body or in suspension should be determined. If the body is dam-
aged, it should be repaired and if suspension is damaged, it
should be replaced.
Toe Setting
Toe is the turning in or out of the front wheels. The purpose of a
toe specification is to ensure parallel rolling of the front wheels
(Excessive toe-in or toe-out may increase tire wear).
Toe-in
“B” – “A” : 2 – 6 mm (0.08 – 0.24 in.)
For adjusting toe setting, refer to “Toe Adjustment” in this section.
Camber
Camber is the tilting of the front wheels from the vertical, as
viewed from the front of the vehicle. When the wheels tilt outward
at the top, the camber is positive. When the wheels tilt inward at
the top, the camber is negative. The amount of tilt is measured in
degrees.
Camber
“C” : 0° 30’ ± 1°
Alignment Service Data (Reference)
Caster
: 1° 55’ ± 1° NOTE:
Toe-in value was measured by using a toe-in gauge.
[A]: Wheel top view
1. Forward
“A”
“B”1 [A]
1. Body center [A]: Front view
2. Center line of wheel
2
1
90
o
C [A]
Page 120 of 687

Downloaded from www.Manualslib.com manuals search engine FRONT WHEEL ALIGNMENT 3A-3
Diagnosis
Diagnosis Table
For the details, refer to “Diagnosis Table” in Section 3.
Preliminary Checks Prior To Adjusting Front Wheel Alignment
Steering and vibration complaints are not always the result of improper alignment. An additional item to be
checked is the possibility of tire lead due to worn or improperly manufactured tires. “Lead” is the deviation of the
vehicle from a straight path on a level road without hand pressure on the steering wheel. Section 3 of this man-
ual contains a procedure for determining the presence of a tire lead problem. Before making any adjustment
affecting toe setting, the following checks and inspections should be made to ensure correctness of alignment
readings and alignment adjustments:
1) Check all tires for proper inflation pressures and approximately the same tread wear.
2) Check for loose of king pin bearings. Check tie rod ends; if excessive looseness is noted, it must be cor-
rected before adjusting.
3) Check for run-out of wheels and tires.
4) Check vehicle trim heights; if out of limits and a correction is to be made, it must be made before adjusting
toe.
5) Check for loose of suspension arms.
6) Check for loose or missing stabilizer bar attachments.
7) Consideration must be given to excess loads, such as tool boxes. If this excess load is normally carried in
vehicle, it should remain in vehicle during alignment checks.
8) Consider condition of equipment being used to check alignment and follow manufacturer's instructions.
9) Regardless of equipment used to check alignment, vehicle must be on a level surface both fore and aft and
transversely.
Toe Adjustment
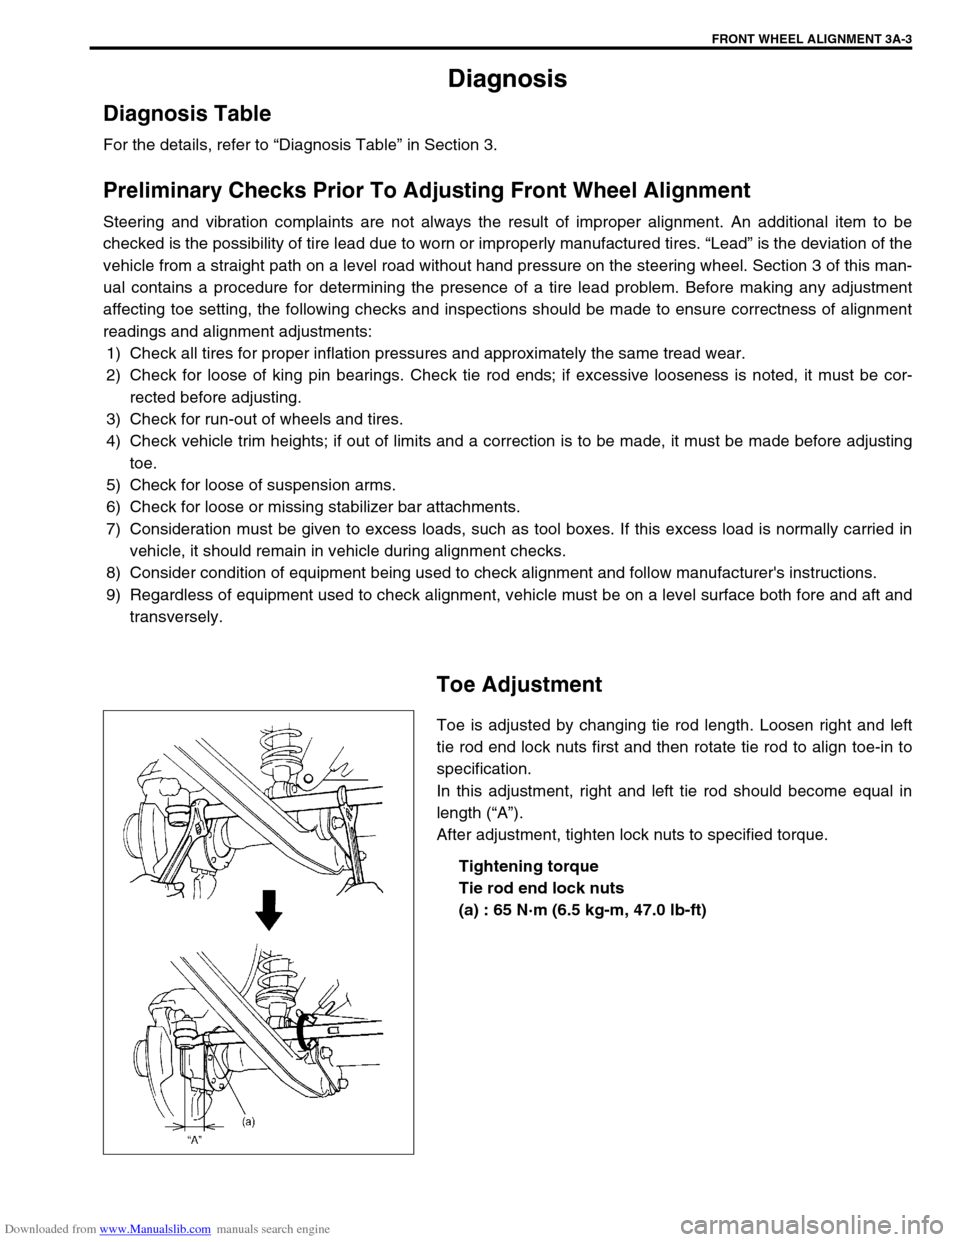
Toe is adjusted by changing tie rod length. Loosen right and left
tie rod end lock nuts first and then rotate tie rod to align toe-in to
specification.
In this adjustment, right and left tie rod should become equal in
length (“A”).
After adjustment, tighten lock nuts to specified torque.
Tightening torque
Tie rod end lock nuts
(a) : 65 N·m (6.5 kg-m, 47.0 lb-ft)
Page 121 of 687

Downloaded from www.Manualslib.com manuals search engine 3A-4 FRONT WHEEL ALIGNMENT
Camber And Caster Check And Adjustment
Should camber or caster be found out of specifications upon
inspection, locate its cause first. If it is in damaged, loose, bent,
dented or worn suspension parts and axle housing, they should
be replaced. If it is in vehicle body, repair it so as to attain specifi-
cations.
Steering Angle Check And Adjustment
When tie rod (2) or tie rod end (3) was replaced, check toe and
then also steering angle with turning radius gauge (1).
If steering angle is not correct, check if right and left tie rods are
equal in length “A”.
Steering angle
Inside : 35° ± 3°
Outside : 32° ± 3°
Side Slip(Reference)
For inspecting front wheel side slip with side slip tester:
If side slip exceeds limit, toe or front wheel alignment may out not
be correct.
Side slip limit
: Less than 3 mm/m (Less than 0.118 in/3 ft) NOTE:
To prevent possible incorrect reading of camber or
caster, vehicle front end must be moved up and down a
few times before inspection.
NOTE:
If tie rod lengths were changed to adjust steering angle,
reinspect toe-in.
Page 125 of 687
Downloaded from www.Manualslib.com manuals search engine 3B-4 STEERING GEAR BOX (MANUAL TYPE) AND LINKAGE
Steering Gear Box Oil Level Check
Oil surface should be up to the level as shown in figure. If not, add
prescribed gear oil, SAE 90.
Steering gear box oil level
“a” : 23 mm (0.91 in.)
Apply sealant to thread parts of breathing plug and tighten breath-
ing plug to specified torque.
(A) : Sealant 99000-31110
Tightening torque
Breathing plug
(a) : 4 N·m (0.4 kg-m, 3.0 lb-ft)
Adjustment of Worm Shaft Starting Torque
Steering gear box has adjusting bolt (1) which gives preload to
sector shaft.
Special tool
(A) : 09944-18211
MAKE ADJUSTMENT ACCORDING TO FOLLOWING PRO-
CEDURE.
1) Check worm shaft (1) to ensure that it is free from thrust
play.
2) Position pitman arm (2) in nearly parallel with worm shaft (1)
as shown. (With pitman arm (2) in this position, front wheels
are in straightforward state.)
Page 130 of 687

Downloaded from www.Manualslib.com manuals search engine STEERING GEAR BOX (MANUAL TYPE) AND LINKAGE 3B-9
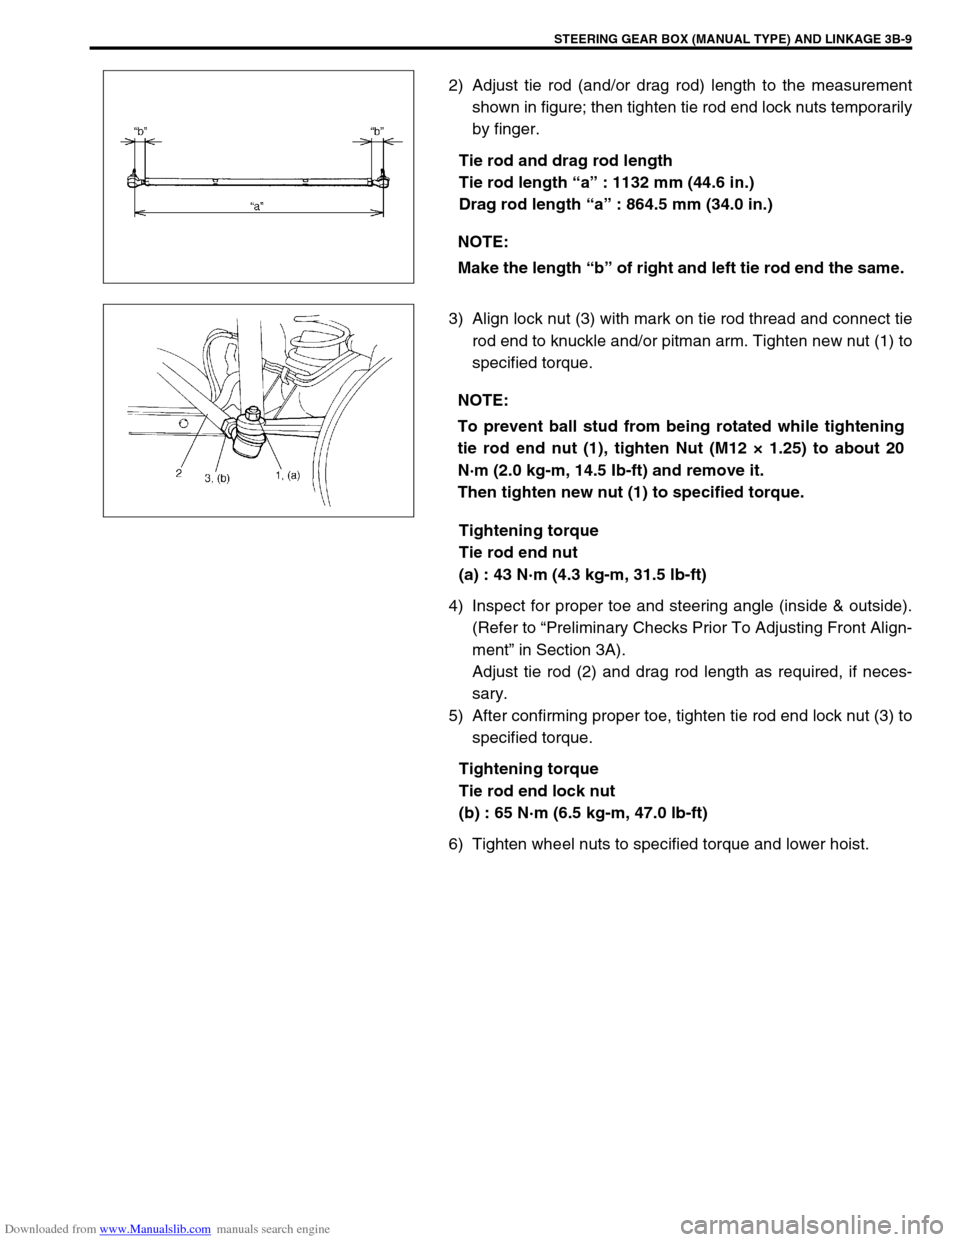
2) Adjust tie rod (and/or drag rod) length to the measurement
shown in figure; then tighten tie rod end lock nuts temporarily
by finger.
Tie rod and drag rod length
Tie rod length “a” : 1132 mm (44.6 in.)
Drag rod length “a” : 864.5 mm (34.0 in.)
3) Align lock nut (3) with mark on tie rod thread and connect tie
rod end to knuckle and/or pitman arm. Tighten new nut (1) to
specified torque.
Tightening torque
Tie rod end nut
(a) : 43 N·m (4.3 kg-m, 31.5 lb-ft)
4) Inspect for proper toe and steering angle (inside & outside).
(Refer to “Preliminary Checks Prior To Adjusting Front Align-
ment” in Section 3A).
Adjust tie rod (2) and drag rod length as required, if neces-
sary.
5) After confirming proper toe, tighten tie rod end lock nut (3) to
specified torque.
Tightening torque
Tie rod end lock nut
(b) : 65 N·m (6.5 kg-m, 47.0 lb-ft)
6) Tighten wheel nuts to specified torque and lower hoist.NOTE:
Make the length “b” of right and left tie rod end the same.
NOTE:
To prevent ball stud from being rotated while tightening
tie rod end nut (1), tighten Nut (M12 × 1.25) to about 20
N·m (2.0 kg-m, 14.5 Ib-ft) and remove it.
Then tighten new nut (1) to specified torque.