Page 500 of 687

Downloaded from www.Manualslib.com manuals search engine ENGINE MECHANICAL (M13 ENGINE) 6A1-19
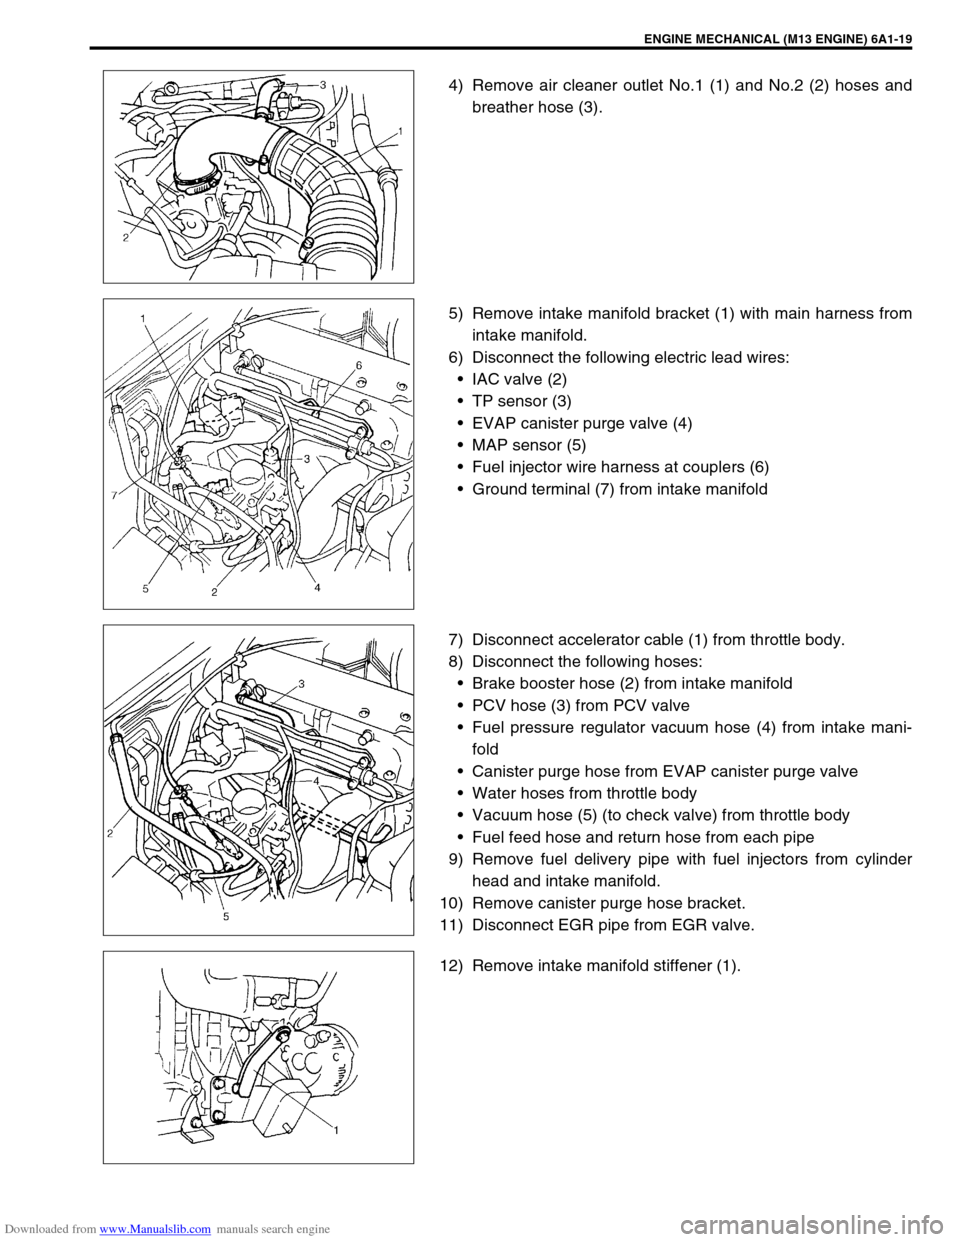
4) Remove air cleaner outlet No.1 (1) and No.2 (2) hoses and
breather hose (3).
5) Remove intake manifold bracket (1) with main harness from
intake manifold.
6) Disconnect the following electric lead wires:
IAC valve (2)
TP sensor (3)
EVAP canister purge valve (4)
MAP sensor (5)
Fuel injector wire harness at couplers (6)
Ground terminal (7) from intake manifold
7) Disconnect accelerator cable (1) from throttle body.
8) Disconnect the following hoses:
Brake booster hose (2) from intake manifold
PCV hose (3) from PCV valve
Fuel pressure regulator vacuum hose (4) from intake mani-
fold
Canister purge hose from EVAP canister purge valve
Water hoses from throttle body
Vacuum hose (5) (to check valve) from throttle body
Fuel feed hose and return hose from each pipe
9) Remove fuel delivery pipe with fuel injectors from cylinder
head and intake manifold.
10) Remove canister purge hose bracket.
11) Disconnect EGR pipe from EGR valve.
12) Remove intake manifold stiffener (1).
Page 501 of 687
Downloaded from www.Manualslib.com manuals search engine 6A1-20 ENGINE MECHANICAL (M13 ENGINE)
13) Remove intake manifold (1) with throttle body (2) and EGR
pipe (3) from cylinder head (4), and then its gasket.
INSTALLATION
Reverse removal procedure for installation noting the followings.
Use new intake manifold gasket and EGR pipe gasket.
Tighten long bolt (1), short bolt (3) and nuts (2) to specified
torque.
Tightening torque
Intake manifold bolts and nuts
(a) : 25 N·m (2.5 kg-m, 18.0 lb-ft)
Check to ensure that all removed parts are back in place.
Reinstall any necessary parts which have not been rein-
stalled.
Adjust accelerator cable play referring to “Accelerator Cable
Adjustment” in Section 6E.
Refill cooling system referring to “Cooling System Flush and
Refill” in Section 6B.
Upon completion of installation, turn ignition switch ON but
engine OFF and check for fuel leaks.
Finally, start engine and check for engine coolant leaks.
Page 502 of 687
Downloaded from www.Manualslib.com manuals search engine ENGINE MECHANICAL (M13 ENGINE) 6A1-21
Exhaust Manifold
REMOVAL
1) Disconnect negative cable at battery.
2) Disconnect heated oxygen sensor coupler (1) (if equipped)
and detach it from its stay.
3) Remove exhaust manifold cover (2).
4) Remove exhaust manifold stiffener (1).
1. Exhaust manifold 4. Exhaust manifold cover Tightening torque
2. Exhaust manifold gasket 5. Engine hook Do not reuse.
3. Heated oxygen sensor (if equipped) 6. Exhaust manifold mounting nut
WARNING:
To avoid danger of being burned, do not service exhaust
system while it is still hot. Service should be performed
after system cools down.
Page 503 of 687
Downloaded from www.Manualslib.com manuals search engine 6A1-22 ENGINE MECHANICAL (M13 ENGINE)
5) Disconnect exhaust pipe (1) from exhaust manifold.
6) Remove exhaust manifold (1) and its gasket from cylinder
head.
INSTALLATION
1) Install new gasket to cylinder head.
Then install exhaust manifold.
Tighten manifold nuts to specified torque.
Tightening torque
Exhaust manifold nuts (a) : 55 N·m (5.5 kg-m, 40.0 lb-ft)
2) Install seal ring and install exhaust pipe (1) to exhaust mani-
fold.
Before installing seal ring, check it for deterioration or dam-
age, and replace as necessary.
Tighten pipe fasteners to specified torque.
Tightening torque
Exhaust pipe bolts (a) : 50 N·m (5.0 kg-m, 36.5 lb-ft)
Page 504 of 687
Downloaded from www.Manualslib.com manuals search engine ENGINE MECHANICAL (M13 ENGINE) 6A1-23
3) Install exhaust manifold stiffener (1).
Tighten exhaust manifold stiffener bolts to specified torque.
Tightening torque
Exhaust manifold stiffener bolts
(a) : 50 N·m (5.0 kg-m, 36.5 lb-ft)
4) Install exhaust manifold cover (1).
5) Connect heated oxygen sensor coupler (2) and fit coupler to
bracket securely (if equipped).
6) Connect negative cable at battery.
7) Check exhaust system for exhaust gas leakage.
Page 505 of 687
Downloaded from www.Manualslib.com manuals search engine 6A1-24 ENGINE MECHANICAL (M13 ENGINE)
Oil Pan and Oil Pump Strainer
REMOVAL
1) Remove oil level gauge.
2) Remove air cleaner outlet No.1 (1) and No.2 (2) hoses and
breather hose (3).
3) To facilitate and ensure removal of oil pan, increase clear-
ance between engine and vehicle body according to the fol-
lowing procedure.
a) Install support device (1).
b) Loosen engine mounting bracket bolts (2), but do not
remove them.
c) Hoist engine 10 – 15 mm (0.4 – 0.6 in.).
[A] : Sealant application amount 3. O-ring 8. Oil pan nut
“a” : 3 mm (0.12 in.) 4. Gasket 9. Oil pan bolt
“b” : 2 mm (0.08 in.) 5. Drain plug Tightening torque
1. Oil pan
: Apply sealant 99000-31150 to mating surface.6. Strainer bolt Do not reuse.
2. Strainer 7. Bracket bolt
CAUTION:
Do not hoist engine more than instructed above. That
may cause trouble to engine or transmission.
Page 506 of 687
Downloaded from www.Manualslib.com manuals search engine ENGINE MECHANICAL (M13 ENGINE) 6A1-25
4) Drain engine oil by removing drain plug.
5) Remove clutch housing (torque converter housing for A/T
vehicle) lower plate (1).
6) Remove oil pan and then oil pump strainer (1) from cylinder
block.
CLEAN
Inside of oil pan and oil pump strainer screen.
Clean sealing surface on oil pan and cylinder block.
Remove oil, old sealant and dust from sealing surface.
Page 507 of 687

Downloaded from www.Manualslib.com manuals search engine 6A1-26 ENGINE MECHANICAL (M13 ENGINE)
INSTALLATION
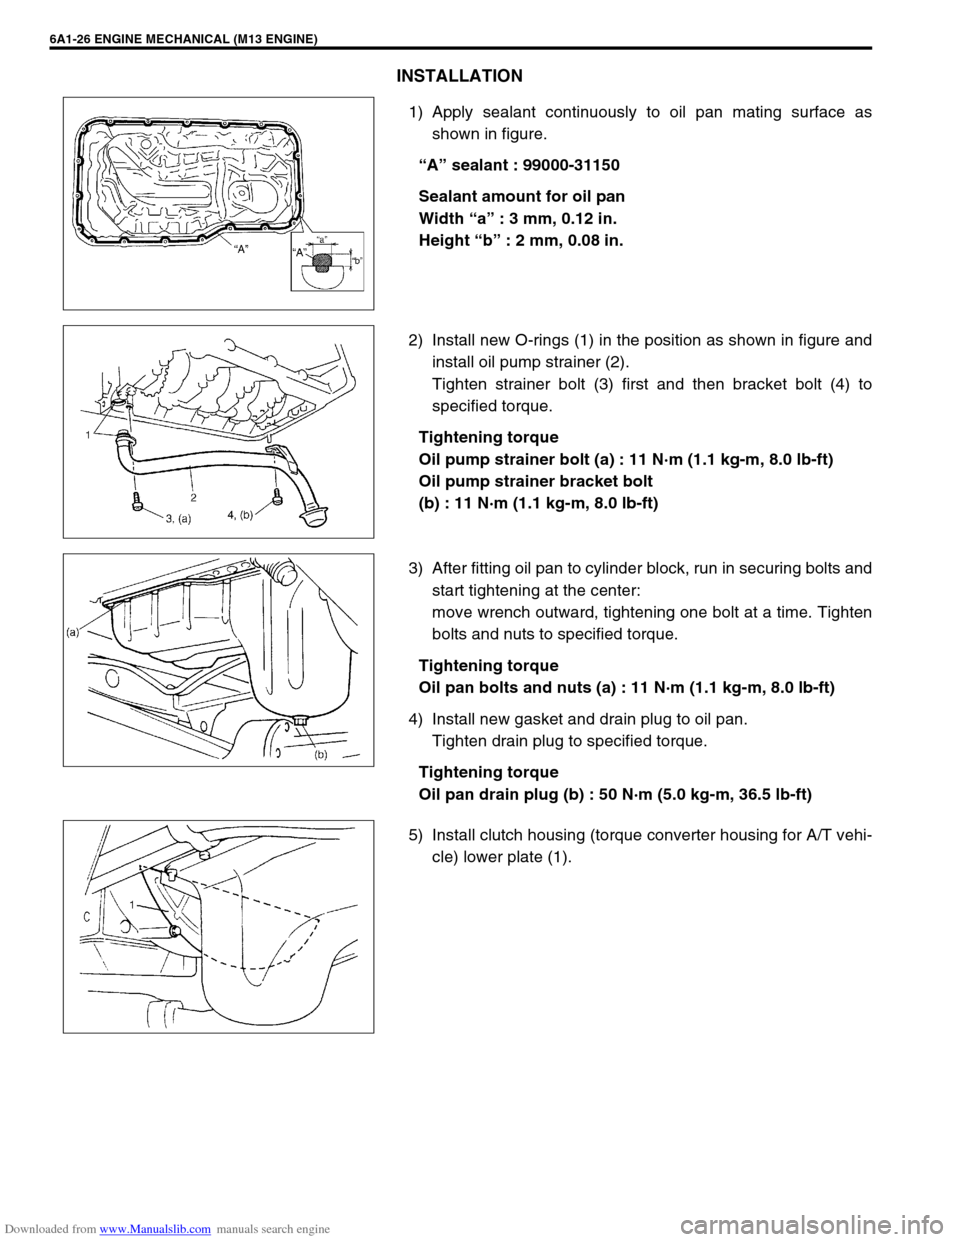
1) Apply sealant continuously to oil pan mating surface as
shown in figure.
“A” sealant : 99000-31150
Sealant amount for oil pan
Width “a” : 3 mm, 0.12 in.
Height “b” : 2 mm, 0.08 in.
2) Install new O-rings (1) in the position as shown in figure and
install oil pump strainer (2).
Tighten strainer bolt (3) first and then bracket bolt (4) to
specified torque.
Tightening torque
Oil pump strainer bolt (a) : 11 N·m (1.1 kg-m, 8.0 lb-ft)
Oil pump strainer bracket bolt
(b) : 11 N·m (1.1 kg-m, 8.0 lb-ft)
3) After fitting oil pan to cylinder block, run in securing bolts and
start tightening at the center:
move wrench outward, tightening one bolt at a time. Tighten
bolts and nuts to specified torque.
Tightening torque
Oil pan bolts and nuts (a) : 11 N·m (1.1 kg-m, 8.0 lb-ft)
4) Install new gasket and drain plug to oil pan.
Tighten drain plug to specified torque.
Tightening torque
Oil pan drain plug (b) : 50 N·m (5.0 kg-m, 36.5 lb-ft)
5) Install clutch housing (torque converter housing for A/T vehi-
cle) lower plate (1).