Page 25 of 250
Downloaded from www.Manualslib.com manuals search engine
1
1
NU761_2_G1-FRA.qxd 10/11/05 15:53 Page 1.15
1.15
Any work or modification
to the engine immobiliser
(electronic units, wiring,
etc.) may be dangerous. It
must be carried out by a qualified
RENAULT technician.
ENGINE IMMOBILISER
This prevents the vehicle being
driven by anyone not in possession
of the vehicle’s RENAULT card.
The vehicle is automatically
protected a few seconds after the
engine is switched off.
Operating principle
When the engine is started, warning
light 1remains on for a few seconds
and then goes out (refer to the
information on starting the engine in
Section 2).
If the code is not recognised, the
card reader flashes rapidly and the
vehicle cannot be started.
Indicator lights
Vehicle protection indicator light
After the ignition has been switched
off, indicator light 1will flash and
the vehicle is protected.
NU761_2_G1-ENG.qxp 1/6/2006 12:23 PM Page 1.15 (Black plate)
Page 26 of 250
Downloaded from www.Manualslib.com manuals search engine
2
1
NU761_2_G1-FRA.qxd 10/11/05 15:53 Page 1.16
1.16
ENGINE IMMOBILISER (continued)
If the RENAULT card is faulty (card
reader flashing rapidly), if possible
use the second RENAULT card
(supplied with the vehicle).
In this situation, it is essential to
contact a RENAULT Dealer who is
the only one qualified to repair the
engine immobiliser system.
If there is interference and/or the
hands-free RENAULT card is not
recognised, insert it into the card
reader 2.
Operating fault warning light
After attempting to start the engine,
if the warning light continues to
flash or remains on continuously,
this indicates that there is a system
operating fault.
NU761_2_G1-ENG.qxp 1/6/2006 12:23 PM Page 1.16 (Black plate)
Page 27 of 250

Downloaded from www.Manualslib.com manuals search engine
A
2
1
NU761_2_G1-FRA.qxd 10/11/05 15:53 Page 1.17
1.17
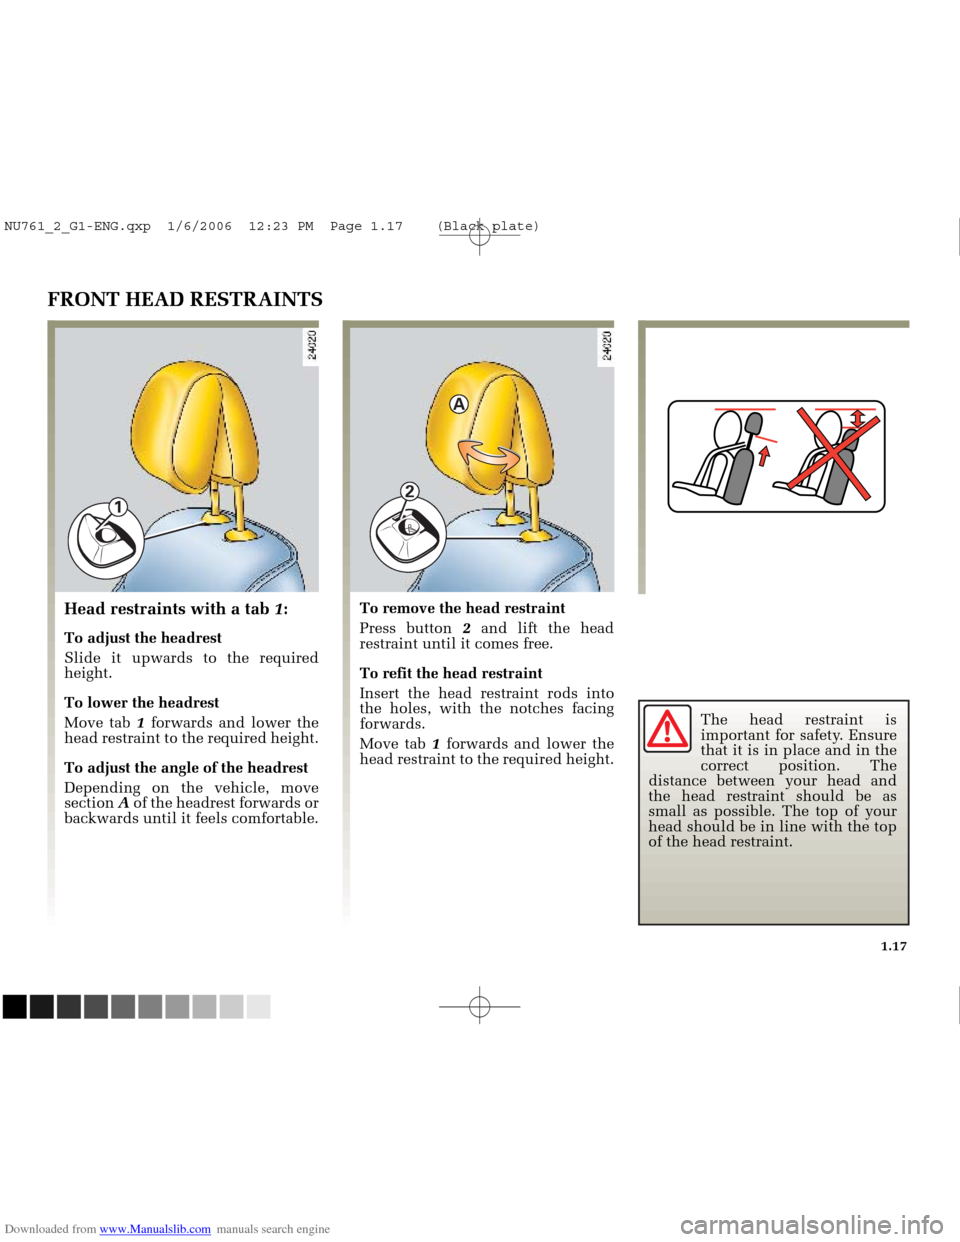
The head restraint is
important for safety. Ensure
that it is in place and in the
correct position. The
distance between your head and
the head restraint should be as
small as possible. The top of your
head should be in line with the top
of the head restraint.
FRONT HEAD RESTRAINTS
To remove the head restraint
Press button 2and lift the head
restraint until it comes free.
To refit the head restraint
Insert the head restraint rods into
the holes, with the notches facing
forwards.
Move tab 1 forwards and lower the
head restraint to the required height.Head restraints with a tab 1:
To adjust the headrest
Slide it upwards to the required
height.
To lower the headrest
Move tab 1 forwards and lower the
head restraint to the required height.
To adjust the angle of the headrest
Depending on the vehicle, move
section Aof the headrest forwards or
backwards until it feels comfortable.
NU761_2_G1-ENG.qxp 1/6/2006 12:23 PM Page 1.17 (Black plate)
Page 28 of 250
Downloaded from www.Manualslib.com manuals search engine
1
NU761_2_G1-FRA.qxd 10/11/05 15:53 Page 1.18
1.18
The head restraint is a
safety component, check
that it is fitted and in the
correct position.
REAR HEAD RESTRAINTS
Position for use
Fit the head restraint as far as it will
go, then, while keeping the head
restraint pulled towards you, lower
it until it locks into place.
The head restraint does not lower
fully. To do this, press tab 1 and
push the head restraint
simultaneously.
To remove it
Press tab 1and then remove the
head restraint completely.
To refit the head restraint
Insert the rods into the holes, press
tab 1and lower the head restraint.
Storage position
Press tab 1and lower the head
restraint completely.
When the headrest is set at the
lowest position, this is for storage
only. It must not be used in this
position when a seat is occupied.
NU761_2_G1-ENG.qxp 1/6/2006 12:23 PM Page 1.18 (Black plate)
Page 29 of 250

Downloaded from www.Manualslib.com manuals search engine
1
3
4
2
NU761_2_G1-FRA.qxd 10/11/05 15:53 Page 1.19
1.19
To avoid hindering the
efficient operation of the
seat belts, you are advised
to keep the seat belt on your
shoulder.
Make sure that the seatback is
locked in place correctly.
No objects should be placed on the
floor (area in front of driver) as
these objects could slide under the
pedal during braking manoeuvres,
thus obstructing its use.
For safety reasons, make
these adjustments only
when the vehicle is
stationary.
FRONT SEATS
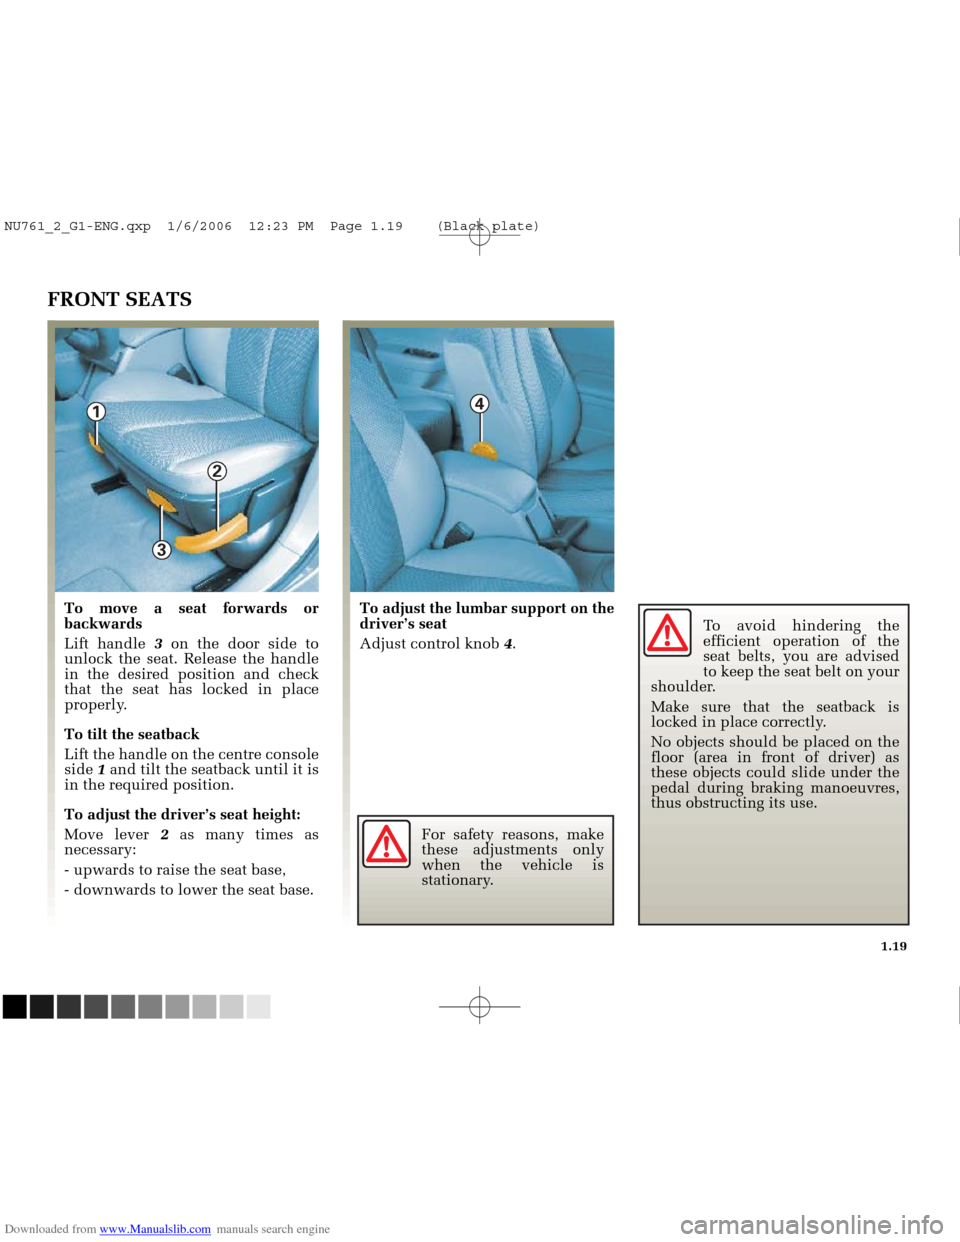
To move a seat forwards or
backwards
Lift handle 3on the door side to
unlock the seat. Release the handle
in the desired position and check
that the seat has locked in place
properly.
To tilt the seatback
Lift the handle on the centre console
side 1and tilt the seatback until it is
in the required position.
To adjust the driver’s seat height:
Move lever 2as many times as
necessary:
- upwards to raise the seat base,
- downwards to lower the seat base. To adjust the lumbar support on the
driver’s seat
Adjust control knob
4.
NU761_2_G1-ENG.qxp 1/6/2006 12:23 PM Page 1.19 (Black plate)
Page 30 of 250
Downloaded from www.Manualslib.com manuals search engine
5
6
NU761_2_G1-FRA.qxd 10/11/05 15:53 Page 1.20
1.20
FRONT SEATS (continued)Heated seats
With the ignition switched on, move
switch 6of the required seat. The
indicator light in the switch lights up.
The system, which has a thermostat,
decides whether or not the heating
is needed.
Access to the seat bases(three-door versions)
Lift handle 5and slide the seat
forwards.
To return the seat to its initial
position (stored position) on the
driver’s side, slide the seat
backwards until it locks into place.
NU761_2_G1-ENG.qxp 1/6/2006 12:23 PM Page 1.20 (Black plate)
Page 31 of 250

Downloaded from www.Manualslib.com manuals search engine
1
2
NU761_2_G1-FRA.qxd 10/11/05 15:53 Page 1.21
1.21
Incorrectly adjusted seat
belts may cause injuries in
the event of an accident.
Even pregnant women
should wear a seat belt. In this
case, ensure that the lap belt is
not exerting too much pressure
on the abdomen without allowing
any slack.
SEAT BELTS
Always wear your seat belt when
travelling in your vehicle. You must
also comply with the legislation of
the particular country you are in.
Before driving off:
- firstly ensure that your driving
position is correctly adjusted,
- then adjust your seat belt to
provide maximum protection.Adjusting your driving position
Sit well back in your seat (having
removed your coat or jacket). This
is essential to ensure your back is
positioned correctly.
Adjust the distance between the seat and the pedals. Your seat
should be as far back as possible
while still allowing you to fully
depress the clutch pedal. The
seatback should be adjusted so
that your arms are slightly bent
when you hold the steering wheel.
Adjust the position of your head restraint. For safety reasons, the
top of your head should be in line
with the top of the head restraint.
Adjust the height of the seat. This
adjustment allows you to select
the seat position which offers you
the best possible view.
Adjust the position of the steering wheel.
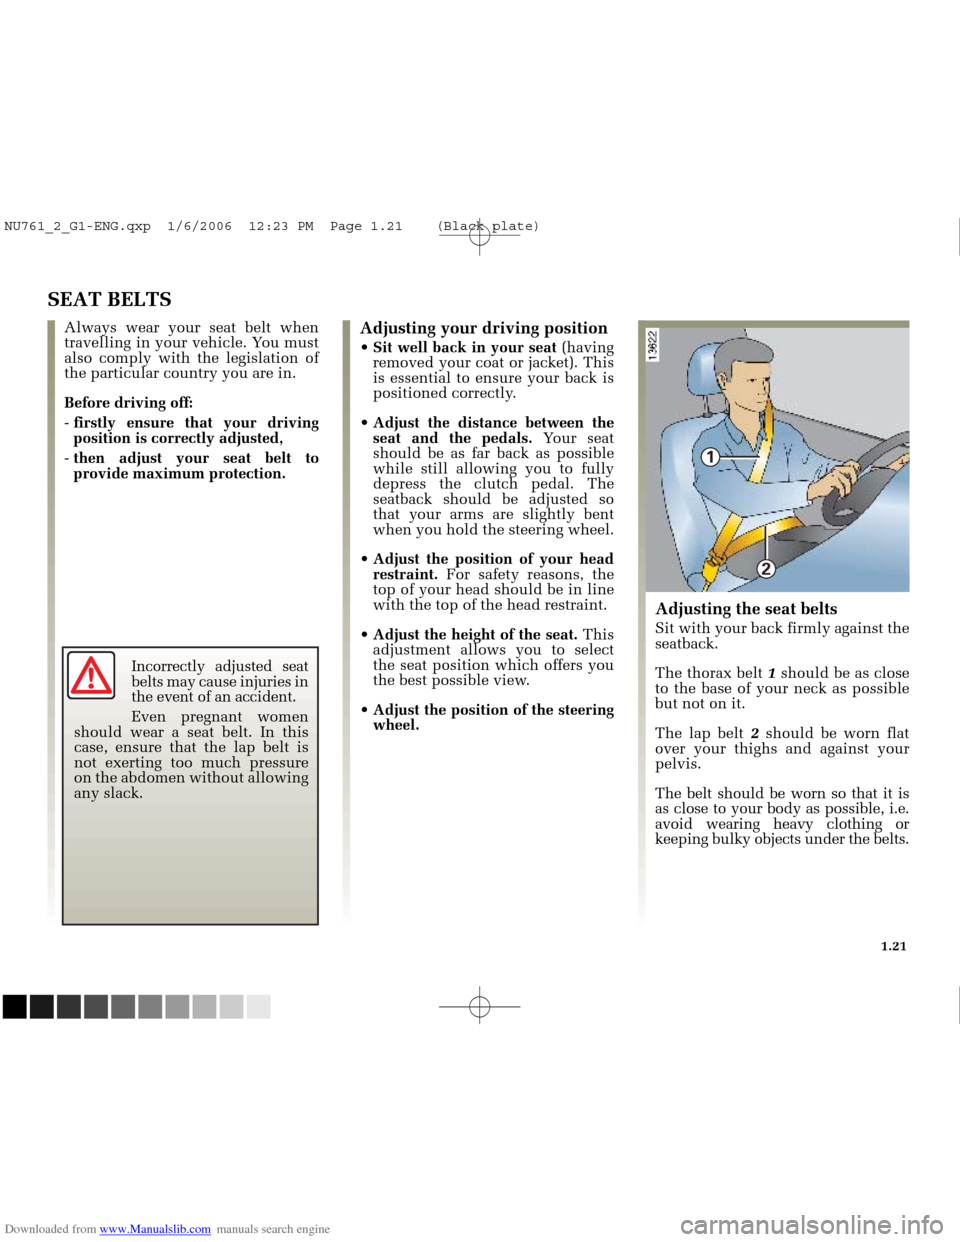
Adjusting the seat belts
Sit with your back firmly against the
seatback.
The thorax belt 1should be as close
to the base of your neck as possible
but not on it.
The lap belt 2should be worn flat
over your thighs and against your
pelvis.
The belt should be worn so that it is
as close to your body as possible, i.e.
avoid wearing heavy clothing or
keeping bulky objects under the belts.
NU761_2_G1-ENG.qxp 1/6/2006 12:23 PM Page 1.21 (Black plate)
Page 32 of 250

Downloaded from www.Manualslib.com manuals search engine
6
4
6
1
3
5
NU761_2_G1-FRA.qxd 10/11/05 15:53 Page 1.22
1.22
SEAT BELTS (continued)
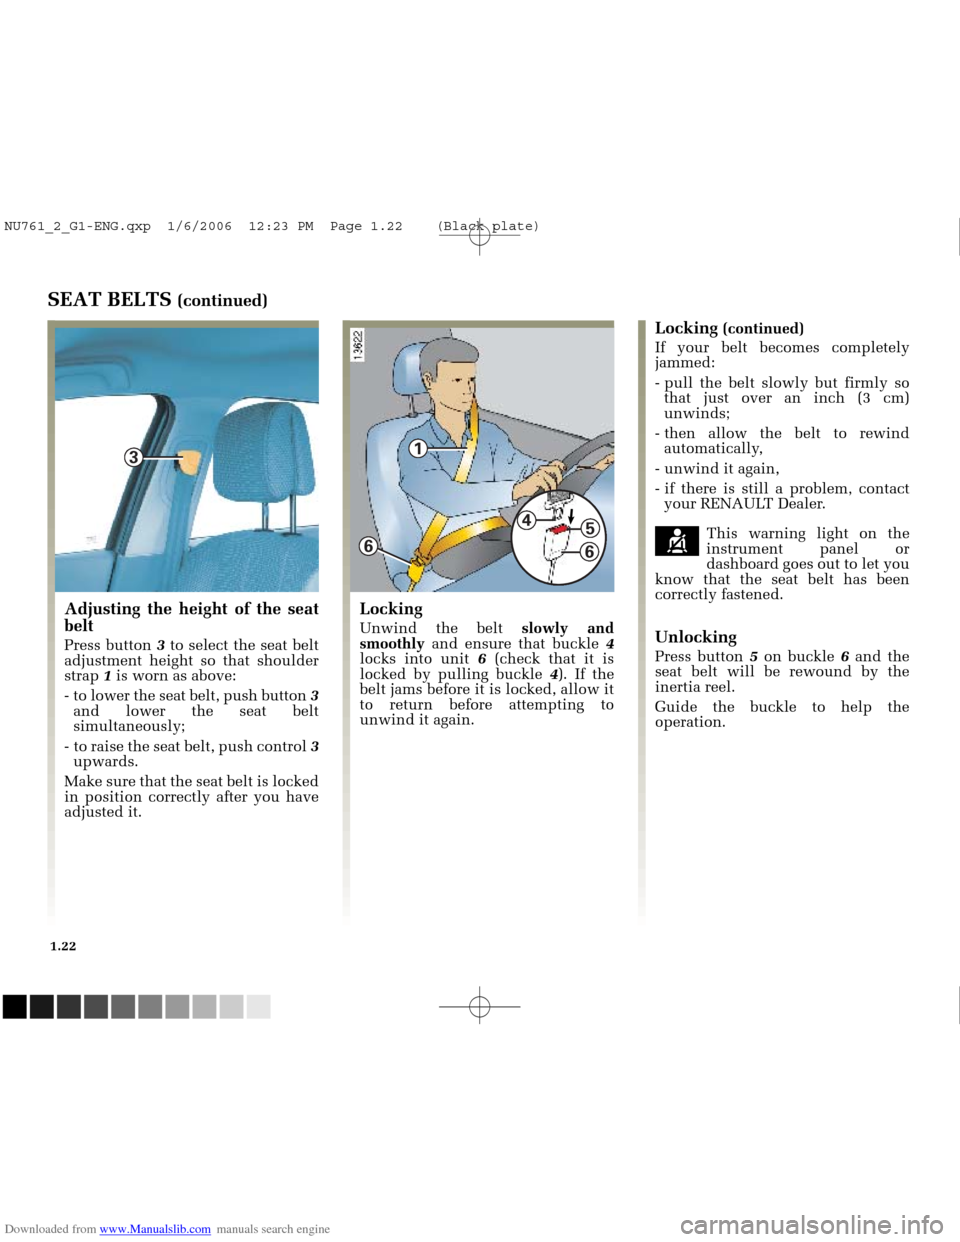
Adjusting the height of the seat
belt
Press button 3to select the seat belt
adjustment height so that shoulder
strap 1is worn as above:
- to lower the seat belt, push button 3
and lower the seat belt
simultaneously;
- to raise the seat belt, push control 3
upwards.
Make sure that the seat belt is locked
in position correctly after you have
adjusted it.
Locking
Unwind the belt slowly and
smoothly and ensure that buckle 4
locks into unit 6(check that it is
locked by pulling buckle 4). If the
belt jams before it is locked, allow it
to return before attempting to
unwind it again.
Locking (continued)
If your belt becomes completely
jammed:
- pull the belt slowly but firmly so that just over an inch (3 cm)
unwinds;
- then allow the belt to rewind automatically,
- unwind it again,
- if there is still a problem, contact your RENAULT Dealer.
çThis warning light on the
instrument panel or
dashboard goes out to let you
know that the seat belt has been
correctly fastened.
Unlocking
Press button 5on buckle 6and the
seat belt will be rewound by the
inertia reel.
Guide the buckle to help the
operation.
NU761_2_G1-ENG.qxp 1/6/2006 12:23 PM Page 1.22 (Black plate)