Page 3369 of 4555
AUDIO
AV-27
C
D
E
F
G
H
I
J
L
MA
B
AV
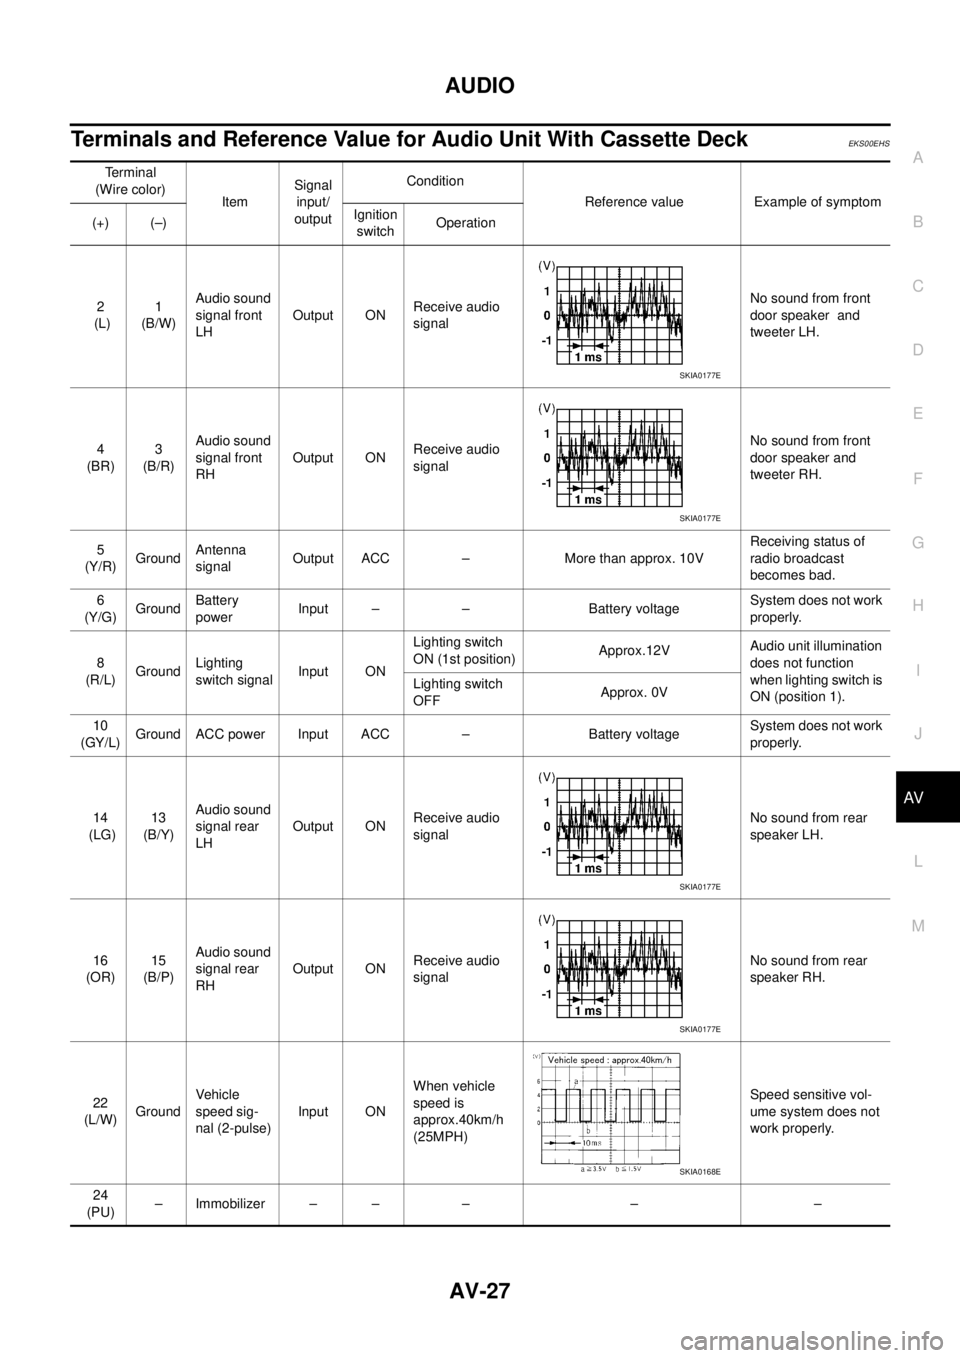
Terminals and Reference Value for Audio Unit With Cassette Deck EKS00EHS
Terminal
(Wire color)
ItemSignal
input/
outputCondition
Reference value Example of symptom
(+) (–)Ignition
switchOperation
2
(L)1
(B/W)Audio sound
signal front
LHOutput ONReceive audio
signalNo sound from front
door speaker and
tweeter LH.
4
(BR) 3
(B/R)Audio sound
signal front
RH Output ONReceive audio
signalNo sound from front
door speaker and
tweeter RH.
5
(Y/R) GroundAntenna
signalOutput ACC – More than approx. 10VReceiving status of
radio broadcast
becomes bad.
6
(Y/G)GroundBattery
power Input – – Battery voltageSystem does not work
properly.
8
(R/L)GroundLighting
switch signalInput ONLighting switch
ON (1st position)Approx.12VAudio unit illumination
does not function
when lighting switch is
ON (position 1). Lighting switch
OFFApprox. 0V
10
(GY/L)Ground ACC power Input ACC – Battery voltageSystem does not work
properly.
14
(LG)13
(B/Y)Audio sound
signal rear
LH Output ONReceive audio
signalNo sound from rear
speaker LH.
16
(OR)15
(B/P)Audio sound
signal rear
RH Output ONReceive audio
signalNo sound from rear
speaker RH.
22
(L/W)GroundVehicle
speed sig-
nal (2-pulse)Input ONWhen vehicle
speed is
approx.40km/h
(25MPH)Speed sensitive vol-
ume system does not
work properly.
24
(PU)– Immobilizer – – – – –
SKIA0177E
SKIA0177E
SKIA0177E
SKIA0177E
SKIA0168E
Page 3370 of 4555

AV-28
AUDIO
Terminals and Reference Value for Audio Unit Without Cassette Deck EKS00EHT
26
(L/B)GroundRemote con-
trol AInput ONPress SOURCE
switchApprox. 0V
Steering wheel audio
controls do not func-
tion. Press SEEK UP
switchApprox. 1.7V
Press VOL UP
switchApprox. 3.3V
Except for above Approx. 5V
27
(L/R)GroundRemote con-
trol BInput ONPress SPECIAL
switchApprox. 0V
Steering wheel audio
controls do not func-
tion. Press SEEK
DOWN switchApprox. 1.7V
Press VOL
DOWN switchApprox. 3.3V
Except for above Approx. 5V
29
(B)GroundRemote con-
trol ground– ON – Approx. 0V – Terminal
(Wire color)
ItemSignal
input/
outputCondition
Reference value Example of symptom
(+) (–)Ignition
switchOperation
Te r m i n a l
(Wire color)
ItemSignal
input/
outputCondition
Reference valueExample of
symptom
(+) (–)Ignition
switchOperation
1
(R/L)GroundLighting
switch signalInput ONLighting switch
ON (1st position)Approx. 12VAudio unit illumi-
nation does not
function when
lighting switch is
ON (position 1). Lighting switch
OFFApprox. 0V
3
(GY/L)Ground ACC power Input ACC – Battery voltageSystem does not
work properly.
5
(PU)– immobilizer – – – – –
6
(Y/R)GroundAntenna
signalOutput ON – More than approx. 10VReceiving status
of radio broadcast
becomes bad.
9
(Y/G)Ground Battery power Input OFF – Battery voltage System does not
work properly.
11
(SB)
*1
(L)*2
10
(GY)*1
(B/W)*2
Audio sound
signal front
LH Output ONReceive audio
signalNo sound from
front door speaker
or tweeter LH.
12
(LG)13
(B/Y)Audio sound
signal rear
LH Output ONReceive audio
signalNo sound from
rear door speaker
LH.
SKIA0177E
SKIA0177E
Page 3371 of 4555
AUDIO
AV-29
C
D
E
F
G
H
I
J
L
MA
B
AV
�*1: LHD model with navigation system
�*2: Except *1
�*3: RHD model with navigation system
�*4: Except *3
�*5: With audio steering wheel switch only
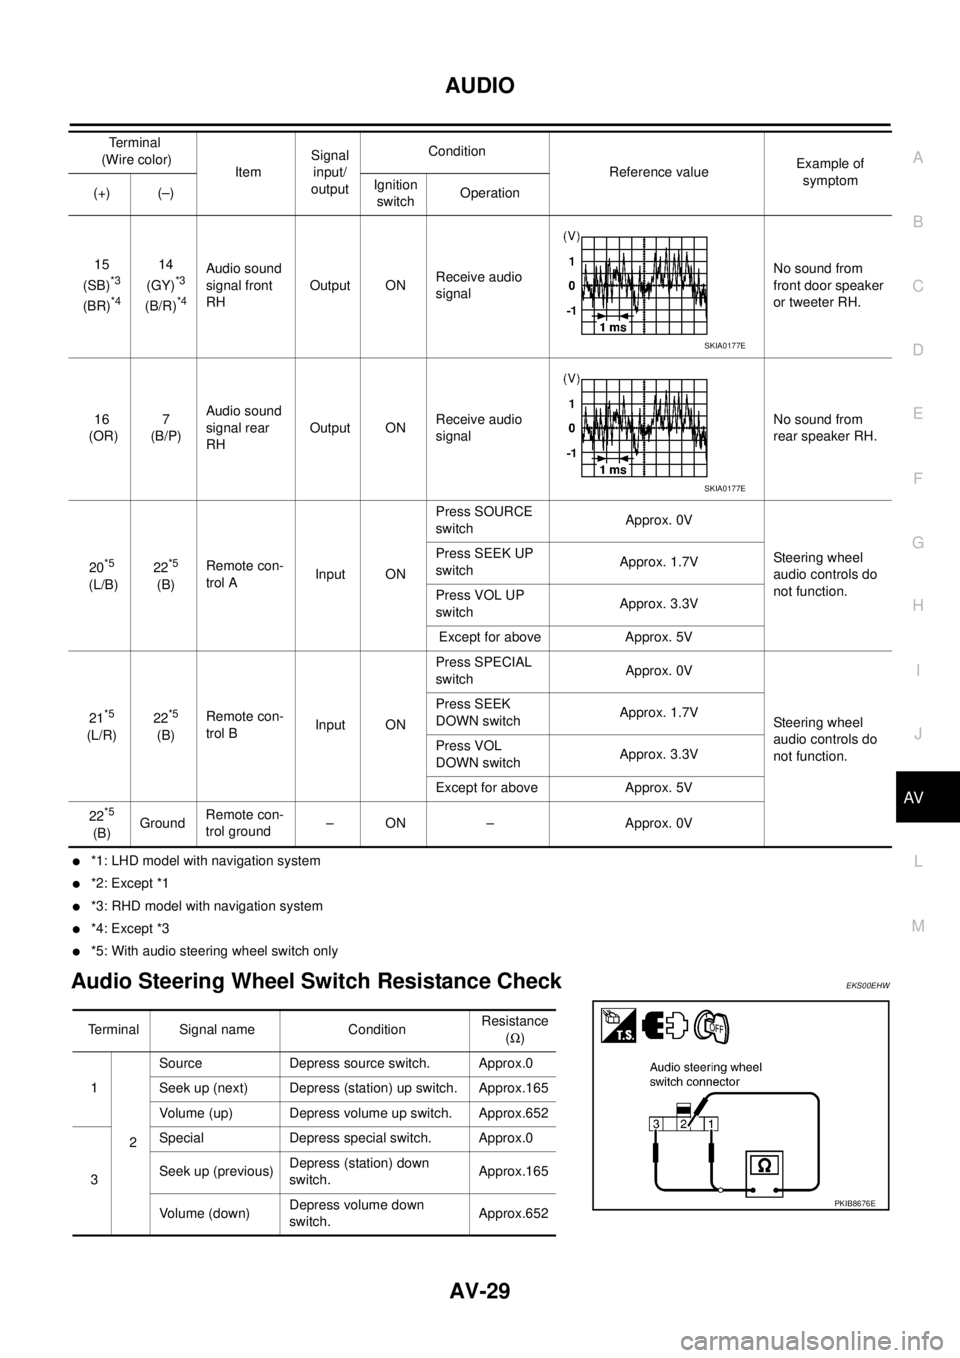
Audio Steering Wheel Switch Resistance CheckEKS00EHW
15
(SB)*3
(BR)*4
14
(GY)*3
(B/R)*4
Audio sound
signal front
RHOutput ONReceive audio
signalNo sound from
front door speaker
or tweeter RH.
16
(OR)7
(B/P)Audio sound
signal rear
RHOutput ONReceive audio
signalNo sound from
rear speaker RH.
20
*5
(L/B)22
*5
(B)Remote con-
trol AInput ONPress SOURCE
switchApprox. 0V
Steering wheel
audio controls do
not function. Press SEEK UP
switchApprox. 1.7V
Press VOL UP
switchApprox. 3.3V
Except for above Approx. 5V
21
*5
(L/R)22
*5
(B)Remote con-
trol BInput ONPress SPECIAL
switch Approx. 0V
Steering wheel
audio controls do
not function. Press SEEK
DOWN switchApprox. 1.7V
Press VOL
DOWN switchApprox. 3.3V
Except for above Approx. 5V
22
*5
(B)GroundRemote con-
trol ground– ON – Approx. 0V Terminal
(Wire color)
ItemSignal
input/
outputCondition
Reference valueExample of
symptom
(+) (–)Ignition
switchOperation
SKIA0177E
SKIA0177E
Terminal Signal name ConditionResistance
(Ω)
1
2Source Depress source switch. Approx.0
Seek up (next) Depress (station) up switch. Approx.165
Volume (up) Depress volume up switch. Approx.652
3Special Depress special switch. Approx.0
Seek up (previous)Depress (station) down
switch.Approx.165
Volume (down)Depress volume down
switch.Approx.652
PKIB8676E
Page 3372 of 4555

AV-30
AUDIO
Trouble DiagnosesEKS00EHY
AUDIO UNIT
InspectionEKS00EHX
AUDIO UNIT
All voltage inspections are made with:
�Ignition switch ON or ACC
�Audio unit ON
�Audio unit connected
ANTENNA
Using a jumper wire, clip an auxiliary ground between antenna and body.
�If reception improves, check antenna ground (at body surface).
�If reception does not improve, check main feeder cable for short circuit or open circuit.
Symptom Possible causes Repair order
Audio unit inoperative (no digital
display and no sound from speak-
ers).1. 10A fuse
2. 15A fuse
3. Audio unit ground
4. Audio unit1. Check 10A fuse [No. 4, located in fuse block
(J/B)]. Turn ignition switch ON and verify that
battery positive voltage is present at terminal
10 (with cassette deck), 3 (without cassette
deck) of audio unit.
2. Check 15A fuse (No. 32, located in fuse and
fusible link box) and verify that battery posi-
tive voltage is present at terminal 6 (with cas-
sette deck), 9 (without cassette deck) of
audio unit.
3. Check audio unit ground.
4. Remove audio unit for repair.
Individual rear speaker is noisy or
inoperative.1. Each speaker
2. Output circuit to each speaker1. Check speaker.
2. Check the output circuits to each speaker
between audio unit and each speaker.
AM/FM stations are weak or noisy. 1. Roof antenna
2. Audio unit ground
3. Audio unit1. Check roof antenna.
2. Check audio unit ground condition.
3. Remove audio unit for repair.
Audio unit generates noise in AM
and FM modes with engine run-
ning.1. Poor audio unit ground
2. Loose or missing ground bonding straps
3. Ignition condenser or rear window defogger
noise suppressor condenser
4. Ignition coil
5. Audio unit1. Check audio unit ground.
2. Check ground bonding straps.
3. Replace ignition condenser or rear window
defogger noise suppressor condenser.
4. Check ignition coil.
5. Remove audio unit for repair.
Audio unit generates noise in AM
and FM modes with accessories
on (switch pops and motor noise).1. Poor audio unit ground
2. Antenna
3. Accessory ground
4. Malfunctioning accessory1. Check audio unit ground.
2. Check antenna.
3. Check accessory ground.
4. Replace accessory.
Page 3373 of 4555
AUDIO
AV-31
C
D
E
F
G
H
I
J
L
MA
B
AV
Audio Steering Wheel Switch Does Not Operate (With Cassette Deck)EKS00EJ1
1. AUDIO STEERING WHEEL SWITCH RESISTANCE CHECK
1. Disconnect audio steering wheel switch connector.
2. Check resistance audio steering wheel switch. Refer to AV- 2 9 , "
Audio Steering Wheel Switch Resistance
Check" .
OK or NG
OK >> GO TO 2.
NG >> Replace audio steering wheel switch.
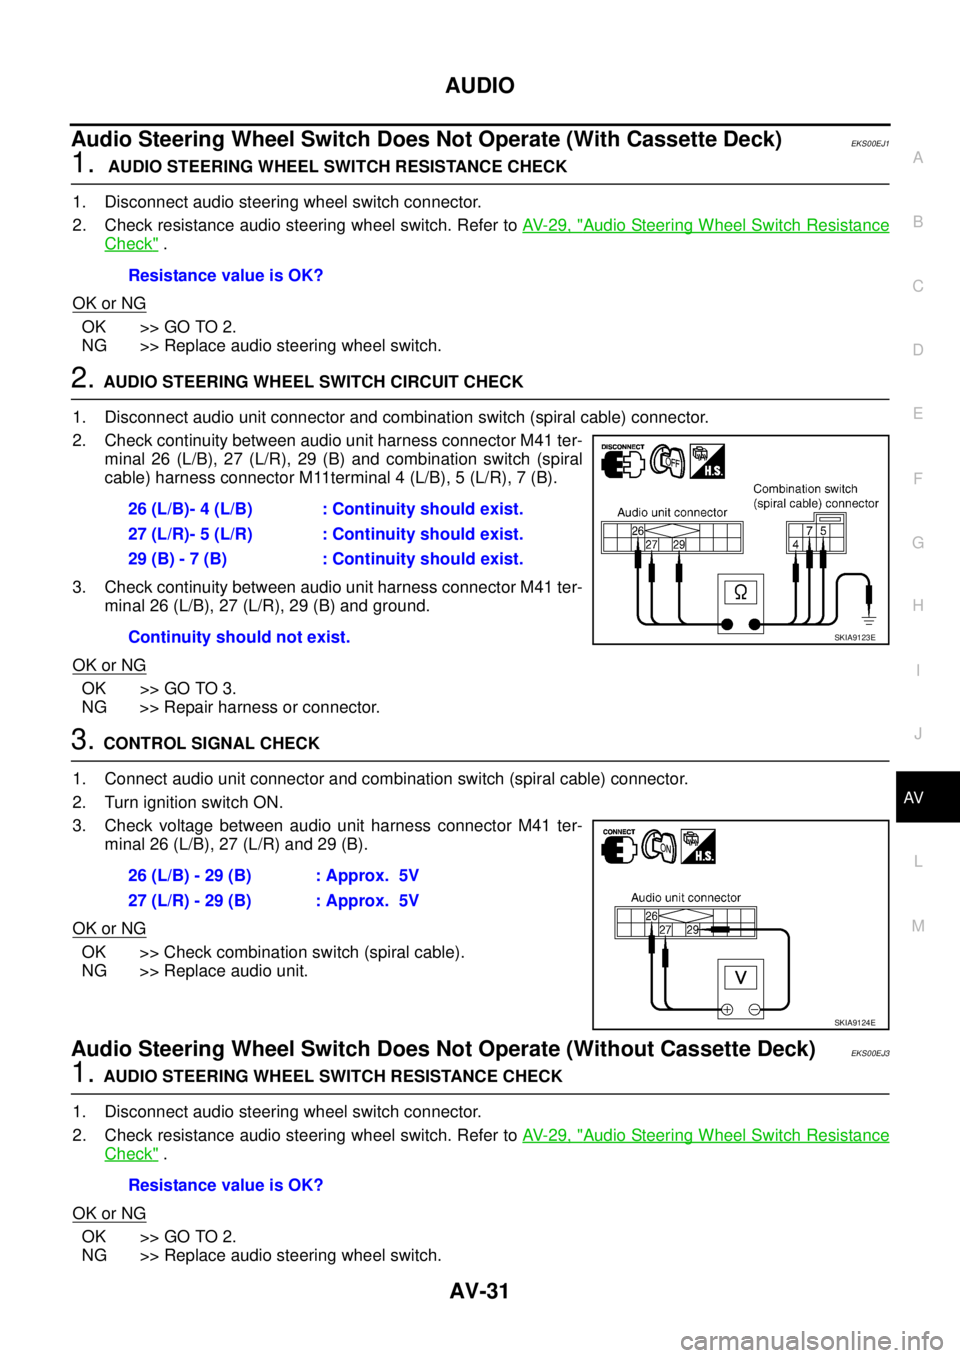
2. AUDIO STEERING WHEEL SWITCH CIRCUIT CHECK
1. Disconnect audio unit connector and combination switch (spiral cable) connector.
2. Check continuity between audio unit harness connector M41 ter-
minal 26 (L/B), 27 (L/R), 29 (B) and combination switch (spiral
cable) harness connector M11terminal 4 (L/B), 5 (L/R), 7 (B).
3. Check continuity between audio unit harness connector M41 ter-
minal 26 (L/B), 27 (L/R), 29 (B) and ground.
OK or NG
OK >> GO TO 3.
NG >> Repair harness or connector.
3. CONTROL SIGNAL CHECK
1. Connect audio unit connector and combination switch (spiral cable) connector.
2. Turn ignition switch ON.
3. Check voltage between audio unit harness connector M41 ter-
minal 26 (L/B), 27 (L/R) and 29 (B).
OK or NG
OK >> Check combination switch (spiral cable).
NG >> Replace audio unit.
Audio Steering Wheel Switch Does Not Operate (Without Cassette Deck)EKS00EJ3
1. AUDIO STEERING WHEEL SWITCH RESISTANCE CHECK
1. Disconnect audio steering wheel switch connector.
2. Check resistance audio steering wheel switch. Refer to AV- 2 9 , "
Audio Steering Wheel Switch Resistance
Check" .
OK or NG
OK >> GO TO 2.
NG >> Replace audio steering wheel switch.Resistance value is OK?
26 (L/B)- 4 (L/B) : Continuity should exist.
27 (L/R)- 5 (L/R) : Continuity should exist.
29 (B) - 7 (B) : Continuity should exist.
Continuity should not exist.
SKIA9123E
26 (L/B) - 29 (B) : Approx. 5V
27 (L/R) - 29 (B) : Approx. 5V
SKIA9124E
Resistance value is OK?
Page 3374 of 4555
AV-32
AUDIO
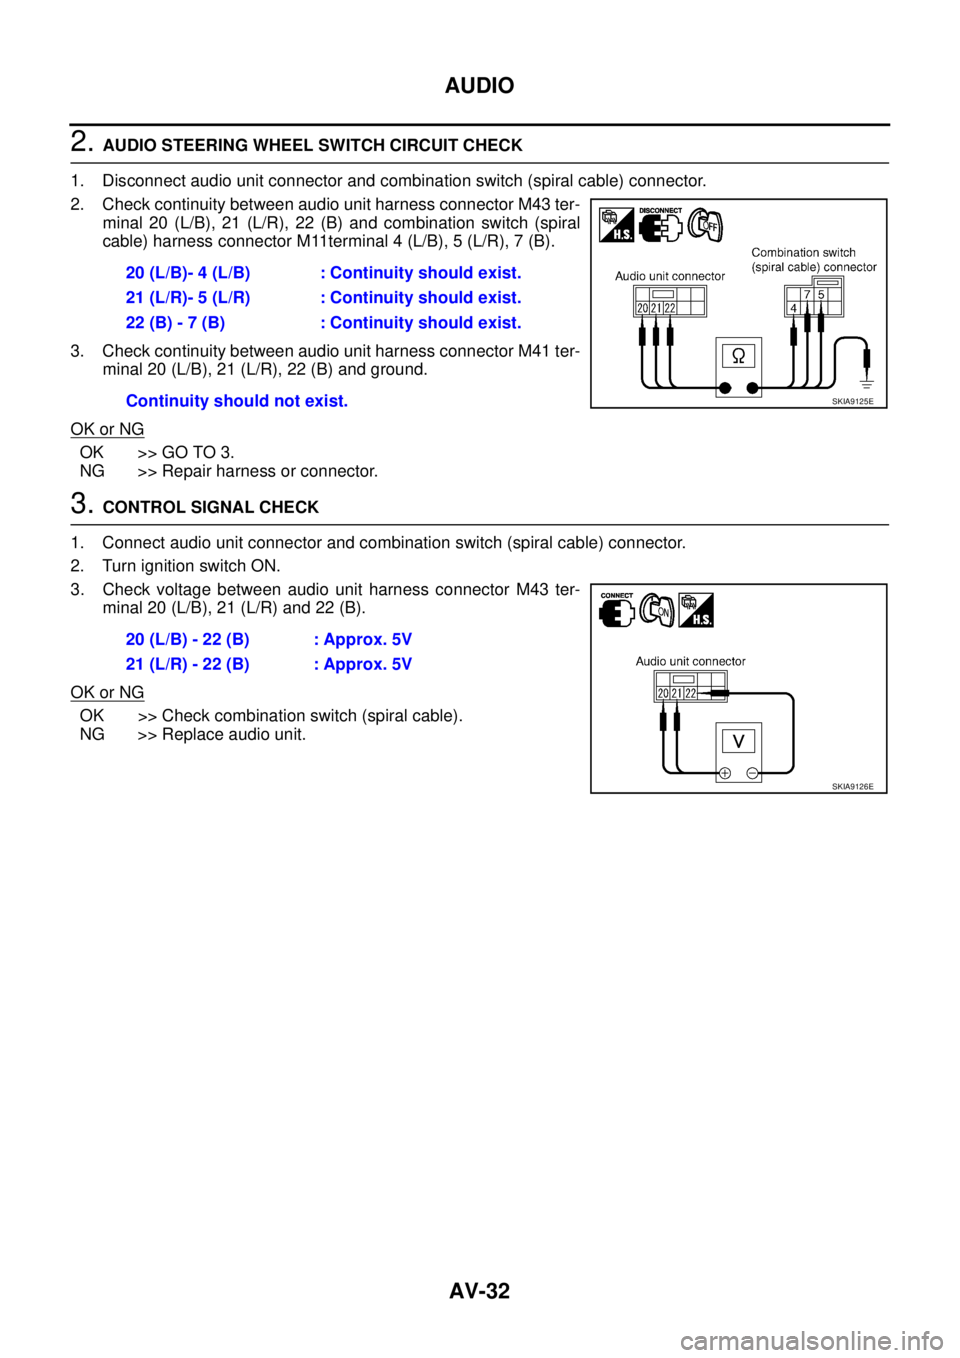
2. AUDIO STEERING WHEEL SWITCH CIRCUIT CHECK
1. Disconnect audio unit connector and combination switch (spiral cable) connector.
2. Check continuity between audio unit harness connector M43 ter-
minal 20 (L/B), 21 (L/R), 22 (B) and combination switch (spiral
cable) harness connector M11terminal 4 (L/B), 5 (L/R), 7 (B).
3. Check continuity between audio unit harness connector M41 ter-
minal 20 (L/B), 21 (L/R), 22 (B) and ground.
OK or NG
OK >> GO TO 3.
NG >> Repair harness or connector.
3. CONTROL SIGNAL CHECK
1. Connect audio unit connector and combination switch (spiral cable) connector.
2. Turn ignition switch ON.
3. Check voltage between audio unit harness connector M43 ter-
minal 20 (L/B), 21 (L/R) and 22 (B).
OK or NG
OK >> Check combination switch (spiral cable).
NG >> Replace audio unit. 20 (L/B)- 4 (L/B) : Continuity should exist.
21 (L/R)- 5 (L/R) : Continuity should exist.
22 (B) - 7 (B) : Continuity should exist.
Continuity should not exist.
SKIA9125E
20 (L/B) - 22 (B) : Approx. 5V
21 (L/R) - 22 (B) : Approx. 5V
SKIA9126E
Page 3375 of 4555
AUDIO
AV-33
C
D
E
F
G
H
I
J
L
MA
B
AV
Speed Sensitive Volume System Does Not Work (With Cassette Deck) EKS00EJ4
1. VEHICLE SPEED OPERATION CHECK
Does speedometer is operated normally?
Ye s o r N o
Ye s > > G O T O 2 .
No >> Check combination meter trouble diagnosis. Refer toDI-28, "
Vehicle Speed Signal Inspection
[With ESP]" in “COMBINATION METERS”.
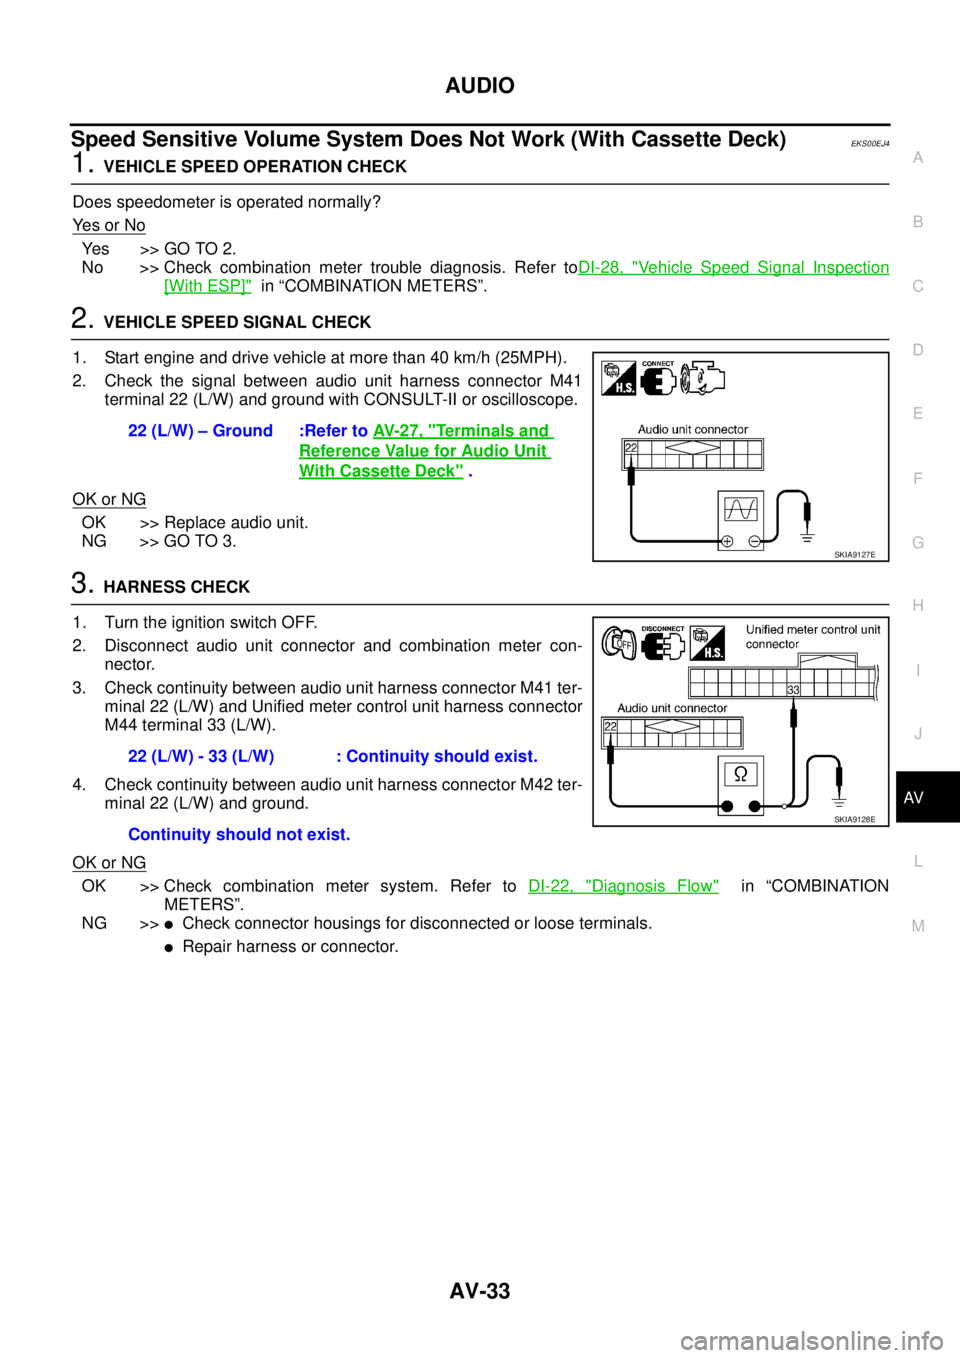
2. VEHICLE SPEED SIGNAL CHECK
1. Start engine and drive vehicle at more than 40 km/h (25MPH).
2. Check the signal between audio unit harness connector M41
terminal 22 (L/W) and ground with CONSULT-II or oscilloscope.
OK or NG
OK >> Replace audio unit.
NG >> GO TO 3.
3. HARNESS CHECK
1. Turn the ignition switch OFF.
2. Disconnect audio unit connector and combination meter con-
nector.
3. Check continuity between audio unit harness connector M41 ter-
minal 22 (L/W) and Unified meter control unit harness connector
M44 terminal 33 (L/W).
4. Check continuity between audio unit harness connector M42 ter-
minal 22 (L/W) and ground.
OK or NG
OK >> Check combination meter system. Refer to DI-22, "Diagnosis Flow" in “COMBINATION
METERS”.
NG >>
�Check connector housings for disconnected or loose terminals.
�Repair harness or connector. 22 (L/W) – Ground :Refer to AV- 2 7 , "
Terminals and
Reference Value for Audio Unit
With Cassette Deck" .
SKIA9127E
22 (L/W) - 33 (L/W) : Continuity should exist.
Continuity should not exist.
SKIA9128E
Page 3376 of 4555
AV-34
AUDIO
Removal and Installation of Audio Unit (With Cassette Deck)EKS00EKR
REMOVAL
1. Remove instrument cluster lid C. Refer to IP-11, "Removal and Installation" .
2. Remove screws (4) and connector, and remove audio unit.
3. Remove screws (8) and bracket.
INSTALLATION
Installation is the reverse order of removal.
SKIA9194E
SKIA9195E