Page 3237 of 4555
TROUBLE DIAGNOSIS
ATC-59
C
D
E
F
G
H
I
K
L
MA
B
AT C
FUNCTION CONFIRMATION PROCEDURE
1. SET IN SELF-DIAGNOSTIC MODE (STEP-1 TO 4)
1. Set the fan control dial to OFF position.
2. Turn ignition switch ON.
3. Set in self-diagnostic mode as follows. Within 10 seconds after starting engine (ignition switch is turned
ON.), press A/C switch for at least 5 seconds.
CAUTION:
If battery voltage drops below 12V during diagnosis step-3, actuator speed becomes slower and as a
result, the system may generate an error even when operation is usual. To avoid this, start engine
before performing this diagnosis.
>> GO TO 2.
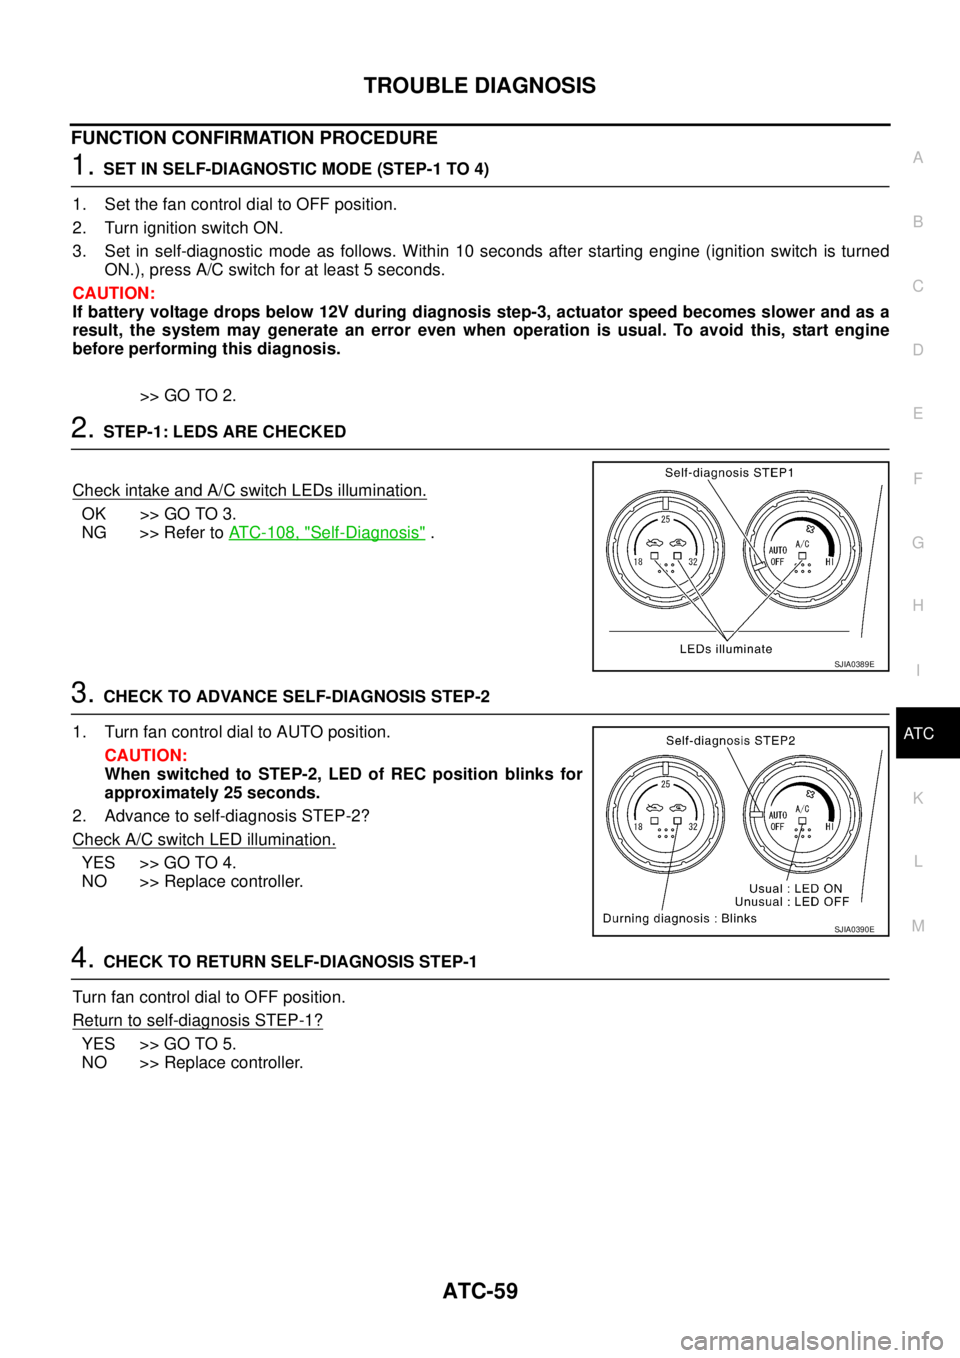
2. STEP-1: LEDS ARE CHECKED
Check intake and A/C switch LEDs illumination.
OK >> GO TO 3.
NG >> Refer to ATC-108, "
Self-Diagnosis" .
3. CHECK TO ADVANCE SELF-DIAGNOSIS STEP-2
1. Turn fan control dial to AUTO position.
CAUTION:
When switched to STEP-2, LED of REC position blinks for
approximately 25 seconds.
2. Advance to self-diagnosis STEP-2?
Check A/C switch LED illumination.
YES >> GO TO 4.
NO >> Replace controller.
4. CHECK TO RETURN SELF-DIAGNOSIS STEP-1
Turn fan control dial to OFF position.
Return to self
-diagnosis STEP-1?
YES >> GO TO 5.
NO >> Replace controller.
SJIA0389E
SJIA0390E
Page 3239 of 4555
TROUBLE DIAGNOSIS
ATC-61
C
D
E
F
G
H
I
K
L
MA
B
AT C
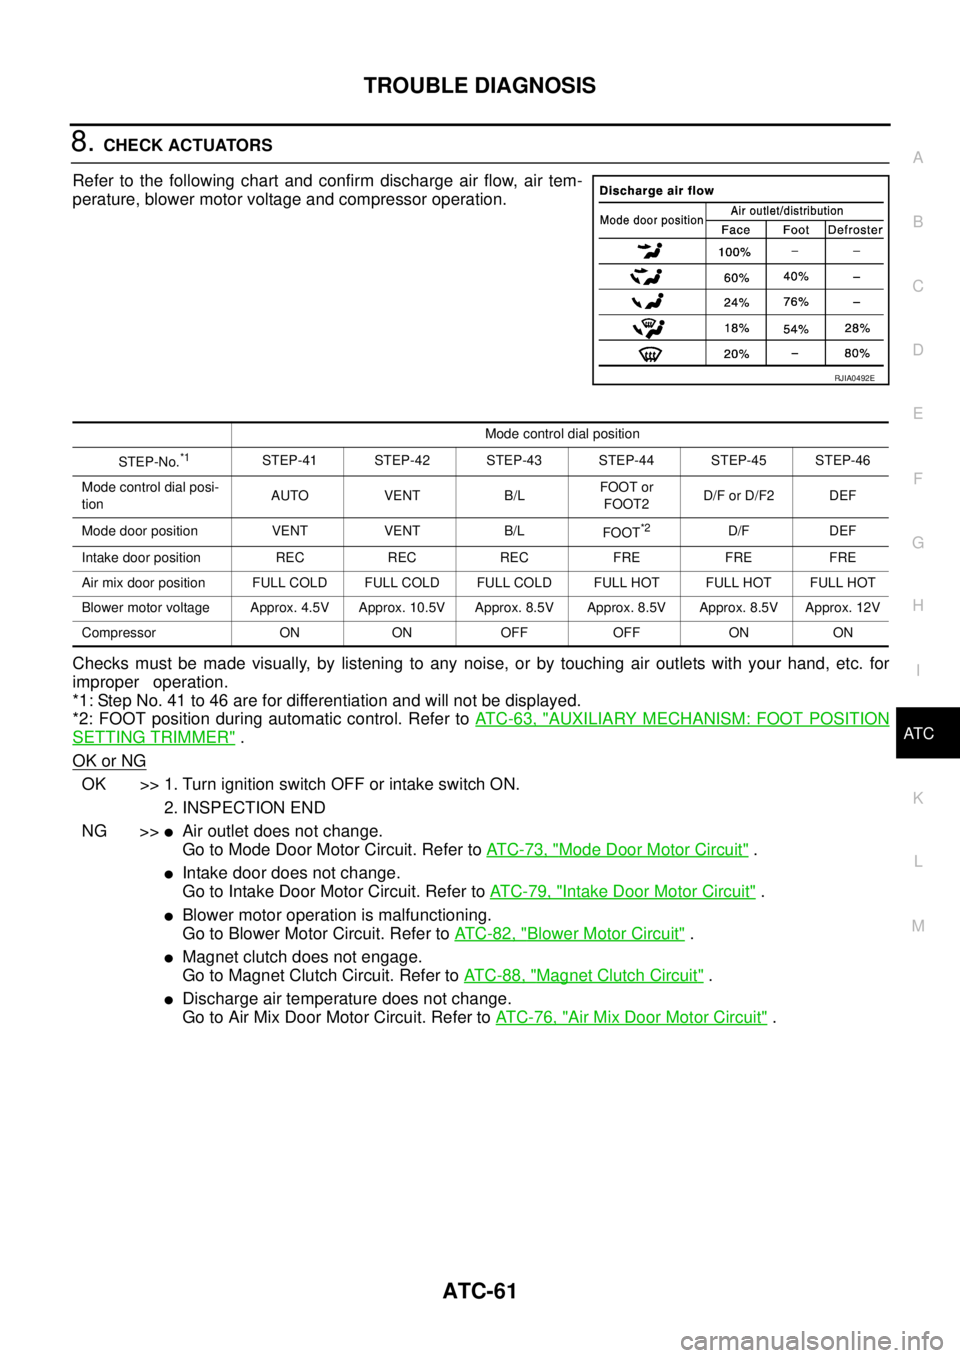
8. CHECK ACTUATORS
Refer to the following chart and confirm discharge air flow, air tem-
perature, blower motor voltage and compressor operation.
Checks must be made visually, by listening to any noise, or by touching air outlets with your hand, etc. for
improper operation.
*1: Step No. 41 to 46 are for differentiation and will not be displayed.
*2: FOOT position during automatic control. Refer to AT C - 6 3 , "
AUXILIARY MECHANISM: FOOT POSITION
SETTING TRIMMER" .
OK or NG
OK >> 1. Turn ignition switch OFF or intake switch ON.
2. INSPECTION END
NG >>
�Air outlet does not change.
Go to Mode Door Motor Circuit. Refer to AT C - 7 3 , "
Mode Door Motor Circuit" .
�Intake door does not change.
Go to Intake Door Motor Circuit. Refer to AT C - 7 9 , "
Intake Door Motor Circuit" .
�Blower motor operation is malfunctioning.
Go to Blower Motor Circuit. Refer to AT C - 8 2 , "
Blower Motor Circuit" .
�Magnet clutch does not engage.
Go to Magnet Clutch Circuit. Refer to AT C - 8 8 , "
Magnet Clutch Circuit" .
�Discharge air temperature does not change.
Go to Air Mix Door Motor Circuit. Refer to AT C - 7 6 , "
Air Mix Door Motor Circuit" .
RJIA0492E
Mode control dial position
STEP-No.
*1STEP-41 STEP-42 STEP-43 STEP-44 STEP-45 STEP-46
Mode control dial posi-
tionAUTO VENT B/LFOOT or
FOOT2D/F or D/F2 DEF
Mode door position VENT VENT B/L
FOOT
*2D/F DEF
Intake door position REC REC REC FRE FRE FRE
Air mix door position FULL COLD FULL COLD FULL COLD FULL HOT FULL HOT FULL HOT
Blower motor voltage Approx. 4.5V Approx. 10.5V Approx. 8.5V Approx. 8.5V Approx. 8.5V Approx. 12V
Compressor ON ON OFF OFF ON ON
Page 3241 of 4555
TROUBLE DIAGNOSIS
ATC-63
C
D
E
F
G
H
I
K
L
MA
B
AT C
AUXILIARY MECHANISM: TEMPERATURE SETTING TRIMMER
The trimmer compensates for differences in range of ±3°C between temperature setting (Temperature control
dial position) and temperature felt by driver.
Operating procedures for this trimmer are as follows:
1. Set temperature at 25°C.
2. Set fan control dial to OFF.
3. Turn ignition switch ON.
4. Set in self-diagnostic mode as follows. Within 10 seconds after starting engine (ignition switch is turned
ON.), press intake switch for at least 5 seconds.
5. Turn temperature control dial as desired. Temperature will change at a rate of 1°C each time a dial is
turned.
When battery cable is disconnected, trimmer operation is canceled. Temperature set becomes that of initial
condition, i.e. 0°C.
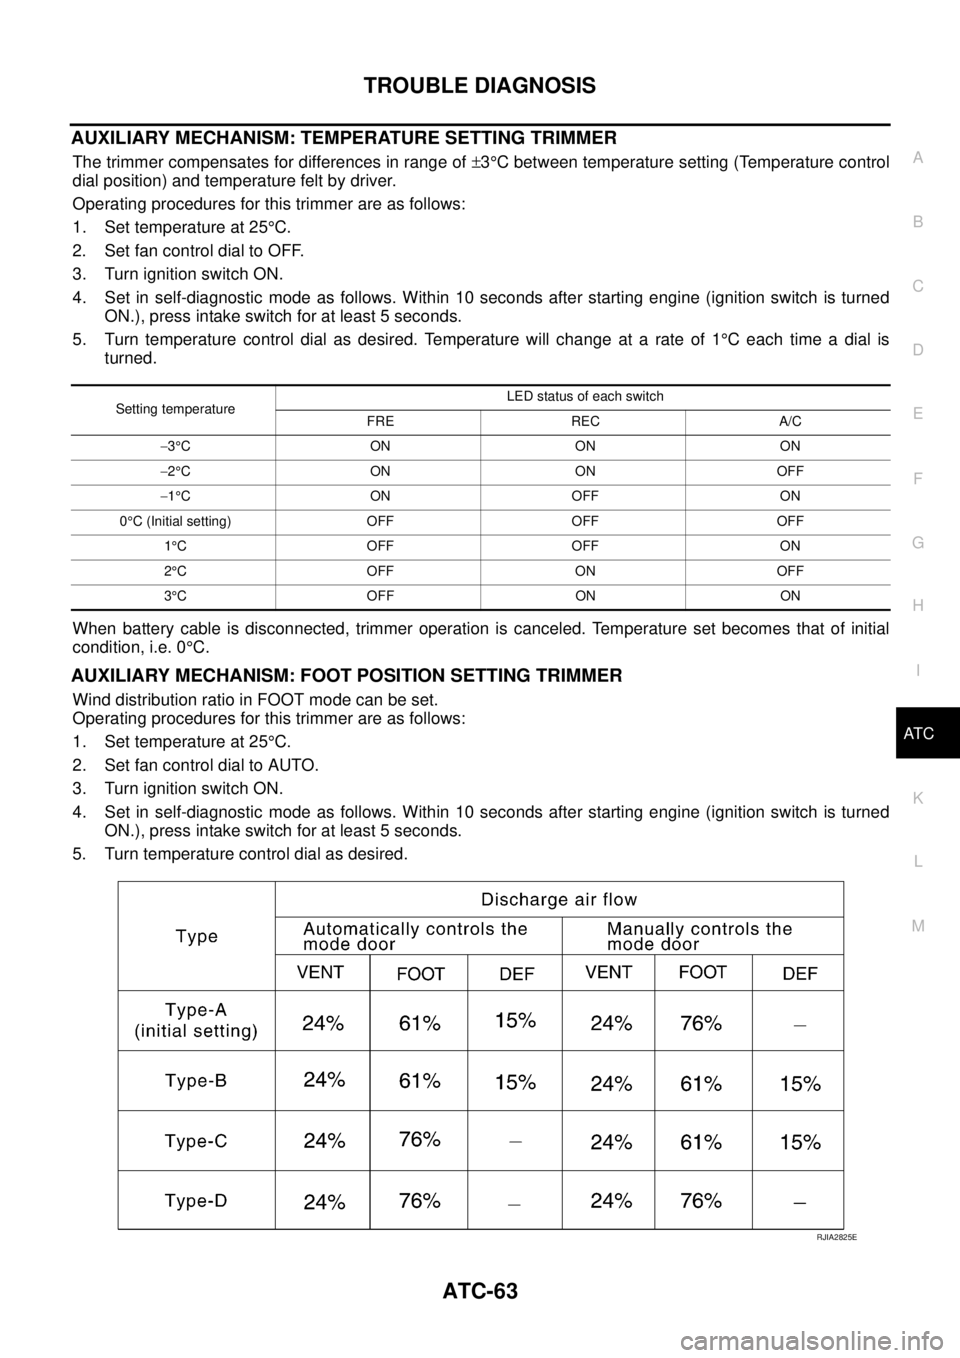
AUXILIARY MECHANISM: FOOT POSITION SETTING TRIMMER
Wind distribution ratio in FOOT mode can be set.
Operating procedures for this trimmer are as follows:
1. Set temperature at 25°C.
2. Set fan control dial to AUTO.
3. Turn ignition switch ON.
4. Set in self-diagnostic mode as follows. Within 10 seconds after starting engine (ignition switch is turned
ON.), press intake switch for at least 5 seconds.
5. Turn temperature control dial as desired.
Setting temperatureLED status of each switch
FRE REC A/C
−3°CON ON ON
−2°CON ON OFF
−1°CON OFF ON
0°C (Initial setting) OFF OFF OFF
1°COFFOFF ON
2°COFF ON OFF
3°C OFF ON ON
RJIA2825E
Page 3242 of 4555

ATC-64
TROUBLE DIAGNOSIS
AUXILIARY MECHANISM: INLET PORT MEMORY FUNCTION
When ignition switch is turned from OFF to ON, inlet port can be set to AUTO or manual.
Operating procedures for this trimmer are as follows:
1. Set fan control dial to 1st-25th speed.
2. Turn ignition switch ON.
3. Set in self-diagnostic mode as follows. Within 10 seconds after starting engine (ignition switch is turned
ON.), press intake switch for at least 5 seconds.
4. Press intake switch as desired.
Ty p eLED status of each switch
FRE REC A/C
Type-A (initial setting) OFF OFF ON
Ty p e - B O F F O N OF F
Ty p e - C O F F O N O N
Ty p e - D ON O F F OF F
LED status
of FRE
positionLED status
of REC posi-
tionSetting status
Setting changeover method
FRE REC
OFF OFF AUTO control AUTO control
Intake SW: ON OFF ON AUTO control (Initial setting)Manual REC status is memorized.
(Initial setting)
ON OFF Manual FRE status is memorized. AUTO control
ON ON Manual FRE status is memorized. Manual REC status is memorized.
Page 3246 of 4555
ATC-68
TROUBLE DIAGNOSIS
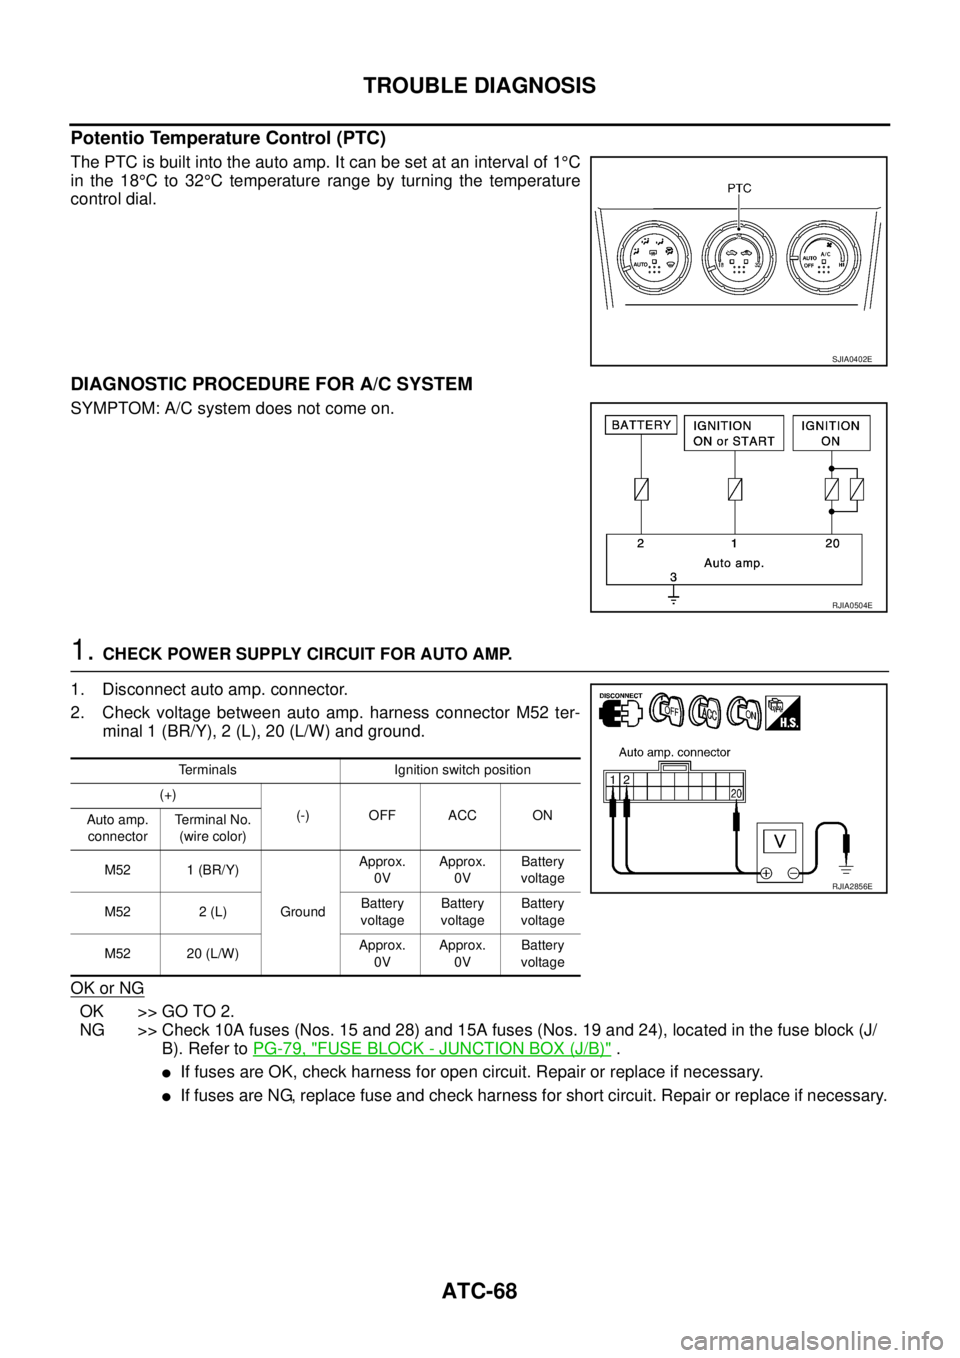
Potentio Temperature Control (PTC)
The PTC is built into the auto amp. It can be set at an interval of 1°C
in the 18°C to 32°C temperature range by turning the temperature
control dial.
DIAGNOSTIC PROCEDURE FOR A/C SYSTEM
SYMPTOM: A/C system does not come on.
1. CHECK POWER SUPPLY CIRCUIT FOR AUTO AMP.
1. Disconnect auto amp. connector.
2. Check voltage between auto amp. harness connector M52 ter-
minal 1 (BR/Y), 2 (L), 20 (L/W) and ground.
OK or NG
OK >> GO TO 2.
NG >> Check 10A fuses (Nos. 15 and 28) and 15A fuses (Nos. 19 and 24), located in the fuse block (J/
B). Refer to PG-79, "
FUSE BLOCK - JUNCTION BOX (J/B)" .
�If fuses are OK, check harness for open circuit. Repair or replace if necessary.
�If fuses are NG, replace fuse and check harness for short circuit. Repair or replace if necessary.
SJIA0402E
RJIA0504E
Terminals Ignition switch position
(+)
(-) OFF ACC ON
Auto amp.
connectorTe r m i n a l N o .
(wire color)
M52 1 (BR/Y)
GroundApprox.
0VApprox.
0VBattery
voltage
M52 2 (L)Battery
voltageBattery
voltageBattery
voltage
M52 20 (L/W)Approx.
0VApprox.
0VBattery
voltage
RJIA2856E
Page 3247 of 4555
TROUBLE DIAGNOSIS
ATC-69
C
D
E
F
G
H
I
K
L
MA
B
AT C
2. CHECK GROUND CIRCUIT FOR AUTO AMP.
1. Turn ignition switch OFF.
2. Check continuity between auto amp. harness connector M52
terminal 3 (B) and ground.
OK or NG
OK >> Replace auto amp.
NG >> Repair or replace harness.
LAN System CircuitEJS004L0
SYMPTOM: Mode door motor, intake door motor and/or air mix door motor(s) does not operate normally.
DIAGNOSTIC PROCEDURE FOR LAN CIRCUIT
1. CHECK POWER SUPPLY FOR AUTO AMP.
1. Turn ignition switch ON.
2. Check voltage between auto amp. harness connector M52 ter-
minal 5 (W) and ground.
OK or NG
OK >> GO TO 2.
NG >> Replace auto amp.3 – Ground : Continuity should exist.
RJIA2857E
RJIA0507E
5 – Ground : Battery voltage
RJIA2858E
Page 3249 of 4555
TROUBLE DIAGNOSIS
ATC-71
C
D
E
F
G
H
I
K
L
MA
B
AT C
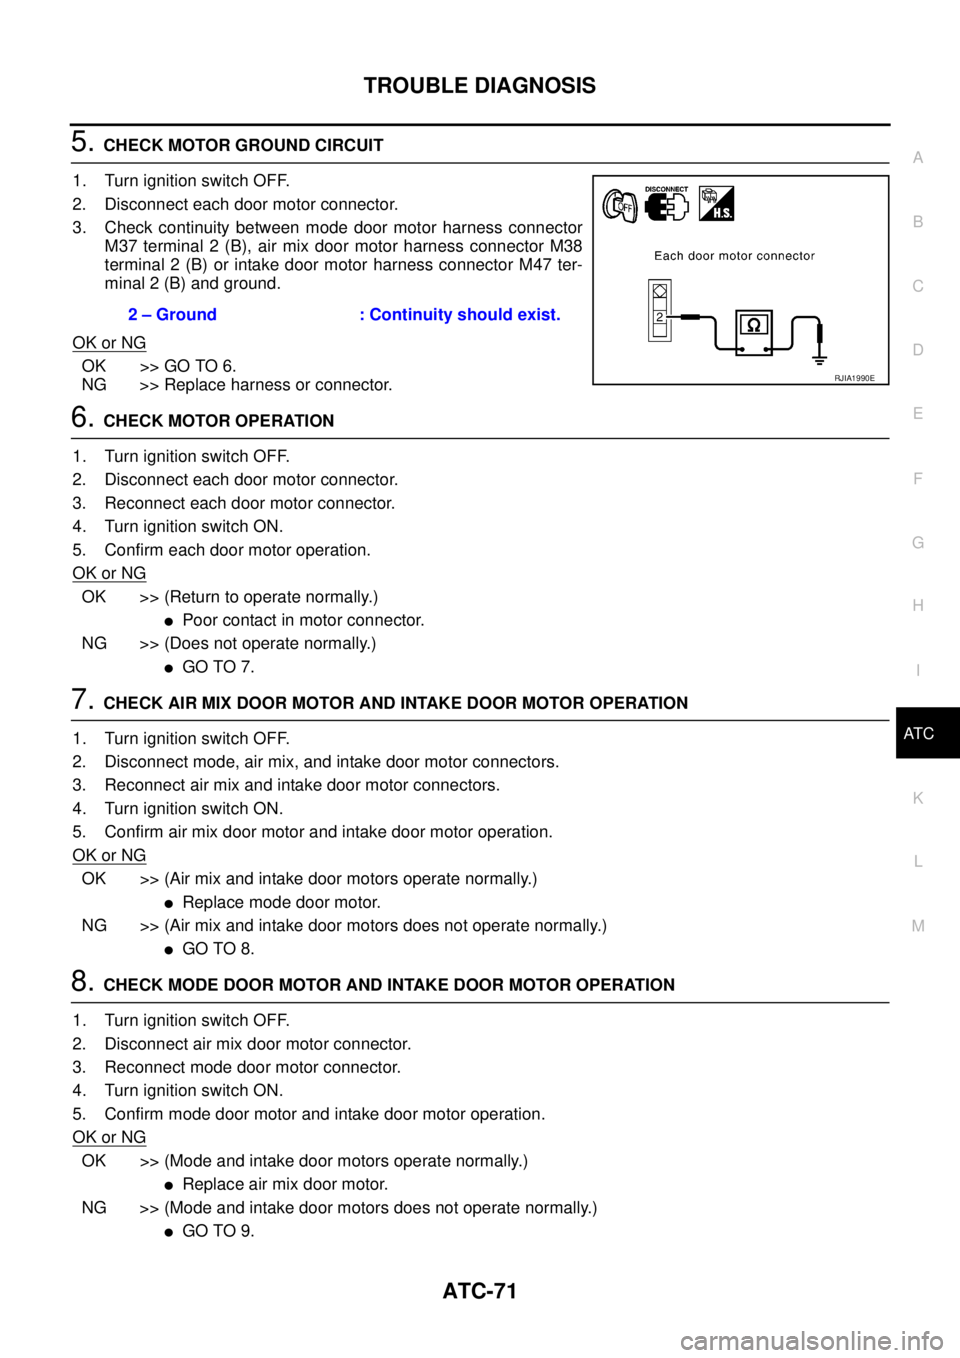
5. CHECK MOTOR GROUND CIRCUIT
1. Turn ignition switch OFF.
2. Disconnect each door motor connector.
3. Check continuity between mode door motor harness connector
M37 terminal 2 (B), air mix door motor harness connector M38
terminal 2 (B) or intake door motor harness connector M47 ter-
minal 2 (B) and ground.
OK or NG
OK >> GO TO 6.
NG >> Replace harness or connector.
6. CHECK MOTOR OPERATION
1. Turn ignition switch OFF.
2. Disconnect each door motor connector.
3. Reconnect each door motor connector.
4. Turn ignition switch ON.
5. Confirm each door motor operation.
OK or NG
OK >> (Return to operate normally.)
�Poor contact in motor connector.
NG >> (Does not operate normally.)
�GO TO 7.
7. CHECK AIR MIX DOOR MOTOR AND INTAKE DOOR MOTOR OPERATION
1. Turn ignition switch OFF.
2. Disconnect mode, air mix, and intake door motor connectors.
3. Reconnect air mix and intake door motor connectors.
4. Turn ignition switch ON.
5. Confirm air mix door motor and intake door motor operation.
OK or NG
OK >> (Air mix and intake door motors operate normally.)
�Replace mode door motor.
NG >> (Air mix and intake door motors does not operate normally.)
�GO TO 8.
8. CHECK MODE DOOR MOTOR AND INTAKE DOOR MOTOR OPERATION
1. Turn ignition switch OFF.
2. Disconnect air mix door motor connector.
3. Reconnect mode door motor connector.
4. Turn ignition switch ON.
5. Confirm mode door motor and intake door motor operation.
OK or NG
OK >> (Mode and intake door motors operate normally.)
�Replace air mix door motor.
NG >> (Mode and intake door motors does not operate normally.)
�GO TO 9. 2 – Ground : Continuity should exist.
RJIA1990E
Page 3250 of 4555
ATC-72
TROUBLE DIAGNOSIS
9. CHECK MODE DOOR MOTOR AND AIR MIX DOOR MOTOR OPERATION
1. Turn ignition switch OFF.
2. Disconnect intake door motor connector.
3. Reconnect air mix door motor connector.
4. Turn ignition switch ON.
5. Confirm mode door motor and air mix door motor operation.
OK or NG
OK >> (Mode and air mix door motors operate normally.)
�Replace intake door motor.
NG >> (Mode and air mix door motors does not operate normally.)
�Replace auto amp.