2005 NISSAN NAVARA ignition
[x] Cancel search: ignitionPage 961 of 3171
WARNING CHIME
DI-51
C
D
E
F
G
H
I
J
L
MA
B
DI
WARNING CHIMEPFP:24814
System DescriptionEKS00L9D
lBuzzer for warning chime system is installed in the combination meter.
lThe buzzer sounds at the following conditions:
–When combination meter receives buzzer output signal with CAN communication line
–When combination meter judges warning chime sound condition is found
POWER SUPPLY AND GROUND CIRCUIT
Power is supplied at all times
lthrough 50A fusible link (letterG, located in the fuse and fusible link box)
lto BCM terminal 57.
With ignition switch in the ON or START position, power is supplied
lthrough 10A fuse [No. 1, located in the fuse block (J/B)]
lto BCM terminal 3.
Ground is supplied
lto BCM terminal 55
lthrough grounds M21, M80 and M83.
LIGHT WARNING CHIME
With ignition switch in OFF or ACC position, driver's door open, and lighting switch in 1ST or 2ND position, the
light warning chime will sound.
lBCM detects ignition switch in OFF or ACC position, front door switch (driver side) ON, and lighting switch
in 1ST or 2ND position. And then transmits buzzer output signal (light warning chime) to combination
meter with CAN communication line.
lWhen combination meter receives buzzer output signal (light warning chime), it sounds the buzzer.
NOTE:
For further details of combination switch, refer toBCS-3, "
COMBINATION SWITCH READING FUNCTION".
KEY REMINDER WARNING CHIME
Key reminder chime sounds, at the same time, when key reminder system starts operating.
key reminder chime also sounds when the following three conditions are simultaneously met.
lKey is inserted in the ignition key cylinder
lDriver¢s door is opened
lThe setting of driver¢s door lock knob is “LOCK”
For information regarding key reminder system, refer toBL-21, "
POWER DOOR LOCK SYSTEM".
LOW-FUEL WARNING CHIME
Low-fuel warning chime sounds, when low-fuel warning lamp is turned ON.
Combination meter sounds warning chime three times when low-fuel warning lamp turns ON.
Page 967 of 3171
WARNING CHIME
DI-57
C
D
E
F
G
H
I
J
L
MA
B
DI
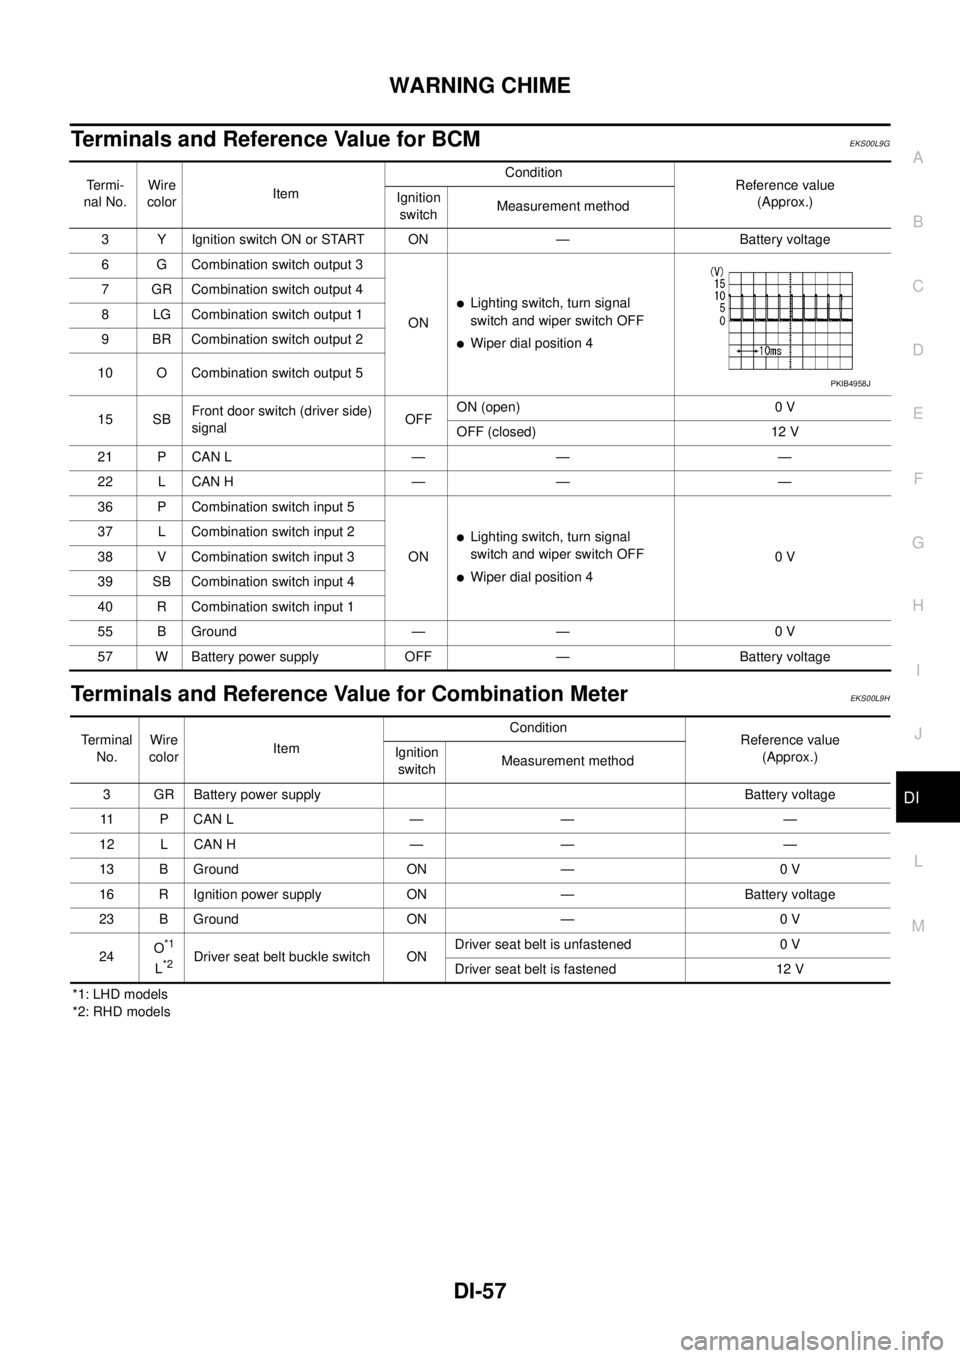
Terminals and Reference Value for BCMEKS00L9G
Terminals and Reference Value for Combination MeterEKS00L9H
*1: LHD models
*2: RHD modelsTe r m i -
nal No.Wire
colorItemCondition
Reference value
(Approx.) Ignition
switchMeasurement method
3 Y Ignition switch ON or START ON — Battery voltage
6 G Combination switch output 3
ON
lLighting switch, turn signal
switch and wiper switch OFF
lWiper dial position 4 7 GR Combination switch output 4
8 LG Combination switch output 1
9 BR Combination switch output 2
10 O Combination switch output 5
15 SBFront door switch (driver side)
signalOFFON (open) 0 V
OFF (closed) 12 V
21 P CAN L — — —
22 L CAN H — — —
36 P Combination switch input 5
ON
lLighting switch, turn signal
switch and wiper switch OFF
lWiper dial position 40V 37 L Combination switch input 2
38 V Combination switch input 3
39 SB Combination switch input 4
40 R Combination switch input 1
55 B Ground — — 0 V
57 W Battery power supply OFF — Battery voltage
PKIB4958J
Terminal
No.Wire
colorItemCondition
Reference value
(Approx.) Ignition
switchMeasurement method
3 GR Battery power supply Battery voltage
11 P C A N L — — —
12 L CAN H — — —
13 B Ground ON — 0 V
16 R Ignition power supply ON — Battery voltage
23 B Ground ON — 0 V
24O
*1
L*2Driver seat belt buckle switch ONDriver seat belt is unfastened 0 V
Driver seat belt is fastened 12 V
Page 968 of 3171
DI-58
WARNING CHIME
CONSULT-II Function (BCM)
EKS00L9K
CONSULT-II can display each diagnostic item using the diagnostic test modes shown following.
DIAGNOSTIC ITEMS DESCRIPTION
CONSULT-II BASIC OPERATION PROCEDURE
CAUTION:
If CONSULT-II is used with no connection of CONSULT-II CONVERTER, malfunctions might be
detected in self-diagnosis depending on control unit which carry out CAN communication.
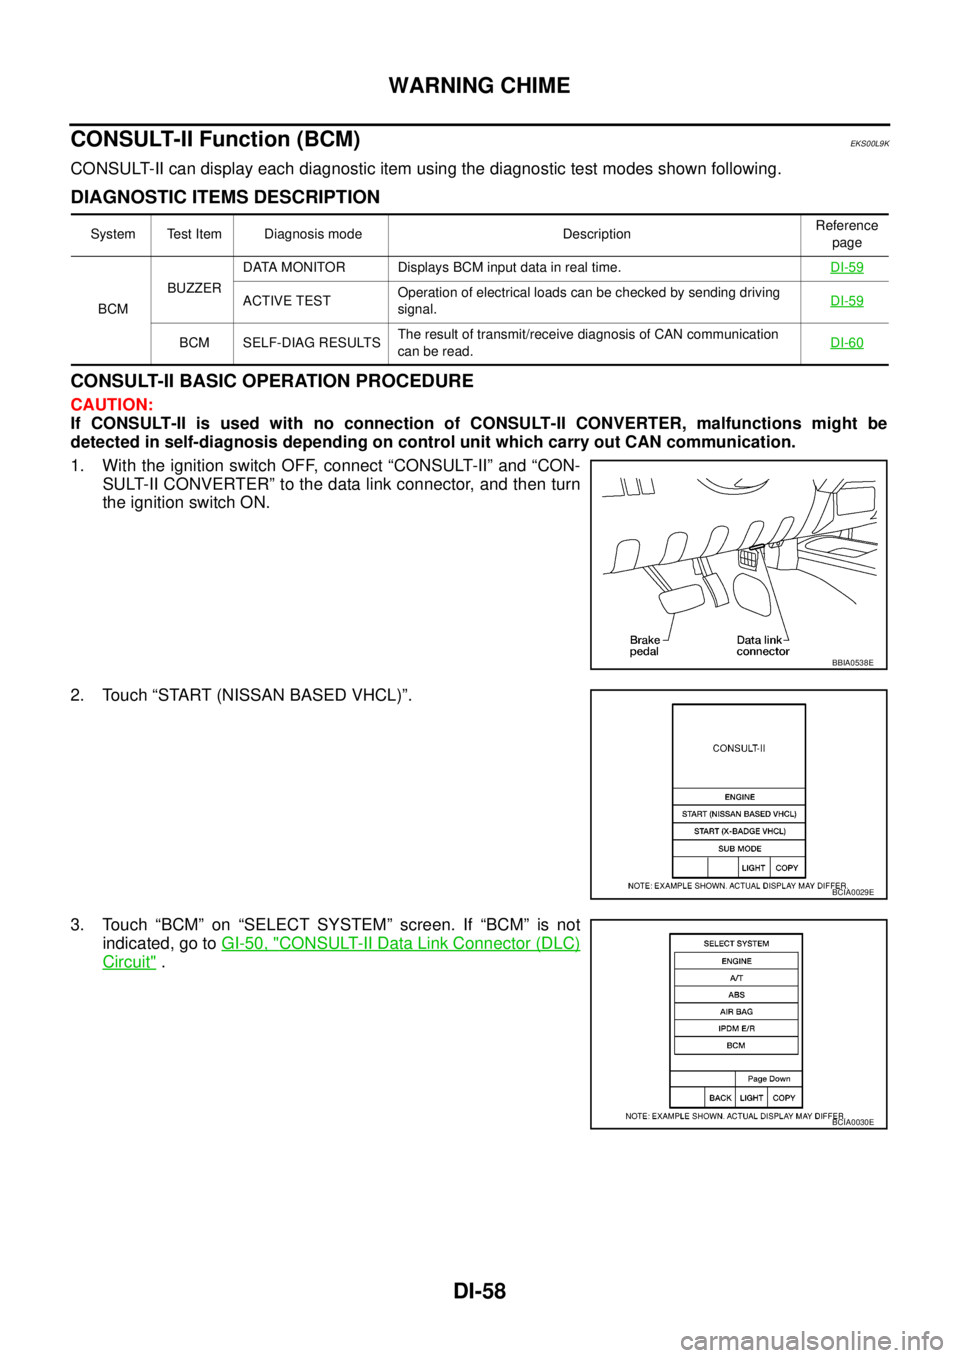
1. With the ignition switch OFF, connect “CONSULT-II” and “CON-
SULT-II CONVERTER” to the data link connector, and then turn
the ignition switch ON.
2. Touch “START (NISSAN BASED VHCL)”.
3. Touch “BCM” on “SELECT SYSTEM” screen. If “BCM” is not
indicated, go toGI-50, "
CONSULT-II Data Link Connector (DLC)
Circuit".
System Test Item Diagnosis mode DescriptionReference
page
BCMBUZZERDATA MONITOR Displays BCM input data in real time.DI-59
ACTIVE TESTOperation of electrical loads can be checked by sending driving
signal.DI-59
BCM SELF-DIAG RESULTSThe result of transmit/receive diagnosis of CAN communication
canberead.DI-60
BBIA0538E
BCIA0029E
BCIA0030E
Page 969 of 3171
WARNING CHIME
DI-59
C
D
E
F
G
H
I
J
L
MA
B
DI
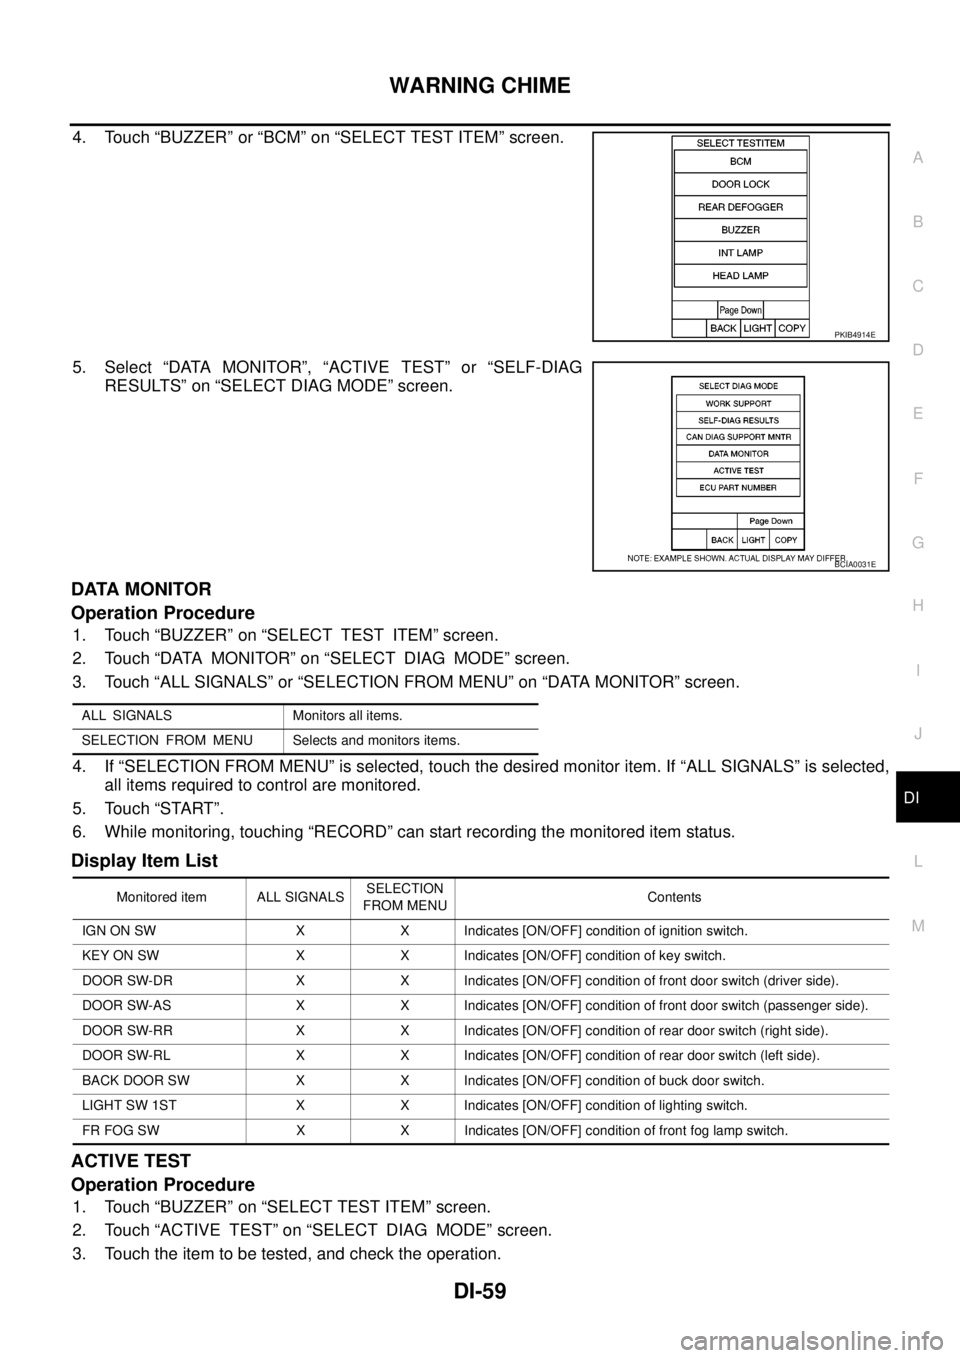
4. Touch “BUZZER” or “BCM” on “SELECT TEST ITEM” screen.
5. Select “DATA MONITOR”, “ACTIVE TEST” or “SELF-DIAG
RESULTS” on “SELECT DIAG MODE” screen.
DATA MONITOR
Operation Procedure
1. Touch “BUZZER” on “SELECT TEST ITEM” screen.
2. Touch “DATA MONITOR” on “SELECT DIAG MODE” screen.
3. Touch “ALL SIGNALS” or “SELECTION FROM MENU” on “DATA MONITOR” screen.
4. If “SELECTION FROM MENU” is selected, touch the desired monitor item. If “ALL SIGNALS” is selected,
all items required to control are monitored.
5. Touch “START”.
6. While monitoring, touching “RECORD” can start recording the monitored item status.
Display Item List
ACTIVE TEST
Operation Procedure
1. Touch “BUZZER” on “SELECT TEST ITEM” screen.
2. Touch “ACTIVE TEST” on “SELECT DIAG MODE” screen.
3. Touch the item to be tested, and check the operation.
PKIB4914E
BCIA0031E
ALL SIGNALS Monitors all items.
SELECTION FROM MENU Selects and monitors items.
Monitored item ALL SIGNALSSELECTION
FROM MENUContents
IGN ON SW X X Indicates [ON/OFF] condition of ignition switch.
KEY ON SW X X Indicates [ON/OFF] condition of key switch.
DOOR SW-DR X X Indicates [ON/OFF] condition of front door switch (driver side).
DOOR SW-AS X X Indicates [ON/OFF] condition of front door switch (passenger side).
DOOR SW-RR X X Indicates [ON/OFF] condition of rear door switch (right side).
DOOR SW-RL X X Indicates [ON/OFF] condition of rear door switch (left side).
BACK DOOR SW X X Indicates [ON/OFF] condition of buck door switch.
LIGHT SW 1ST X X Indicates [ON/OFF] condition of lighting switch.
FR FOG SW X X Indicates [ON/OFF] condition of front fog lamp switch.
Page 972 of 3171
DI-62
WARNING CHIME
Lighting Switch Signal Inspection
EKS00L9O
1.CHECK BCM INPUT SIGNAL
1. Select “BCM”.
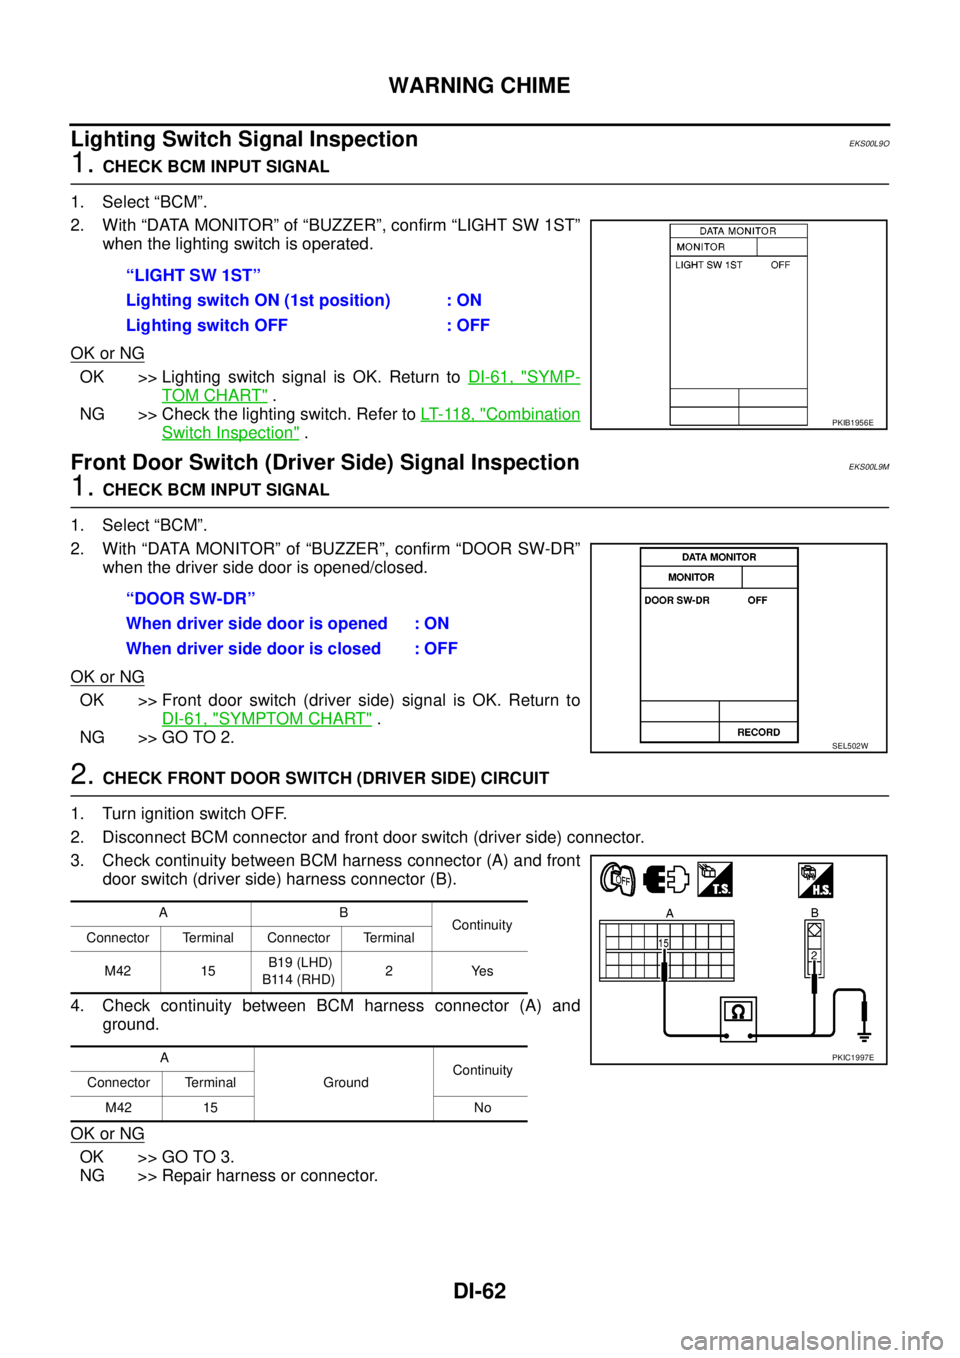
2. With “DATA MONITOR” of “BUZZER”, confirm “LIGHT SW 1ST”
whenthelightingswitchisoperated.
OK or NG
OK >> Lighting switch signal is OK. Return toDI-61, "SYMP-
TOM CHART".
NG >> Check the lighting switch. Refer toLT- 11 8 , "
Combination
Switch Inspection".
Front Door Switch (Driver Side) Signal InspectionEKS00L9M
1.CHECK BCM INPUT SIGNAL
1. Select “BCM”.
2. With “DATA MONITOR” of “BUZZER”, confirm “DOOR SW-DR”
when the driver side door is opened/closed.
OK or NG
OK >> Front door switch (driver side) signal is OK. Return to
DI-61, "
SYMPTOM CHART".
NG >> GO TO 2.
2.CHECK FRONT DOOR SWITCH (DRIVER SIDE) CIRCUIT
1. Turn ignition switch OFF.
2. Disconnect BCM connector and front door switch (driver side) connector.
3. Check continuity between BCM harness connector (A) and front
door switch (driver side) harness connector (B).
4. Check continuity between BCM harness connector (A) and
ground.
OK or NG
OK >> GO TO 3.
NG >> Repair harness or connector.“LIGHT SW 1ST”
Lighting switch ON (1st position) : ON
Lighting switch OFF : OFF
PKIB1956E
“DOOR SW-DR”
When driver side door is opened : ON
When driver side door is closed : OFF
SEL502W
AB
Continuity
Connector Terminal Connector Terminal
M42 15B19 (LHD)
B114 (RHD)2Yes
A
GroundContinuity
Connector Terminal
M42 15 No
PKIC1997E
Page 973 of 3171
WARNING CHIME
DI-63
C
D
E
F
G
H
I
J
L
MA
B
DI
3.CHECK FRONT DOOR SWITCH (DRIVER SIDE)
Check front door switch (driver side). Refer toDI-64, "
FRONT DOOR SWITCH (DRIVER SIDE)".
OK or NG
OK >> Replace BCM. Refer toBCS-17, "Removal and Installation of BCM".
NG >> Replace front door switch (driver side).
Seat Belt Buckle Switch Signal Inspection (Driver Side)EKS00L9P
1.CHECK OPERATION OF SEAT BELT WARNING LAMP
1. Turn ignition switch ON.
2. Check operation of seat belt warning lamp.
OK or NG
OK >> Seat belt buckle switch signal (driver side) is OK. Return toDI-61, "SYMPTOM CHART".
NG >> GO TO 2.
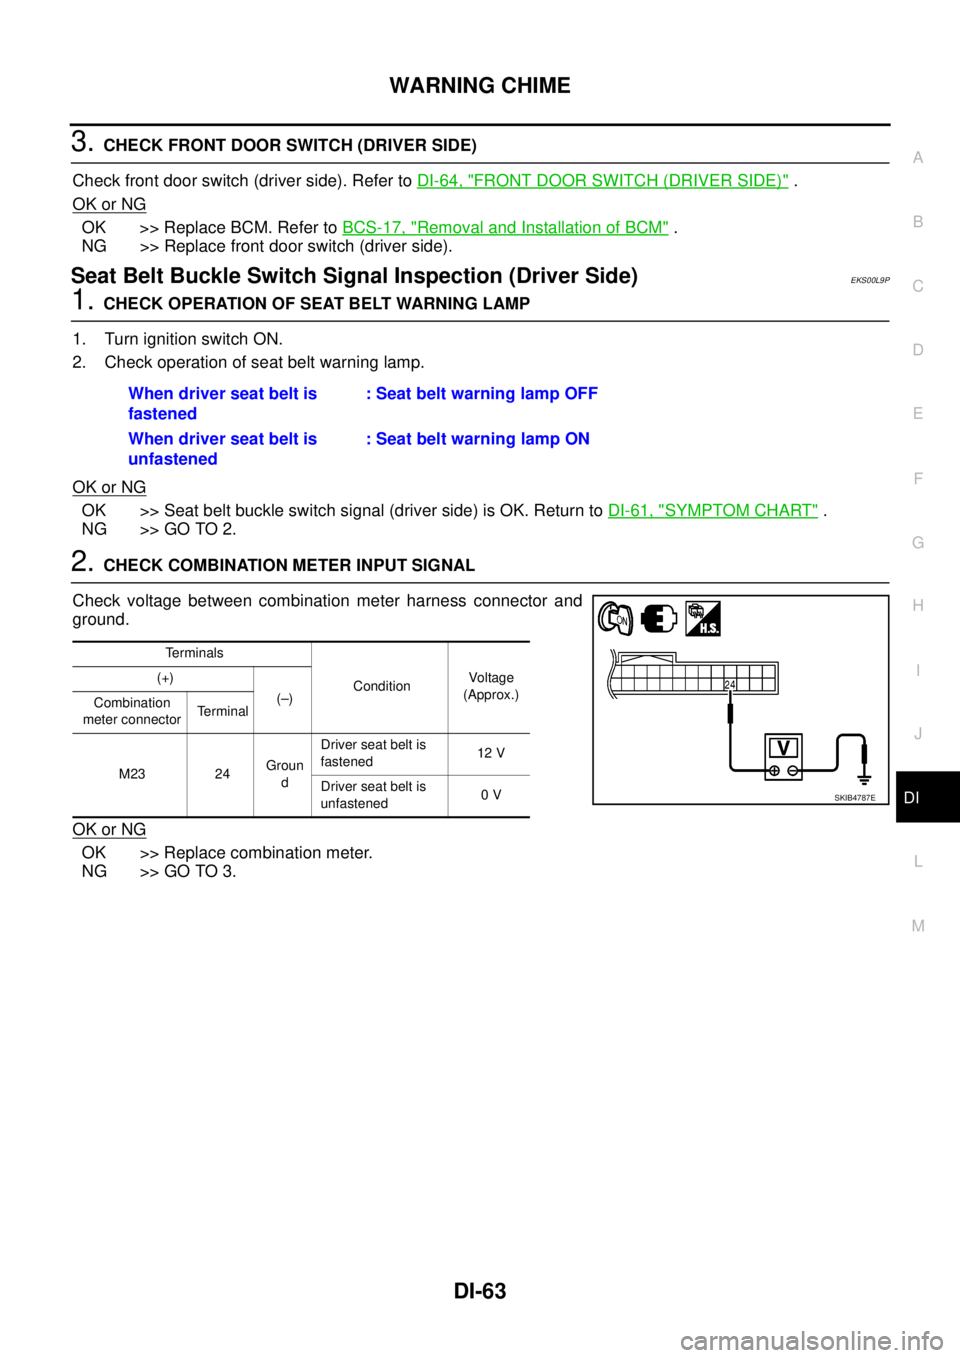
2.CHECK COMBINATION METER INPUT SIGNAL
Check voltage between combination meter harness connector and
ground.
OK or NG
OK >> Replace combination meter.
NG >> GO TO 3.When driver seat belt is
fastened: Seat belt warning lamp OFF
When driver seat belt is
unfastened: Seat belt warning lamp ON
Terminals
ConditionVoltag e
(Approx.) (+)
(–)
Combination
meter connectorTerminal
M23 24Groun
dDriver seat belt is
fastened12 V
Driver seat belt is
unfastened0V
SKIB4787E
Page 974 of 3171
DI-64
WARNING CHIME
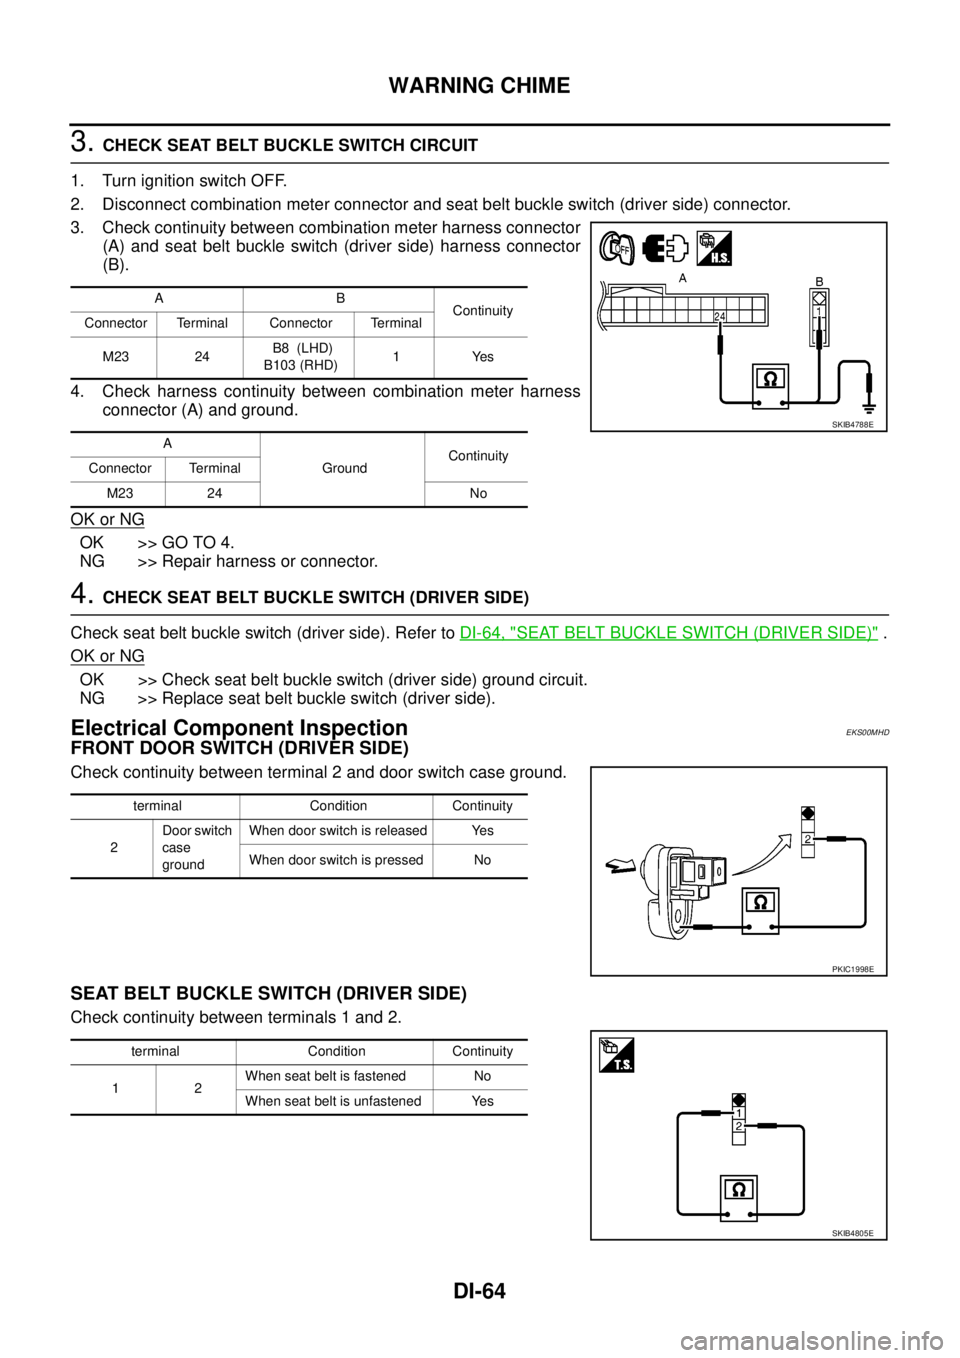
3.CHECK SEAT BELT BUCKLE SWITCH CIRCUIT
1. Turn ignition switch OFF.
2. Disconnect combination meter connector and seat belt buckle switch (driver side) connector.
3. Check continuity between combination meter harness connector
(A) and seat belt buckle switch (driver side) harness connector
(B).
4. Check harness continuity between combination meter harness
connector (A) and ground.
OK or NG
OK >> GO TO 4.
NG >> Repair harness or connector.
4.CHECK SEAT BELT BUCKLE SWITCH (DRIVER SIDE)
Check seat belt buckle switch (driver side). Refer toDI-64, "
SEAT BELT BUCKLE SWITCH (DRIVER SIDE)".
OK or NG
OK >> Check seat belt buckle switch (driver side) ground circuit.
NG >> Replace seat belt buckle switch (driver side).
Electrical Component InspectionEKS00MHD
FRONT DOOR SWITCH (DRIVER SIDE)
Check continuity between terminal 2 and door switch case ground.
SEAT BELT BUCKLE SWITCH (DRIVER SIDE)
Check continuity between terminals 1 and 2.
AB
Continuity
Connector Terminal Connector Terminal
M23 24B8 (LHD)
B103 (RHD)1Yes
A
GroundContinuity
Connector Terminal
M23 24 No
SKIB4788E
terminal Condition Continuity
2Door switch
case
groundWhen door switch is released Yes
When door switch is pressed No
PKIC1998E
terminal Condition Continuity
12When seat belt is fastened No
When seat belt is unfastened Yes
SKIB4805E
Page 976 of 3171
DI-66
COMPASS
COMPASS
PFP:24835
System DescriptionEKS00M4Z
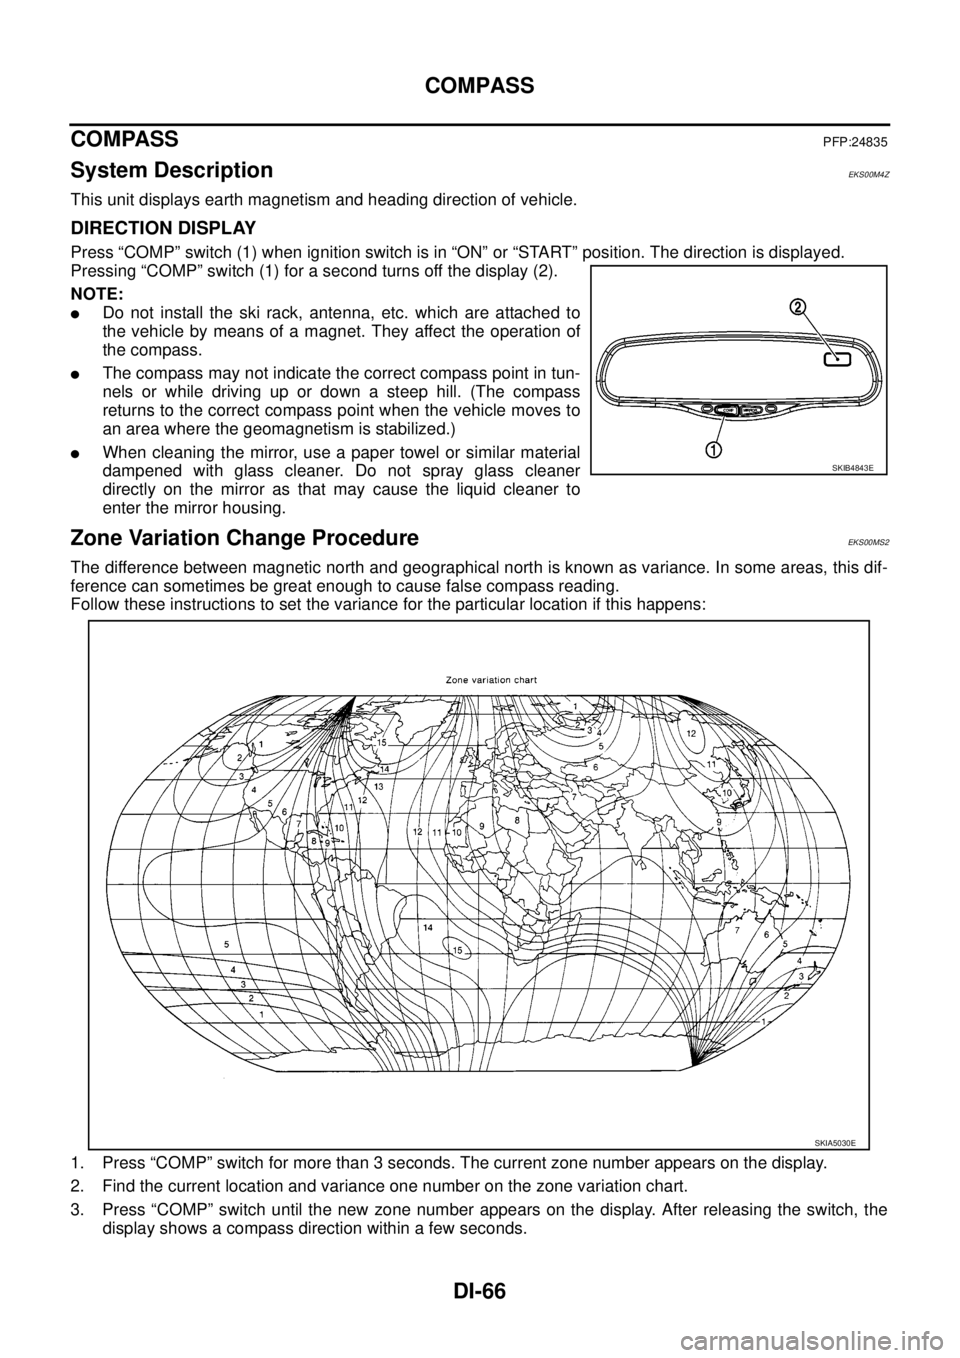
This unit displays earth magnetism and heading direction of vehicle.
DIRECTION DISPLAY
Press “COMP” switch (1) when ignition switch is in “ON” or “START” position. The direction is displayed.
Pressing “COMP” switch (1) for a second turns off the display (2).
NOTE:
lDo not install the ski rack, antenna, etc. which are attached to
the vehicle by means of a magnet. They affect the operation of
the compass.
lThe compass may not indicate the correct compass point in tun-
nels or while driving up or down a steep hill. (The compass
returns to the correct compass point when the vehicle moves to
an area where the geomagnetism is stabilized.)
lWhen cleaning the mirror, use a paper towel or similar material
dampened with glass cleaner. Do not spray glass cleaner
directly on the mirror as that may cause the liquid cleaner to
enter the mirror housing.
Zone Variation Change ProcedureEKS00MS2
The difference between magnetic north and geographical north is known as variance. In some areas, this dif-
ference can sometimes be great enough to cause false compass reading.
Follow these instructions to set the variance for the particular location if this happens:
1. Press “COMP” switch for more than 3 seconds. The current zone number appears on the display.
2. Find the current location and variance one number on the zone variation chart.
3. Press “COMP” switch until the new zone number appears on the display. After releasing the switch, the
display shows a compass direction within a few seconds.
SKIB4843E
SKIA5030E