2005 MITSUBISHI 380 torque
[x] Cancel search: torquePage 1222 of 1500
00-1
GROUP 00
GENERAL
CONTENTS
HOW TO USE THIS MANUAL . . . . . .00-3
TROUBLESHOOTING GUIDELINES00-6
HOW TO USE TROUBLESHOOTING /
INSPECTION SERVICE POINTS. . . .00-7
TROUBLESHOOTING CONTENTS . . . . . . 00-7
HOW TO USE THE INSPECTION
PROCEDURES . . . . . . . . . . . . . . . . . . . . . . 00-9
CONNECTOR MEASUREMENT SERVICE
POINTS . . . . . . . . . . . . . . . . . . . . . . . . . . . . 00-11
CONNECTOR INSPECTION SERVICE
POINTS . . . . . . . . . . . . . . . . . . . . . . . . . . . . 00-13
HOW TO COPE WITH INTERMITTENT
MALFUNCTIONS . . . . . . . . . . . . . . . . . . . . 00-14
INSPECTION SERVICE POINTS
FOR A BLOWN FUSE . . . . . . . . . . . . . . . . 00-16
HOW TO TREAT CURRENT TROUBLE . . 00-16
HOW TO TREAT PAST TROUBLE . . . . . . 00-16
AFFILIATED DTC REFERENCE
TABLE . . . . . . . . . . . . . . . . . . . . . . . .00-17
VEHICLE IDENTIFICATION . . . . . . .00-18
VEHICLE IDENTIFICATION NUMBER . . . 00-18
VEHICLE INFORMATION NUMBER LIST 00-19
VEHICLE COMPLIANCE PLATE . . . . . . . . 00-19
VEHICLE DATA PLATE . . . . . . . . . . . . . . . 00-20
AUSTRALIAN DESIGN RULES . . . . . . . . . 00-20OPTION CODES . . . . . . . . . . . . . . . . . . . . . 00-21
EXPORT CODES . . . . . . . . . . . . . . . . . . . . 00-21
TYRE AND LOADING PLACARD . . . . . . . . 00-21
ENGINE MODEL STAMPING . . . . . . . . . . . 00-22
PRECAUTIONS BEFORE SERVICE .00-22
SUPPLEMENTAL RESTRAINT
SYSTEM (SRS . . . . . . . . . . . . . . . . . . . . . . 00-22
HOW TO PERFORM VEHICLE
IDENTIFICATION NUMBER (VIN) WRITING00-23
SERVICING ELECTRICAL SYSTEM . . . . . 00-24
VEHICLE WASHING . . . . . . . . . . . . . . . . . . 00-24
APPLICATION OF ANTI-CORROSION
AGENTS AND UNDERCOATS . . . . . . . . . . 00-25
DIAGNOSTIC TOOL (MUT-III) . . . . . . . . . . 00-25
TOWING AND HOISTING. . . . . . . . . .00-26
GENERAL DATA AND
SPECIFICATIONS . . . . . . . . . . . . . . .00-31
TIGHTENING TORQUE . . . . . . . . . . .00-32
LUBRICATION AND MAINTENANCE 00-34
RECOMMENDED LUBRICANTS AND
LUBRICANT CAPACITIES TABLE . .00-35
Continued on next page
Page 1224 of 1500
HOW TO USE THIS MANUAL
GENERAL00-3
HOW TO USE THIS MANUALM1001000100897
MAINTENANCE, REPAIR AND
SERVICING EXPLANATIONS
This manual provides explanations, etc. concerning
procedures for the inspection, maintenance, repair
and servicing of the subject model. Unless otherwise
specified, each service procedure covers all models.
Procedures covering specific models are identified
by the model codes, or similar designation (engine
type, transaxle type, etc). A description of these des-
ignations is covered in this manual under "VEHICLE
IDENTIFICATION."
.
ON-VEHICLE SERVICE
The "ON-VEHICLE SERVICE" section has proce-
dures for performing inspections and adjustments of
particularly important components. These proce-
dures are done with regard to maintenance and ser-
vicing, but other inspections (looseness, play,
cracking, damage, etc.) must also be performed.
.
SERVICE PROCEDURES
The service steps are arranged in numerical order.
Attention to be paid in performing vehicle service are
described in detail in SERVICE POINTS.
DEFINITION OF TERMS
.
STANDARD VALUE
Indicates the value used as the standard for judging
whether or not a part or adjustment is correct.
.
LIMIT
Shows the maximum or minimum value for judging
whether or not a part or adjustment is acceptable.
.
REFERENCE VALUE
Indicates the adjustment value prior to starting the
work (presented in order to facilitate assembly and
adjustment procedures, and so they can be com-
pleted in a shorter time).
.
DANGER, WARNING, AND CAUTION
DANGER, WARNING, and CAUTION call special
attention to a necessary action or to an action that
must be avoided. The differences among DANGER,
WARNING, and CAUTION are as follows:
If a DANGER is not followed, the result is severe
bodily harm or even death.
If a WARNING is not followed, the result could be
bodily injury.
If a CAUTION is not followed, the result could be
damage to the vehicle, vehicle components or
service equipment.
TIGHTENING TORQUE INDICATION
The tightening torque indicates a median and its tol-
erance by a unit of N
m (in-lb.) or Nm (ft.-lb.). For
fasteners with no assigned torque value, refer to
P.00-32.
SPECIAL TOOL NOTE
Only MMC special tool part numbers are called out in
the repair sections of this manual. Please refer to the
special tool cross-reference chart located at the
beginning of each group, for the special tool number
that is available in your market.
ABBREVIATIONS
The following abbreviations are used in this manual
for classification of model types:
A/T:Automatic transaxle, or models equipped with
automatic transaxle.
MPI: Multipoint fuel injection, or engines equipped
with multiport fuel injection.
A/C: Air conditioning.
3.8L engine: 3.8 litre <6G75> engine, or a model
equipped with such an engine.
ABS: Anti-lock Braking System
TCL: Traction Control System
ECU: Electronic Control Unit
V.C.I.: Vehicle Communication Interface
SWS: Simplified Wiring System
CAN: Controller Area Network
M/T: Manual Transmission
SRS: Supplemental Restraint System
Page 1253 of 1500

TIGHTENING TORQUE
GENERAL00-32
TIGHTENING TORQUEM1001001100555
Each torque value in the table is a standard value for
tightening under the following conditions.
1. Bolts, nuts and washers are all made of steel and
plated with zinc.
2. The threads and bearing surface of bolts and
nuts are all in dry condition.
The values in the table are not applicable:1. If toothed washers are inserted.
2. If plastic parts are fastened.
3. If bolts are tightened to plastic or die-cast
inserted nuts.
4. If self-tapping screws or self-locking nuts are
used.
STANDARD BOLT AND NUT TIGHTENING TORQUE Engine Model No. 6G75
Total displacement 3,828cc
Automatic
TransaxleModel No. F5A5A-4-C2Z
Type 5-speed automatic
Manual
Trans.Model No. F 5M51
Type 5-speed manual
Fuel
systemFuel supply system Electronic controlled multipoint fuel injection (MPI) ITEM 380, 380LS, 380LX 380VRX, 380GT
THREAD SIZE STANDARD TIGHTENING TORQUE
NOMINAL BOLT
DIAMETER (mm)PITCH
(mm)HEAD MARK "4" HEAD MARK "7" HEAD MARK "8"
M5 0.8 2.5
0.5 Nm (23 4
in-lb)5.0 1.0 Nm (44 9
in-lb)6.0 1.0 Nm (53 9
in-lb)
M6 1.0 5.0
1.0 Nm (44 9
in-lb)8.5 1.5 Nm (76 13
in-lb)10 2 Nm (89 17
in-lb)
M8 1.25 11
2 Nm (98 17
in-lb)20 4 Nm (15 3 ft-lb) 24 4 Nm (18 3 ft-lb)
M10 1.25 23
4 Nm (17 3 ft-lb) 42 8 Nm (31 6 ft-lb) 53 7 Nm (39 5 ft-lb)
M12 1.25 42
8 Nm (31 6 ft-lb) 80 10 Nm (59 7
ft-lb)93 12 Nm (68 9
ft-lb)
M14 1.5 70
10 Nm (52 7
ft-lb)130 20 Nm (96 15
ft-lb)150 20 Nm ( 111 14
ft-lb)
M16 1.5 105
15 Nm (78 11
ft-lb)195 25 Nm (144 18
ft-lb)230 30 Nm (170 22
ft-lb)
M18 1.5 150
20 Nm ( 111 14
ft-lb)290 40 Nm (214 29
ft-lb)335 45 Nm (247 33
ft-lb)
Page 1254 of 1500

TIGHTENING TORQUE
GENERAL00-33
FLANGE BOLT AND NUT TIGHTENING TORQUE M20 1.5 210
30 Nm (155 22
ft-lb)400 60 Nm (295 44
ft-lb)465 65 Nm (343 48
ft-lb)
M22 1.5 290
40 Nm (214 29
ft-lb)540 80 Nm (398 59
ft-lb)630 90 Nm (465 66
ft-lb)
M24 1.5 375
55 Nm (277 40
ft-lb)705 105 Nm (520
77 ft-lb)820 120 Nm (605
88 ft-lb)
THREAD SIZE STANDARD TIGHTENING TORQUE
NOMINAL BOLT
DIAMETER (mm)PITCH
(mm)HEAD MARK "4" HEAD MARK "7" HEAD MARK "8"
M6 1.0 5.0
1.0 Nm (44 9
in-lb)10 2 Nm (89 17
in-lb)12 2 Nm (107 17
in-lb)
M8 1.25 13
2 Nm (111 22
in-lb)24 4 Nm (18 3 ft-lb) 28 5 Nm (20 4 ft-lb)
M10 1.25 26
5 Nm (19 4 ft-lb) 50 5 Nm (37 4 ft-lb) 58 7 Nm (43 5 ft-lb)
M10 1.5 25
4 Nm (18 3 ft-lb) 46 8 Nm (34 6 ft-lb) 55 5 Nm (41 3 ft-lb)
M12 1.25 47
9 Nm (35 6 ft-lb) 93 12 Nm (68 9
ft-lb)105 15 Nm (78 11
ft-lb)
M12 1.75 43
8 Nm (32 6 ft-lb) 83 12 Nm (61 9
ft-lb)98 12 Nm (72 9
ft-lb) THREAD SIZE STANDARD TIGHTENING TORQUE
NOMINAL BOLT
DIAMETER (mm)PITCH
(mm)HEAD MARK "4" HEAD MARK "7" HEAD MARK "8"
Page 1263 of 1500
MAINTENANCE SERVICE
GENERAL00-42
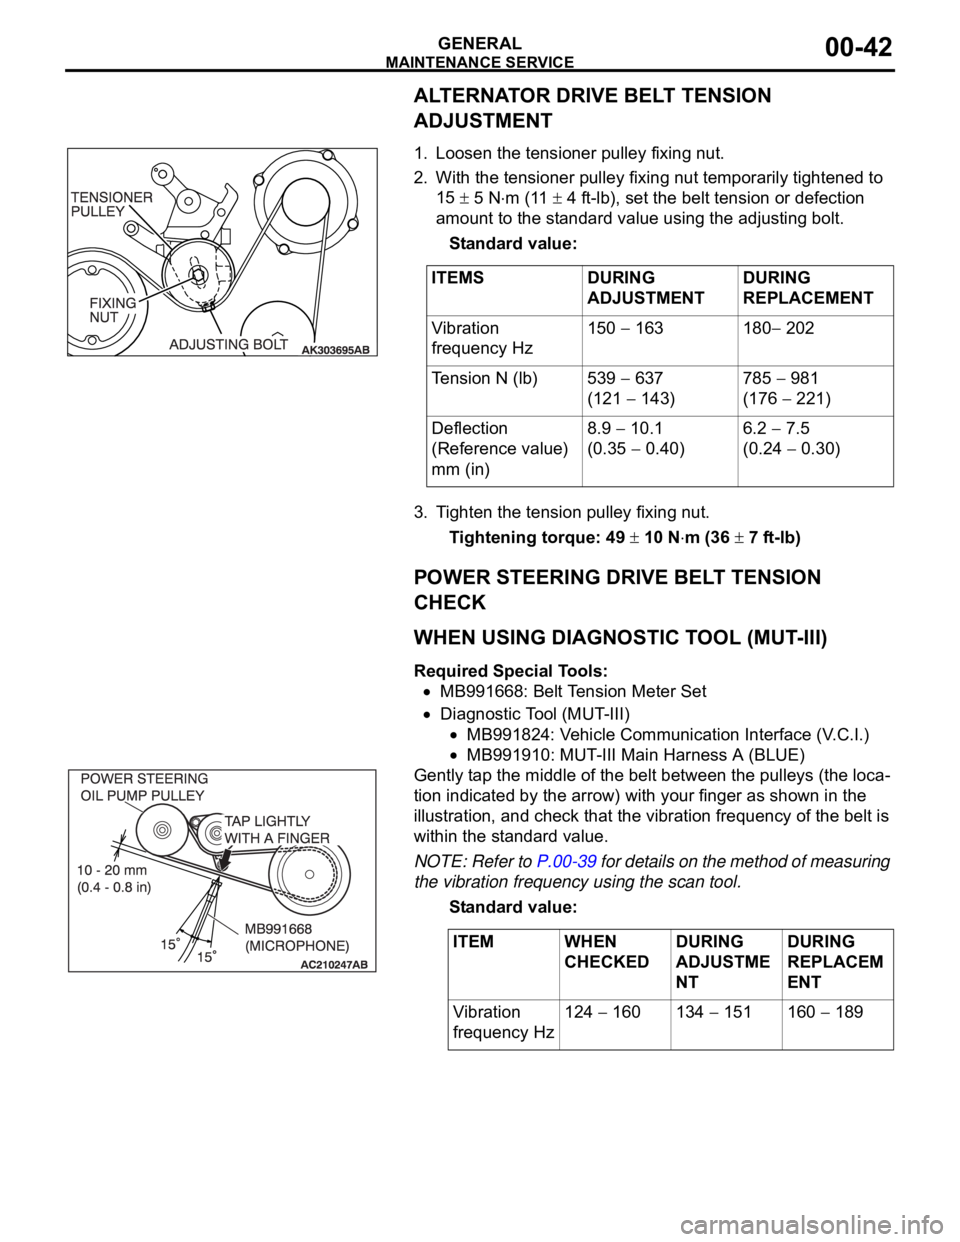
ALTERNATOR DRIVE BELT TENSION
ADJUSTMENT
.1. Loosen the tensioner pulley fixing nut.
2. With the tensioner pulley fixing nut temporarily tightened to
15
5 Nm (11 4 ft-lb), set the belt tension or defection
amount to the standard value using the adjusting bolt.
Standard value:
3. Tighten the tension pulley fixing nut.
Tightening torque: 49
10 Nm (36 7 ft-lb)
POWER STEERING DRIVE BELT TENSION
CHECK
.
WHEN USING DIAGNOSTIC TOOL (MUT-III)
Required Special Tools:
MB991668: Belt Tension Meter Set
Diagnostic Tool (MUT-III)
MB991824: Vehicle Communication Interface (V.C.I.)
MB991910: MUT-III Main Harness A (BLUE)
Gently tap the middle of the belt between the pulleys (the loca-
tion indicated by the arrow) with your finger as shown in the
illustration, and check that the vibration frequency of the belt is
within the standard value.
NOTE: Refer to P.00-39 for details on the method of measuring
the vibration frequency using the scan tool.
Standard value:
.
ITEMS DURING
ADJUSTMENTDURING
REPLACEMENT
Vibration
frequency Hz150
163 180 202
Tension N (lb) 539
637
(121
143)785
981
(176
221)
Deflection
(Reference value)
mm (in)8.9
10.1
(0.35
0.40)6.2
7.5
(0.24
0.30)
ITEM WHEN
CHECKEDDURING
ADJUSTME
NTDURING
REPLACEM
ENT
Vibration
frequency Hz124
160 134 151 160 189
Page 1264 of 1500
MAINTENANCE SERVICE
GENERAL00-43
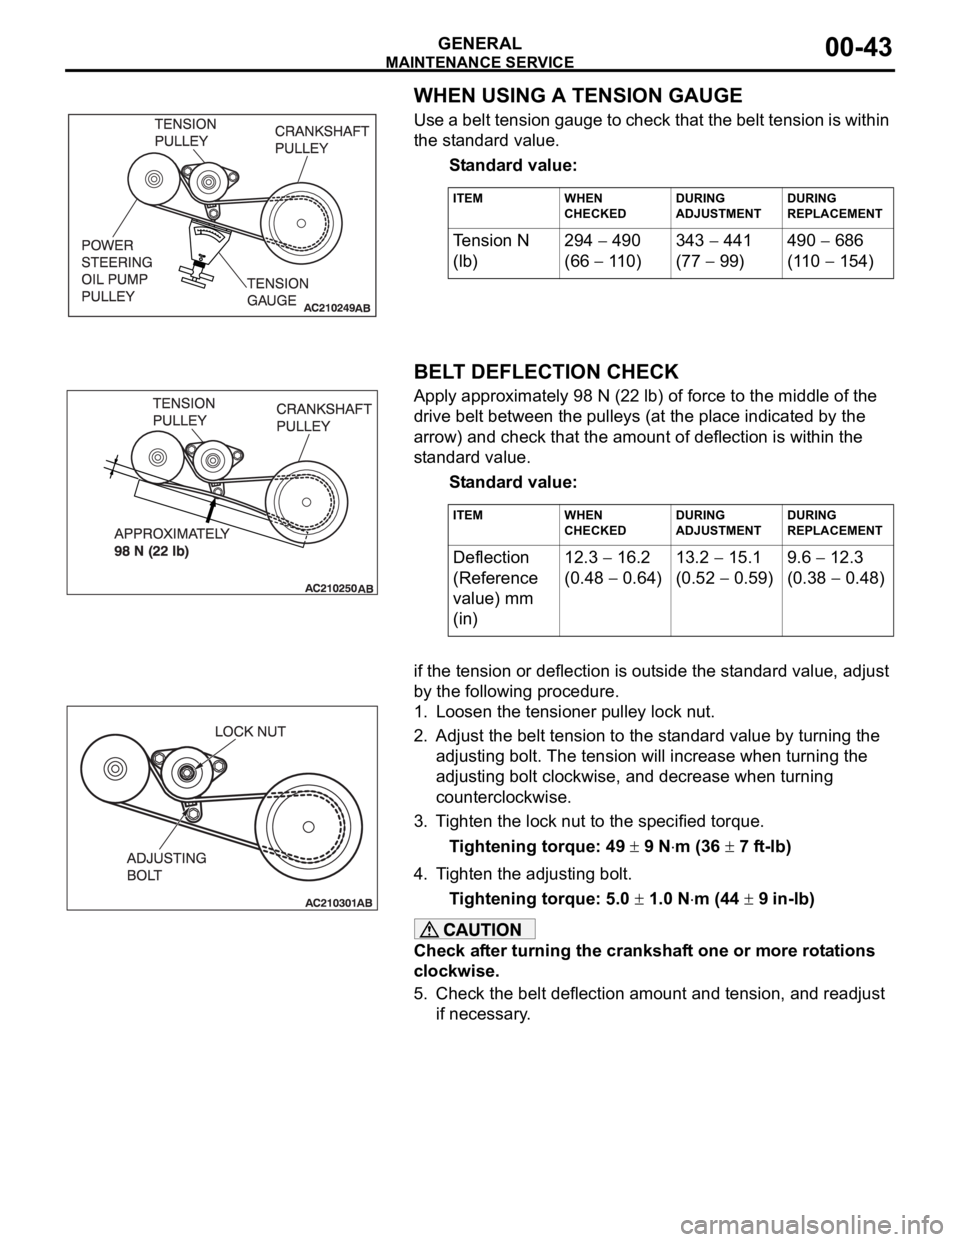
WHEN USING A TENSION GAUGE
Use a belt tension gauge to check that the belt tension is within
the standard value.
Standard value:
.
BELT DEFLECTION CHECK
Apply approximately 98 N (22 lb) of force to the middle of the
drive belt between the pulleys (at the place indicated by the
arrow) and check that the amount of deflection is within the
standard value.
Standard value:
.if the tension or deflection is outside the standard value, adjust
by the following procedure.
1. Loosen the tensioner pulley lock nut.
2. Adjust the belt tension to the standard value by turning the
adjusting bolt. The tension will increase when turning the
adjusting bolt clockwise, and decrease when turning
counterclockwise.
3. Tighten the lock nut to the specified torque.
Tightening torque: 49
9 Nm (36 7 ft-lb)
4. Tighten the adjusting bolt.
Tightening torque: 5.0
1.0 Nm (44 9 in-lb)
Check after turning the crankshaft one or more rotations
clockwise.
5. Check the belt deflection amount and tension, and readjust
if necessary.
ITEM WHEN
CHECKEDDURING
ADJUSTMENTDURING
REPLACEMENT
Te n s i o n N
(lb)294 490
(66
110)343
441
(77
99)490
686
(110
154)
ITEM WHEN
CHECKEDDURING
ADJUSTMENTDURING
REPLACEMENT
Deflection
(Reference
value) mm
(in)12.3 16.2
(0.48
0.64)13.2
15.1
(0.52
0.59)9.6
12.3
(0.38
0.48)
Page 1265 of 1500
MAINTENANCE SERVICE
GENERAL00-44
8. EXHAUST SYSTEM (CONNECTIONS PORTION
OF MUFFLER, MUFFLER PIPES AND
CONVERTER HEAT SHIELDS) (CHECK AND
SERVICE AS REQUIRED)
M1001005800299
1. Check for holes and exhaust gas leaks due to damage,
corrosion, etc.
2. Check the joints and connections for looseness and exhaust
gas leaks.
3. Check the rubber hangers and brackets for damage.
9. ENGINE OIL (CHANGE)M1001002600360
Use the specified oil. (Refer to P.00-35.)
Use care as oil could be hot.
1. After warming up the engine, remove the oil filler cap.
2. Remove the drain plug to allow the engine oil to drain.
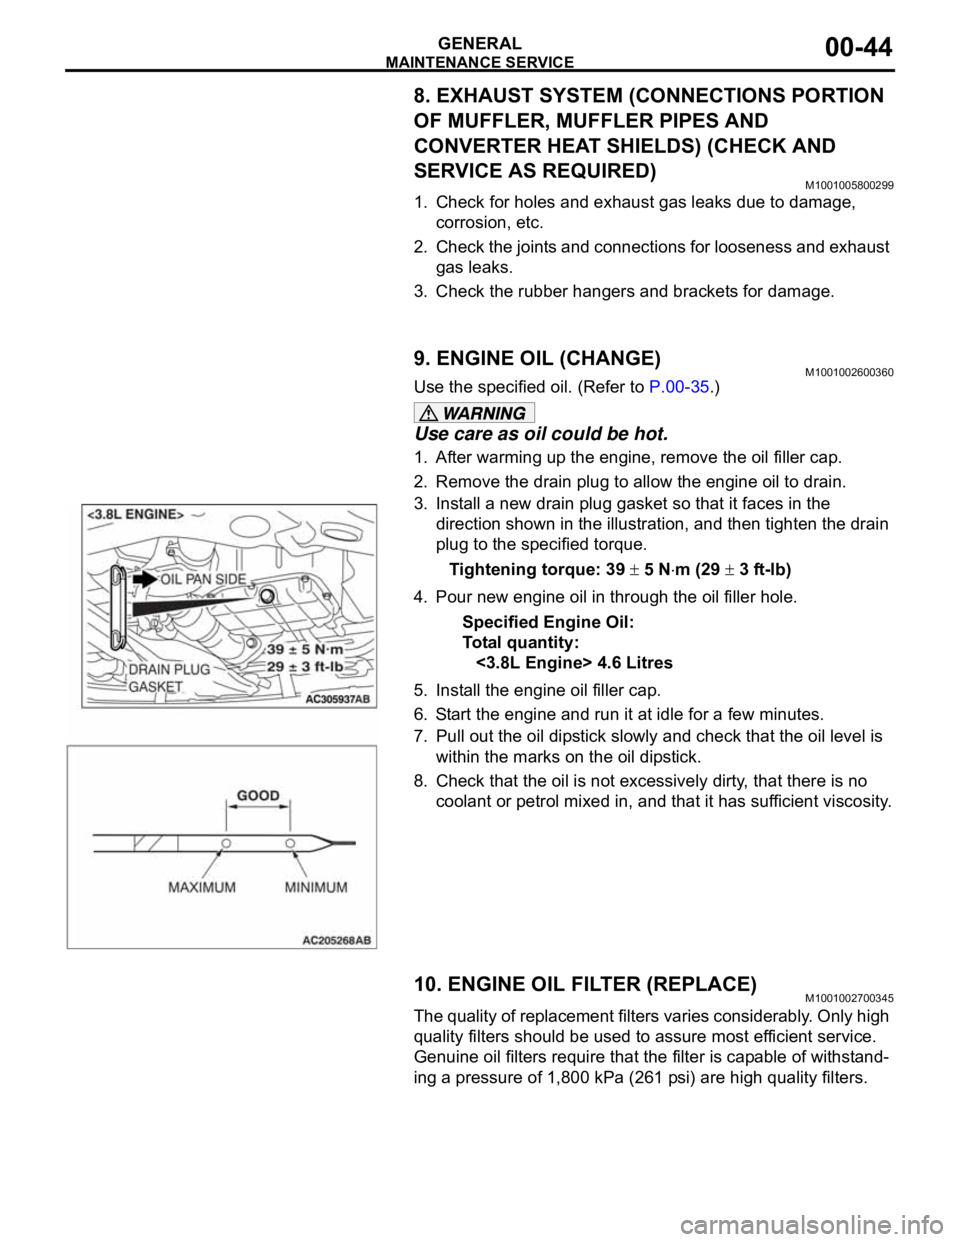
3. Install a new drain plug gasket so that it faces in the
direction shown in the illustration, and then tighten the drain
plug to the specified torque.
Tightening torque: 39
5 Nm (29 3 ft-lb)
4. Pour new engine oil in through the oil filler hole.
Specified Engine Oil:
To ta l q u a n t i t y :
<3.8L Engine> 4.6 Litres
5. Install the engine oil filler cap.
6. Start the engine and run it at idle for a few minutes.
7. Pull out the oil dipstick slowly and check that the oil level is
within the marks on the oil dipstick.
8. Check that the oil is not excessively dirty, that there is no
coolant or petrol mixed in, and that it has sufficient viscosity.
10. ENGINE OIL FILTER (REPLACE)M1001002700345
The quality of replacement filters varies considerably. Only high
quality filters should be used to assure most efficient service.
Genuine oil filters require that the filter is capable of withstand-
ing a pressure of 1,800 kPa (261 psi) are high quality filters.
.
Page 1266 of 1500
MAINTENANCE SERVICE
GENERAL00-45
Engine Oil Filter Selection
This vehicle is equipped with a full-flow, throw-away oil filter.
The same type of filter is recommended as a replacement filter
for this vehicle. It is possible, particularly in cold weather, that
this vehicle may develop high oil pressure for a short duration.
Make sure that any replacement filter used on this vehicle is a
high-quality filter. The filter must withstand a pressure of 1,800
kPa (261 psi) [manufacturer's specifications] to avoid filter and
ultimately engine damage. The Genuine Mitsubishi high-quality
filter and is strongly recommended for use on this vehicle.
Any replacement oil filter should be installed in accordance with
the oil filter manufacturer's installation instructions.
.
Oil Filter Replacement
Use care as oil could be hot.
1. Drain the engine oil by removing the oil drain plug.
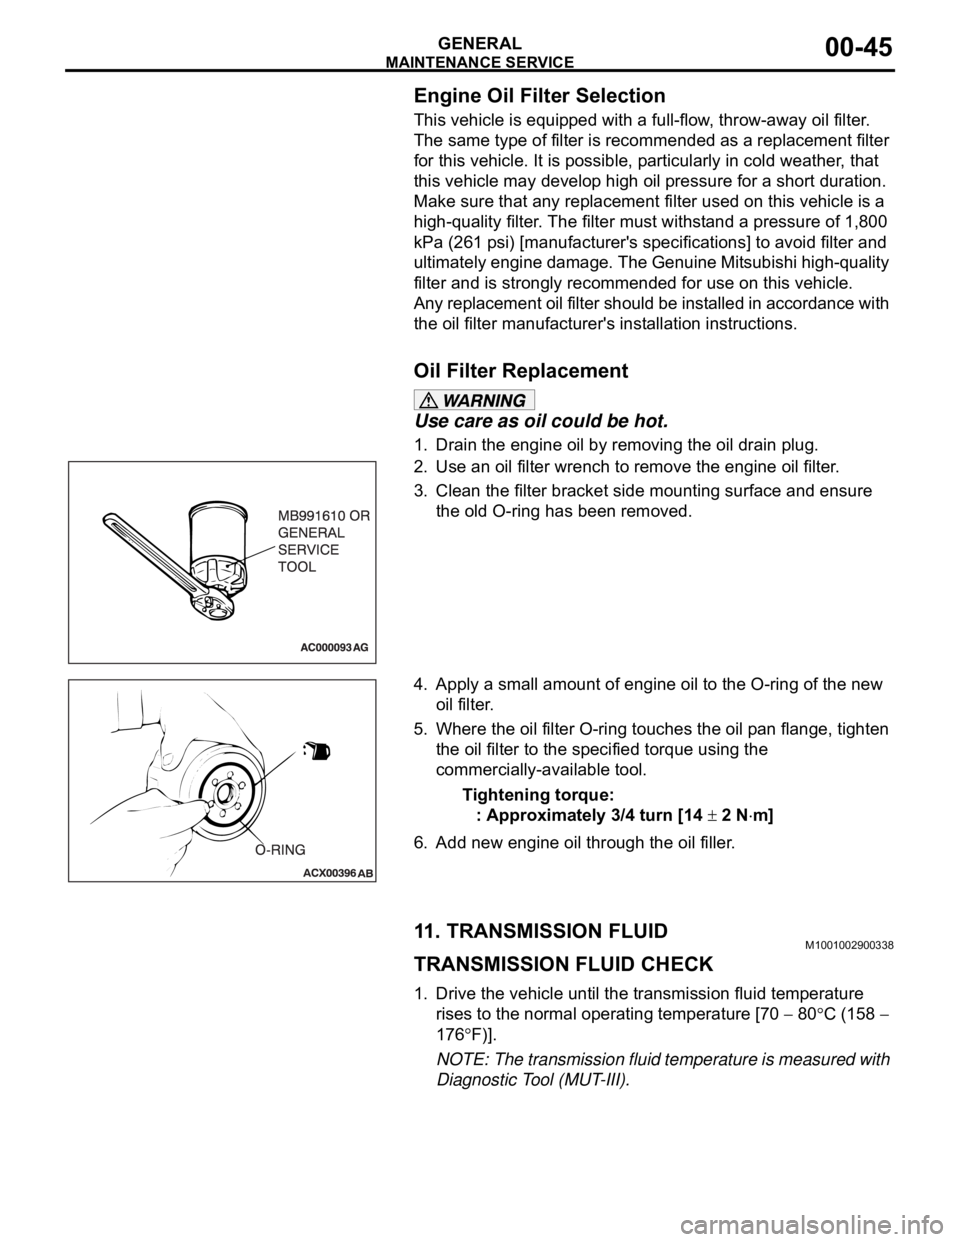
2. Use an oil filter wrench to remove the engine oil filter.
3. Clean the filter bracket side mounting surface and ensure
the old O-ring has been removed.
4. Apply a small amount of engine oil to the O-ring of the new
oil filter.
5. Where the oil filter O-ring touches the oil pan flange, tighten
the oil filter to the specified torque using the
commercially-available tool.
Tightening torque:
: Approximately 3/4 turn [14
2 Nm]
6. Add new engine oil through the oil filler.
11. TRANSMISSION FLUIDM1001002900338
TRANSMISSION FLUID CHECK
1. Drive the vehicle until the transmission fluid temperature
rises to the normal operating temperature [70
80C (158
176
F)].
NOTE: The transmission fluid temperature is measured with
Diagnostic Tool (MUT-III).