2005 MITSUBISHI 380 charging
[x] Cancel search: chargingPage 843 of 1500

ON-VEHICLE SERVICE
HEATER, AIR CONDITIONING AND VENTILATION55-142
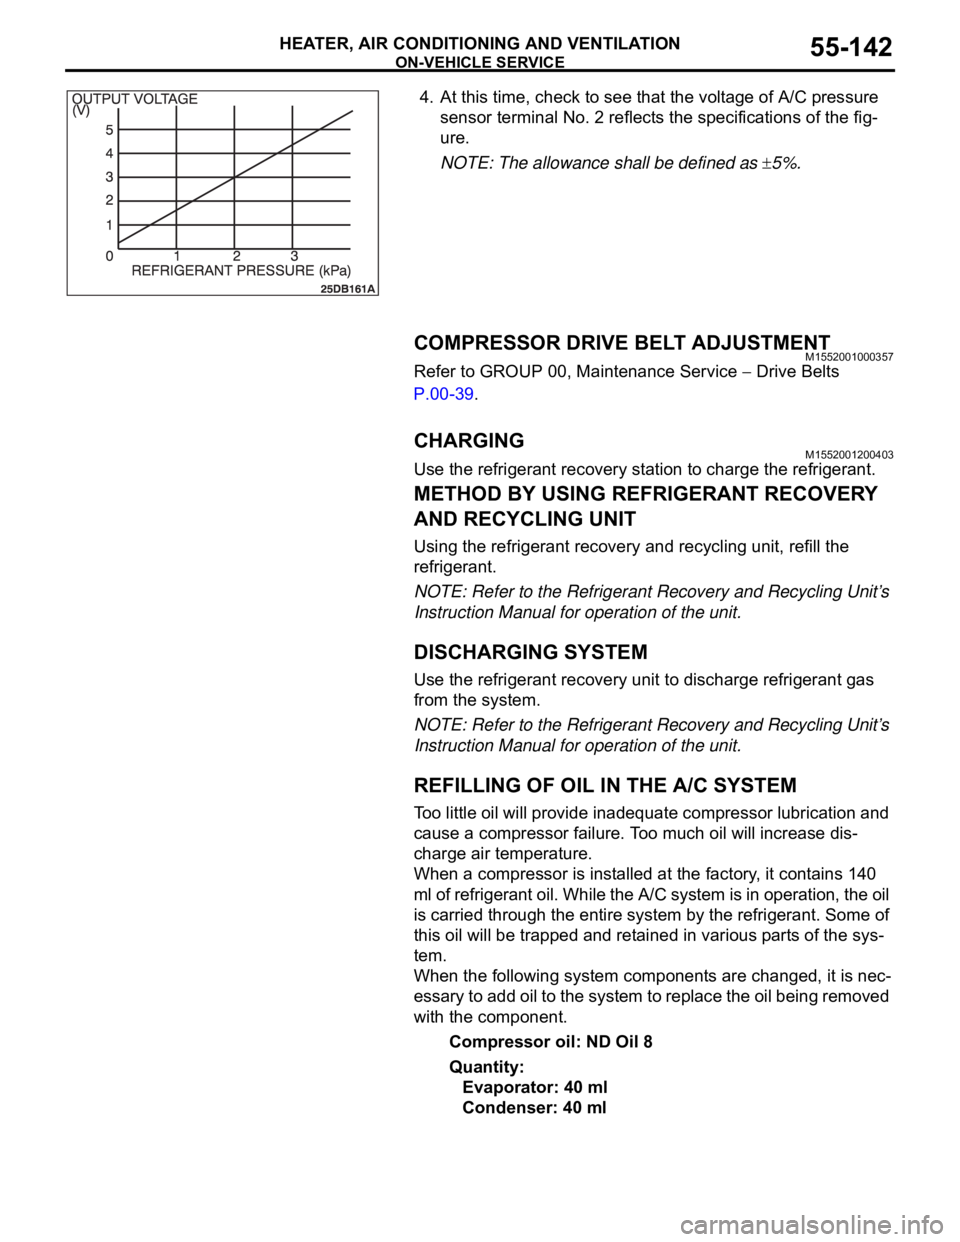
4. At this time, check to see that the voltage of A/C pressure
sensor terminal No. 2 reflects the specifications of the fig-
ure.
NOTE: The allowance shall be defined as
5%.
COMPRESSOR DRIVE BELT ADJUSTMENTM1552001000357
Refer to GROUP 00, Maintenance Service Drive Belts
P.00-39.
CHARGING M1552001200403
Use the refrigerant recovery station to charge the refrigerant.
METHOD BY USING REFRIGERANT RECOVERY
AND RECYCLING UNIT
Using the refrigerant recovery and recycling unit, refill the
refrigerant.
NOTE: Refer to the Refrigerant Recovery and Recycling Unit’s
Instruction Manual for operation of the unit.
DISCHARGING SYSTEM
Use the refrigerant recovery unit to discharge refrigerant gas
from the system.
NOTE: Refer to the Refrigerant Recovery and Recycling Unit’s
Instruction Manual for operation of the unit.
REFILLING OF OIL IN THE A/C SYSTEM
Too little oil will provide inadequate compressor lubrication and
cause a compressor failure. Too much oil will increase dis-
charge air temperature.
When a compressor is installed at the factory, it contains 140
ml of refrigerant oil. While the A/C system is in operation, the oil
is carried through the entire system by the refrigerant. Some of
this oil will be trapped and retained in various parts of the sys-
tem.
When the following system components are changed, it is nec-
essary to add oil to the system to replace the oil being removed
with the component.
Compressor oil: ND Oil 8
Quantity:
Evaporator: 40 ml
Condenser: 40 ml
Page 844 of 1500

ON-VEHICLE SERVICE
HEATER, AIR CONDITIONING AND VENTILATION55-143
PERFORMANCE TEST M1552001400526
The vehicles to be tested should be parked out of direct sun-
light.
1. Close the high and low-pressure valve of the gauge
manifold.
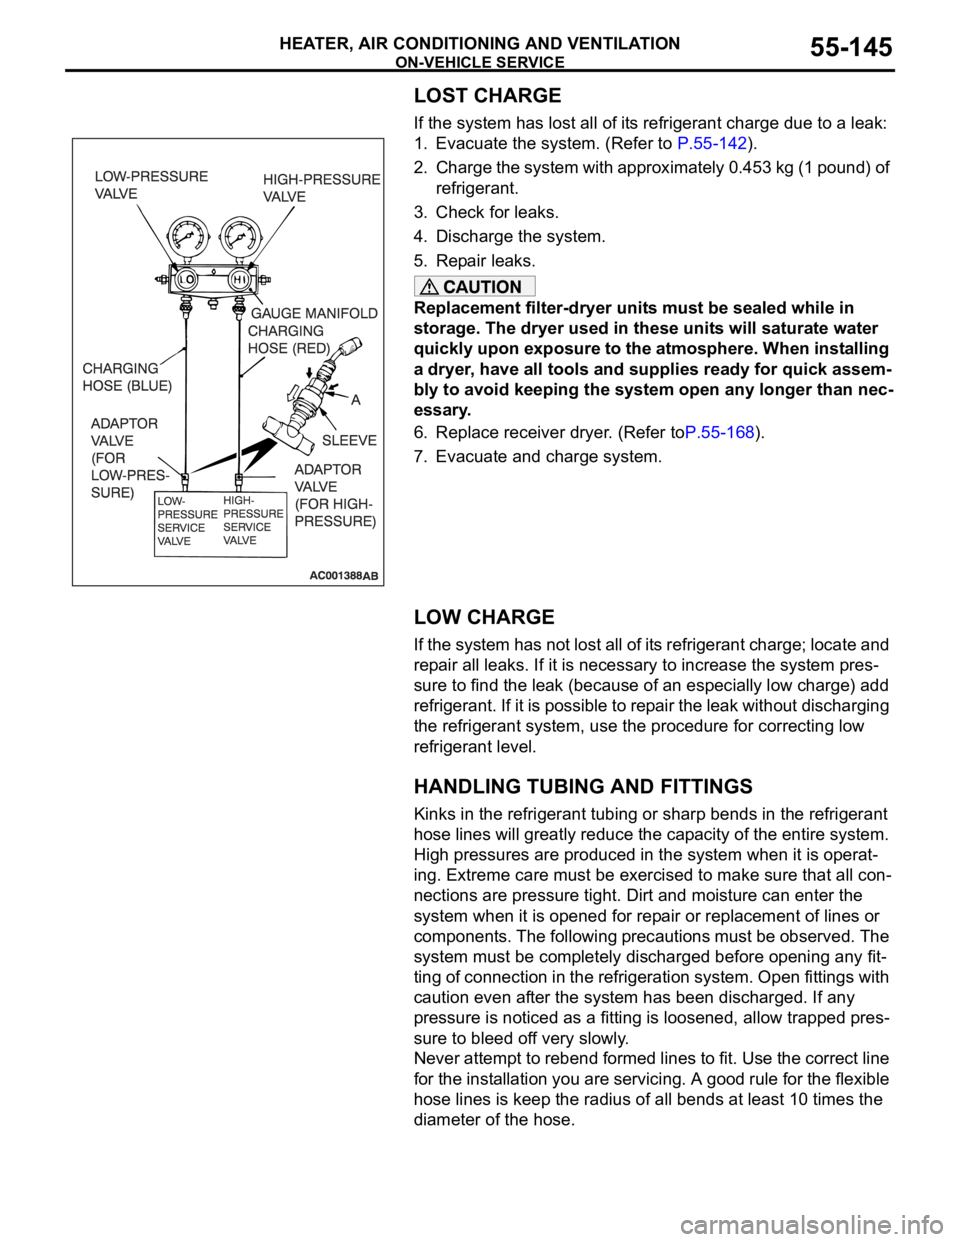
2. Connect the charging hose (blue) to the low-pressure valve
and connect the charging hose (red) to the high-pressure
valve of the gauge manifold.
3. Install the quick joint (for low-pressure) to the charging hose
(blue), and connect the quick joint (for high-pressure) to the
charging hose (red).
To connect the quick joint, press section A firmly
against the service valve until a click is heard.
When connecting, run your hand along the hose while
pressing to ensure that there are no bends in the hose.
4. Connect the quick joint (for low-pressure) to the
low-pressure service valve and connect the quick joint (for
high-pressure) to the high-pressure service valve.
NOTE: The high-pressure service valve is on the A/C pipe
and the low-pressure service valve is on the suction hose.
5. Start the engine.
6. Set the A/C controls as follows:
A/C switch: A/C ON position
Mode selection: FACE position
Temperature control: MAXIMUM COOLING position
Air selection: RECIRCULATION position
Blower switch: Maximum air volume
7. Adjust engine speed to 1,500 r/min with A/C clutch engaged.
8. Engine should be warmed up with doors and windows
closed.
9. Insert a thermometer in the center air outlet and operate the
engine for 20 minutes.
NOTE: If the A/C clutch cycles, take the reading before the
clutch disengages.
10.Note the discharge air temperature.
PERFORMANCE TEMPERATURE CHART
GARAGE AMBIENT AIR TEMPERATURE C
(
F)20 (68) 25 (77) 30 (86) 35 (95)
Discharge air temperature
C (F) 1 (34) 6 (43)
Compressor high pressure kPa (psi) 1275 (185)
1863 (270)
Compressor low pressure kPa (psi) 49 (7.1)
294 (42.7)
Page 846 of 1500

ON-VEHICLE SERVICE
HEATER, AIR CONDITIONING AND VENTILATION55-145
LOST CHARGE
If the system has lost all of its refrigerant charge due to a leak:
1. Evacuate the system. (Refer to P.55-142).
2. Charge the system with approximately 0.453 kg (1 pound) of
refrigerant.
3. Check for leaks.
4. Discharge the system.
5. Repair leaks.
Replacement filter-dryer units must be sealed while in
storage. The dryer used in these units will saturate water
quickly upon exposure to the atmosphere. When installing
a dryer, have all tools and supplies ready for quick assem-
bly to avoid keeping the system open any longer than nec-
essary.
6. Replace receiver dryer. (Refer toP.55-168).
7. Evacuate and charge system.
LOW CHARGE
If the system has not lost all of its refrigerant charge; locate and
repair all leaks. If it is necessary to increase the system pres-
sure to find the leak (because of an especially low charge) add
refrigerant. If it is possible to repair the leak without discharging
the refrigerant system, use the procedure for correcting low
refrigerant level.
HANDLING TUBING AND FITTINGS
Kinks in the refrigerant tubing or sharp bends in the refrigerant
hose lines will greatly reduce the capacity of the entire system.
High pressures are produced in the system when it is operat-
ing. Extreme care must be exercised to make sure that all con-
nections are pressure tight. Dirt and moisture can enter the
system when it is opened for repair or replacement of lines or
components. The following precautions must be observed. The
system must be completely discharged before opening any fit-
ting of connection in the refrigeration system. Open fittings with
caution even after the system has been discharged. If any
pressure is noticed as a fitting is loosened, allow trapped pres-
sure to bleed off very slowly.
Never attempt to rebend formed lines to fit. Use the correct line
for the installation you are servicing. A good rule for the flexible
hose lines is keep the radius of all bends at least 10 times the
diameter of the hose.
Page 852 of 1500

HEATER UNIT, HEATER CORE, BLOWER ASSEMBLY AND EVAPORATOR UNIT
HEATER, AIR CONDITIONING AND VENTILATION55-151
HEATER UNIT, HEATER CORE, BLOWER ASSEMBLY AND
EVAPORATOR UNIT
REMOVAL AND INSTALLATIONM1552021400012
Before removing the front seat assembly, refer to GROUP 52B, Service Precautions
P.52B-16 and Air Bag Module and Clock Spring P.52B-237.
Pre-removal and Post-installation Operation
Refrigerant draining and Refilling (Refer to Charging and
Discharging P.55-142).
Engine coolant Draining and Refilling (Refer to GROUP
00, Engine coolant P.00-47).
Instrument Panel Removal and Installation (Refer to
GROUP 52A, Instrument Panel P.52A-4).
Steering Column Shaft Assembly Removal and Installa-
tion (Refer to GROUP 37A, Steering ShaftP.37-25).
Floor Console Removal and Installation (Refer to GROUP
52A, Floor Console P.52A-10).
Front Seat Assembly Removal and Installation (Refer to
GROUP 52A, Front Seat P.52A-21).
² Strut Tower Bar (Refer to GROUP 42, Removal And
InstallationP.42-12.)
REMOVAL STEPS
BATTERY
AIR CLEANER BODY (REFER TO
GROUP 15, AIR CLEANER
P.15-4.)
1. HEATER HOSE CONNECTION
<>2. SUCTION PIPE CONNECTION
<>3. LIQUID PIPE CONNECTION
4. O-RING
REAR HEATER DUCT A AND B
(REFER TO P.55-175.)
5. JUNCTION BLOCKREMOVAL STEPS (Continued)
Page 865 of 1500

COMPRESSOR ASSEMBLY AND DRIVE BELT
HEATER, AIR CONDITIONING AND VENTILATION55-164
COMPRESSOR ASSEMBLY AND DRIVE BELT
REMOVAL AND INSTALLATIONM1552004100289
Pre-removal Operation
Refrigerant Discharging (Refer to P.55-142).
Front Bumper Under Cover (Refer to GROUP 51, FRONT
BUMPERP.51-2).
Front Under Cover RH (Refer to GROUP 51, UNDER
COVER P.51-13).Post-installation Operation
Drive Belt Tension Adjustment (Refer to GROUP 00,
Maintenance Service
Drive Belt P.00-39).
Refrigerant Charging (Refer to P.55-142).
Front Bumper Under Cover (Refer to GROUP 51, FRONT
BUMPERP.51-2).
Front Under Cover RH (Refer to GROUP 51, UNDER
COVER P.51-13).
REMOVAL STEPS
<>>>A<<1. FLEXIBLE SUCTION HOSE
CONNECTION
<>2. FLEXIBLE DISCHARGE HOSE
CONNECTION
3. O-RING4. DRIVE BELT
<> >>B<<5. A/C COMPRESSOR
6. ALTERNATOR
7. A/C COMPRESSOR BRACKETREMOVAL STEPS (Continued)
Page 871 of 1500

REFRIGERANT LINE
HEATER, AIR CONDITIONING AND VENTILATION55-170
REFRIGERANT LINE
REMOVAL AND INSTALLATIONM1552006400446
Pre-removal and Post-installation Operation
Refrigerant Draining and Refilling (Refer to Charging and
Discharging P.55-142).
Radiator Grille Removal and Installation (Refer to
GROUP 51, Radiator Grilles P.51-6).
REMOVAL STEPS
<>1. FLEXIBLE DISCHARGE HOSE
<> >>A<<2. FLEXIBLE SUCTION HOSE
<> >>A<<3. SUCTION PIPE
<>4. LIQUID PIPE
<>5. A/C PRESSURE SENSOR
9. EXPANSION VALVE JOINT
<>10. EXPANSION VALVE
11 . O - R I N GREMOVAL STEPS (Continued)
Page 978 of 1500

16-1
GROUP 16
ENGINE
ELECTRICAL
CONTENTS
CHARGING SYSTEM . . . . . . . .
16-2
GENERAL DESCRIPTION . . . . . .
16-2
CHARGING SYSTEM DIAGNOSIS16-3
SPECIAL TOOL . . . . . . . . . . . . . . .16-6
ON-VEHICLE SERVICE. . . . . . . . .16-7
ALTERNATOR OUTPUT WIRE VOLTAGE
DROP TEST . . . . . . . . . . . . . . . . . . . . . 16-7
OUTPUT CURRENT TEST . . . . . . . . . . 16-8
REGULATED VOLTAGE TEST . . . . . . . 16-10
WAVE PATTERN CHECK USING AN
OSCILLOSCOPE . . . . . . . . . . . . . . . . . . 16-11
ALTERNATOR ASSEMBLY . . . . .16-14
REMOVAL AND INSTALLATION . . . . . 16-14
DISASSEMBLY AND ASSEMBLY. . . . . 16-15
INSPECTION . . . . . . . . . . . . . . . . . . . . . 16-17
STARTING SYSTEM . . . . . . . . .16-20
GENERAL DESCRIPTION . . . . . .
16-20
STARTING SYSTEM DIAGNOSIS . . . . 16-21
STARTER MOTOR ASSEMBLY . .16-23
REMOVAL AND INSTALLATION . . . . . 16-23
INSPECTION . . . . . . . . . . . . . . . . . . . . . 16-24
DISASSEMBLY AND ASSEMBLY. . . . . 16-26
INSPECTION . . . . . . . . . . . . . . . . . . . . . 16-28
IGNITION SYSTEM . . . . . . . . . . . . . .16-30GENERAL DESCRIPTION . . . . . . .
16-30
SPECIAL TOOLS . . . . . . . . . . . . . .16-30
ON-VEHICLE SERVICE . . . . . . . . .16-31
KNOCK CONTROL SYSTEM CHECK . . 16-31
IGNITION COIL CHECK. . . . . . . . . . . . . 16-31
SPARK PLUG TEST . . . . . . . . . . . . . . . 16-32
SPARK PLUG CHECK AND CLEANING16-32
CAMSHAFT POSITION SENSOR CHECK16-32
CRANKSHAFT POSITION SENSOR
CHECK . . . . . . . . . . . . . . . . . . . . . . . . . . 16-32
IGNITION COIL . . . . . . . . . . . . . . . .16-33
REMOVAL AND INSTALLATION . . . . . 16-33
CAMSHAFT POSITION SENSOR .16-34
REMOVAL AND INSTALLATION . . . . . 16-34
CRANKSHAFT POSITION SENSOR16-35
REMOVAL AND INSTALLATION . . . . . 16-35
KNOCK SENSOR . . . . . . . . . . . . . .16-36
REMOVAL AND INSTALLATION . . . . . 16-36
SPECIFICATIONS . . . . . . . . . . 16-38
FASTENER TIGHTENING
SPECIFICATIONS . . . . . . . . . . . . .
16-38
GENERAL SPECIFICATIONS . . . .16-38
SERVICE SPECIFICATIONS . . . . .16-39
Page 979 of 1500

16-2
CHARGING SYSTEM
GENERAL DESCRIPTIONM1161000100629
The charging system charges the battery with the
alternator output to keep the battery charged at a
constant level during varying electrical load.
OPERATION
Rotation of the excited field coil generates AC volt-
age in the stator.
This alternating current is rectified through diodes to
DC voltage having a waveform shown in the illustra-
tion above.
The average output voltage fluctuates slightly with
the alternator load condition.When the ignition switch is turned on, current flows in
the field coil and initial excitation of the field coil
occurs.
When the stator coil begins to generate power after
the engine is started, the field coil is excited by the
output current of the stator coil.
The alternator output voltage rises as the field cur-
rent increases and it falls as the field current
decreases. When the battery positive voltage
(alternator S terminal voltage) reaches a regulated
voltage of approximately 14.4 V, the field current is
cut off. When the battery positive voltage drops
below the regulated voltage, the voltage regulator
regulates the output voltage to a constant level by
controlling the field current.
In addition, when the field current is constant, the
alternator output voltage rises as the engine speed
increases.