Page 114 of 417
.
The instrument cluster is activated when
you
�
open a door
�
sw")
113 Controls in detail
Instrument cluster
�Instrument cluster
For a full view illustration of the instrument
cluster, see (
�page 28).
The instrument cluster is activated when
you
�
open a door
�
switch on the ignition
�
press the reset button (
�page 29)
�
switch on exterior lamps
Opening a door will activate the instrument
cluster only for about 30 seconds.
You can change the instrument cluster
settings in the Instrument cluster submenu
of the control system (
�page 128).
Instrument cluster illumination
Use the reset button to adjust the illumina-
tion brightness for the instrument cluster
and the switches on the center console.To brighten illumination
�
Turn the reset button in the instrument
cluster (
�page 29) clockwise.
The instrument cluster illumination will
brighten.
To dim illumination
�
Turn the reset button in the instrument
cluster (
�page 29) counterclockwise.
The instrument cluster illumination will
dim.
iThe instrument cluster illumination is
dimmed or brightened to suit ambient
light conditions.
Page 118 of 417

117 Controls in detail
Control system
�Control system
The control system is activated as soon as
the SmartKey in the starter switch is
turned to position1. The control system
enables you to�
call up information about your vehicle
�
change vehicle settings
For example, you can use the control sys-
tem to find out when your vehicle is next
due for service, to set the language for
messages in the instrument cluster dis-
play, and much more.
The control system relays information to
the multifunction display.
Multifunction display
The multifunction display consists of the
display fields in the speedometer and the
tachometer. In its default state, the left
display field shows the trip and main
odometer, while the present outside tem-
perature appears in the right display field.
This default setting is referred to as the
standard display.Standard display1Main odometer
2Trip odometer
3Current gear selector lever posi-
tion/gear range
4Outside temperature
5Automatic transmission shift program
mode
6Clock
Warning!
G
A driver’s attention to the road and traffic
conditions must always be his/her primary
focus when driving.
For your safety and the safety of others, se-
lecting features through the multifunction
steering wheel should only be done by the
driver when traffic and road conditions per-
mit it to be done safely.
Bear in mind that at a speed of just 30 mph
(approximately 50 km/h), your vehicle is
covering a distance of 44 feet (approximate-
ly 14 m) every second.
Page 128 of 417
127 Controls in detail
Control system
The table below shows what settings can
be changed within the various menus. De-
tailed instructions on making individual
settings can be found on the following pag-
es.Instrument cluster
Lighting
Vehicle
Set time (hours)
Set daytime running lamp mode (USA only)
Set station selection mode (radio)
Set time (minutes)
Set locator lighting
Set automatic locking
Select time display mode
Exterior lamps delayed switch-off
Tire inflation pressure display
Select temperature display mode
Interior lighting delayed switch-off
Select speedometer display modeSelect language
Page 130 of 417

129 Controls in detail
Control system
Selecting time display�
Move the selection marker with the
æ or ç button to the
Inst.
cluster
submenu.
�
Press button j or k repeatedly
until you see this message in the left
display:
Clock
.
The selection marker is on the current
setting.
�
Press æ or ç to set the
12-hour
or
24-hour
time display mode.Selecting temperature display mode
�
Move the selection marker with button
æ or ç to the
Inst. cluster
submenu.
�
Press button j or k repeatedly
until you see this message in the left
display:
Temp. indicator
.
The selection marker is on the current
setting.
�
Press æ or ç to set temperature
unit to degrees Celsius (
°C) or degrees
Fahrenheit (
°F).Selecting the speedometer display
(Canada only)
�
Move the selection marker with button
æ or ç to the
Inst. cluster
submenu.
�
Press button j or k repeatedly
until you see this message in the left
display:
Speedometer
.
The selection marker is on the current
setting.
�
Press æ or ç to set the speed-
ometer units to
Kilometres
or
Miles
.
Page 133 of 417

132 Controls in detailControl systemSetting locator lighting
With the locator lighting feature activated
and the exterior lamp switch in
positionU, the following lamps will
switch on when the vehicle is unlocked
with the SmartKey during darkness:�
Parking lamps
�
Tail lamps
�
License plate lamps
�
Side marker lamps
�
Front fog lamps
The locator lighting switches off when the
driver’s door is opened.
If you do not open a door after unlocking
with the SmartKey the lamps will switch off
automatically after approximately
40 seconds.
�
Move the selection marker with button
æ or ç to the
Lighting
sub-
menu.
�
Press button j or k repeatedly
until you see this message in the left
display:
Locator lighting
.
The selection marker is on the current
setting.
�
Press æ or ç to switch the loca-
tor lighting function
On.
�
Turn the exterior lamp switch to
positionU when exiting the vehicle
(�page 105).
The locator lighting feature is
activated.Setting night security illumination
(Headlamps delayed shut-off)
Use this function to set whether and how
long you would like the exterior lamps to
illuminate during darkness after exiting the
vehicle and all doors closed.
With the delayed shut-off feature activated
and the exterior lamp switch in
positionU before the engine is turned
off, the following lamps will switch on after
you have removed the SmartKey from the
starter switch:
�
Parking lamps
�
Tail lamps
�
License plate lamps
�
Side marker lamps
�
Front fog lamps
If you do not open a door after removing
the SmartKey from the starter switch, the
lamps will switch off automatically after
approximately 60 seconds.
Page 135 of 417
134 Controls in detailControl systemInterior lighting delayed switch-off
Use this function to set whether and for
how long you would like the interior light-
ing to remain lit during darkness after the
SmartKey is removed from the starter
switch. �
Move the selection marker with button
æ or ç to the
Lighting
sub-
menu.
�
Press button j or k repeatedly
until you see this message in the left
display:
Int. lighting delayed
switch-off
.
The selection marker is on the current
setting.
�
Press æ or ç to select the de-
sired lamp-on time period. You can se-
lect:�
0 s
, the delayed switch-off feature
is deactivated
�
5 s
, 10 s
, 15 s
or
20 s
, the delayed
switch-off feature is activatedVehicle submenu
Access the
Vehicle
submenu via the
Set-
tings
menu. Use the
Vehicle
submenu to
make general vehicle settings.
The following functions are available:
Function
Page
Set station selection mode
(radio)
135
Set automatic locking
135
Tire inflation pressure display
136
Page 136 of 417
135 Controls in detail
Control system
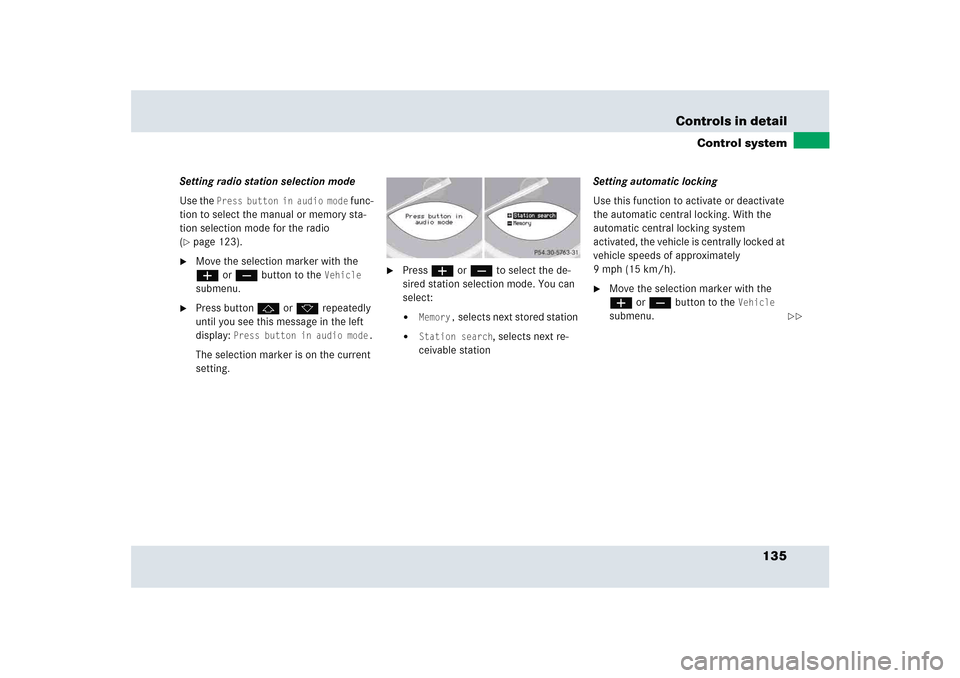
Setting radio station selection mode
Use the
Press button in audio mode
func-
tion to select the manual or memory sta-
tion selection mode for the radio
(
�page 123).
�
Move the selection marker with the
æ or ç button to the
Vehicle
submenu.
�
Press button j or k repeatedly
until you see this message in the left
display:
Press button in audio mode.
The selection marker is on the current
setting.
�
Press æ or ç to select the de-
sired station selection mode. You can
select:�
Memory,
selects next stored station
�
Station search
, selects next re-
ceivable stationSetting automatic locking
Use this function to activate or deactivate
the automatic central locking. With the
automatic central locking system
activated, the vehicle is centrally locked at
vehicle speeds of approximately
9mph(15km/h).
�
Move the selection marker with the
æ or ç button to the
Vehicle
submenu.
��
Page 137 of 417

136 Controls in detailControl system�
Press button j or k repeatedly
until you see this message in the left
display:
Automatic Door lock
.
The selection marker is on the current
setting.
�
Press æ or ç to switch Automatic Door lock
On or
Off
.Tire inflation pressure display
Use this function to set the unit for the tire
inflation pressure display.
�
Move the selection marker with the
æ or ç button to the
Vehicle
submenu.
�
Press button j or k repeatedly
until you see this message in the left
display:
Tire press. display
.
The selection marker is on the current
setting.
�
Press æ or ç to select the de-
sired tire inflation pressure unit.
Trip computer menu
Use the trip computer menu to call up
statistical data on your vehicle.
The following information is available:Function
Page
Fuel consumption statistics after
start
137
Fuel consumption statistics since
last reset
137
Call up range (distance to empty)
138
iThe last function called up will reap-
pear the next time you enter the trip
computer menu.
��