Page 196 of 417
195 Controls in detail
Power windows
Stopping the windows�
Press or pull respective switch again.
Opening and closing the windows with
the SmartKey
You can also open and close the windows
from the outside using the SmartKey.
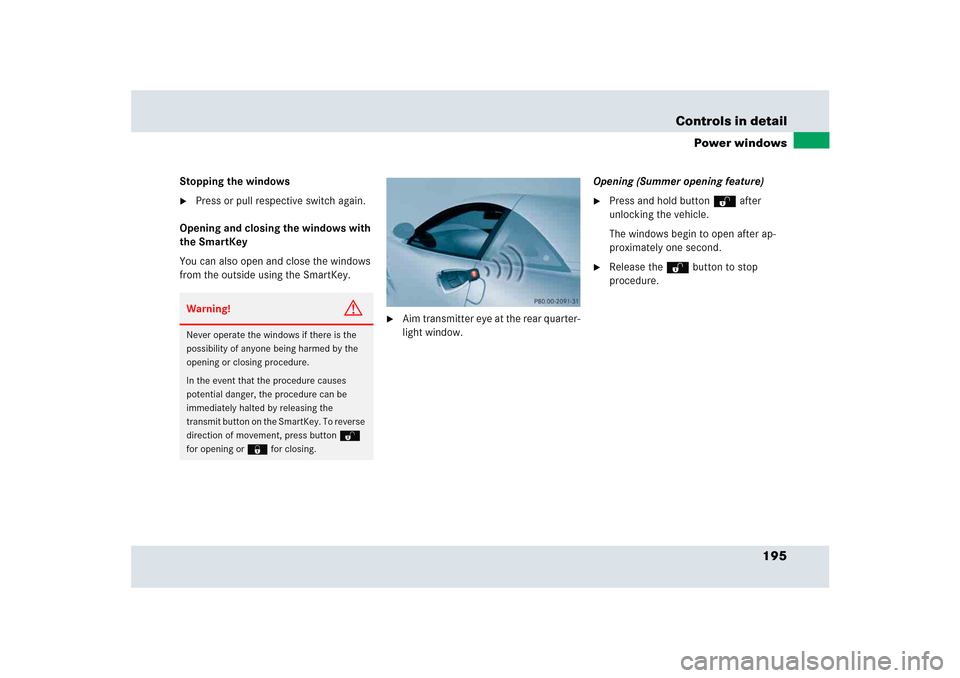
�
Aim transmitter eye at the rear quarter-
light window.Opening (Summer opening feature)
�
Press and hold buttonΠafter
unlocking the vehicle.
The windows begin to open after ap-
proximately one second.
�
Release the Œbutton to stop
procedure.
Warning!
G
Never operate the windows if there is the
possibility of anyone being harmed by the
opening or closing procedure.
In the event that the procedure causes
potential danger, the procedure can be
immediately halted by releasing the
transmit button on the SmartKey. To reverse
direction of movement, press buttonŒ
for opening or‹ for closing.
Page 197 of 417
196 Controls in detailPower windowsClosing (Convenience feature)�
Press and hold button‹ after
locking the vehicle.
The windows begin to close after ap-
proximately one second.
�
Release the ‹button to stop
procedure.
Make sure all windows are properly closed
before leaving the vehicle.
Synchronizing power windows
The power windows must be
resynchronized each time�
after the battery has been
disconnected.
�
if the power windows cannot be fully
opened (Express-open) or closed
(Express-close).
�
Switch on the ignition (
�page 40).
�
Pull the power window switches until
the windows are closed.
Hold the switches for approximately
one second.
The power windows are synchronized.
Page 203 of 417

202 Controls in detailUseful featuresAshtray and cigarette lighter
The ashtray and the cigarette lighter are lo-
cated in the storage compartment under
the armrest.
1Cigarette lighter
2Ashtray insertAshtray
Removing ashtray insert
�
Pull insert 2 upwards.
Replacing ashtray insert
�
Press the insert into the holder until
you hear it click into place.Cigarette lighter
Lighter socket1 may be used for acces-
sories with a maximum power consump-
tion of 180 W.
�
Switch on the ignition (
�page 40).
�
Push in cigarette lighter 1.
The cigarette lighter pops out automat-
ically when hot.
Warning!
G
Remove front ashtray only with vehicle
standing still.
Warning!
G
Never touch the heating element or sides of
the lighter; they are extremely hot. Hold the
knob only.
When leaving the vehicle, always remove the
SmartKey from the starter switch, take it
with you, and lock the vehicle. Do not leave
children unattended in the vehicle, or with
access to an unlocked vehicle. Unsuper-
vised use of vehicle equipment may cause
an accident and/or serious personal injury.
Page 209 of 417

The Tele Aid system consists of three
types of response:
�
automatic and manual emergency
�
R")
208 Controls in detailUseful featuresThe Tele Aid system
(Tele
matic A
larm I
dentification on D
e-
mand)
The Tele Aid system consists of three
types of response:
�
automatic and manual emergency
�
Roadside assistance
�
information
The Tele Aid system is operational provid-
ing that the vehicle’s battery is charged,
properly connected, not damaged and cel-
lular and GPS coverage is available.
The speaker volume of a Tele Aid call can
be adjusted when using the volume control
on the multifunction steering wheel. To
raise, press buttonæ and to lower,
press buttonç.
�
To activate, press the SOS button, the
Roadside Assistance button• or
the Information button¡, depend-
ing on the type of response required.Shortly after the completion of your Tele
Aid acquaintance call, you will receive a
user ID and password. By visiting
www.mbusa.com and selecting “Tele Aid”
(USA only), you will have access to account
information, remote door unlock, and
more.System self-check
Initially, after switching on the ignition,
malfunctions are detected and indicated
(the indicator lamps in the SOS button, the
Roadside Assistance button• and the
Information button¡ stay on longer
than ten seconds or do not come on). The
message
Tele Aid – Drive to workshop!
appears for approximately ten seconds in
the multifunction display.
iThe SOS button is located above the in-
side rear view mirror.
The Roadside Assistance button•
and the Information button¡ are
located in the center storage compart-
ment (
�page 201).
!The Tele Aid system utilizes the cellular
network for communication and the
GPS (G
lobal P
ositioning S
ystem) satel-
lites for vehicle location. If either of
these signals are unavailable, the Tele
Aid system may not function and if this
occurs, assistance must be summoned
by other means.
Page 215 of 417
,
and the reserve SmartKey is not handy:�
Contact the Mer")
214 Controls in detailUseful features
Remote door unlock
In case you have locked your vehicle unin-
tentionally (e.g. SmartKey inside vehicle),
and the reserve SmartKey is not handy:�
Contact the Mercedes-Benz Response
Center at 1-800-756-9018 (in the USA)
or 1-888-881-6611 (in Canada).
You will be asked to provide your pass-
word which you provided when you
completed the subscriber agreement.
�
Then return to your vehicle and pull the
trunk recessed handle for a minimum
of 20 seconds until the SOS button is
flashing.
The message
Connecting call
ap-
pears in the multifunction display.
As an alternative, you may unlock the vehi-
cle via Internet using the ID and password
sent to you shortly after the completion of
your acquaintance call.
The Response Center will then unlock your
vehicle with the remote door unlocking
feature.
iThe indicator lamp in the respective
button flashes until the call is conclud-
ed. Calls can only be terminated by a
Response Center or Customer Assis-
tance Center representative except
Roadside Assistance and Information
calls, which can also be terminated by
pressing button ì on the multifunc-
tion steering wheel.iWhen a Tele Aid call has been initiated,
the audio system is muted and the se-
lected mode (radio or CD) pauses. The
cellular phone (if installed) switches
off. If you must use this phone, the ve-
hicle must be parked. Disconnect the
coiled cord and place the call. The dis-
play in the instrument cluster is avail-
able for use.
iThe remote door unlock feature is avail-
able if the relevant cellular phone net-
work is available.
The SOS button will flash and the mes-
sage
Connecting call
will appear in
the multifunction display to indicate re-
ceipt of the door unlock command.
Once the vehicle is unlocked, a Re-
sponse Center specialist will attempt
to establish voice contact with the ve-
hicle occupants.
If the trunk recessed handle was pulled
for more than 20 seconds before door
unlock authorization was received by
the Response Center, you must wait
15 minutes before pulling the trunk re-
cessed handle again.
Page 223 of 417
222 Controls in detailUseful featuresDust coverWarning!
G
Allow the engine to cool down completely
before slipping the dust cover on your vehi-
cle. Otherwise you could be seriously
burned when coming into contact with the
hot exhaust system.!To avoid damage to the vehicle and the
dust cover, observe the following:�
Use the dust cover only when the
vehicle is garaged.
�
Cover the vehicle only when the en-
gine has cooled down completely.
�
The vehicle as well as the dust cov-
er must be dry before slipping the
dust cover on the vehicle.
�
Remove the padlock that serves as
an antitheft device before slipping
the dust cover on or off
(�page 224).
�
To avoid scratches, make sure the
zip fastener and the steel cable do
not come into contact with the vehi-
cle (
�page 224).
�
Make sure the dust cover is clean
and dry before inserting it in the bag
provided with the dust cover.
iClean the dust cover according to the
care label on the inside of the dust cov-
er.
Page 225 of 417
224 Controls in detailUseful features�
To remove the dust cover, follow the
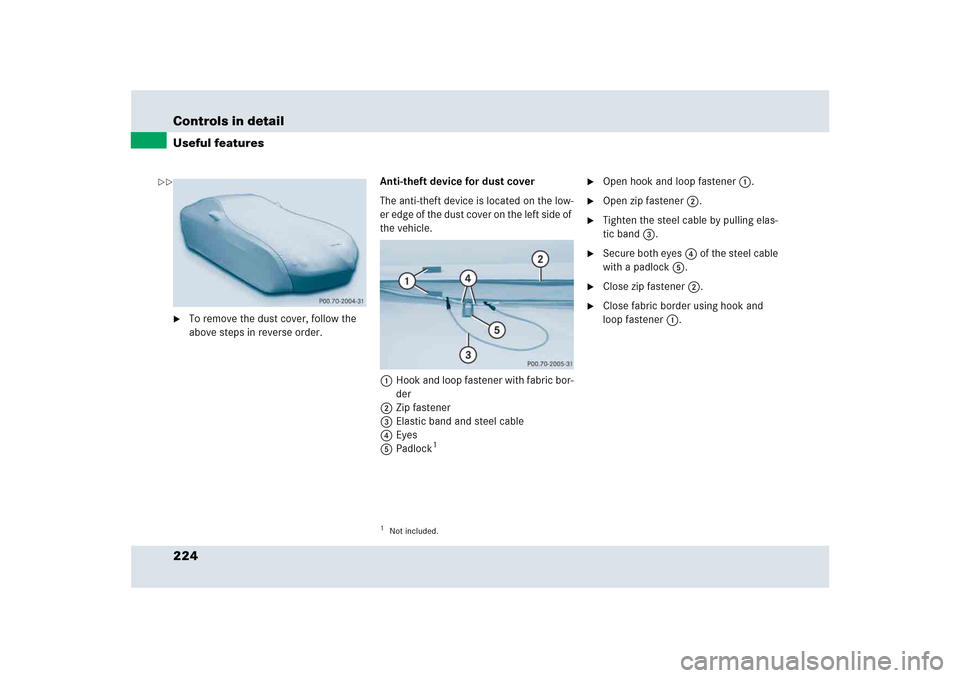
above steps in reverse order.Anti-theft device for dust cover
The anti-theft device is located on the low-
er edge of the dust cover on the left side of
the vehicle.
1Hook and loop fastener with fabric bor-
der
2Zip fastener
3Elastic band and steel cable
4Eyes
5Padlock
1�
Open hook and loop fastener 1.
�
Open zip fastener 2.
�
Tighten the steel cable by pulling elas-
tic band 3.
�
Secure both eyes4 of the steel cable
with a padlock5.
�
Close zip fastener 2.
�
Close fabric border using hook and
loop fastener 1.
1Not included.
��
Page 233 of 417

232 OperationDriving instructionsDriving off
Apply the brakes to test them briefly after
driving off. Perform this procedure only
when the road is clear of other traffic.
Warm up the engine smoothly. Do not
place full load on the engine until the
operating temperature has been reached
(�page 301).
When starting off on a slippery surface, do
not allow a drive wheel to spin for an
extended period with the ESP switched off.
Doing so may cause serious damage to the
drivetrain which is not covered by the
Mercedes-Benz Limited Warranty.
Parking
!Simultaneously depressing the
accelerator pedal and applying the
brake reduces engine performance and
causes premature brake and drivetrain
wear.
!Set the parking brake whenever park-
ing or leaving the vehicle. In addition,
move gear selector lever to positionP.
When parking on hills, always turn front
wheels towards the road curb.
Warning!
G
Do not park this vehicle in areas where com-
bustible materials such as grass, hay or
leaves can come into contact with the hot
exhaust system, as these materials could be
ignited and cause a vehicle fire.
To reduce the risk of personal injury as a re-
sult of vehicle movement, before turning off
the engine and leaving the vehicle always:�
Keep right foot on brake pedal.
�
Pull the parking brake lever up as many
notches as possible.
�
Move the gear selector lever to
positionP.
�
Slowly release brake pedal.
�
When parked on an incline, turn front
wheels towards the road curb.
�
Turn the SmartKey in the starter switch
to position0 and remove the SmartKey
from the starter switch.
�
Take the SmartKey with you and lock
the vehicle when leaving.