Page 387 of 498
385 Practical hints
What to do if …?
Display symbol
Display message
Possible cause
Possible solution
.
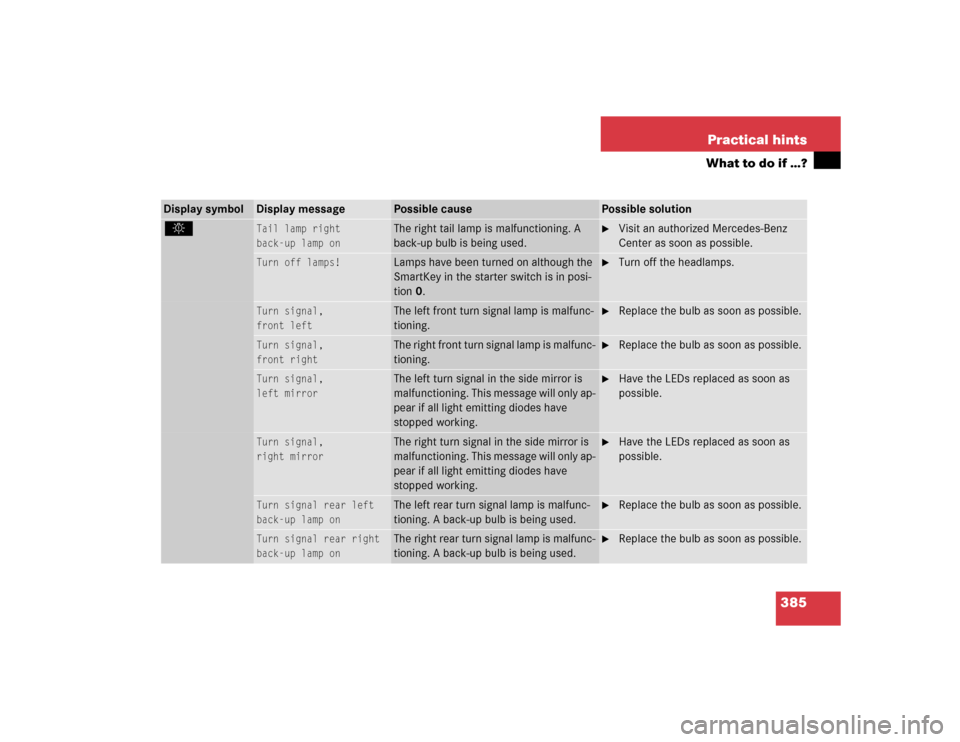
Tail lamp right
back-up lamp on
The right tail lamp is malfunctioning. A
back-up bulb is being used.
�
Visit an authorized Mercedes-Benz
Center as soon as possible.
Turn off lamps!
Lamps have been turned on although the
SmartKey in the starter switch is in posi-
tion 0.
�
Turn off the headlamps.
Turn signal,
front left
The left front turn signal lamp is malfunc-
tioning.
�
Replace the bulb as soon as possible.
Turn signal,
front right
The right front turn signal lamp is malfunc-
tioning.
�
Replace the bulb as soon as possible.
Turn signal,
left mirror
The left turn signal in the side mirror is
malfunctioning. This message will only ap-
pear if all light emitting diodes have
stopped working.
�
Have the LEDs replaced as soon as
possible.
Turn signal,
right mirror
The right turn signal in the side mirror is
malfunctioning. This message will only ap-
pear if all light emitting diodes have
stopped working.
�
Have the LEDs replaced as soon as
possible.
Turn signal rear left
back-up lamp on
The left rear turn signal lamp is malfunc-
tioning. A back-up bulb is being used.
�
Replace the bulb as soon as possible.
Turn signal rear right
back-up lamp on
The right rear turn signal lamp is malfunc-
tioning. A back-up bulb is being used.
�
Replace the bulb as soon as possible.
Page 398 of 498
396 Practical hintsWhere will I find...?In the case of a flat tire, you may
temporarily use the collapsible tire when
observing the following restrictions:�
Do not exceed a vehicle speed of
50 mph (80 km/h).
�
Drive to the nearest tire repair facility
to have the flat tire repaired or
replaced as appropriate.
�
Do not operate vehicle with more than
one collapsible tire mounted.
For more information, see “Rims and tires”
(
�page 439).
Spare wheel bolts
1Wheel bolt for light alloy rims
2Wheel bolt for Minispare wheel,
collapsible tire, or other steel rims
(located in trunk with spare wheel)
!Wheel bolts2 must be used when
mounting the Minispare wheel,
collapsible tire, or other steel rims. The
use of any wheel bolts other than wheel
bolts2 for the Minispare wheel,
collapsible tire, or other steel rims will
physically damage the vehicle’s
brakes. Warning!
G
Make sure to use the original length wheel
bolts when remounting the original wheel
after it has been repaired.
Page 403 of 498
401 Practical hints
Opening/closing in an emergency
�Opening/closing in an emergency
Power tilt/sliding sunroof*
You can open or close the tilt/sliding
sunroof manually should an electrical
malfunction occur.
The tilt/sliding sunroof drive is located
behind the lens 1 of the interior overhead
light.�
Remove SmartKey from the starter
switch.
�
Pry off lens1 using a flat blade
screwdriver.
�
Slide both locking tabs2 in direction
of arrows.
�
Lower the rear of the cover and
remove.
�
Remove the cover.
�
Take the crank 3 out of the Operator’s
Manual pouch.
�
Insert crank3 through hole on the left
side.
�
Turn crank3 clockwise to:�
slide sunroof closed
�
raise sunroof at the rear
�
Turn crank3 counterclockwise to:�
slide sunroof open
�
lower sunroof at the rear
iDo not disconnect electrical
connectors.
iTurn crank3 slowly and smoothly.
The tilt/sliding sunroof must be
synchronized after being operated
manually (
�page 254)
Page 405 of 498
403 Practical hints
Replacing batteries in the SmartKey/SmartKey with KEYLESS-GO*
�
Remove the batteries.
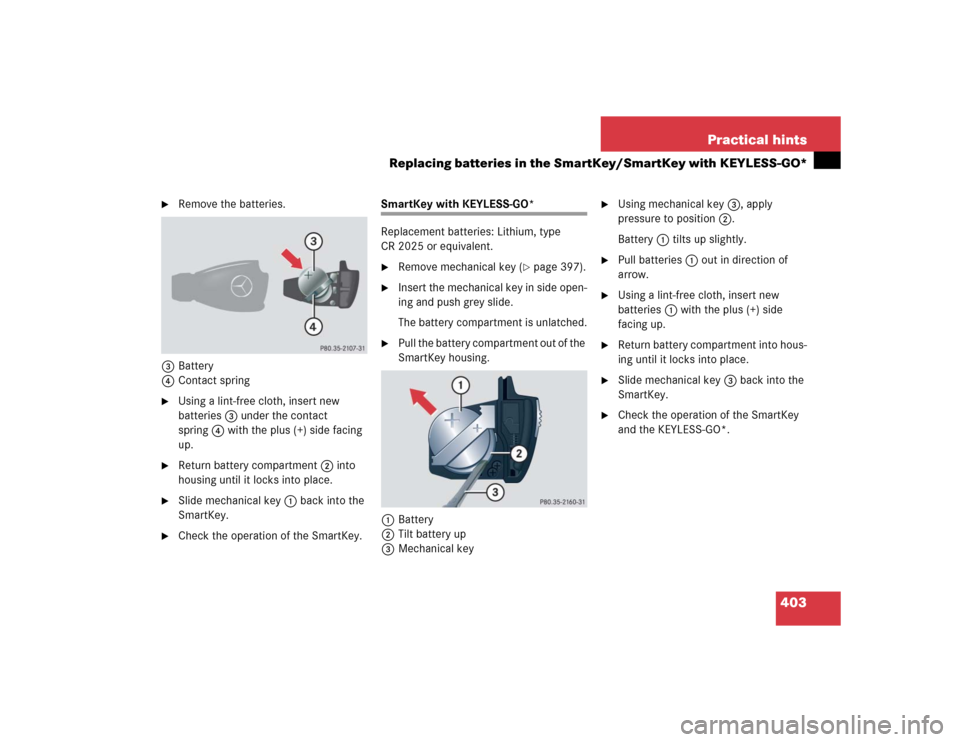
3Battery
4Contact spring
�
Using a lint-free cloth, insert new
batteries 3 under the contact
spring4 with the plus (+) side facing
up.
�
Return battery compartment 2 into
housing until it locks into place.
�
Slide mechanical key 1 back into the
SmartKey.
�
Check the operation of the SmartKey.
SmartKey with KEYLESS-GO*
Replacement batteries: Lithium, type
CR 2025 or equivalent.�
Remove mechanical key (
�page 397).
�
Insert the mechanical key in side open-
ing and push grey slide.
The battery compartment is unlatched.
�
Pull the battery compartment out of the
SmartKey housing.
1Battery
2Tilt battery up
3Mechanical key
�
Using mechanical key3, apply
pressure to position2.
Battery1 tilts up slightly.
�
Pull batteries1 out in direction of
arrow.
�
Using a lint-free cloth, insert new
batteries1 with the plus (+) side
facing up.
�
Return battery compartment into hous-
ing until it locks into place.
�
Slide mechanical key 3 back into the
SmartKey.
�
Check the operation of the SmartKey
and the KEYLESS-GO*.
Page 406 of 498
404 Practical hintsReplacing bulbsSafe vehicle operation depends on proper
exterior lighting and signaling. It is there-
fore essential that all bulbs and lamp
assemblies are in good working order at all
times.
Correct headlamp adjustment is extremely
important. Have headlamps checked and
readjusted at regular intervals and when a
bulb has been replaced. See an authorized
Mercedes-Benz Center for headlamp ad-
justment.
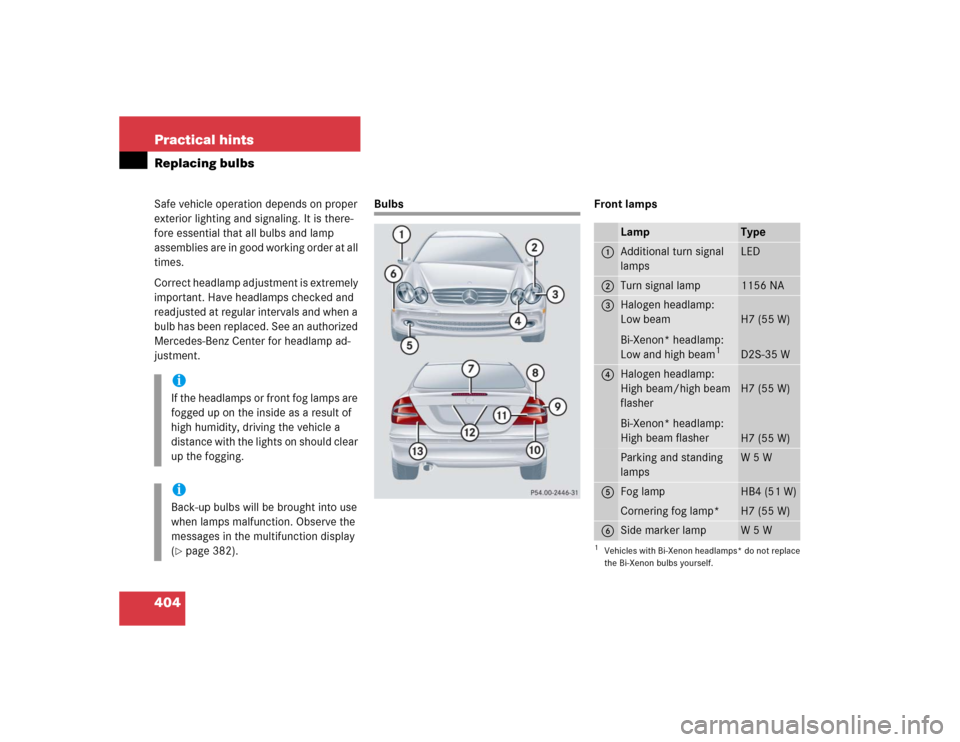
Bulbs Front lamps
iIf the headlamps or front fog lamps are
fogged up on the inside as a result of
high humidity, driving the vehicle a
distance with the lights on should clear
up the fogging.iBack-up bulbs will be brought into use
when lamps malfunction. Observe the
messages in the multifunction display
(�page 382).
Lamp
Type
1
Additional turn signal
lamps
LED
2
Turn signal lamp
1156 NA
3
Halogen headlamp:
Low beam
Bi-Xenon* headlamp:
Low and high beam
1
1Vehicles with Bi-Xenon headlamps* do not replace
the Bi-Xenon bulbs yourself.
H7 (55 W)
D2S-35 W
4
Halogen headlamp:
High beam/high beam
flasher
Bi-Xenon* headlamp:
High beam flasher
H7 (55 W)
H7 (55 W)
Parking and standing
lamps
W 5 W
5
Fog lamp
HB4 (51 W)
Cornering fog lamp*
H7 (55 W)
6
Side marker lamp
W 5 W
Page 407 of 498
405 Practical hints
Replacing bulbs
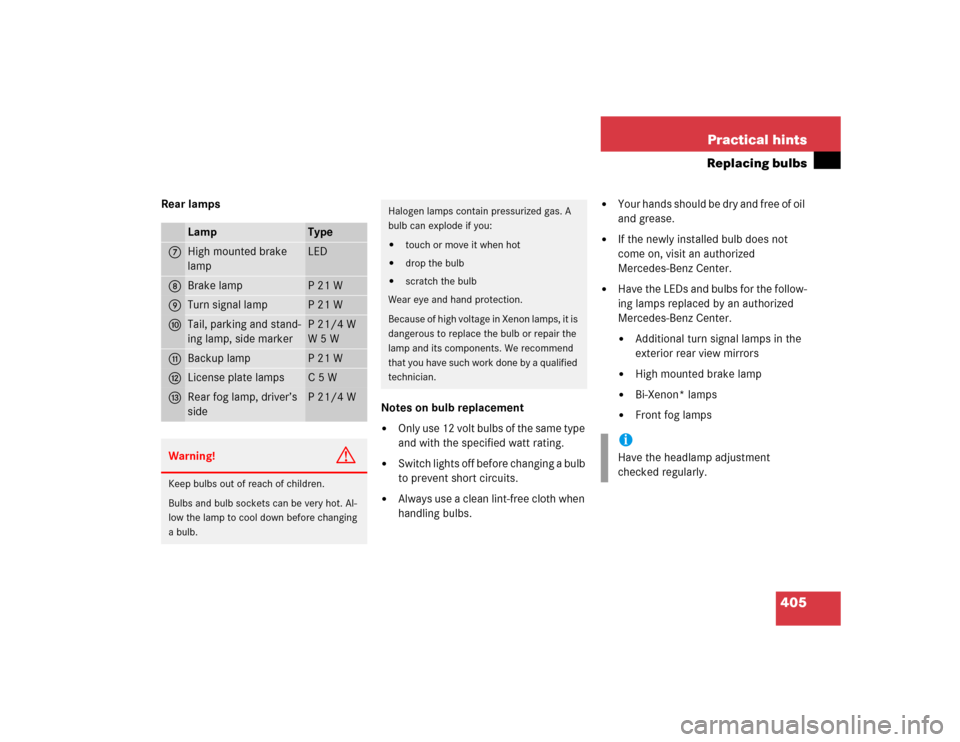
Rear lamps
Notes on bulb replacement
�
Only use 12 volt bulbs of the same type
and with the specified watt rating.
�
Switch lights off before changing a bulb
to prevent short circuits.
�
Always use a clean lint-free cloth when
handling bulbs.
�
Your hands should be dry and free of oil
and grease.
�
If the newly installed bulb does not
come on, visit an authorized
Mercedes-Benz Center.
�
Have the LEDs and bulbs for the follow-
ing lamps replaced by an authorized
Mercedes-Benz Center.�
Additional turn signal lamps in the
exterior rear view mirrors
�
High mounted brake lamp
�
Bi-Xenon* lamps
�
Front fog lamps
Lamp
Type
7
High mounted brake
lamp
LED
8
Brake lamp
P 21 W
9
Turn signal lamp
P 21 W
a
Tail, parking and stand-
ing lamp, side marker
P 21/4 W
W 5 W
b
Backup lamp
P 21 W
c
License plate lamps
C 5 W
d
Rear fog lamp, driver’s
side
P 21/4 W
Warning!
G
Keep bulbs out of reach of children.
Bulbs and bulb sockets can be very hot. Al-
low the lamp to cool down before changing
a bulb.
Halogen lamps contain pressurized gas. A
bulb can explode if you:�
touch or move it when hot
�
drop the bulb
�
scratch the bulb
Wear eye and hand protection.
Because of high voltage in Xenon lamps, it is
dangerous to replace the bulb or repair the
lamp and its components. We recommend
that you have such work done by a qualified
technician.
iHave the headlamp adjustment
checked regularly.
Page 412 of 498
410 Practical hintsReplacing bulbsReplacing bulbs for rear lamps
Before you start to replace a bulb for a rear
lamp, do the following first:�
Turn the exterior lamp switch to
positionM (
�page 124).
Tail lamp unit
�
Open trunk lid.
�
Swing the trim panel covering the cor-
responding rear lights to the side.
1Tab
�
Press tabs1 together.
�
Remove the bulb carrier.
�
Press gently onto the respective bulb
and turn counterclockwise out of its
bulb socket.
�
Press the new bulb gently into its bulb
socket and turn clockwise until it
engages.
1Brake lamp
2Turn signal lamp
3Backup lamp
4Standing and side marker lamp
5Rear fog lamp (driver’s side)/tail
�
Reinstall the bulb carrier.
Let tabs1 engage.
�
Reinstall trim panel.License plate lamp
1Screws
�
Loosen both screws1.
�
Remove the license plate lamp.
�
Replace the tubular lamp.
�
Reinstall the license plate lamp.
�
Retighten the screws1.
Page 417 of 498
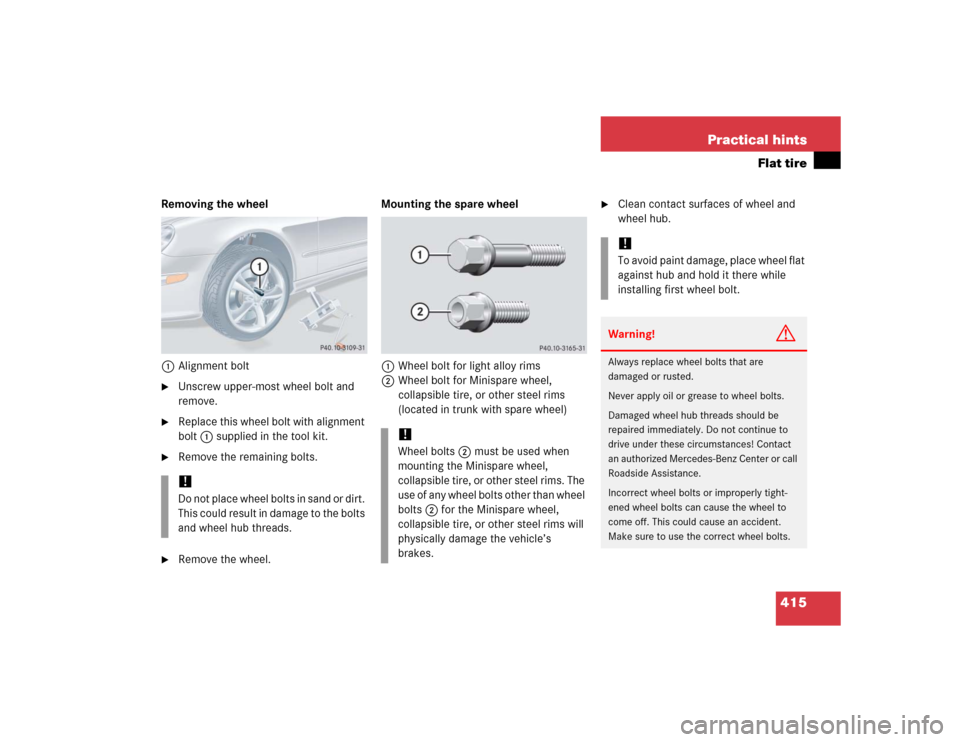
415 Practical hints
Flat tire
Removing the wheel
1Alignment bolt�
Unscrew upper-most wheel bolt and
remove.
�
Replace this wheel bolt with alignment
bolt1 supplied in the tool kit.
�
Remove the remaining bolts.
�
Remove the wheel.Mounting the spare wheel
1Wheel bolt for light alloy rims
2Wheel bolt for Minispare wheel,
collapsible tire, or other steel rims
(located in trunk with spare wheel)
�
Clean contact surfaces of wheel and
wheel hub.
!Do not place wheel bolts in sand or dirt.
This could result in damage to the bolts
and wheel hub threads.
!Wheel bolts2 must be used when
mounting the Minispare wheel,
collapsible tire, or other steel rims. The
use of any wheel bolts other than wheel
bolts2 for the Minispare wheel,
collapsible tire, or other steel rims will
physically damage the vehicle’s
brakes.
!To avoid paint damage, place wheel flat
against hub and hold it there while
installing first wheel bolt.Warning!
G
Always replace wheel bolts that are
damaged or rusted.
Never apply oil or grease to wheel bolts.
Damaged wheel hub threads should be
repaired immediately. Do not continue to
drive under these circumstances! Contact
an authorized Mercedes-Benz Center or call
Roadside Assistance.
Incorrect wheel bolts or improperly tight-
ened wheel bolts can cause the wheel to
come off. This could cause an accident.
Make sure to use the correct wheel bolts.