Page 27 of 498

25 At a glance
Instrument cluster
Item
Page
1
LLeft turn signal indi-
cator lamp
51
2
vESP warning lamp
358
3
Speedometer
4
Multifunction display
137
5
lDistance warning
lamp
Warning lamp without func-
tion. It illuminates with the
ignition on. It should go out
when the engine is running.
6
KRight turn signal indi-
cator lamp
51
7
Coolant temperature indi-
cator with:
135
•
Coolant temperature
warning lamp
357,
376
Item
Page
8
Tachometer with:
136
1Supplemental
restraint system
indicator lamp
359,
386
-Antilock Brake Sys-
tem (ABS) warning
lamp
354
359,
386
AHigh beam headlamp
indicator lamp
129
BLow beam headlamp
indicator lamp
129
9
Main odometer with:�
Gear selector lever posi-
tion
166
�
Program mode
170
Item
Page
a
Clock with:
151
;Brake warning lamp,
USA only
355
3Brake warning lamp,
Canada only?Engine malfunction
indicator lamp,
USA only
356
±Engine malfunction
indicator lamp,
Canada only
356
b
Fuel display with:AFuel reserve warning
lamp
359
c
Reset button for:�
Resetting trip odometer
135
�
Adjusting instrument
cluster illumination
134
�
Confirming new time set-
tings
151
Page 136 of 498
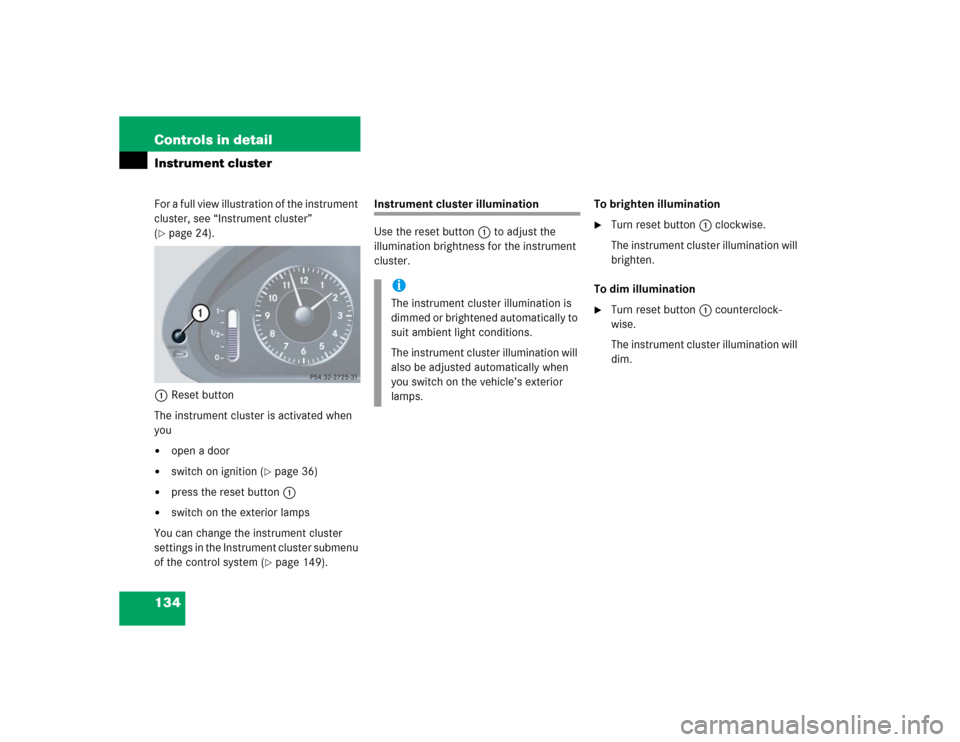
134 Controls in detailInstrument clusterFor a full view illustration of the instrument
cluster, see “Instrument cluster”
(�page 24).
1Reset button
The instrument cluster is activated when
you
�
open a door
�
switch on ignition (
�page 36)
�
press the reset button1
�
switch on the exterior lamps
You can change the instrument cluster
settings in the Instrument cluster submenu
of the control system (
�page 149).
Instrument cluster illumination
Use the reset button1 to adjust the
illumination brightness for the instrument
cluster.To brighten illumination
�
Turn reset button1 clockwise.
The instrument cluster illumination will
brighten.
To dim illumination
�
Turn reset button1 counterclock-
wise.
The instrument cluster illumination will
dim.
iThe instrument cluster illumination is
dimmed or brightened automatically to
suit ambient light conditions.
The instrument cluster illumination will
also be adjusted automatically when
you switch on the vehicle’s exterior
lamps.
Page 154 of 498

This function can only be seen with audio
system.�
Move the selection marker with
buttonæ orç to the
Time/Date
submenu.
�
Press buttonj")
152 Controls in detailControl systemSetting time (hours)
This function can only be seen with audio
system.�
Move the selection marker with
buttonæ orç to the
Time/Date
submenu.
�
Press buttonj ork repeatedly
until the message
Clock, hours
Confirm by press. R
appears in the
multifunction display.
The selection marker is on the hour
setting.
�
Press buttonæ orç to set the
hour.
�
Press the reset button in the instru-
ment cluster (
�page 134) to confirm.
The hour is set and stored.
Setting time (minutes)
This function can only be seen with audio
system.
�
Move the selection marker with
buttonæ orç to the
Time/Date
submenu.
�
Press buttonj ork repeatedly
until the message
Clock, minutes
Confirm by press. R
appears in the
multifunction display.
The selection marker is on the minutes
setting.
�
Press buttonæ orç to set the
minutes.
�
Press the reset button in the instru-
ment cluster (
�page 134) to confirm.
The minutes are set and stored.
iVehicles with COMAND*:
For information on setting the time,
refer to the separate COMAND
operating instructions.
iVehicles with COMAND*:
For information on setting the time,
refer to the separate COMAND
operating instructions.
Page 307 of 498

305 Operation
At the gas station
�At the gas station
Refueling
The fuel filler flap is located on the
right-hand side of the vehicle towards the
rear. Locking/unlocking the vehicle with
the SmartKey or the SmartKey with
KEYLESS-GO* automatically locks/un-
locks the fuel filler flap.1To open the fuel filler flap
2To insert the fuel filler cap
�
Turn the engine off�
by turning the SmartKey to
position0. Remove the SmartKey
from the starter switch.
�
by pressing the KEYLESS-GO*
start/stop button. Open the driv-
er’s door (with driver’s door open,
starter switch is now in position0,
same as with SmartKey removed
from starter switch).
�
Open the fuel filler flap by pushing at
the point indicated by the arrow 1.
The fuel filler flap springs open.
�
Turn fuel cap counterclockwise and
hold on to it until possible pressure is
released.
�
Take off cap and set it in direction of
arrow 2 in the recess on the fuel filler
flap.
To prevent fuel vapors from escaping
into open air, fully insert filler nozzle
unit.
�
Only fill your tank until the filler nozzle
unit cuts out – do not top up or
overfill.
Warning!
G
Gasoline is highly flammable and poisonous.
It burns violently and can cause serious inju-
ry. Whenever you are around gasoline, avoid
inhaling fumes and skin contact, extinguish
all smoking materials. Never allow sparks,
flame or smoking materials near gasoline!
Failure to remove the fuel cap slowly could
result in personal injury.
��
Page 394 of 498
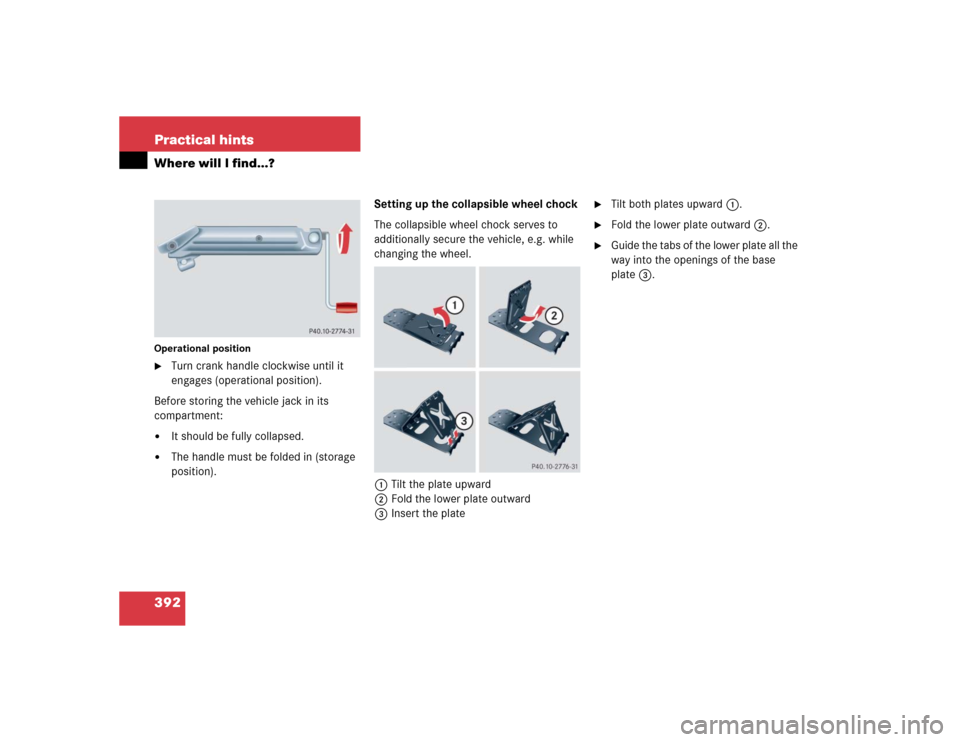
392 Practical hintsWhere will I find...?Operational position�
Turn crank handle clockwise until it
engages (operational position).
Before storing the vehicle jack in its
compartment:
�
It should be fully collapsed.
�
The handle must be folded in (storage
position).Setting up the collapsible wheel chock
The collapsible wheel chock serves to
additionally secure the vehicle, e.g. while
changing the wheel.
1Tilt the plate upward
2Fold the lower plate outward
3Insert the plate
�
Tilt both plates upward1.
�
Fold the lower plate outward2.
�
Guide the tabs of the lower plate all the
way into the openings of the base
plate3.
Page 411 of 498

409 Practical hints
Replacing bulbs
Front turn signal lamp bulb�
Turn bulb socket1 counterclockwise
and remove it.
�
Press gently onto the bulb and turn
counterclockwise out of bulb
socket1.
�
Press the new bulb gently into bulb
socket1 and turn clockwise until it
engages.
�
Place bulb socket1 back into the
lamp and turn it clockwise.Parking and standing lamp bulb
�
Turn housing cover2 counterclock-
wise and remove it.
�
Pull out bulb socket5 with the bulb.
�
Pull the bulb out of the bulb socket5.
�
Press the new bulb into bulb socket5.
�
Press bulb socket5 back into the
lamp.
�
Align housing cover2 and turn it
clockwise.Side marker lamp bulb
�
Carefully slide the lamp towards the
rear in direction of arrows.
�
Remove front end first.
�
Turn the bulb socket with the bulb
counterclockwise and remove it.
�
Pull the bulb out of the bulb socket.
�
Insert the new bulb into the bulb
socket.
�
Place the bulb socket back into the
lamp and turn it clockwise.
�
To reinstall the lamp, set rear end in the
bumper and let the front end engage.
Page 424 of 498

422 Practical hintsBatteryCharging and reinstalling battery�
Charge battery in accordance with the
instructions of the battery charger
manufacturer.
�
Reinstall the charged battery. Follow
the previously described steps in
reverse order.
Reconnecting the battery�
Turn off all electrical consumers.
�
Remove SmartKey from starter switch.
Vehicles with KEYLESS-GO*:�
Press the start / stop button until
the engine shuts off.
�
Open the driver’s door.
�
Connect the battery positive lead and
fasten its cover 2.
�
Connect the battery negative lead.
�
Reinstall the filter box (
�page 420).Batteries contain materials that can harm
the environment if disposed of improperly.
Large 12-volt storage batteries contain
lead. Recycling of batteries is the preferred
method of disposal. Many states require
sellers of batteries to accept old batteries
for recycling.
Warning!
G
Never charge a battery while still installed in
the vehicle. Gases may escape during charg-
ing and cause explosions that may result in
paint damage, corrosion or personal injury.
!NEVER invert the terminal connections!!The battery, its filler caps and the vent
tube must always be securely installed
when the vehicle is in operation.
iThe following procedures must be car-
ried out following any interruption of
battery power (e.g. due to reconnect-
ing):�
Set the clock (
�page 151) (vehi-
cles with COMAND*: see COMAND
operator’s manual).
�
Resynchronize the side windows
(�page 250).
�
Resynchronize the tilt/sliding
sunroof* (
�page 254).
Page 468 of 498

466 IndexClimate control 184
Activating 185
Adjusting air distribution 188
Air recirculation mode 190
Deactivating 185
Defrosting 189
Rear window defroster 183
Clock 25, 152
Closing
Cup holder 275
Glove box 272
Hood 309
Power tilt/sliding sunroof* 251, 401
Power tilt/sliding sunroof*
with KEYLESS-GO* 250, 253
Power tilt/sliding sunroof*
with SmartKey 253
Side windows 248
Trunk 107
Windows 247
Windows
with KEYLESS-GO* 250, 253
Windows
with SmartKey 249Closing power tilt/sliding sunroof*
In an emergency 401
Cockpit 22, 455
Cockpit management
and data system (COMAND*) 456
Cold tire inflation pressure 338
Collapsible tire (CLK 55 AMG only) 394
Collapsible wheel chock 392
COMAND* see separate
operating instructions
Combination switch 129
High beam flasher 129
Turn signals 51
Windshield wipers 52
Comfort driving
Transmission program mode 170
Control and
operation of radio transmitters 302Control system 137, 456
AUDIO menu 143
Convenience submenu 158
Display digital speedometer 142
Functions 138, 141
Instrument
cluster submenu 149, 151
Lighting submenu 154
Menus 140, 141, 457
Multifunction display 137
Multifunction steering wheel 138
NAV menu 144
Operate CD player 144
Selecting radio system 143
Selecting satellite radio* system 143
Settings menu 146
Standard display menu 142
Submenus 139, 141
TEL* menu 162
Trip computer menu 160
Vehicle status
message memory menu 145
Vehicle submenu 158