Page 160 of 498

158 Controls in detailControl system
You can select:�
0 s
, the delayed shut-off feature is
deactivated.
�
5 s
, 10 s
, 15 s
or
20 s
, the interior
lighting delayed shut-off feature is
activated with the desired lamp-on
period.
Vehicle submenu
Access the
Vehicle
submenu via the
Settings
menu. Use the
Vehicle
submenu
to make general vehicle settings.
The following functions are available:Setting automatic locking
Use this function to activate or deactivate
the automatic central locking. With the
automatic central locking system
activated, the vehicle is centrally locked at
vehicle speeds of approximately 9 mph
(15 km/h).
�
Move the selection marker with
buttonæ orç to the
Vehicle
submenu.
�
Press buttonj ork repeatedly
until the message
Automatic door
lock
appears in the multifunction
display.
The selection marker is on the current
setting.
�
Press buttonæ orç to switch
the automatic central locking
on or
off
.Convenience submenu
Access the
Convenience
submenu via the
Settings
menu. Use the
Convenience
sub-
menu to change the settings for a number
of convenience features.
The following functions are available:
Function
Page
Setting automatic locking
158
Function
Page
Activating easy-entry/exit
feature
159
Setting key-dependency
160
Setting parking position for exte-
rior rear view mirror
160
��
Page 174 of 498

172 Controls in detailAutomatic transmissionStopping
When you stop briefly, e.g. at traffic lights:�
Leave the transmission in gear.
�
Hold the vehicle with the brake.
When you stop longer with the engine
idling or on an uphill gradient:
�
Move the gear selector lever to
positionP.
�
Set the parking brake.
Maneuvering
When you maneuver in tight areas,
e.g. when pulling into a parking space:
�
Control the vehicle speed by gradually
releasing the brakes.
�
Accelerate gently.
�
Never abruptly step on the accelerator.Working on the vehicle Steering wheel gearshift control
(Speedshift) - CLK 500 and CLK 55 AMG
When driving in the automatic program
modes CorS, or in the manual program
modeM (CLK 55 AMG only), you can
change the gears manually on the steering
wheel or by using the gear selector lever
(�page 167).
Warning!
G
When working on the vehicle, set the
parking brake and move gear selector lever
to positionP. Otherwise the vehicle could
roll away.
iTo avoid overrevving the engine when
downshifting with steering wheel
gearshift buttons, the transmission will
not shift to a lower gear if the engine’s
max. speed would be exceeded.
Page 180 of 498
178 Controls in detailGood visibilityFor information on the windshield wipers,
see “Windshield wipers” (
�page 52).
Headlamp cleaning system*
The switch is located on the left side of the
dashboard.
1Headlamp washer switch
�
Switch on ignition (
�page 36).
�
Press switch1.
The headlamps are cleaned with a
high-pressure water jet.
For information on filling up the washer
reservoir, see “Windshield washer system
and headlamp cleaning system*”
(
�page 454).
Rear view mirrors
For more information on setting the rear
view mirrors, see “Mirrors” (
�page 41).
Auto-dimming rear view mirrors
The reflection brightness of the exterior
rear view mirror on the driver’s side and
the interior rear view mirror will respond
automatically to glare when
�
the ignition is switched on,
and
�
incoming light from headlamps falls on
the sensor in the interior rear view
mirror.
The rear view mirror will not react if
�
reverse gearR is engaged
�
the interior lighting is turned on
Page 181 of 498

179 Controls in detail
Good visibility
Warning!
G
The auto-dimming function does not react if
incoming light is not aimed directly at sen-
sors in the interior rear view mirror.
The interior rear view mirror and the exterior
rear view mirror on the driver’s side do not
react, for example, if the rear window sun
shade* is in raised position.
Glare can endanger you and others.
Warning!
G
In the case of an accident, liquid electrolyte
may escape from the mirror housing if the
mirror glass breaks.
Electrolyte has an irritating effect. Do not
allow the liquid to come into contact with
eyes, skin, clothing, or respiratory system.
In case it does, immediately flush affected
area with water, and seek medical help if
necessary.!Electrolyte drops coming into contact
with the vehicle paint finish can be
completely removed only while in the
liquid state and by applying plenty of
water.
Warning!
G
Exercise care when using the passen-
ger-side exterior rear view mirror. The mirror
surface is convex (outwardly curved surface
for a wider field of view). Objects in mirror
are closer than they appear. Check your
interior rear view mirror or glance over your
shoulder before changing lanes.
Page 183 of 498
181 Controls in detail
Good visibility
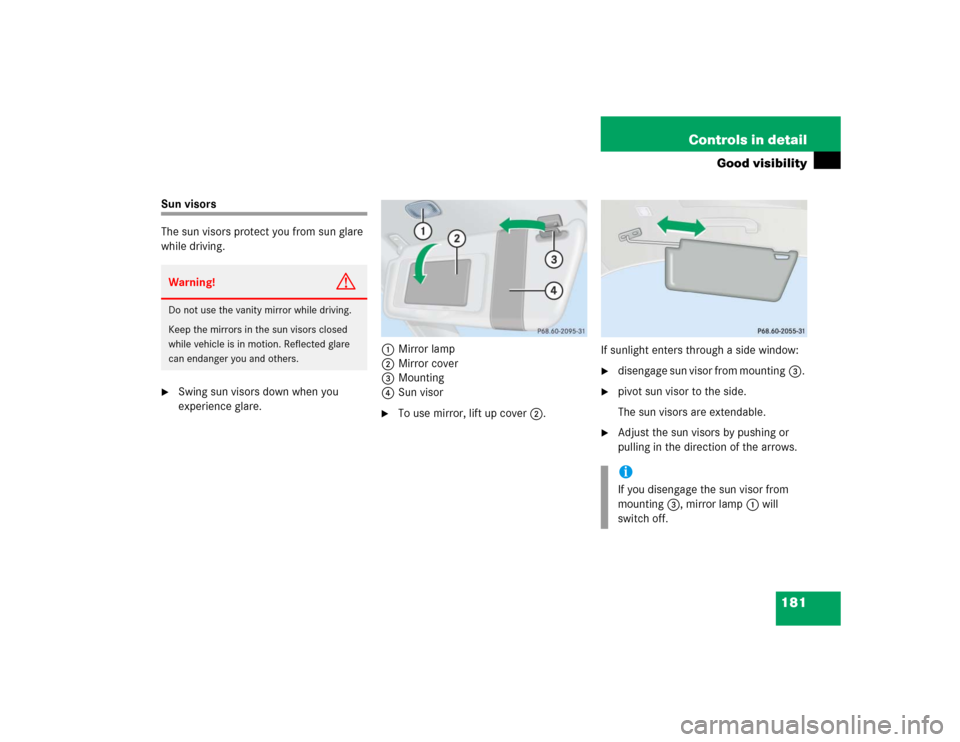
Sun visors
The sun visors protect you from sun glare
while driving.�
Swing sun visors down when you
experience glare.1Mirror lamp
2Mirror cover
3Mounting
4Sun visor
�
To use mirror, lift up cover2.If sunlight enters through a side window:
�
disengage sun visor from mounting3.
�
pivot sun visor to the side.
The sun visors are extendable.
�
Adjust the sun visors by pushing or
pulling in the direction of the arrows.
Warning!
G
Do not use the vanity mirror while driving.
Keep the mirrors in the sun visors closed
while vehicle is in motion. Reflected glare
can endanger you and others.
iIf you disengage the sun visor from
mounting3, mirror lamp1 will
switch off.
Page 190 of 498
Increasing�
Turn temperature control2 or3
(�page 185) slightly to the right.
The climate control system will corre-
spondingly adjust the interior air t")
188 Controls in detailClimate control (CLK 320)Increasing�
Turn temperature control2 or3
(�page 185) slightly to the right.
The climate control system will corre-
spondingly adjust the interior air tem-
perature.
Decreasing
�
Turn temperature control2 or3
(�page 185) slightly to the left.
The climate control system will corre-
spondingly adjust the interior air tem-
perature.
Adjusting air distribution and volume
Use air distribution control4
(�page 185) to adjust the air distribution.
The following symbols are found on the
controls:
Use the air volume control1
(�page 185) to adjust the air volume. You
can select between six air volume speeds.Adjusting manually
�
Press buttonU (
�page 185).
The indicator lamp on the button goes
out.
�
Select any of the six air volume speeds
and the air distribution.
Adjusting automatically
�
Press buttonU (
�page 185).
The indicator lamp on the button
comes on. The temperature, air distri-
bution and volume are adjusted auto-
matically.
Symbol
Function
Z
Directs air to the windshield
and the side defroster vents
b
Directs air into the entire
vehicle interior
Y
Directs air to the footwells
a
Directs air through the center,
side and rear passenger
compartment air vents
Page 228 of 498

226 Controls in detailAudio system
D o n o t u s e C D s w i t h a n e i g h t c m d i a m e t e r ,
not even with a CD adapter. Attempting to
play CDs with an eight cm diameter or
playing such CDs with an adapter may
cause damage to the CD drive. Such dam-
age is not covered by the Mercedes-Benz
Limited Warranty.
Should excessively high or low tempera-
tures occur while in CD changer mode*, CD TEMP
will appear in the display, and the
CD will be muted until the temperature has
reached an acceptable level for the system
to continue operation.
The single CD player and the CD changer*
play audio CDs.Tips on handling CDs
�
Handle CDs carefully to prevent inter-
ference during playback.
�
Avoid scratches, fingerprints and dust
on the CDs.
�
Do not write on CDs or apply any labels
or other material to them.
�
Clean CDs from time to time with a
commercially available cleaning cloth.
Never wipe the CD in a circular motion;
instead, wipe it in a straight line start-
ing in the center and moving outward.
Do not use solvents, anti-static sprays,
etc. for cleaning.
�
Replace the CD in its case after use.
�
Protect CDs from heat and direct sun-
light.
!If you affix stickers to the CDs, they can
become warped due to the heat that
develops in the CD drive or CD chang-
er.
In certain situations, the CDs can then
no longer be ejected and cause dam-
age to the drive. Such damage is not
covered by the Mercedes-Benz Limited
Warranty.!Your CD drive or CD changer has been
designed to play CDs which corre-
spond to the EN 60908 standard. You
can therefore only use CDs with a max-
imum thickness of 1.3 mm.
If you insert thicker data carriers, e.g.
ones that have data on both sides (one
side with DVD data, the other side with
audio data), they cannot be ejected and
will damage the drive.
Page 249 of 498

247 Controls in detail
Power windows
�Power windows
Opening and closing the windows
The side windows are opened and closed
electrically. The switches for all the side
windows are on the driver’s door. The
switches for the respective windows are
on the front passenger door and the rear
side trim panels.
1Left front window
2Right front window
3Right rear window
4Left rear window
5Rear window override switch
(
�page 82)
Warning!
G
When closing the windows, make sure there
is no danger of anyone being harmed by the
closing procedure.
The closing of the door windows can be im-
mediately halted by releasing the switch or,
if switch was pulled past the resistance
point and released, by either pressing or
pulling the respective switch.
The closing of the rear side windows can be
immediately halted by releasing the switch.
The door windows are equipped with the ex-
press-close and automatic reversal func-
tion. If a door window encounters an
obstruction that blocks its path in a circum-
stance where you pulled the switch past the
resistance point and released it to close the
window, the automatic reversal function will
stop the window and open it slightly.
If a door window encounters an obstruction
that blocks its path in a circumstance where
you are closing the window by pulling and
holding the switch, by pressing and holding
button
‹
on the SmartKey, or by press-
ing and holding the lock button
(vehicles with KEYLESS-GO*) on the door
handle, the automatic reversal function will
not operate.
When leaving the vehicle, always remove the
SmartKey or SmartKey with KEYLESS-GO*
from the starter switch, take it with you, and
lock the vehicle. Do not leave children unat-
tended in the vehicle, or with access to an
unlocked vehicle. Unsupervised use of vehi-
cle equipment can cause an accident
and/or serious personal injury.