Page 502 of 969
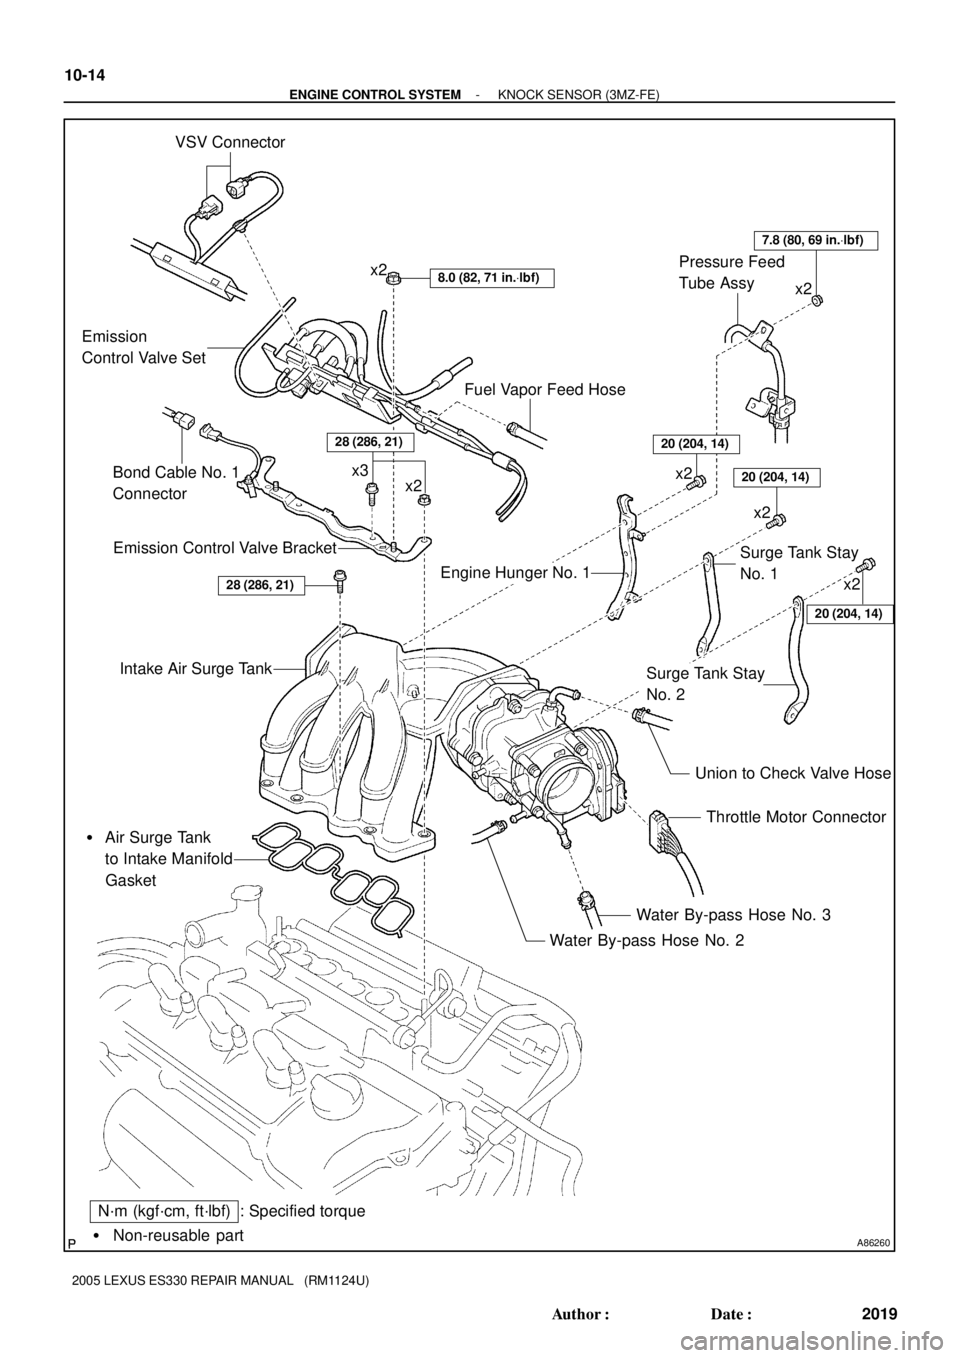
A86260� Non-reusable part
: Specified torque VSV Connector
8.0 (82, 71 in.Vlbf)x2
Emission
Control Valve Set
Emission Control Valve Bracket
Intake Air Surge Tank
� Air Surge Tank
to Intake Manifold
Gasket
Throttle Motor Connector
Water By-pass Hose No. 3
Water By-pass Hose No. 2
N´m (kgf´cm, ft´lbf)
Union to Check Valve Hose
Fuel Vapor Feed Hose
x2 x3
Engine Hunger No. 1Surge Tank Stay
No. 1
Surge Tank Stay
No. 2
20 (199, 14)
20 (199, 14)
20 (199, 14)
7.8 (80, 69 in.Vlbf)
x2
x2 Pressure Feed
Tube Assy
28 (286, 21)
x2
x2
Bond Cable No. 1
Connector
28 (286, 21)
14-126
- ENGINE MECHANICALCYLINDER HEAD GASKET NO.2 (3MZ-FE)
2218 Author�: Date�:
2005 LEXUS ES330 REPAIR MANUAL (RM1124U)
Page 509 of 969
141JJ-01
A86574
- ENGINE MECHANICALCYLINDER HEAD GASKET NO.2 (3MZ-FE)
14-133
2225 Author�: Date�:
2005 LEXUS ES330 REPAIR MANUAL (RM1124U)
REPLACEMENT
1. DISCHARGE FUEL SYSTEM PRESSURE (See page 11-1)
2. DISCONNECT BATTERY NEGATIVE TERMINAL
3. DRAIN ENGINE COOLANT (See page 16-9)
4. DRAIN ENGINE OIL (See page 17-20)
5. REMOVE FRONT WHEEL RH
6. REMOVE RADIATOR LOWER AIR DEFLECTOR (See page 19-5)
7. REMOVE FRONT SUSPENSION UPPER BRACE CENTER (W/O TEMS) (See page 10-1 1)
8. REMOVE V-BANK COVER SUB-ASSY (See page 10-1 1)
9. REMOVE AIR CLEANER INLET ASSY (See page 19-5)
10. REMOVE AIR CLEANER CAP SUB-ASSY (See page 10-1 1)
11. REMOVE AIR CLEANER CASE (See page 19-5)
12. REMOVE EMISSION CONTROL VALVE SET (See page 11-13)
13. REMOVE INTAKE AIR SURGE TANK (See page 11-13)
14. REMOVE INTAKE MANIFOLD (See page 10-16)
15. REMOVE WATER OUTLET (See page 10-16)
16. REMOVE FRONT FENDER APRON SEAL RH
17. REMOVE V (COOLER COMPRESSOR TO CRANKSHAFT PULLEY) BELT NO.1
(See page 14-5)
18. REMOVE VANE PUMP V BELT (See page 14-5)
19. REMOVE ENGINE MOVING CONTROL ROD (See page 14-79)
20. REMOVE ENGINE MOUNTING STAY NO.2 RH (See page 14-79)
21. REMOVE GENERATOR BRACKET NO.2 (See page 14-79)
22. REMOVE CRANKSHAFT PULLEY (See page 14-79)
SST 09213-54015 (91651-60855), 09330-00021, 09950-50013 (09951-05010, 09952-05010,
09953-05020, 09954-05031)
23. REMOVE TIMING BELT NO.1 COVER
24. REMOVE TIMING BELT NO.2 COVER (See page 14-79)
25. REMOVE ENGINE MOUNTING BRACKET RH (See page 14-79)
26. REMOVE TIMING BELT GUIDE NO.2
27. REMOVE TIMING BELT (See page 14-79)
28. REMOVE TIMING BELT IDLER SUB-ASSY NO.2
29. REMOVE CAMSHAFT TIMING PULLEY (See page 14-93)
SST 09960-10010 (09962-01000, 09963-01000), 09249-63010
30. REMOVE TIMING BELT NO.3 COVER (See page 14-93)
31. REMOVE MANIFOLD STAY NO.2 (See page 14-29)
32. SEPARATE EXHAUST PIPE ASSY FRONT (See page 15-2)
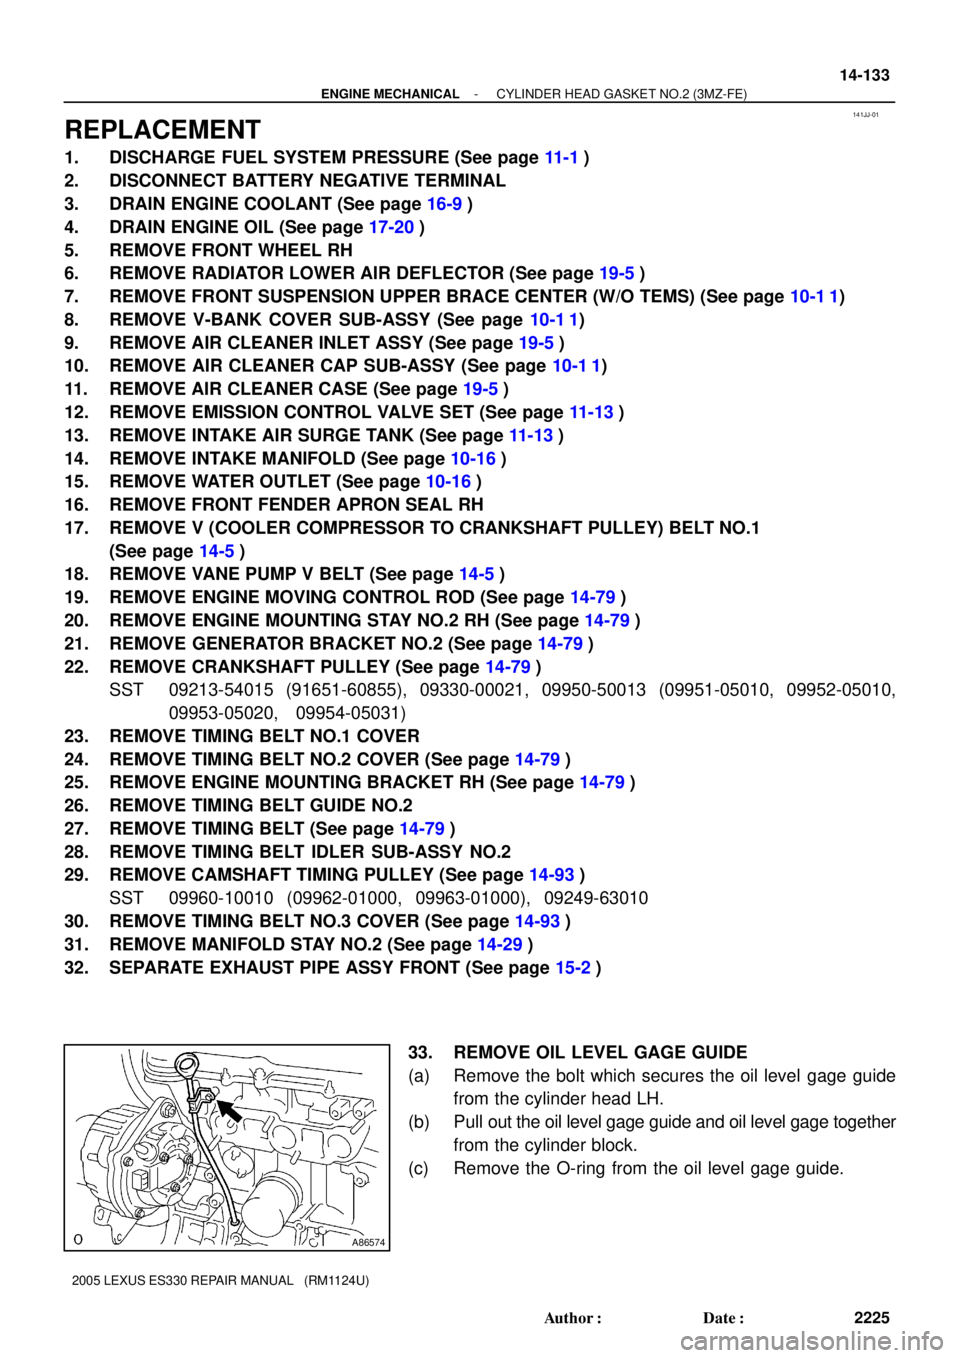
33. REMOVE OIL LEVEL GAGE GUIDE
(a) Remove the bolt which secures the oil level gage guide
from the cylinder head LH.
(b) Pull out the oil level gage guide and oil level gage together
from the cylinder block.
(c) Remove the O-ring from the oil level gage guide.
Page 512 of 969

A86573
O-ring
14-136
- ENGINE MECHANICALCYLINDER HEAD GASKET NO.2 (3MZ-FE)
2228 Author�: Date�:
2005 LEXUS ES330 REPAIR MANUAL (RM1124U)
49. INSTALL OIL LEVEL GAGE GUIDE
(a) Install a new O-ring to the oil level gage guide.
(b) Apply soapy water to the O-ring.
(c) Push in the oil level gage guide end into the guide hole of
the cylinder block.
(d) Install the oil level gage guide with the bolt.
Torque: 8.0 NVm (82 kgfVcm, 71 in.Vlbf)
(e) Install the oil level gage.
50. INSTALL EXHAUST PIPE ASSY FRONT (See page 15-2)
51. INSTALL MANIFOLD STAY NO.2 (See page 14-29)
52. INSTALL TIMING BELT NO.3 COVER (See page 14-93)
53. INSTALL CAMSHAFT TIMING PULLEY (See page 14-93)
SST 09960-10010 (09962-01000, 09963-01000), 09249-63010
54. INSTALL TIMING BELT IDLER SUB-ASSY NO.2 (See page 14-93)
55. INSPECT TIMING BELT (See page 14-79)
56. INSTALL TIMING BELT (See page 14-79)
SST 09960-10010 (09962-01000, 09963-01000)
57. INSTALL TIMING BELT TENSIONER ASSY (See page 14-79)
58. INSTALL TIMING BELT GUIDE NO.2 (See page 14-79)
59. INSTALL ENGINE MOUNTING BRACKET RH (See page 14-79)
60. INSTALL TIMING BELT NO.2 COVER (See page 14-79)
61. INSTALL TIMING BELT NO.1 COVER (See page 14-79)
62. INSTALL CRANKSHAFT PULLEY (See page 14-79)
SST 09213-54015 (91651-60855), 09330-00021
63. INSTALL GENERATOR BRACKET NO.2 (See page 14-79)
64. INSTALL ENGINE MOUNTING STAY NO.2 RH (See page 14-79)
65. INSTALL ENGINE MOVING CONTROL ROD (See page 14-79)
66. INSTALL VANE PUMP V BELT (See page 14-5)
67. INSTALL V (COOLER COMPRESSOR TO CRANKSHAFT PULLEY) BELT NO.1
(See page 14-5)
68. INSPECT DRIVE BELT DEFLECTION AND TENSION (See page 14-1)
69. INSTALL WATER OUTLET (See page 10-16)
70. INSTALL INTAKE MANIFOLD (See page 10-16)
71. INSTALL INTAKE AIR SURGE TANK (See page 11-13)
72. INSTALL EMISSION CONTROL VALVE SET (See page 11-13)
73. INSTALL AIR CLEANER CASE (See page 19-5)
74. INSTALL AIR CLEANER CAP SUB-ASSY (See page 10-1 1)
75. INSTALL AIR CLEANER INLET ASSY (See page 19-5)
76. CHECK CONNECTION OF VACUUM HOSE (See page 14-29)
77. INSTALL V-BANK COVER SUB-ASSY (See page 10-1 1)
78. INSTALL FRONT SUSPENSION UPPER BRACE CENTER (W/O TEMS) (See page 10-1 1)
79. INSTALL FRONT WHEEL RH (See page 14-5)
80. ADD ENGINE OIL (See page 17-20)
81. ADD ENGINE COOLANT (See page 16-9)
82. CHECK FOR ENGINE OIL LEAKS
83. CHECK FOR ENGINE COOLANT LEAKS (See page 16-1)
84. INSPECT FOR FUEL LEAKS
Page 571 of 969
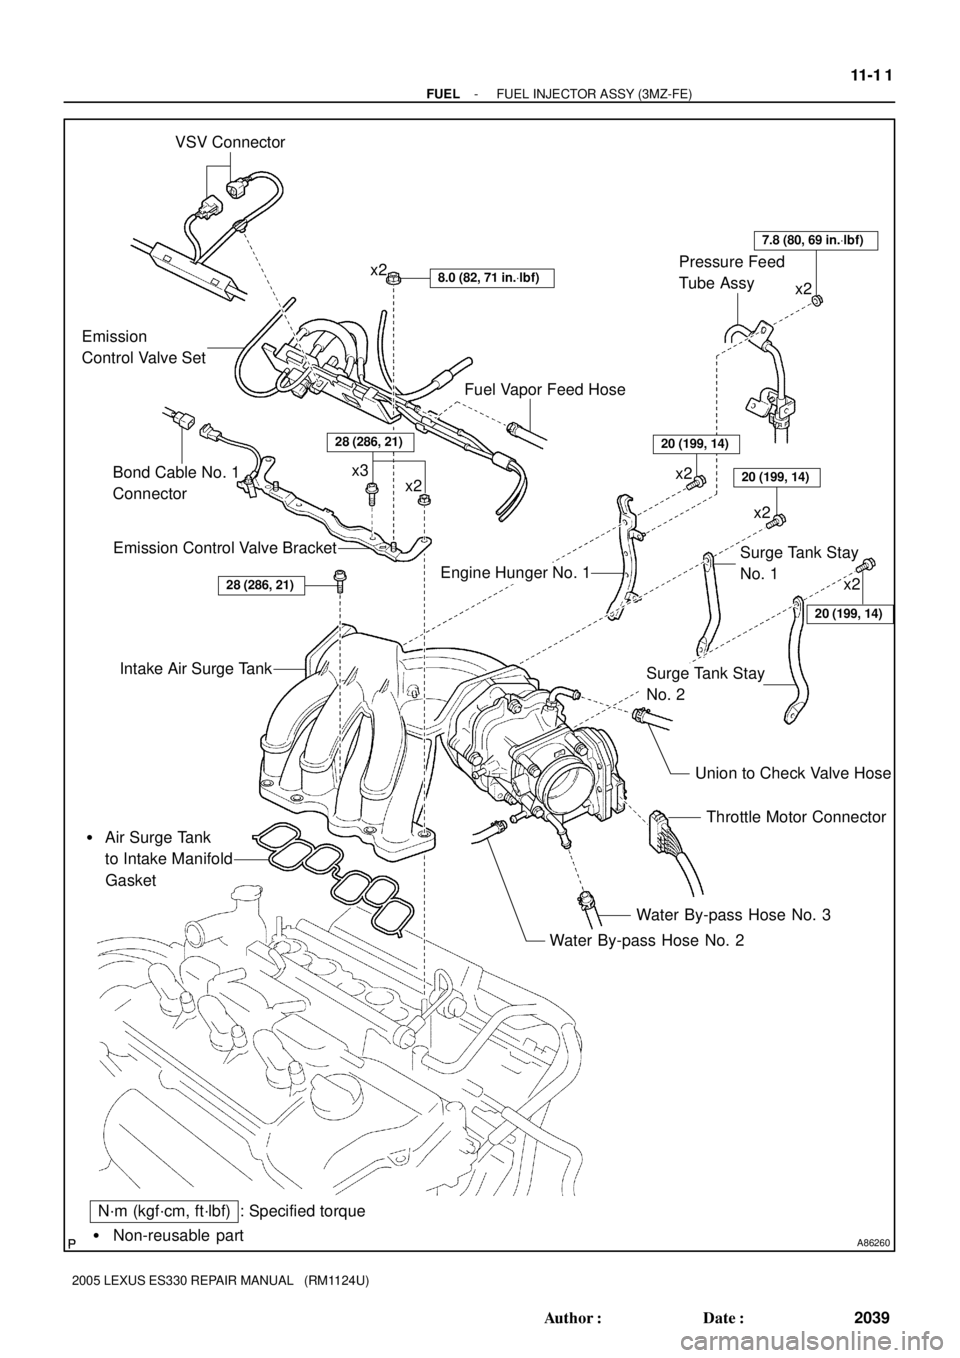
A86260� Non-reusable part
: Specified torque VSV Connector
8.0 (82, 71 in.Vlbf)x2
Emission
Control Valve Set
Emission Control Valve Bracket
Intake Air Surge Tank
� Air Surge Tank
to Intake Manifold
Gasket
Throttle Motor Connector
Water By-pass Hose No. 3
Water By-pass Hose No. 2
N´m (kgf´cm, ft´lbf)
Union to Check Valve Hose
Fuel Vapor Feed Hose
x2 x3
Engine Hunger No. 1Surge Tank Stay
No. 1
Surge Tank Stay
No. 2
20 (204, 14)
20 (204, 14)
20 (204, 14)
7.8 (80, 69 in.Vlbf)
x2
x2 Pressure Feed
Tube Assy
28 (286, 21)
x2
x2
Bond Cable No. 1
Connector
28 (286, 21)
10-14
- ENGINE CONTROL SYSTEMKNOCK SENSOR (3MZ-FE)
2019 Author�: Date�:
2005 LEXUS ES330 REPAIR MANUAL (RM1124U)
Page 575 of 969
A86268
(d)
(e)
(f)
(f)
(f)
(f)
(g)
A79749
(a)
(b)
(a)
(b)
A79750
Upper
Engine
Front0 to 5� 10-18
- ENGINE CONTROL SYSTEMKNOCK SENSOR (3MZ-FE)
2023 Author�: Date�:
2005 LEXUS ES330 REPAIR MANUAL (RM1124U)
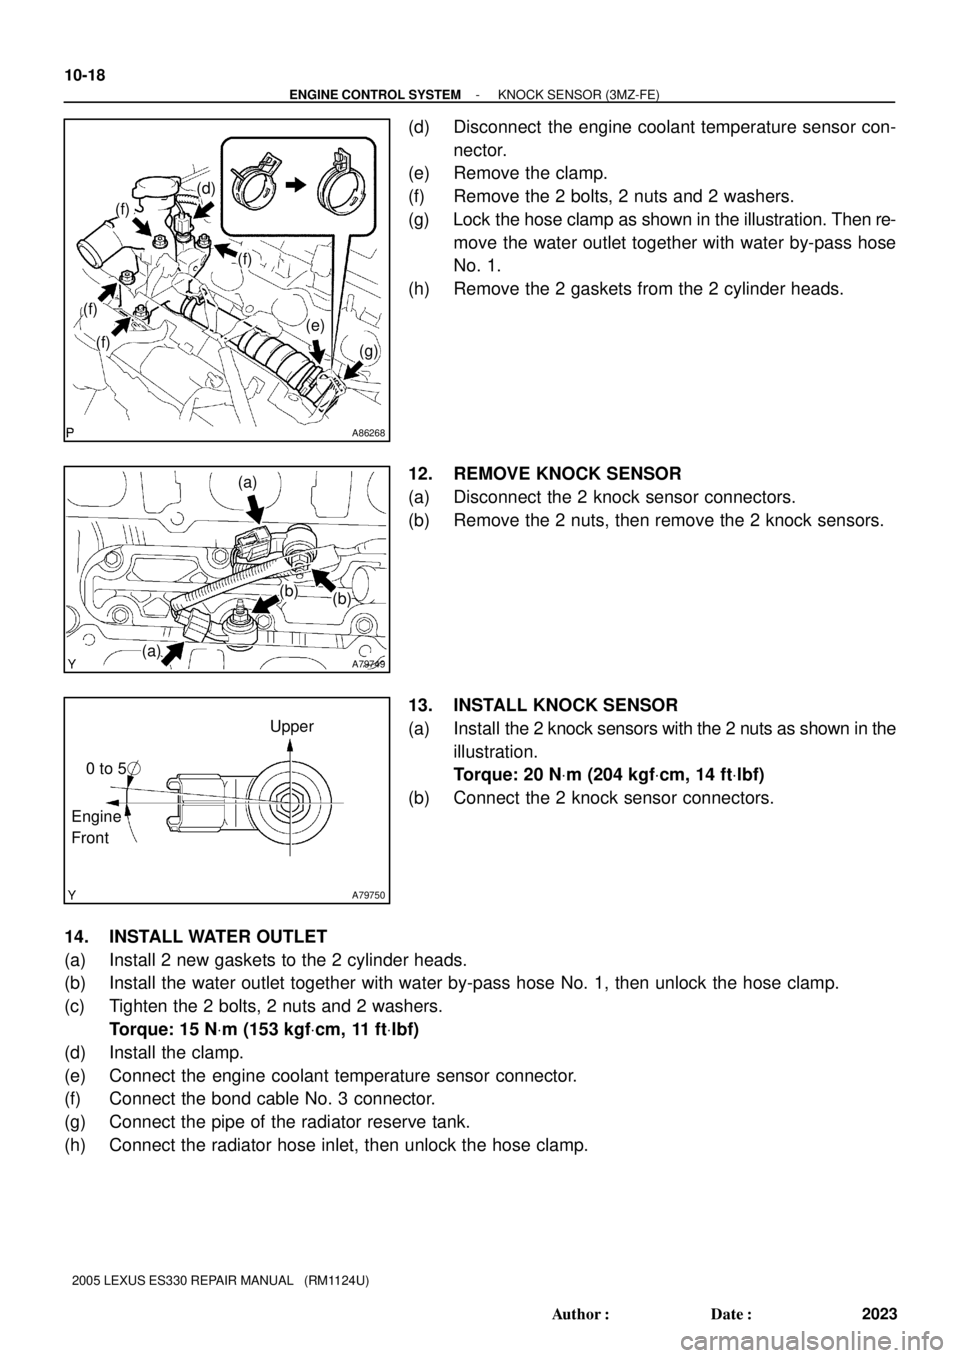
(d) Disconnect the engine coolant temperature sensor con-
nector.
(e) Remove the clamp.
(f) Remove the 2 bolts, 2 nuts and 2 washers.
(g) Lock the hose clamp as shown in the illustration. Then re-
move the water outlet together with water by-pass hose
No. 1.
(h) Remove the 2 gaskets from the 2 cylinder heads.
12. REMOVE KNOCK SENSOR
(a) Disconnect the 2 knock sensor connectors.
(b) Remove the 2 nuts, then remove the 2 knock sensors.
13. INSTALL KNOCK SENSOR
(a) Install the 2 knock sensors with the 2 nuts as shown in the
illustration.
Torque: 20 NVm (204 kgfVcm, 14 ftVlbf)
(b) Connect the 2 knock sensor connectors.
14. INSTALL WATER OUTLET
(a) Install 2 new gaskets to the 2 cylinder heads.
(b) Install the water outlet together with water by-pass hose No. 1, then unlock the hose clamp.
(c) Tighten the 2 bolts, 2 nuts and 2 washers.
Torque: 15 NVm (153 kgfVcm, 11 ftVlbf)
(d) Install the clamp.
(e) Connect the engine coolant temperature sensor connector.
(f) Connect the bond cable No. 3 connector.
(g) Connect the pipe of the radiator reserve tank.
(h) Connect the radiator hose inlet, then unlock the hose clamp.
Page 581 of 969
110XR-01
A62391
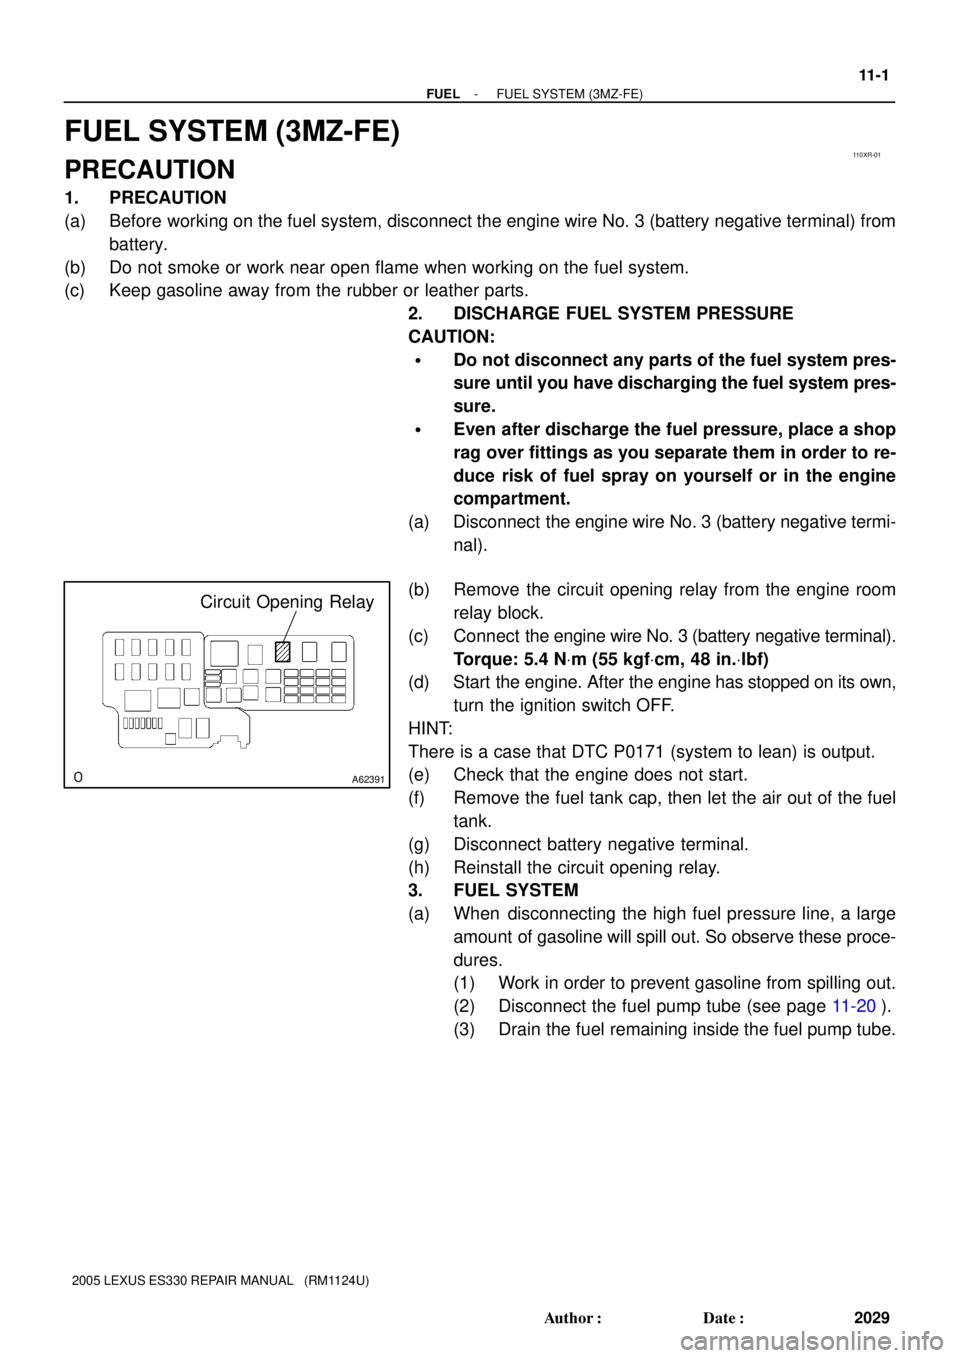
Circuit Opening Relay
- FUELFUEL SYSTEM (3MZ-FE)
11-1
2029 Author�: Date�:
2005 LEXUS ES330 REPAIR MANUAL (RM1124U)
FUEL SYSTEM (3MZ-FE)
PRECAUTION
1. PRECAUTION
(a) Before working on the fuel system, disconnect the engine wire No. 3 (battery negative terminal) from
battery.
(b) Do not smoke or work near open flame when working on the fuel system.
(c) Keep gasoline away from the rubber or leather parts.
2. DISCHARGE FUEL SYSTEM PRESSURE
CAUTION:
�Do not disconnect any parts of the fuel system pres-
sure until you have discharging the fuel system pres-
sure.
�Even after discharge the fuel pressure, place a shop
rag over fittings as you separate them in order to re-
duce risk of fuel spray on yourself or in the engine
compartment.
(a) Disconnect the engine wire No. 3 (battery negative termi-
nal).
(b) Remove the circuit opening relay from the engine room
relay block.
(c) Connect the engine wire No. 3 (battery negative terminal).
Torque: 5.4 NVm (55 kgfVcm, 48 in.Vlbf)
(d) Start the engine. After the engine has stopped on its own,
turn the ignition switch OFF.
HINT:
There is a case that DTC P0171 (system to lean) is output.
(e) Check that the engine does not start.
(f) Remove the fuel tank cap, then let the air out of the fuel
tank.
(g) Disconnect battery negative terminal.
(h) Reinstall the circuit opening relay.
3. FUEL SYSTEM
(a) When disconnecting the high fuel pressure line, a large
amount of gasoline will spill out. So observe these proce-
dures.
(1) Work in order to prevent gasoline from spilling out.
(2) Disconnect the fuel pump tube (see page 11-20).
(3) Drain the fuel remaining inside the fuel pump tube.
Page 591 of 969
A86260� Non-reusable part
: Specified torque VSV Connector
8.0 (82, 71 in.Vlbf)x2
Emission
Control Valve Set
Emission Control Valve Bracket
Intake Air Surge Tank
� Air Surge Tank
to Intake Manifold
Gasket
Throttle Motor Connector
Water By-pass Hose No. 3
Water By-pass Hose No. 2
N´m (kgf´cm, ft´lbf)
Union to Check Valve Hose
Fuel Vapor Feed Hose
x2 x3
Engine Hunger No. 1Surge Tank Stay
No. 1
Surge Tank Stay
No. 2
20 (199, 14)
20 (199, 14)
20 (199, 14)
7.8 (80, 69 in.Vlbf)
x2
x2 Pressure Feed
Tube Assy
28 (286, 21)
x2
x2
Bond Cable No. 1
Connector
28 (286, 21)
- FUELFUEL INJECTOR ASSY (3MZ-FE)
11-1 1
2039 Author�: Date�:
2005 LEXUS ES330 REPAIR MANUAL (RM1124U)
Page 594 of 969
A86298
(f)
(f)
A86299
(g)
(g)
(i)
(h)
(h)
(i)
A86301
(l)
(k)(k)
(k)(l)
(k)
(i)
A79710
(a)
(b)(c)
A86302
(a)(a)
(a)
(a)
(a)
(a) 11-14
- FUELFUEL INJECTOR ASSY (3MZ-FE)
2042 Author�: Date�:
2005 LEXUS ES330 REPAIR MANUAL (RM1124U)
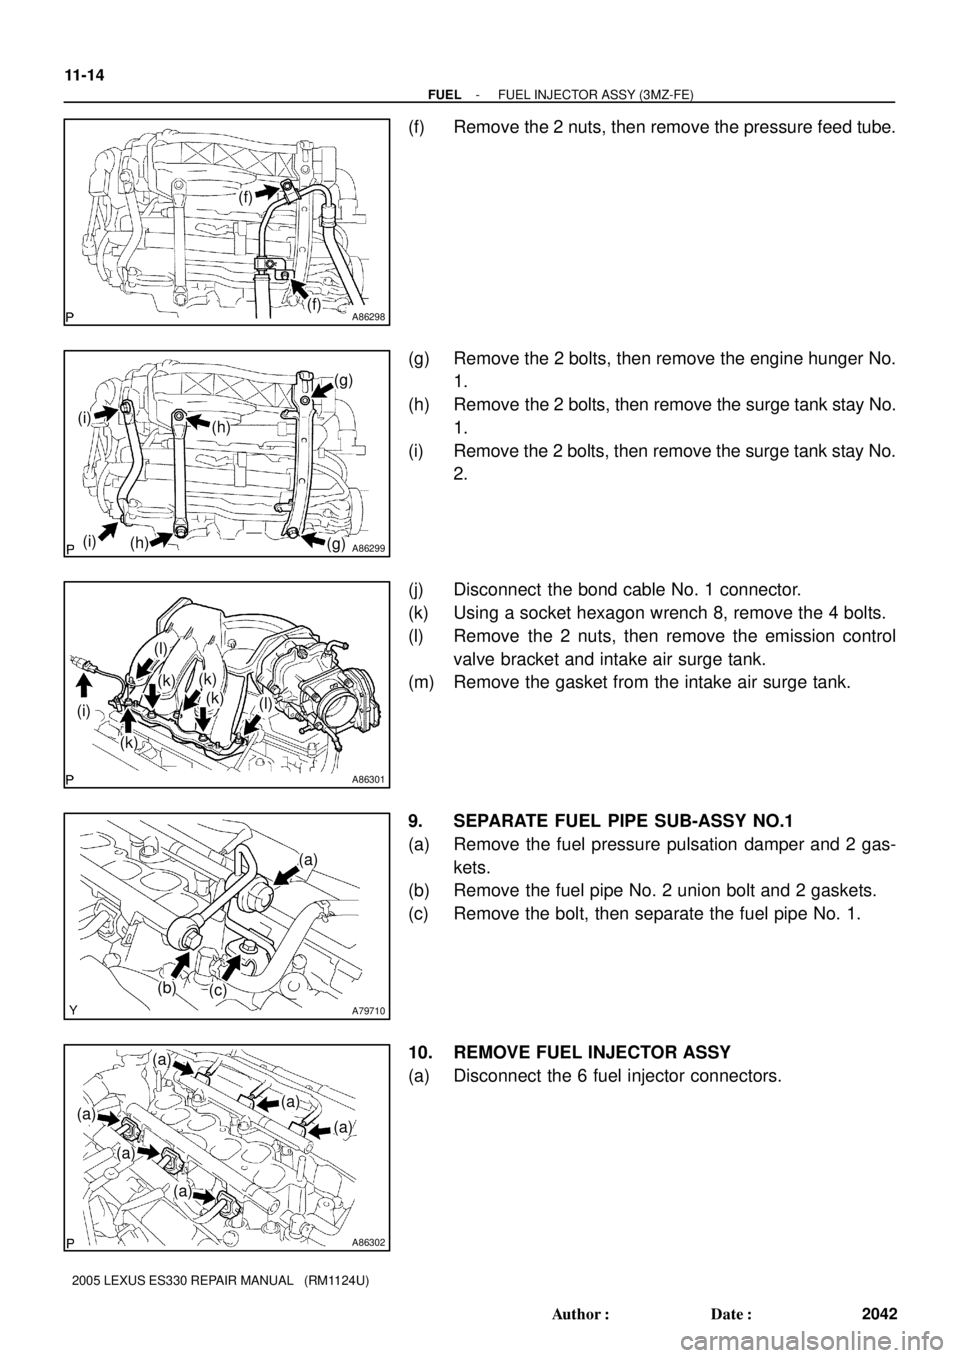
(f) Remove the 2 nuts, then remove the pressure feed tube.
(g) Remove the 2 bolts, then remove the engine hunger No.
1.
(h) Remove the 2 bolts, then remove the surge tank stay No.
1.
(i) Remove the 2 bolts, then remove the surge tank stay No.
2.
(j) Disconnect the bond cable No. 1 connector.
(k) Using a socket hexagon wrench 8, remove the 4 bolts.
(l) Remove the 2 nuts, then remove the emission control
valve bracket and intake air surge tank.
(m) Remove the gasket from the intake air surge tank.
9. SEPARATE FUEL PIPE SUB-ASSY NO.1
(a) Remove the fuel pressure pulsation damper and 2 gas-
kets.
(b) Remove the fuel pipe No. 2 union bolt and 2 gaskets.
(c) Remove the bolt, then separate the fuel pipe No. 1.
10. REMOVE FUEL INJECTOR ASSY
(a) Disconnect the 6 fuel injector connectors.