Page 712 of 969

(c) Remove the bolt, disconnect the fro")
C65925
C93871
F40140
F03956
SST
SST
- FRONT SUSPENSIONFRONT SHOCK ABSORBER WITH COIL SPRING
26-9
2372 Author�: Date�:
2005 LEXUS ES330 REPAIR MANUAL (RM1124U)
(c) Remove the bolt, disconnect the front flexible hose No. 1
and speed sensor front LH.
(d) Remove the 2 nuts and 2 bolts on the lower side of front
shock absorber with coil spring.
NOTICE:
When removing bolt, stop the bolt from rotating and loosen
the nut.
(e) Remove the 3 nuts on the upper side of the front shock
absorber with coil spring.
(f) Remove the front shock absorber with the coil spring.
NOTICE:
Be careful not to drop the 2 washers in the case that there
is front suspension upper brace center.
5. FIX FRONT SHOCK ABSORBER WITH COIL SPRING
(a) Install 2 nuts and a bolt to the bracket at the lower side of
the front shock absorber with coil spring and secure it in
a vise.
6. REMOVE SHOCK ABSORBER ASSY FRONT LH
(a) Using SST, compress the front coil spring LH.
SST 09727-30021
NOTICE:
Do not use an impact wrench. It will damage the SST.
HINT:
Use 2 of the same type of SST.
(b) Remove the front suspension support sub-assy LH, front suspension support bearing LH, front coil
spring seat upper LH, front coil spring insulator upper LH, front coil spring LH, front spring bumper LH
and front coil spring insulator upper LH.
Page 715 of 969
C65925
C91030
F40136
26-12
- FRONT SUSPENSIONFRONT SHOCK ABSORBER WITH COIL SPRING
2375 Author�: Date�:
2005 LEXUS ES330 REPAIR MANUAL (RM1124U)
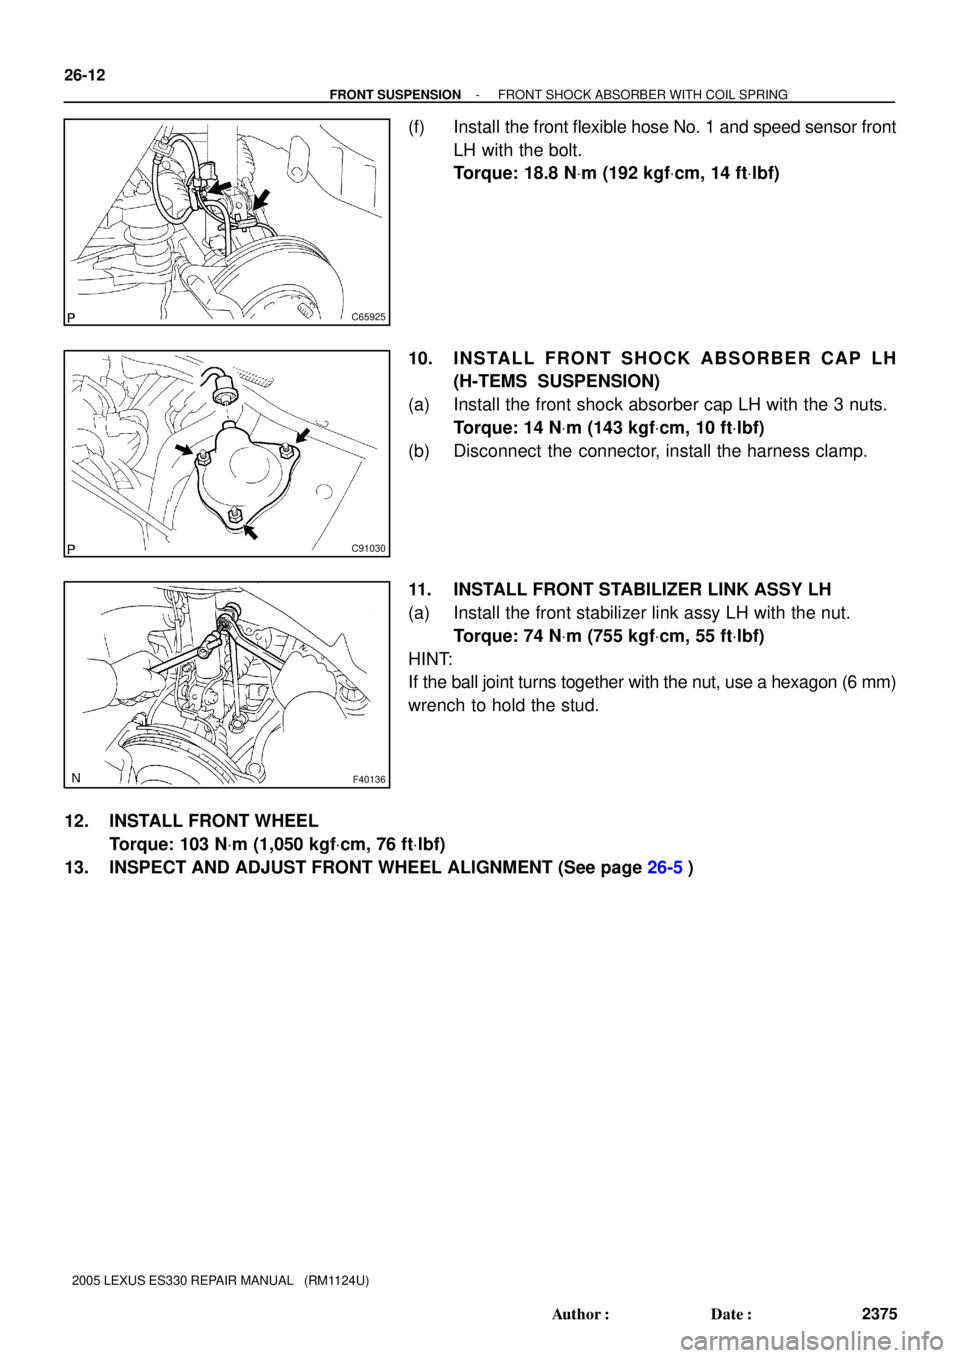
(f) Install the front flexible hose No. 1 and speed sensor front
LH with the bolt.
Torque: 18.8 NVm (192 kgfVcm, 14 ftVlbf)
10. INSTALL FRONT SHOCK ABSORBER CAP LH
(H-TEMS SUSPENSION)
(a) Install the front shock absorber cap LH with the 3 nuts.
Torque: 14 NVm (143 kgfVcm, 10 ftVlbf)
(b) Disconnect the connector, install the harness clamp.
11. INSTALL FRONT STABILIZER LINK ASSY LH
(a) Install the front stabilizer link assy LH with the nut.
Torque: 74 NVm (755 kgfVcm, 55 ftVlbf)
HINT:
If the ball joint turns together with the nut, use a hexagon (6 mm)
wrench to hold the stud.
12. INSTALL FRONT WHEEL
Torque: 103 NVm (1,050 kgfVcm, 76 ftVlbf)
13. INSPECT AND ADJUST FRONT WHEEL ALIGNMENT (See page 26-5)
Page 719 of 969

LOWER BALL JOINT ASSY FRONT LH
REPLACEMENT
HINT:
CONPONENTS: See")
2601I-09
ZX1712
26-16
- FRONT SUSPENSIONLOWER BALL JOINT ASSY FRONT LH
2379 Author�: Date�:
2005 LEXUS ES330 REPAIR MANUAL (RM1124U)
LOWER BALL JOINT ASSY FRONT LH
REPLACEMENT
HINT:
CONPONENTS: See page 26-3.
1. REMOVE FRONT WHEEL
2. REMOVE FRONT AXLE HUB LH NUT (See page 30-8)
SST 09930-00010
3. DISCONNECT SPEED SENSOR FRONT LH (See page 30-8)
4. DISCONNECT FRONT DISC BRAKE CALIPER ASSY LH (See page 30-19)
5. REMOVE FRONT DISC
6. DISCONNECT TIE ROD ASSY LH (See page 30-8)
SST 09628-6201 1
7. DISCONNECT FRONT SUSPENSION ARM SUB-ASSY LOWER NO.1 LH (See page 30-8)
8. REMOVE FRONT AXLE ASSY LH (See page 30-19)
9. REMOVE LOWER BALL JOINT ASSY FRONT LH (See page 30-19)
SST 09628-6201 1
10. INSPECT LOWER BALL JOINT ASSY FRONT LH
(a) As shown in the illustration, flip the ball joint stud back and
forth 5 times, before installing the nut.
(b) Using a torque wrench, turn the nut continuously at a rate
of 3 - 5 seconds per 1 turn and take the torque reading
on the 5th turn.
Turning torque:
0.98 - 3.43 N´m (10 - 35 kgf´cm, 8.7 - 30 in.´lbf)
11. INSTALL LOWER BALL JOINT ASSY FRONT LH (See page 30-19)
12. INSTALL FRONT AXLE ASSY LH (See page 30-19)
13. INSTALL FRONT SUSPENSION ARM SUB-ASSY LOWER NO.1 LH (See page 30-8)
14. INSTALL TIE ROD ASSY LH (See page 30-8)
15. INSTALL FRONT DISC
16. INSTALL FRONT DISC BRAKE CALIPER ASSY LH (See page 30-19)
17. INSTALL SPEED SENSOR FRONT LH (See page 30-8)
18. INSTALL FRONT AXLE HUB LH NUT (See page 30-8)
19. INSTALL FRONT WHEEL
Torque: 103 NVm (1,050 kgfVcm, 76 ftVlbf)
20. INSPECT AND ADJUST FRONT WHEEL ALIGNMENT (See page 26-5)
21. CHECK ABS SPEED SENSOR SIGNAL
w/ VSC (See page 05-471)
w/o VSC (See page 05-420)
Page 766 of 969

SHOCK ABSORBER ASSY REAR LH
REPLACEMENT
HINT:
COMPONENTS: See p")
2706G-03
C66631
F41030
27-4
- REAR SUSPENSIONSHOCK ABSORBER ASSY REAR LH
2386 Author�: Date�:
2005 LEXUS ES330 REPAIR MANUAL (RM1124U)
SHOCK ABSORBER ASSY REAR LH
REPLACEMENT
HINT:
COMPONENTS: See page 27-2
1. REMOVE REAR WHEEL
2. REMOVE REAR SEAT CUSHION ASSY (See page 72-39)
3. REMOVE REAR SEATBACK ASSY (See page 72-39)
4. REMOVE ROOF SIDE GARNISH INNER RH (See page 76-25)
5. REMOVE ROOF SIDE GARNISH INNER LH
HINT:
Remove the LH side by the same procedures with the RH side.
6. REMOVE REAR DOOR OPENING TRIM WEATHERSTRIP RH (See page 72-39)
7. REMOVE REAR DOOR OPENING TRIM WEATHERSTRIP LH
HINT:
Remove the LH side by the same procedures with the RH side.
8. REMOVE CENTER STOP LAMP ASSY (W/O SUN SHADE) (See page 65-31)
9. REMOVE REAR SEAT SHOULDER BELT COVER (See page 61-15)
10. REMOVE PACKAGE TRAY TRIM PANEL ASSY (W/ SUN SHADE) (See page 61-15)
11. REMOVE PACKAGE TRAY TRIM PANEL ASSY (W/O SUN SHADE) (See page 61-15)
12. REMOVE REAR SEAT 3 POINT TYPE BELT ASSY OUTER (See page 61-15)
13. SEPARATE REAR STABILIZER LINK ASSY LH
(a) Remove the nut and disconnect the stabilizer bar link from
the shock absorber.
HINT:
If the ball joint turns together with the nut, use a hexagon (5 mm)
wrench to hold the stud.
14. REMOVE REAR SUSPENSION SUPOPORT NO.1 COVER LH (W/O H-TEMS SUSPENSION)
15. REMOVE REAR SHOCK ABSORBER WITH COIL
SPRING
(a) Remove the 2 bolts, disconnect the flexible hose and ABS
speed sensor wire harness from shock absorber.
Page 769 of 969

C93768
5�
5� Lower Bracket
Suspension supportOutside Front
F02773
C92184
C66634
F41030
A
B
- REAR SUSPENSIONSHOCK ABSORBER ASSY REAR LH
27-7
2389 Author�: Date�:
2005 LEXUS ES330 REPAIR MANUAL (RM1124U)
(e) Align the suspension support with the shock absorber
lower bracket, as shown in the illustration.
HINT:
Set the suspension support so that the ribbed part of the sus-
pension support faces out side.
(f) Install the collar to the piston rod.
(g) Temporarily install a new nut.
(h) Remove the SST.
SST 09727-30021
HINT:
After removing SST, recheck the direction of the suspension
support.
20. INSTALL REAR SHOCK ABSORBER WITH COIL
SPRING
(a) Install the shock absorber with the coil spring and 3 nuts.
Torque: 39 NVm (400 kgfVcm, 29 ftVlbf)
(b) Install the shock absorber with the coil spring, 2 bolts and
nuts.
Torque: 255 NVm (2,600 kgfVcm, 188 ftVlbf)
HINT:
Keep the bolt fixed while tightening the nut.
(c) Install the flexible hose and ABS speed sensor wire har-
ness with the 2 bolts.
Torque:
A: Flexible hose: 19 NVm (194 kgfVcm, 14 ftVlbf)
B: ABS speed sensor wire harness:
5.5 NVm (56 kgfVcm, 49 inVlbf)
Page 772 of 969

REAR SUSPENSION ARM ASSY NO.1 LH
REPLACEMENT
HINT:
COMPON")
2706H-02
B53735
B53736
27-10
- REAR SUSPENSIONREAR SUSPENSION ARM ASSY NO.1 LH
2392 Author�: Date�:
2005 LEXUS ES330 REPAIR MANUAL (RM1124U)
REAR SUSPENSION ARM ASSY NO.1 LH
REPLACEMENT
HINT:
COMPONENTS: See page 27-2
1. REMOVE REAR WHEEL
2. REMOVE EXHAUST PIPE ASSY CENTER (See page 15-2)
3. REMOVE STABILIZER BAR REAR (See page 27-16)
4. SEPARATE STRUT ROD ASSY REAR (See page 27-18)
5. SEPARATE HEIGHT CONTROL SENSOR SUB-ASSY REAR RH (See page 65-33)
6. SEPARATE REAR SUSPENSION ARM ASSY NO.2 LH
(a) Remove the bolt, nut and rear suspension arm No. 2 (out-
er side) from the rear carrier.
HINT:
Keep the nut fixed while loosening and removing the bolt.
7. SEPARATE REAR SUSPENSION ARM ASSY NO.2 RH
HINT:
Separate the RH side by the procedures with the LH side.
8. SEPARATE REAR SUSPENSION ARM ASSY NO.1 LH
(a) Remove the bolt, nut and rear suspension arm No. 1 (out-
er side) from rear axle carrier.
HINT:
Keep the nut fixed while loosening and removing the bolt.
9. SEPARATE REAR SUSPENSION ARM ASSY NO.1 RH
HINT:
Separate the RH side by the procedures with the LH side.
Page 774 of 969

13. INSTALL REAR SUSPENSION MEMBER SUB-ASSY
(a) Support the")
B53742
B53736
B53735
27-12
- REAR SUSPENSIONREAR SUSPENSION ARM ASSY NO.1 LH
2394 Author�: Date�:
2005 LEXUS ES330 REPAIR MANUAL (RM1124U)
13. INSTALL REAR SUSPENSION MEMBER SUB-ASSY
(a) Support the rear suspension member with a jack.
(b) Install the rear suspension member with the 4 nuts, 2 bolts
and 4 retainers.
Torque:
A, B: 55 NVm (561 kgfVcm, 41 ftVlbf)
C: 38 NVm (387 kgfVcm, 28 ftVlbf)
14. TEMPORARILY TIGHTEN REAR SUSPENSION ARM
ASSY NO.1 LH
(a) Connect the rear suspension arm No. 1 (outer side) to the
rear axle carrier with the bolt and nut, and temporarily
tighten the bolt and nut.
HINT:
Insert the bolt from the front side of the vehicle and temporarily
install the bolt.
15. TEMPORARILY TIGHTEN REAR SUSPENSION ARM ASSY NO.1 RH
HINT:
Temporarily tighten the RH side by the procedures with the LH side.
16. TEMPORARILY TIGHTEN REAR SUSPENSION ARM
ASSY NO.2 LH
(a) Connect the rear suspension arm No. 2 (outer side) to the
rear axle carrier with the bolt and nut, and temporarily
tighten the bolt.
HINT:
Insert the bolt from the rear side of the vehicle and temporarily
install the bolt.
17. TEMPORARILY TIGHTEN REAR SUSPENSION ARM ASSY NO.2 RH
HINT:
Temporarily tighten the RH side by the procedures with the LH side.
18. CONNECT HEIGHT CONTROL SENSOR SUB-ASSY REAR RH (See page 65-33)
19. TEMPORARILY TIGHTEN STRUT ROD ASSY REAR (See page 27-18)
Page 776 of 969

REAR SUSPENSION ARM ASSY NO.2 LH
REPLACEMENT
HINT:")
2706I-02
C82992
C82993
C82992
27-14
- REAR SUSPENSIONREAR SUSPENSION ARM ASSY NO.2 LH
2396 Author�: Date�:
2005 LEXUS ES330 REPAIR MANUAL (RM1124U)
REAR SUSPENSION ARM ASSY NO.2 LH
REPLACEMENT
HINT:
COMPONENTS: See page 27-2
1. REMOVE REAR WHEEL
2. REMOVE EXHAUST PIPE ASSY CENTER (See page 15-2)
3. REMOVE STABILIZER BAR REAR (See page 27-16)
4. SEPARATE STRUT ROD ASSY REAR (See page 27-18)
5. SEPARATE HEIGHT CONTROL SENSOR SUB-ASSY REAR RH (See page 65-33)
6. SEPARATE REAR SUSPENSION ARM ASSY NO.2 LH (See page 27-10)
7. SEPARATE REAR SUSPENSION ARM ASSY NO.2 RH
HINT:
Separate the RH side by the procedures with the LH side.
8. SEPARATE REAR SUSPENSION ARM ASSY NO.1 LH (See page 27-10)
9. SEPARATE REAR SUSPENSION ARM ASSY NO.1 RH
HINT:
Separate the RH side by the procedures with the LH side.
10. REMOVE REAR SUSPENSION MEMBER SUB-ASSY (See page 27-10)
11. REMOVE REAR SUSPENSION ARM ASSY NO.2 LH
(a) Remove the bolt and rear suspension arm No. 2 (inner
side).
(b) Remove the bolt, nut and disconnect the rear suspension
arm No. 2 (outer side) from rear axle carrier.
HINT:
Keep the nut fixed while loosening and removing the bolt.
12. INSTALL REAR SUSPENSION ARM ASSY NO.2 LH
(a) Install the rear suspension arm No. 2 (inner side) with the
bolt and temporarily tighten the bolt.