Page 274 of 354
In case of an emergency6 6Jump starting procedure 1. Make sure the booster battery is
12-volt and that its negative termi-
nal is grounded.
2. If the booster battery is in another
vehicle, do not allow the vehicles
to touch.
3. Turn off all unnecessary electrical
loads.
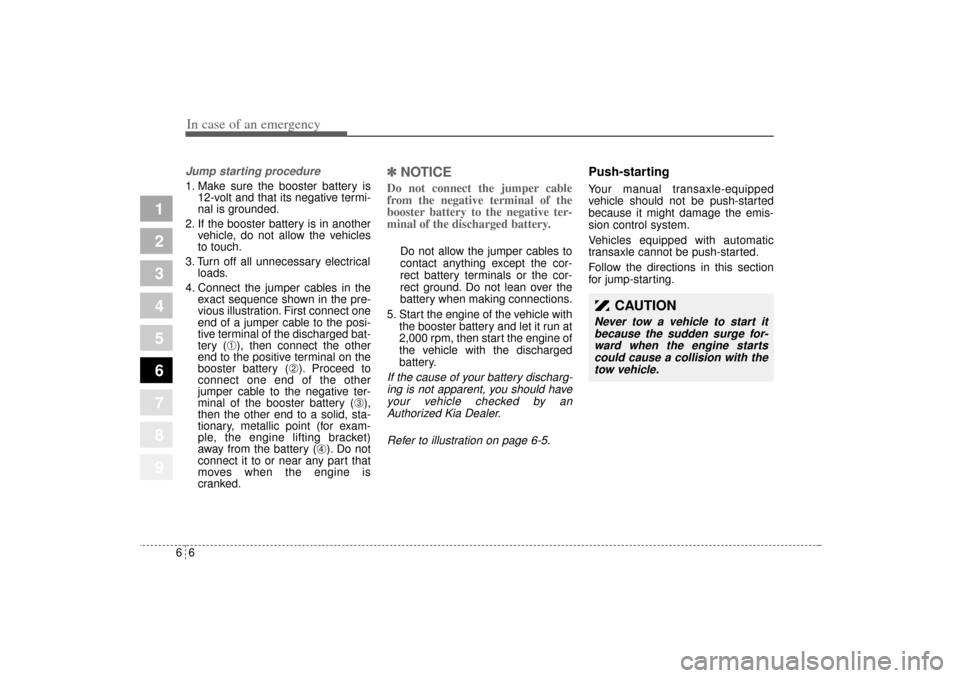
4. Connect the jumper cables in the
exact sequence shown in the pre-
vious illustration. First connect one
end of a jumper cable to the posi-
tive terminal of the discharged bat-
tery (
➀), then connect the other
end to the positive terminal on the
booster battery (
➁). Proceed to
connect one end of the other
jumper cable to the negative ter-
minal of the booster battery (
➂),
then the other end to a solid, sta-
tionary, metallic point (for exam-
ple, the engine lifting bracket)
away from the battery (
➃). Do not
connect it to or near any part that
moves when the engine is
cranked.
✽ ✽
NOTICEDo not connect the jumper cable
from the negative terminal of the
booster battery to the negative ter-
minal of the discharged battery.
Do not allow the jumper cables to
contact anything except the cor-
rect battery terminals or the cor-
rect ground. Do not lean over the
battery when making connections.
5. Start the engine of the vehicle with
the booster battery and let it run at
2,000 rpm, then start the engine of
the vehicle with the discharged
battery.
If the cause of your battery discharg-
ing is not apparent, you should have
your vehicle checked by an
Authorized Kia Dealer.
Refer to illustration on page 6-5.
Push-starting Your manual transaxle-equipped
vehicle should not be push-started
because it might damage the emis-
sion control system.
Vehicles equipped with automatic
transaxle cannot be push-started.
Follow the directions in this section
for jump-starting.
1
2
3
4
5
6
7
8
9
CAUTION
Never tow a vehicle to start it
because the sudden surge for-
ward when the engine starts
could cause a collision with the
tow vehicle.
KM CAN (ENG) 6.qxd 9/13/2004 4:47 PM Page 6
Page 275 of 354
67
In case of an emergency
ELECTRICAL CIRCUIT PROTECTION Fuses A vehicle’s electrical system is pro-
tected from electrical overload dam-
age by fuses.
This vehicle has two fuse panels,
one located in the driver's side panel
bolster, the other in the engine com-
partment near the battery.If any of your vehicle’s lights, acces-
sories, or controls do not work, check
the appropriate circuit fuse. If a fuse
has blown, the element inside the
fuse will be melted.
If the electrical system does not
work, first check the driver’s side
fuse panel.
Always replace a blown fuse with
one of the same rating.If the replacement fuse blows, this
indicates an electrical problem. Avoid
using the system involved and imme-
diately consult an Authorized Kia
Dealer.
Two kinds of fuses are used: stan-
dard for lower amperage rating and
main for higher amperage ratings.
1
2
3
4
5
6
7
8
9
1LDA4002 Standard
Main fuse
NormalNormal
Blown
Blown
KM CAN (ENG) 6.qxd 9/13/2004 4:47 PM Page 7
Page 276 of 354
In case of an emergency8 6Fuse replacement
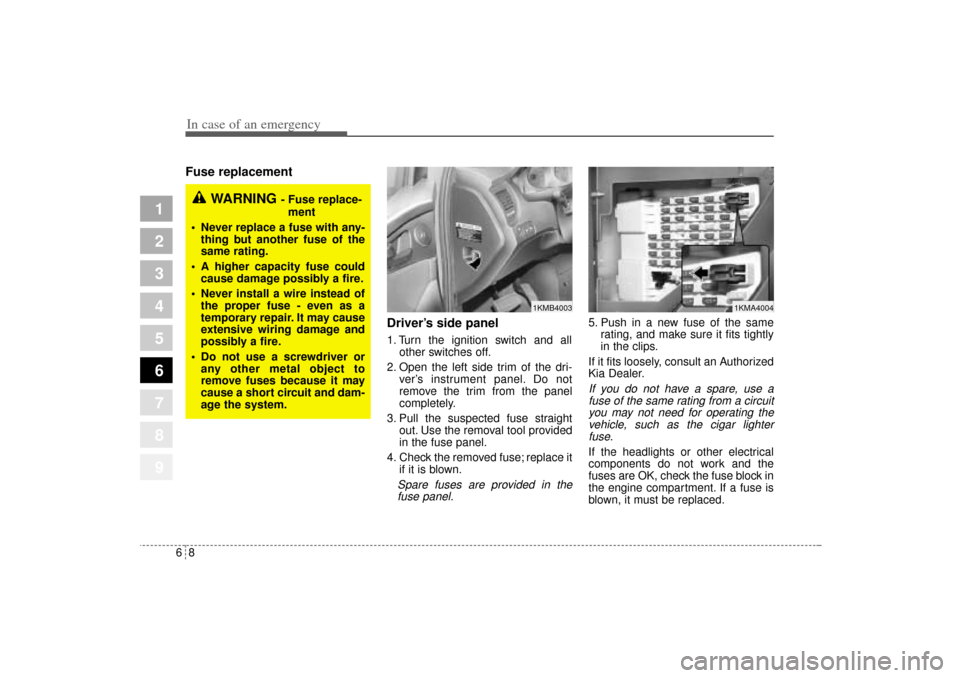
Driver’s side panel
1. Turn the ignition switch and all
other switches off.
2. Open the left side trim of the dri-
ver’s instrument panel. Do not
remove the trim from the panel
completely.
3. Pull the suspected fuse straight
out. Use the removal tool provided
in the fuse panel.
4. Check the removed fuse; replace it
if it is blown.Spare fuses are provided in the
fuse panel.
5. Push in a new fuse of the same
rating, and make sure it fits tightly
in the clips.
If it fits loosely, consult an Authorized
Kia Dealer.If you do not have a spare, use a
fuse of the same rating from a circuit
you may not need for operating the
vehicle, such as the cigar lighter
fuse.If the headlights or other electrical
components do not work and the
fuses are OK, check the fuse block in
the engine compartment. If a fuse is
blown, it must be replaced.
1
2
3
4
5
6
7
8
9
1KMB4003
1KMA4004
WARNING
- Fuse replace-
ment
Never replace a fuse with any-
thing but another fuse of the
same rating.
A higher capacity fuse could
cause damage possibly a fire.
Never install a wire instead of
the proper fuse - even as a
temporary repair. It may cause
extensive wiring damage and
possibly a fire.
Do not use a screwdriver or
any other metal object to
remove fuses because it may
cause a short circuit and dam-
age the system.
KM CAN (ENG) 6.qxd 9/13/2004 4:47 PM Page 8
Page 277 of 354
69
In case of an emergency
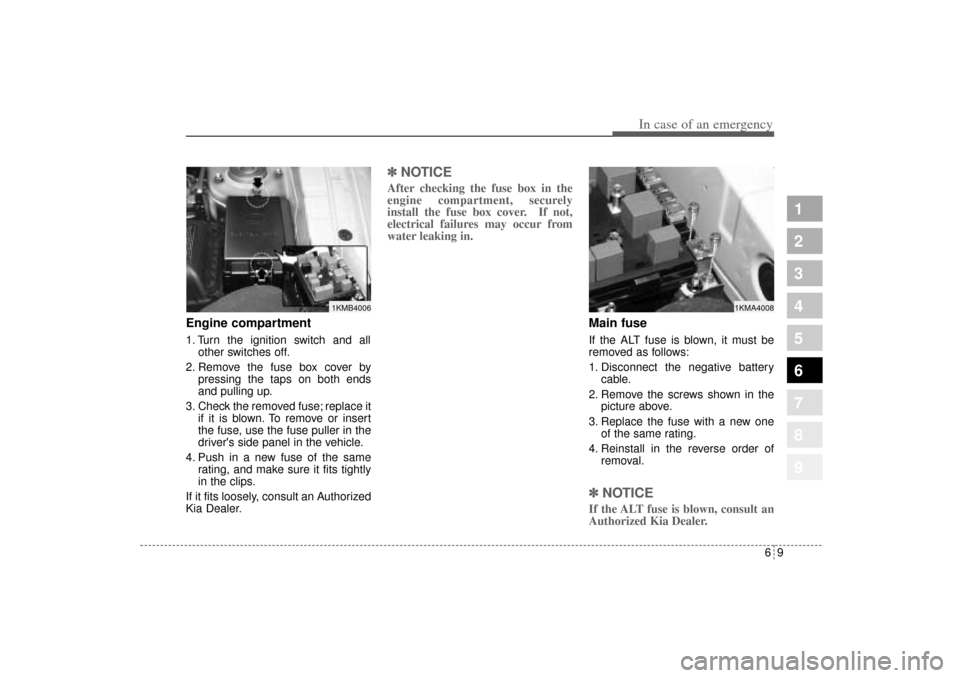
Engine compartment1. Turn the ignition switch and all
other switches off.
2. Remove the fuse box cover by
pressing the taps on both ends
and pulling up.
3. Check the removed fuse; replace it
if it is blown. To remove or insert
the fuse, use the fuse puller in the
driver's side panel in the vehicle.
4. Push in a new fuse of the same
rating, and make sure it fits tightly
in the clips.
If it fits loosely, consult an Authorized
Kia Dealer.
✽ ✽
NOTICEAfter checking the fuse box in the
engine compartment, securely
install the fuse box cover. If not,
electrical failures may occur from
water leaking in.
Main fuseIf the ALT fuse is blown, it must be
removed as follows:
1. Disconnect the negative battery
cable.
2. Remove the screws shown in the
picture above.
3. Replace the fuse with a new one
of the same rating.
4. Reinstall in the reverse order of
removal.✽ ✽
NOTICEIf the ALT fuse is blown, consult an
Authorized Kia Dealer.
1
2
3
4
5
6
7
8
9
1KMB4006
1KMA4008
KM CAN (ENG) 6.qxd 9/13/2004 4:47 PM Page 9
Page 278 of 354
1
2
3
4
5
6
7
8
9
Fuse/Relay panel descriptionInside the fuse/relay box covers, you can find the fuse/relay label describing fuse/relay name and capacity.In case of an emergency10 6Driver’s side panel
1KMA4009/1KMR4010
Engine compartment
KM CAN (ENG) 6.qxd 9/13/2004 4:47 PM Page 10
Page 280 of 354
In case of an emergency12 6
1
2
3
4
5
6
7
8
9
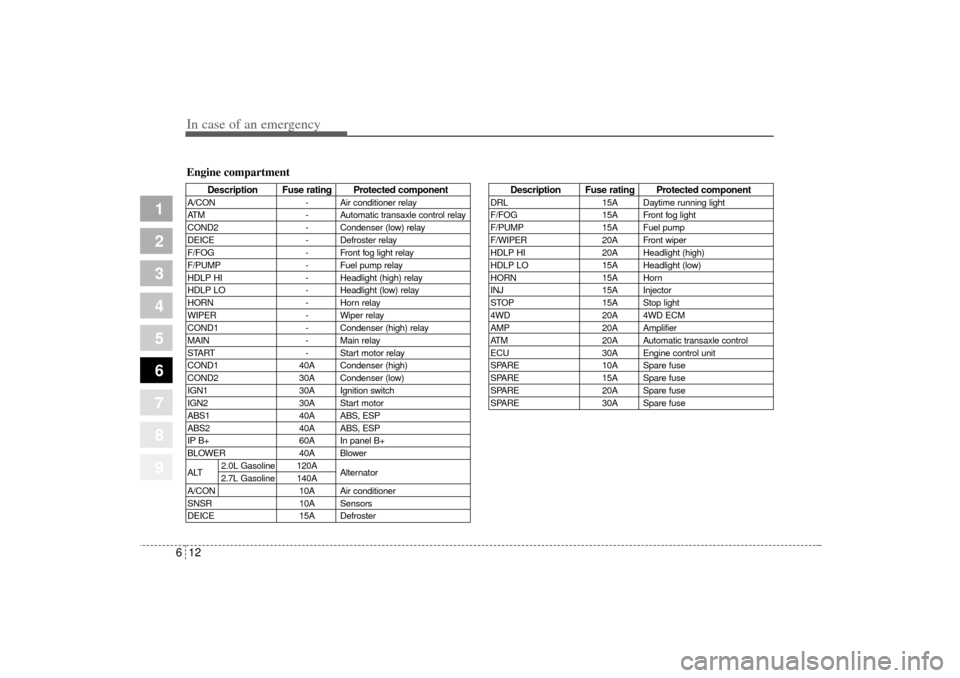
Engine compartment
Description Fuse rating Protected component
A/CON - Air conditioner relay
ATM - Automatic transaxle control relay
COND2 - Condenser (low) relay
DEICE - Defroster relay
F/FOG - Front fog light relay
F/PUMP - Fuel pump relay
HDLP HI - Headlight (high) relay
HDLP LO - Headlight (low) relay
HORN - Horn relay
WIPER - Wiper relay
COND1 - Condenser (high) relay
MAIN - Main relay
START - Start motor relay
COND1 40A Condenser (high)
COND2 30A Condenser (low)
IGN1 30A Ignition switch
IGN2 30A Start motor
ABS1 40A ABS, ESP
ABS2 40A ABS, ESP
IP B+ 60A In panel B+
BLOWER 40A Blower
ALT2.0L Gasoline 120A
Alternator
2.7L Gasoline 140A
A/CON 10A Air conditioner
SNSR 10A Sensors
DEICE 15A Defroster
Description Fuse rating Protected component
DRL 15A Daytime running light
F/FOG 15A Front fog light
F/PUMP 15A Fuel pump
F/WIPER 20A Front wiper
HDLP HI 20A Headlight (high)
HDLP LO 15A Headlight (low)
HORN 15A Horn
INJ 15A Injector
STOP 15A Stop light
4WD 20A 4WD ECM
AMP 20A Amplifier
ATM 20A Automatic transaxle control
ECU 30A Engine control unit
SPARE 10A Spare fuse
SPARE 15A Spare fuse
SPARE 20A Spare fuse
SPARE 30A Spare fuse
KM CAN (ENG) 6.qxd 9/13/2004 4:47 PM Page 12
Page 281 of 354
613
In case of an emergency
1
2
3
4
5
6
7
8
9
Power connector fuseYour vehicle is equipped with a
power connector fuse to prevent bat-
tery discharge if your vehicle is
parked without being operated for
prolonged periods. Use the following
procedures before parking the vehi-
cle for prolonged period.
1. Turn off the engine.
2. Turn off the headlights and tail
lights.
3. Open the driver’s side panel cover
and pull up the “P/CONN 30A”.
✽ ✽
NOTICE• If the power connector fuse is
pulled up from the fuse panel, the
warning chime, audio, clock and
interior lamps, etc., will not oper-
ate. Some items must be reset after
replacement. (Refer to “Items to
be reset···.” on page 7-37)
• Even though the power connector
fuse is pulled up, the battery can
still be discharged by operation of
the headlights or other electrical
devices.
1KMA4005
Power connector fuse
KM CAN (ENG) 6.qxd 9/13/2004 4:47 PM Page 13
Page 289 of 354
621
In case of an emergency
1
2
3
4
5
6
7
8
9
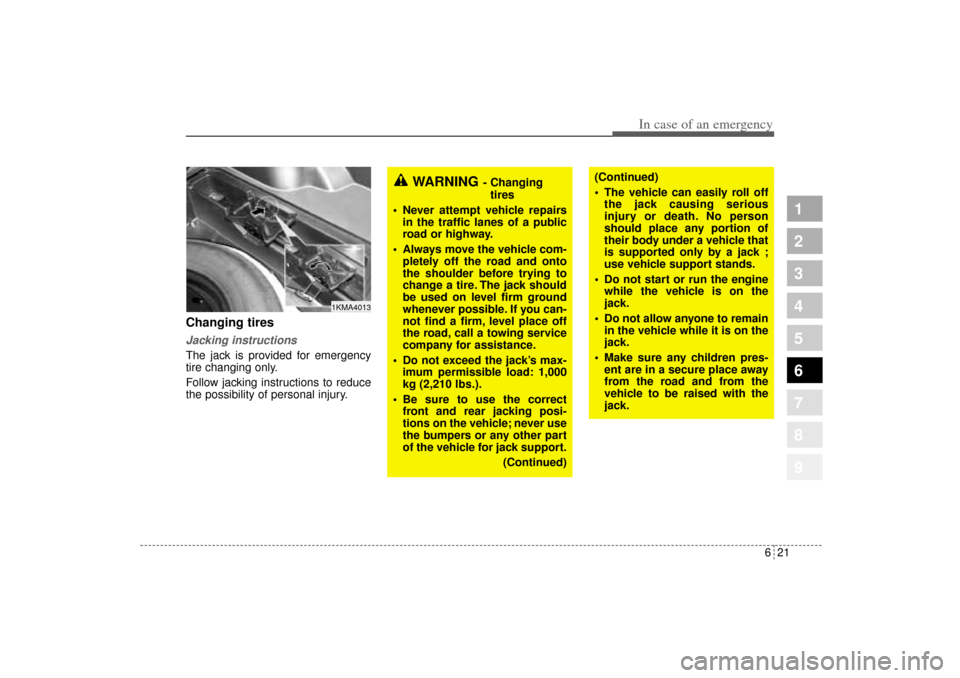
Changing tires Jacking instructions The jack is provided for emergency
tire changing only.
Follow jacking instructions to reduce
the possibility of personal injury.
WARNING
- Changing
tires
Never attempt vehicle repairs
in the traffic lanes of a public
road or highway.
Always move the vehicle com-
pletely off the road and onto
the shoulder before trying to
change a tire. The jack should
be used on level firm ground
whenever possible. If you can-
not find a firm, level place off
the road, call a towing service
company for assistance.
Do not exceed the jack’s max-
imum permissible load: 1,000
kg (2,210 lbs.).
Be sure to use the correct
front and rear jacking posi-
tions on the vehicle; never use
the bumpers or any other part
of the vehicle for jack support.
(Continued)
(Continued)
The vehicle can easily roll off
the jack causing serious
injury or death. No person
should place any portion of
their body under a vehicle that
is supported only by a jack ;
use vehicle support stands.
Do not start or run the engine
while the vehicle is on the
jack.
Do not allow anyone to remain
in the vehicle while it is on the
jack.
Make sure any children pres-
ent are in a secure place away
from the road and from the
vehicle to be raised with the
jack.
1KMA4013
KM CAN (ENG) 6.qxd 9/13/2004 4:47 PM Page 21