Page 1833 of 3419

EC-642Revision: October 2005
FUEL PUMP CIRCUIT
2005 QX56
11 . DETECT MALFUNCTIONING PART
Check the following.
�Harness connectors E41, C1
�Harness for open or short between fuel pump and IPDM E/R
�Harness for open or short between fuel pump and ground
>> Repair open circuit or short to ground or short to power in harness or connectors.
12. CHECK FUEL PUMP
Refer to EC-642, "
Component Inspection" .
OK or NG
OK >> GO TO 13.
NG >> Replace “fuel level sensor unit and fuel pump”.
13. CHECK INTERMITTENT INCIDENT
Refer to EC-156, "
TROUBLE DIAGNOSIS FOR INTERMITTENT INCIDENT" .
OK or NG
OK >> Replace IPDM E/R.
NG >> Repair or replace harness or connectors.
Component InspectionUBS00HDF
FUEL PUMP
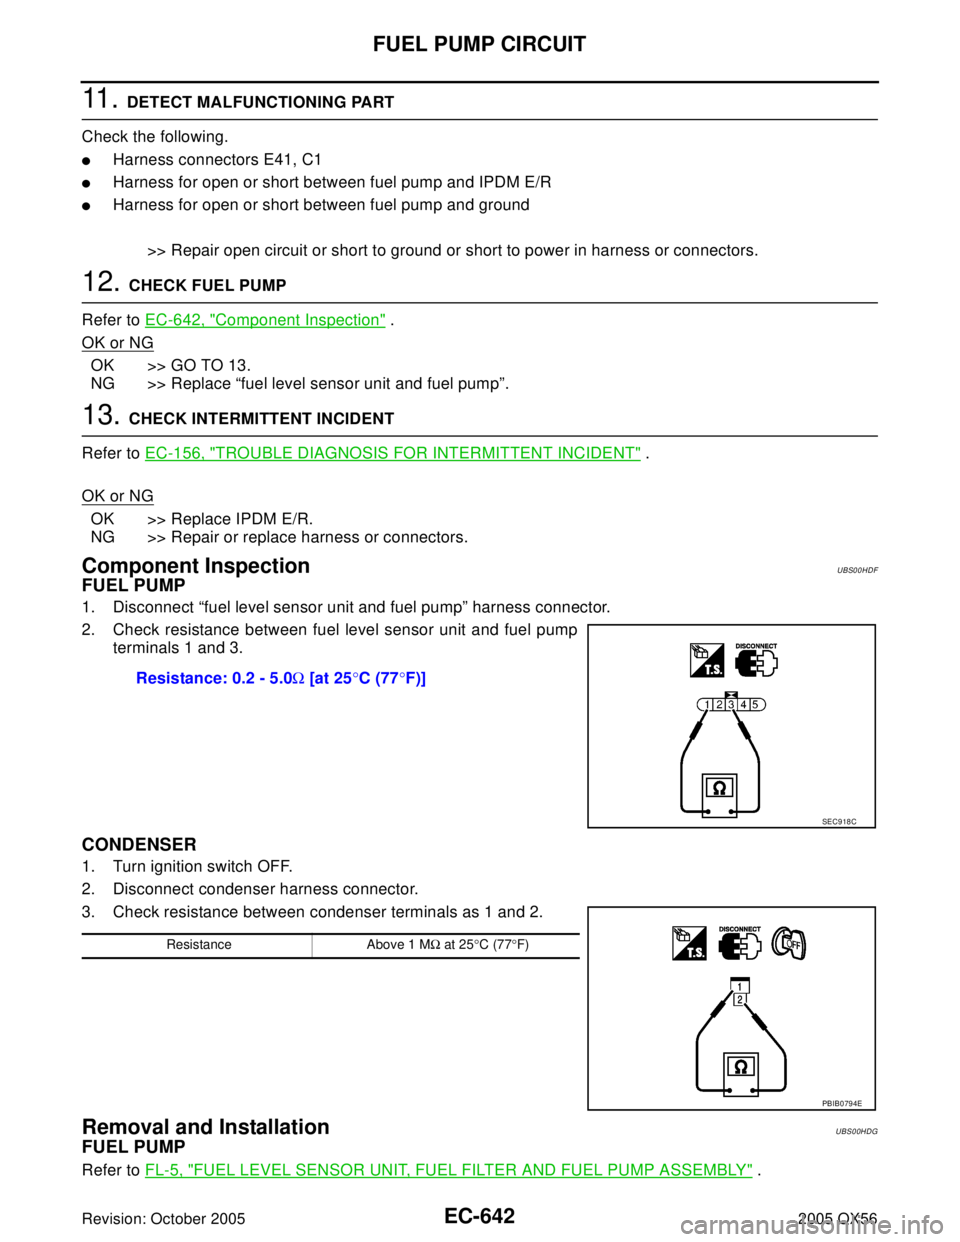
1. Disconnect “fuel level sensor unit and fuel pump” harness connector.
2. Check resistance between fuel level sensor unit and fuel pump
terminals 1 and 3.
CONDENSER
1. Turn ignition switch OFF.
2. Disconnect condenser harness connector.
3. Check resistance between condenser terminals as 1 and 2.
Removal and InstallationUBS00HDG
FUEL PUMP
Refer to FL-5, "FUEL LEVEL SENSOR UNIT, FUEL FILTER AND FUEL PUMP ASSEMBLY" . Resistance: 0.2 - 5.0Ω [at 25°C (77°F)]
SEC9 18 C
Resistance Above 1 MΩ at 25°C (77°F)
PBIB0794E
Page 1834 of 3419
REFRIGERANT PRESSURE SENSOR
EC-643
C
D
E
F
G
H
I
J
K
L
MA
EC
Revision: October 20052005 QX56
REFRIGERANT PRESSURE SENSORPFP:92136
Component DescriptionUBS00HDH
The refrigerant pressure sensor is installed at the liquid tank of the
air conditioner system. The sensor uses an electrostatic volume
pressure transducer to convert refrigerant pressure to voltage. The
voltage signal is sent to ECM, and ECM controls cooling fan system.
BBIA0445E
SEF 0 99 XA
Page 1835 of 3419
EC-644Revision: October 2005
REFRIGERANT PRESSURE SENSOR
2005 QX56
Wiring DiagramUBS00HDI
BBWA1715E
Page 1836 of 3419

REFRIGERANT PRESSURE SENSOR
EC-645
C
D
E
F
G
H
I
J
K
L
MA
EC
Revision: October 20052005 QX56
Specification data are reference values and are measured between each terminal and ground.
CAUTION:
Do not use ECM ground terminals when measuring input/output voltage. Doing so may result in dam-
age to the ECM's transistor. Use a ground other than ECM terminals, such as the ground.
Diagnostic ProcedureUBS00HDJ
1. CHECK REFRIGERANT PRESSURE SENSOR OVERALL FUNCTION
1. Start engine and warm it up to normal operating temperature.
2. Turn A/C switch and blower switch ON.
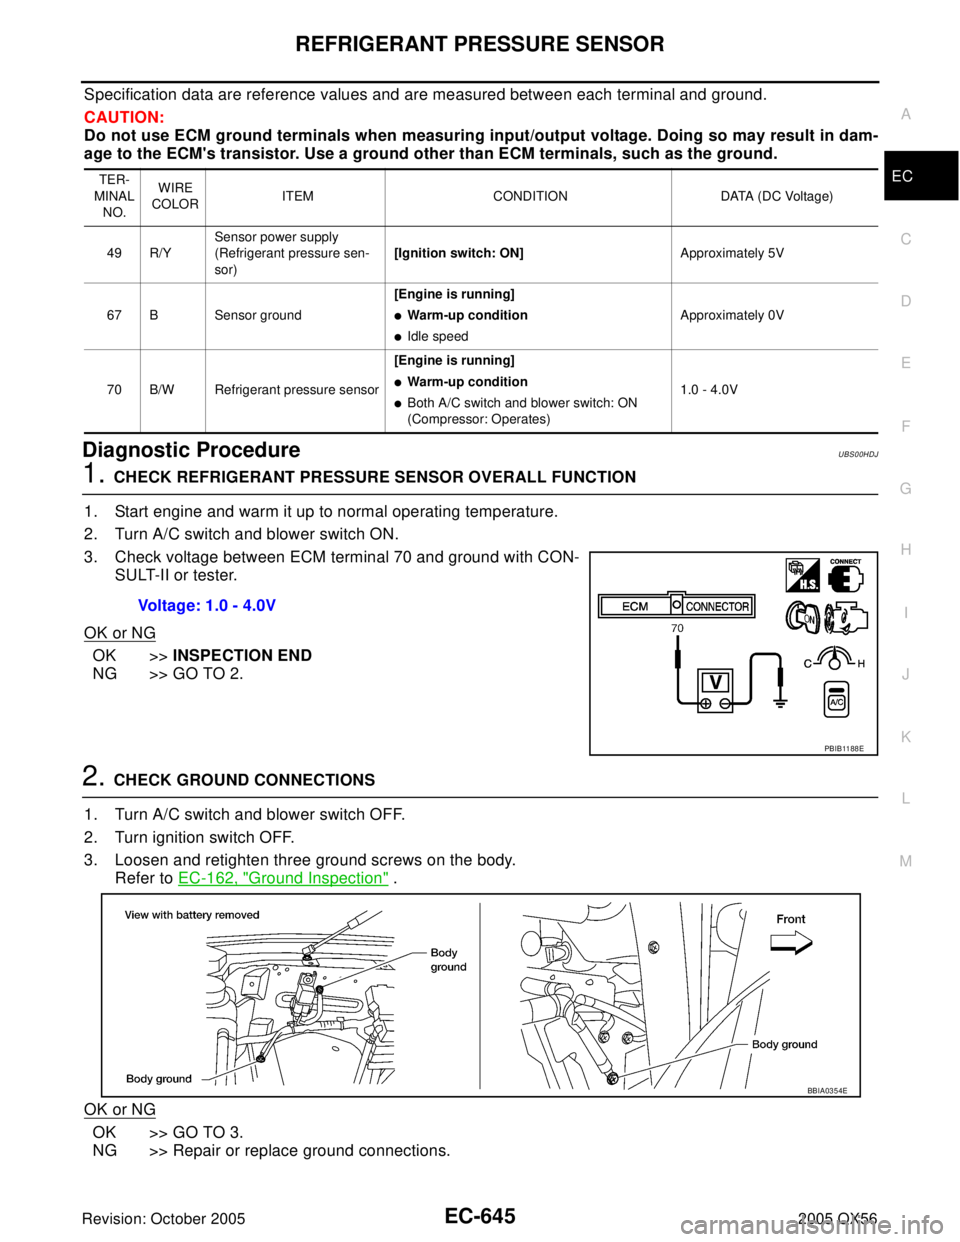
3. Check voltage between ECM terminal 70 and ground with CON-
SULT-II or tester.
OK or NG
OK >>INSPECTION END
NG >> GO TO 2.
2. CHECK GROUND CONNECTIONS
1. Turn A/C switch and blower switch OFF.
2. Turn ignition switch OFF.
3. Loosen and retighten three ground screws on the body.
Refer to EC-162, "
Ground Inspection" .
OK or NG
OK >> GO TO 3.
NG >> Repair or replace ground connections.
TER-
MINAL
NO.WIRE
COLORITEM CONDITION DATA (DC Voltage)
49 R/YSensor power supply
(Refrigerant pressure sen-
sor)[Ignition switch: ON]Approximately 5V
67 B Sensor ground[Engine is running]
�Warm-up condition
�Idle speedApproximately 0V
70 B/W Refrigerant pressure sensor[Engine is running]
�Warm-up condition
�Both A/C switch and blower switch: ON
(Compressor: Operates)1.0 - 4.0V
Voltage: 1.0 - 4.0V
PBIB11 88 E
BBIA0354E
Page 1837 of 3419

EC-646Revision: October 2005
REFRIGERANT PRESSURE SENSOR
2005 QX56
3. CHECK REFRIGERANT PRESSURE SENSOR POWER SUPPLY CIRCUIT
1. Disconnect refrigerant pressure sensor harness connector.
2. Turn ignition switch ON.
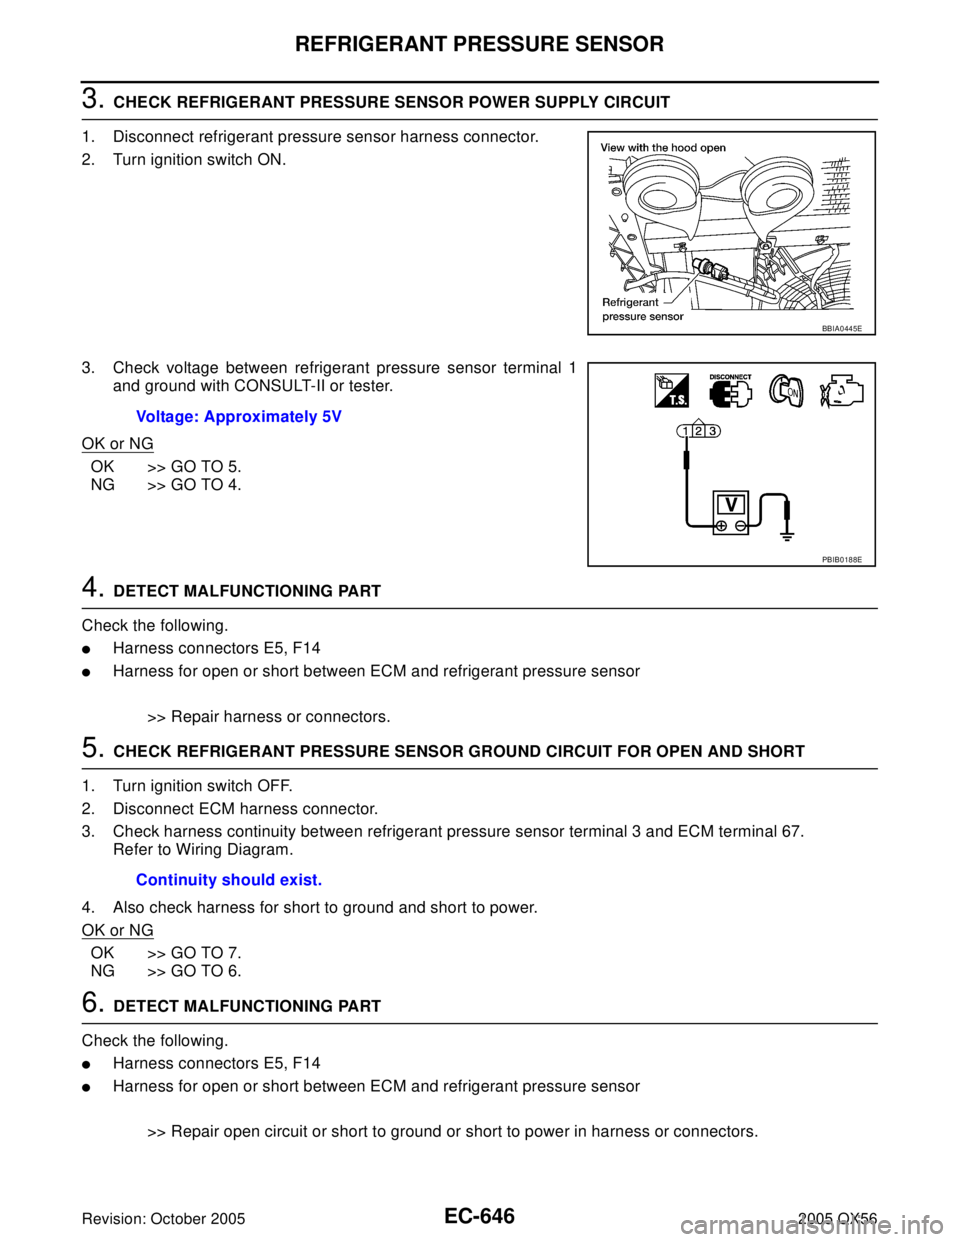
3. Check voltage between refrigerant pressure sensor terminal 1
and ground with CONSULT-II or tester.
OK or NG
OK >> GO TO 5.
NG >> GO TO 4.
4. DETECT MALFUNCTIONING PART
Check the following.
�Harness connectors E5, F14
�Harness for open or short between ECM and refrigerant pressure sensor
>> Repair harness or connectors.
5. CHECK REFRIGERANT PRESSURE SENSOR GROUND CIRCUIT FOR OPEN AND SHORT
1. Turn ignition switch OFF.
2. Disconnect ECM harness connector.
3. Check harness continuity between refrigerant pressure sensor terminal 3 and ECM terminal 67.
Refer to Wiring Diagram.
4. Also check harness for short to ground and short to power.
OK or NG
OK >> GO TO 7.
NG >> GO TO 6.
6. DETECT MALFUNCTIONING PART
Check the following.
�Harness connectors E5, F14
�Harness for open or short between ECM and refrigerant pressure sensor
>> Repair open circuit or short to ground or short to power in harness or connectors.
BBIA0445E
Voltage: Approximately 5V
PBIB0188E
Continuity should exist.
Page 1838 of 3419
REFRIGERANT PRESSURE SENSOR
EC-647
C
D
E
F
G
H
I
J
K
L
MA
EC
Revision: October 20052005 QX56
7. CHECK REFRIGERANT PRESSURE SENSOR INPUT SIGNAL CIRCUIT FOR OPEN AND SHORT
1. Check harness continuity between ECM terminal 70 and refrigerant pressure sensor terminal 2.
Refer to Wiring Diagram.
2. Also check harness for short to ground and short to power.
OK or NG
OK >> GO TO 9.
NG >> GO TO 8.
8. DETECT MALFUNCTIONING PART
Check the following.
�Harness connectors E5, F14
�Harness for open or short between ECM and refrigerant pressure sensor
>> Repair open circuit or short to ground or short to power in harness or connectors.
9. CHECK INTERMITTENT INCIDENT
Refer to EC-156, "
TROUBLE DIAGNOSIS FOR INTERMITTENT INCIDENT" .
OK or NG
OK >> Replace refrigerant pressure sensor.
NG >> Repair or replace.
Removal and InstallationUBS00HDK
REFRIGERANT PRESSURE SENSOR
Refer to ATC-185, "Removal and Installation for Refrigerant Pressure Sensor" . Continuity should exist.
Page 1860 of 3419

SERVICE DATA AND SPECIFICATIONS (SDS)
EC-669
C
D
E
F
G
H
I
J
K
L
MA
EC
Revision: October 20052005 QX56
SERVICE DATA AND SPECIFICATIONS (SDS)PFP:00030
Fuel PressureUBS00HE9
Idle Speed and Ignition TimingUBS00HEA
*: Under the following conditions:
�Air conditioner switch: OFF
�Electric load: OFF (Lights and heater fan)
�Steering wheel: Kept in straight-ahead position
Calculated Load ValueUBS00HEB
Mass Air Flow SensorUBS00HEC
*: Engine is warmed up to normal operating temperature and running under no load.
Intake Air Temperature SensorUBS00HED
Engine Coolant Temperature SensorUBS00HEE
A/F Sensor 1 HeaterUBS00HEF
Heated Oxygen sensor 2 HeaterUBS00HEG
Crankshaft Position Sensor (POS)UBS00HEH
Refer to EC-290, "Component Inspection" .
Camshaft Position Sensor (PHASE)UBS00HEI
Refer to EC-297, "Component Inspection" .
Throttle Control MotorUBS00HEJ
Fuel pressure at idling kPa (kg/cm2 , psi)Approximately 350 (3.57, 51)
Target idle speed
No-load* (in P or N position)650±50 rpm
Air conditioner: ON In P or N position 700 rpm or more
Ignition timing In P or N position 15° ± 5° BTDC
Condition Calculated load value % (Using CONSULT-II or GST)
At idle14.0 - 33.0
At 2,500 rpm12.0 - 25.0
Supply voltage Battery voltage (11 - 14V)
Output voltage at idle1.0 - 1.3V*
Mass air flow (Using CONSULT-II or GST)3.0 - 9.0 g·m/sec at idle*
9.0 - 28.0 g·m/sec at 2,500 rpm*
Temperature °C (°F) Resistance kΩ
25 (77)1.94 - 2.06
80 (176)0.295 - 0.349
Temperature °C (°F) Resistance kΩ
20 (68)2.1 - 2.9
50 (122)0.68 - 1.00
90 (194)0.236 - 0.260
Resistance [at 25°C (77°F)] 2.3 - 4.3Ω
Resistance [at 25°C (77°F)] 5.0 - 7.0Ω
Resistance [at 25°C (77°F)] Approximately 1 - 15Ω
Page 1877 of 3419

EI-16
REAR BUMPER
Revision: October 20052005 QX56
1. Remove quarter panel trim covers LH and RH.
2. Disconnect sonar sensor harness connector under rear fascia assembly.
3. Release retainer clips on both sides of rear fascia assembly with a 1/4 turn and top S clips and remove
fascia assembly.
4. Remove energy absorber.
5. Remove reinforcement assembly.
6. Remove nuts and remove retainer assembly.
�Remove S clips from retainer assembly.
7. Disconnect sonar sensors from sonar sensor retainers.
8. Remove sonar sensors and harness from rear fascia assembly.
�Disconnect sonar sensors from harness.
�Remove sonar sensor retainers from rear fascia assembly.
9. Remove bolts on each side of tow hitch and remove tow hitch.
10. Remove drafter duct from under LH quarter panel.
Installation is in the reverse order of removal.
1. Retainer assembly 2. Plastic clip 3. S clip
4. Reinforcement assembly 5. Energy absorber 6. Sonar sensor
7. Quarter panel trim cover LH 8. Drafter duct 9. Retainer clip
10. Rear fascia assembly 11. Sonar sensor retainer 12. Tow hitch
13. Sonar sensor harness 14. Quarter panel trim cover RH