Page 2841 of 3419
RF-24
SUNROOF
Revision: October 20052005 QX56
CAUTION:
�Always work with a helper.
�Before removal, fully close the glass lid assembly. Then, after removal, do not move the motor
assembly.
�After installing the sunroof and glass lid assembly, check gap adjustment to ensure there is no
malfunction.
Page 2842 of 3419
SUNROOF
RF-25
C
D
E
F
G
H
J
K
L
MA
B
RF
Revision: October 20052005 QX56
1. Glass lid assembly 2. Wind deflector 3. Rear drain hoses
4. Shade stoppers 5. Sunroof bracket 6. Sunshade assembly
WIIA0657E
Page 2843 of 3419

RF-26
SUNROOF
Revision: October 20052005 QX56
SUNROOF UNIT
Removal
CAUTION:
�Always work with a helper.
�When taking sunroof unit out, use shop cloths to protect the seats and trim from damage.
�After installing the sunroof unit and glass lid, be sure to check gap adjustment to ensure there is
no malfunction.
1. Remove headlining. Refer to EI-38, "
HEADLINING" .
2. Remove the sunroof glass lid. Refer to RF-26, "
GLASS LID" .
3. Remove overhead console bracket.
4. Disconnect the drain hoses.
5. Remove front sunroof bolts.
6. Remove rear sunroof bracket bolts.
7. Remove the side bolts and the sunroof unit.
Installation
1. Position the sunroof frame assembly and install the side bolts.
2. Install the rear brackets.
3. Install the front mounting bolts.
4. Connect drain hoses.
5. Install the overhead console bracket.
6. Install the sunroof glass lid. Refer to RF-26, "
GLASS LID" .
7. Install headlining. Refer to EI-38, "
HEADLINING" .
GLASS LID
Removal
1. Open sunshade.
2. Ensure glass lid is closed.
3. Remove side cover LH and RH.
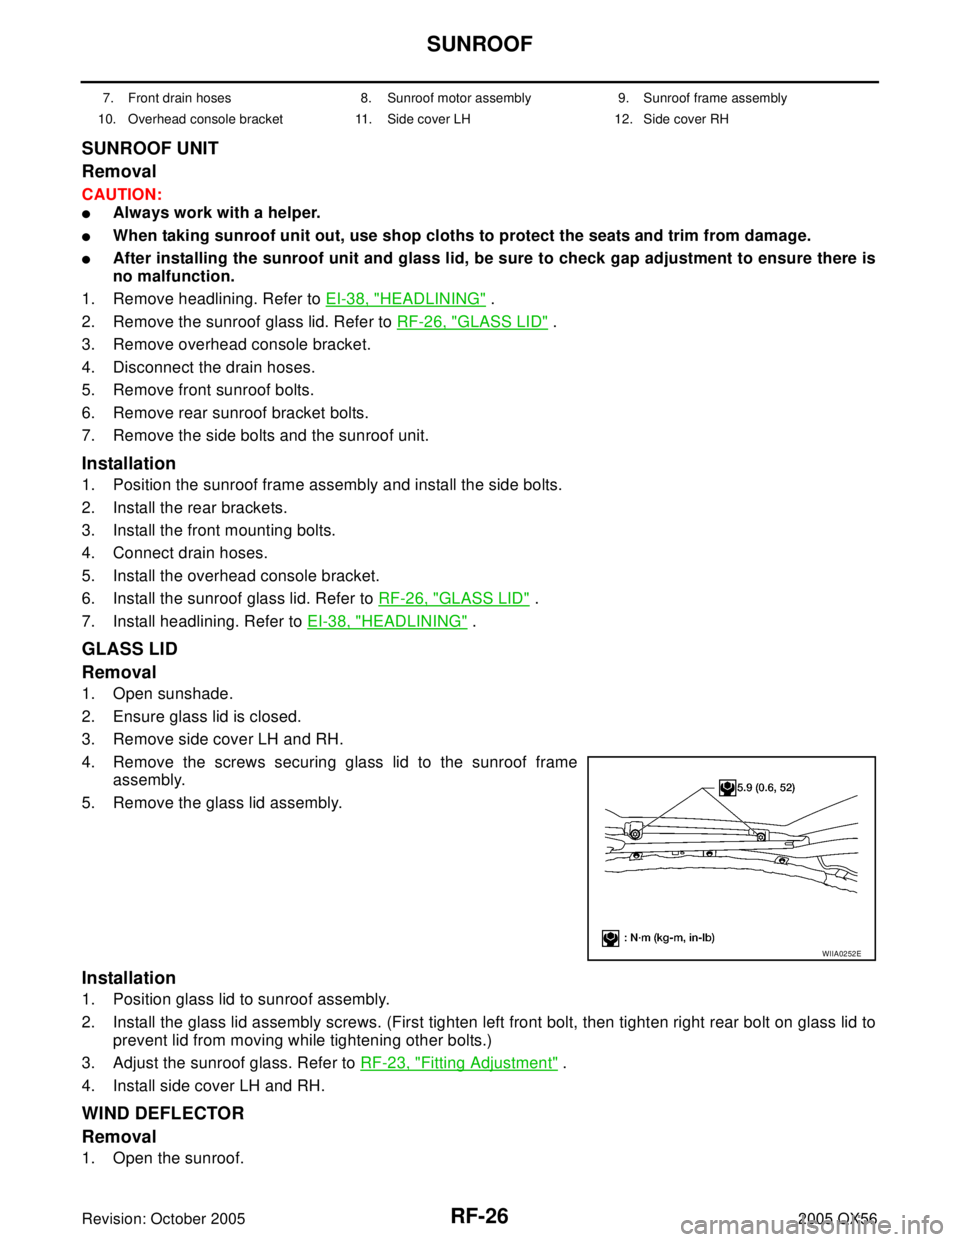
4. Remove the screws securing glass lid to the sunroof frame
assembly.
5. Remove the glass lid assembly.
Installation
1. Position glass lid to sunroof assembly.
2. Install the glass lid assembly screws. (First tighten left front bolt, then tighten right rear bolt on glass lid to
prevent lid from moving while tightening other bolts.)
3. Adjust the sunroof glass. Refer to RF-23, "
Fitting Adjustment" .
4. Install side cover LH and RH.
WIND DEFLECTOR
Removal
1. Open the sunroof.
7. Front drain hoses 8. Sunroof motor assembly 9. Sunroof frame assembly
10. Overhead console bracket 11. Side cover LH 12. Side cover RH
WIIA0252E
Page 2844 of 3419

SUNROOF
RF-27
C
D
E
F
G
H
J
K
L
MA
B
RF
Revision: October 20052005 QX56
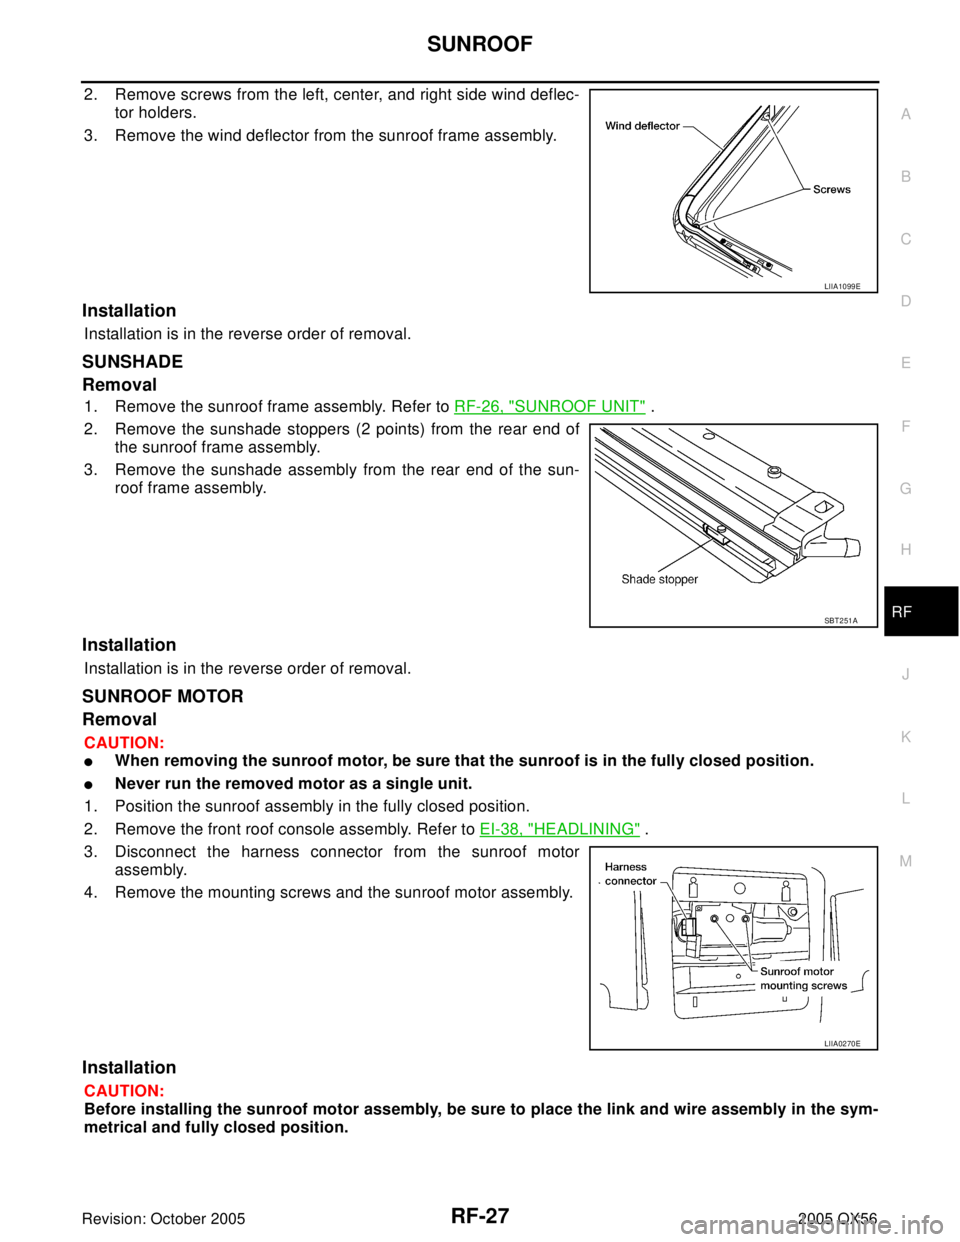
2. Remove screws from the left, center, and right side wind deflec-
tor holders.
3. Remove the wind deflector from the sunroof frame assembly.
Installation
Installation is in the reverse order of removal.
SUNSHADE
Removal
1. Remove the sunroof frame assembly. Refer to RF-26, "SUNROOF UNIT" .
2. Remove the sunshade stoppers (2 points) from the rear end of
the sunroof frame assembly.
3. Remove the sunshade assembly from the rear end of the sun-
roof frame assembly.
Installation
Installation is in the reverse order of removal.
SUNROOF MOTOR
Removal
CAUTION:
�When removing the sunroof motor, be sure that the sunroof is in the fully closed position.
�Never run the removed motor as a single unit.
1. Position the sunroof assembly in the fully closed position.
2. Remove the front roof console assembly. Refer to EI-38, "
HEADLINING" .
3. Disconnect the harness connector from the sunroof motor
assembly.
4. Remove the mounting screws and the sunroof motor assembly.
Installation
CAUTION:
Before installing the sunroof motor assembly, be sure to place the link and wire assembly in the sym-
metrical and fully closed position.
LIIA1099E
SBT 2 51 A
LIIA0270E
Page 2845 of 3419
RF-28
SUNROOF
Revision: October 20052005 QX56
1. Move the sunroof motor assembly laterally little by little so that
the gear is completely engaged into the wire on the sunroof unit
and the mounting surface becomes parallel. Then secure the
motor with bolts.
2. Connect the wire harness connector to the sunroof motor
assembly.
3. Install the roof console assembly. Refer to EI-38, "
HEADLINING" .
4. Reset the sunroof motor memory. Refer to RF-11, "
MEMORY RESET PROCEDURE" .
DRAIN HOSES
LIIA0270E
1. Rear drain hoses 2. Front drain hoses
WIIA0853E
Page 2846 of 3419

SUNROOF
RF-29
C
D
E
F
G
H
J
K
L
MA
B
RF
Revision: October 20052005 QX56
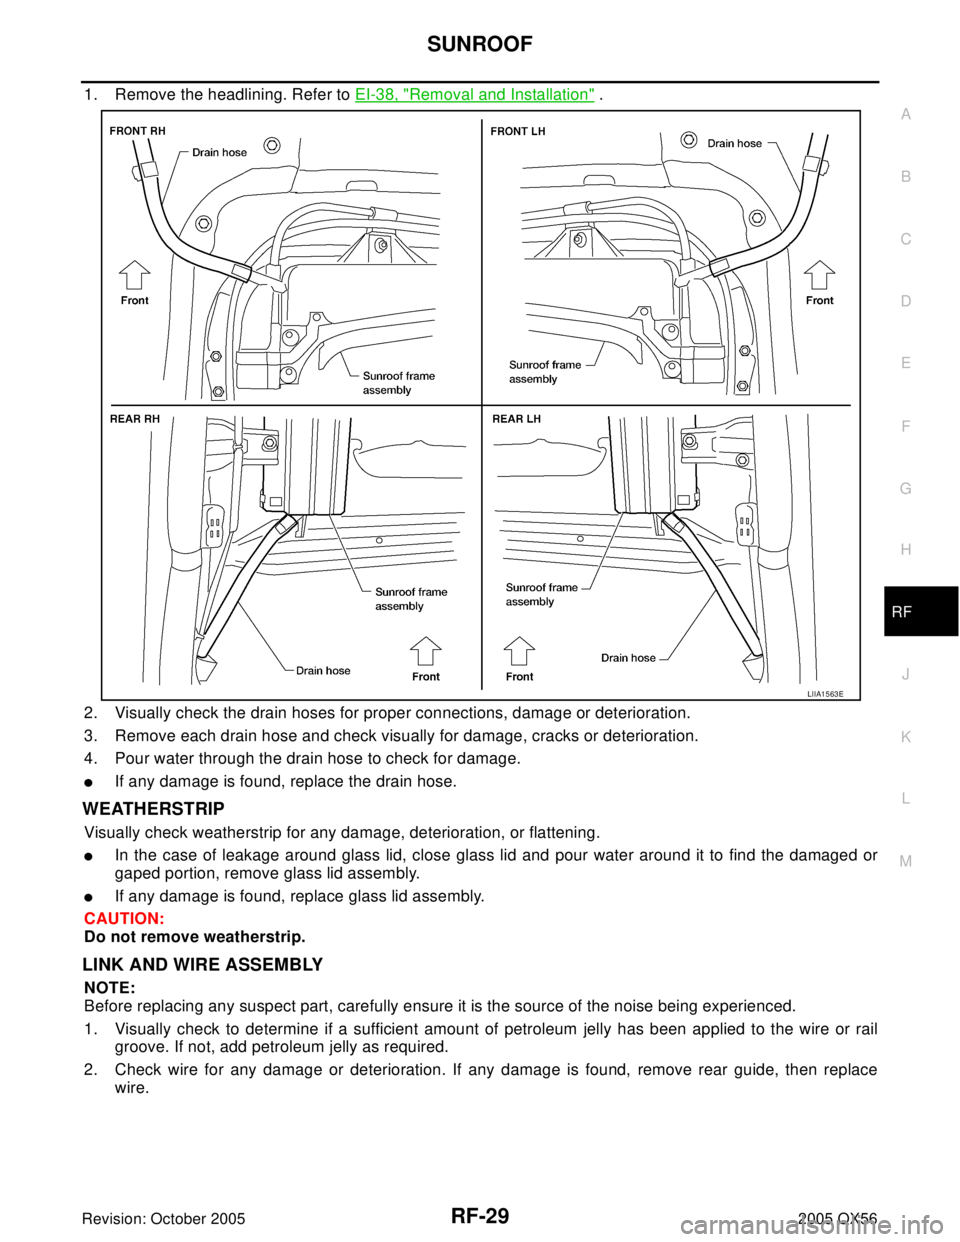
1. Remove the headlining. Refer to EI-38, "Removal and Installation" .
2. Visually check the drain hoses for proper connections, damage or deterioration.
3. Remove each drain hose and check visually for damage, cracks or deterioration.
4. Pour water through the drain hose to check for damage.
�If any damage is found, replace the drain hose.
WEATHERSTRIP
Visually check weatherstrip for any damage, deterioration, or flattening.
�In the case of leakage around glass lid, close glass lid and pour water around it to find the damaged or
gaped portion, remove glass lid assembly.
�If any damage is found, replace glass lid assembly.
CAUTION:
Do not remove weatherstrip.
LINK AND WIRE ASSEMBLY
NOTE:
Before replacing any suspect part, carefully ensure it is the source of the noise being experienced.
1. Visually check to determine if a sufficient amount of petroleum jelly has been applied to the wire or rail
groove. If not, add petroleum jelly as required.
2. Check wire for any damage or deterioration. If any damage is found, remove rear guide, then replace
wire.
LIIA1563E
Page 2847 of 3419
RF-30
SUNROOF
Revision: October 20052005 QX56
Page 2966 of 3419

SE-1
SEAT
I BODY
CONTENTS
C
D
E
F
G
H
J
K
L
M
SECTION SE
A
B
SE
Revision: October 20052005 QX56 PRECAUTIONS .......................................................... 3
Precautions for Supplemental Restraint System
(SRS) “AIR BAG” and “SEAT BELT PRE-TEN-
SIONER” .................................................................. 3
Precautions for Work ................................................ 3
PREPARATION ........................................................... 4
Special Service Tool ................................................. 4
Commercial Service Tool ......................................... 4
SQUEAK AND RATTLE TROUBLE DIAGNOSES ..... 5
Work Flow ................................................................ 5
CUSTOMER INTERVIEW ..................................... 5
DUPLICATE THE NOISE AND TEST DRIVE ....... 6
CHECK RELATED SERVICE BULLETINS ........... 6
LOCATE THE NOISE AND IDENTIFY THE
ROOT CAUSE ...................................................... 6
REPAIR THE CAUSE ........................................... 6
CONFIRM THE REPAIR ....................................... 7
Generic Squeak and Rattle Troubleshooting ........... 7
INSTRUMENT PANEL .......................................... 7
CENTER CONSOLE ............................................. 7
DOORS ................................................................. 7
TRUNK .................................................................. 8
SUNROOF/HEADLINING ..................................... 8
OVERHEAD CONSOLE (FRONT AND REAR) ..... 8
SEATS ................................................................... 8
UNDERHOOD ....................................................... 8
Diagnostic Worksheet .............................................. 9
AUTOMATIC DRIVE POSITIONER ...........................11
Component Parts And Harness Connector Location
....11
Manual Operation ................................................... 12
Automatic Operation .............................................. 12
System Description ................................................ 12
FAIL- SAFE MODE ............................................. 14
CANCEL OF FAIL-SAFE MODE ......................... 14
MEMORY STORING AND KEYFOB INTER-
LOCK STORING ................................................. 15
MEMORY OPERATION ...................................... 16
ENTRY OPERATION .......................................... 16
EXITING OPERATION ........................................ 16KEYFOB INTERLOCK OPERATION .................. 17
CAN Communication System Description .............. 17
Schematic ............................................................... 18
Wiring Diagram — AUT/DP — ............................... 20
Terminals and Reference Values for BCM .............. 30
Terminals and Reference Values for Driver Seat
Control Unit ............................................................. 30
Terminals and Reference Values for Automatic
Drive Positioner Control Unit .................................. 32
Work Flow ............................................................... 34
Preliminary Check .................................................. 35
SETTING CHANGE FUNCTION ......................... 35
POWER SUPPLY AND GROUND CIRCUIT
INSPECTION ...................................................... 35
CONSULT-II Function (AUTO DRIVE POS.) .......... 38
CONSULT-II INSPECTION PROCEDURE .......... 38
SELF-DIAGNOSIS RESULTS ............................. 40
DATA MONITOR ................................................. 41
ACTIVE TEST ..................................................... 41
CAN Communication Inspection Using CONSULT-
II (Self-Diagnosis) ................................................... 42
Symptom Chart ....................................................... 42
Sliding Motor Circuit Inspection .............................. 44
Reclining Motor LH Circuit Inspection .................... 45
Lifting Motor (Front) Circuit Inspection ................... 46
Lifting Motor (Rear) Circuit Inspection .................... 48
Pedal Adjusting Motor Circuit Inspection ................ 49
Mirror Motor LH Circuit Check ................................ 50
Mirror Motor RH Circuit Check ............................... 52
Steering Wheel Tilt Circuit Inspection ..................... 53
Sliding Sensor Circuit Inspection ............................ 55
Reclining Sensor Circuit Inspection ........................ 56
Lifting Sensor (Front) Circuit Inspection ................. 57
Lifting Sensor (Rear) Circuit Inspection .................. 58
Pedal Adjusting Sensor Circuit Inspection .............. 59
Mirror Sensor LH Circuit Check .............................. 60
Mirror Sensor RH Circuit Check ............................. 62
Steering Wheel Tilt Sensor Circuit Inspection ........ 64
Sliding Switch Circuit Inspection ............................. 66
Reclining Switch Inspection .................................... 67