Page 2022 of 3419
WHEEL HUB
FAX-5
C
E
F
G
H
I
J
K
L
MA
B
FA X
Revision: October 20052005 QX56
WHEEL HUBPFP:43202
On-Vehicle Inspection and ServiceEDS001XD
Make sure the mounting conditions (looseness, backlash) of each component and component status (wear,
damage) are normal.
WHEEL BEARING INSPECTION
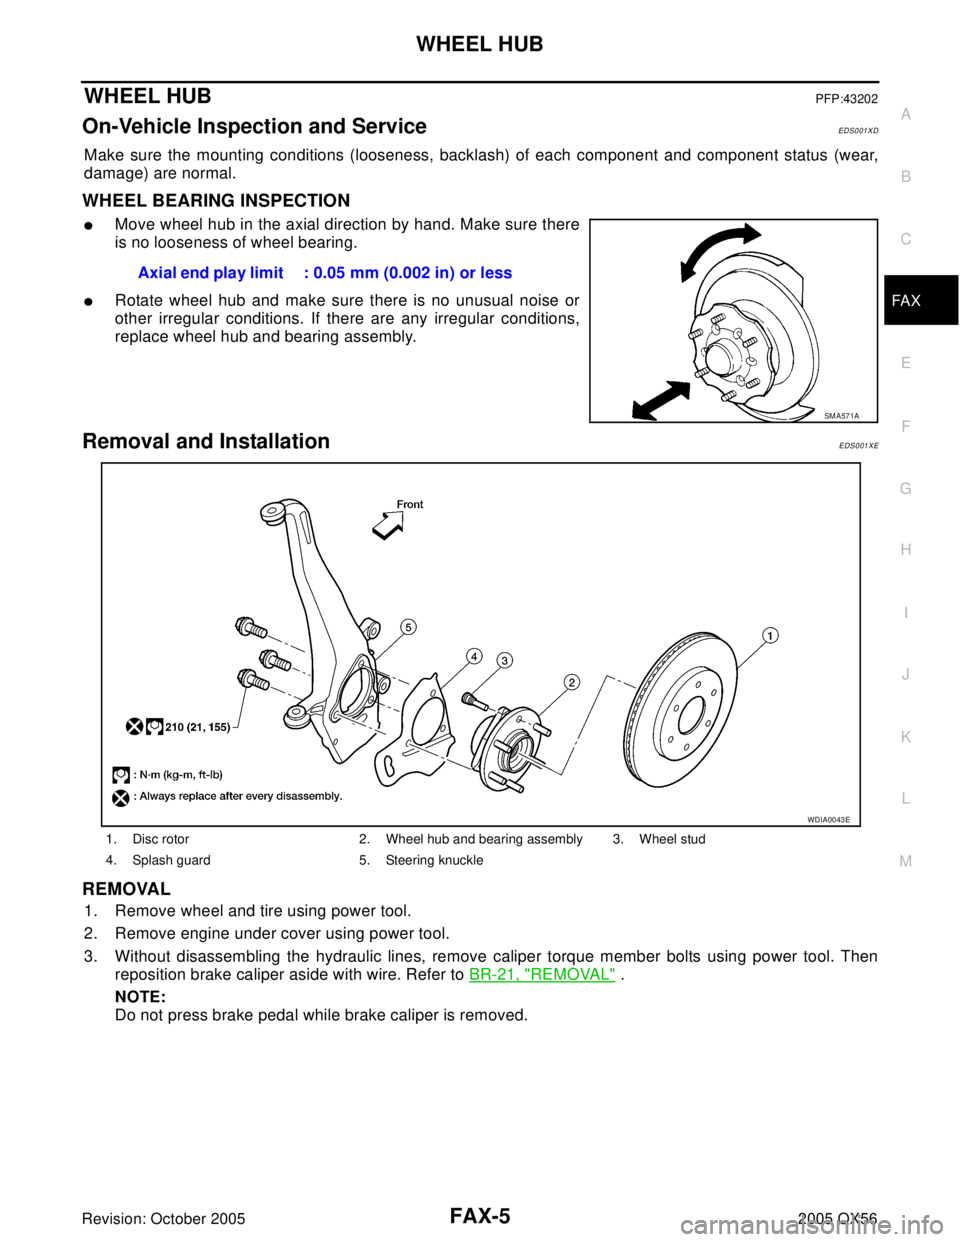
�Move wheel hub in the axial direction by hand. Make sure there
is no looseness of wheel bearing.
�Rotate wheel hub and make sure there is no unusual noise or
other irregular conditions. If there are any irregular conditions,
replace wheel hub and bearing assembly.
Removal and InstallationEDS001XE
REMOVAL
1. Remove wheel and tire using power tool.
2. Remove engine under cover using power tool.
3. Without disassembling the hydraulic lines, remove caliper torque member bolts using power tool. Then
reposition brake caliper aside with wire. Refer to BR-21, "
REMOVAL" .
NOTE:
Do not press brake pedal while brake caliper is removed.Axial end play limit : 0.05 mm (0.002 in) or less
SM A57 1A
1. Disc rotor 2. Wheel hub and bearing assembly 3. Wheel stud
4. Splash guard 5. Steering knuckle
WDIA0043E
Page 2023 of 3419
FAX-6
WHEEL HUB
Revision: October 20052005 QX56
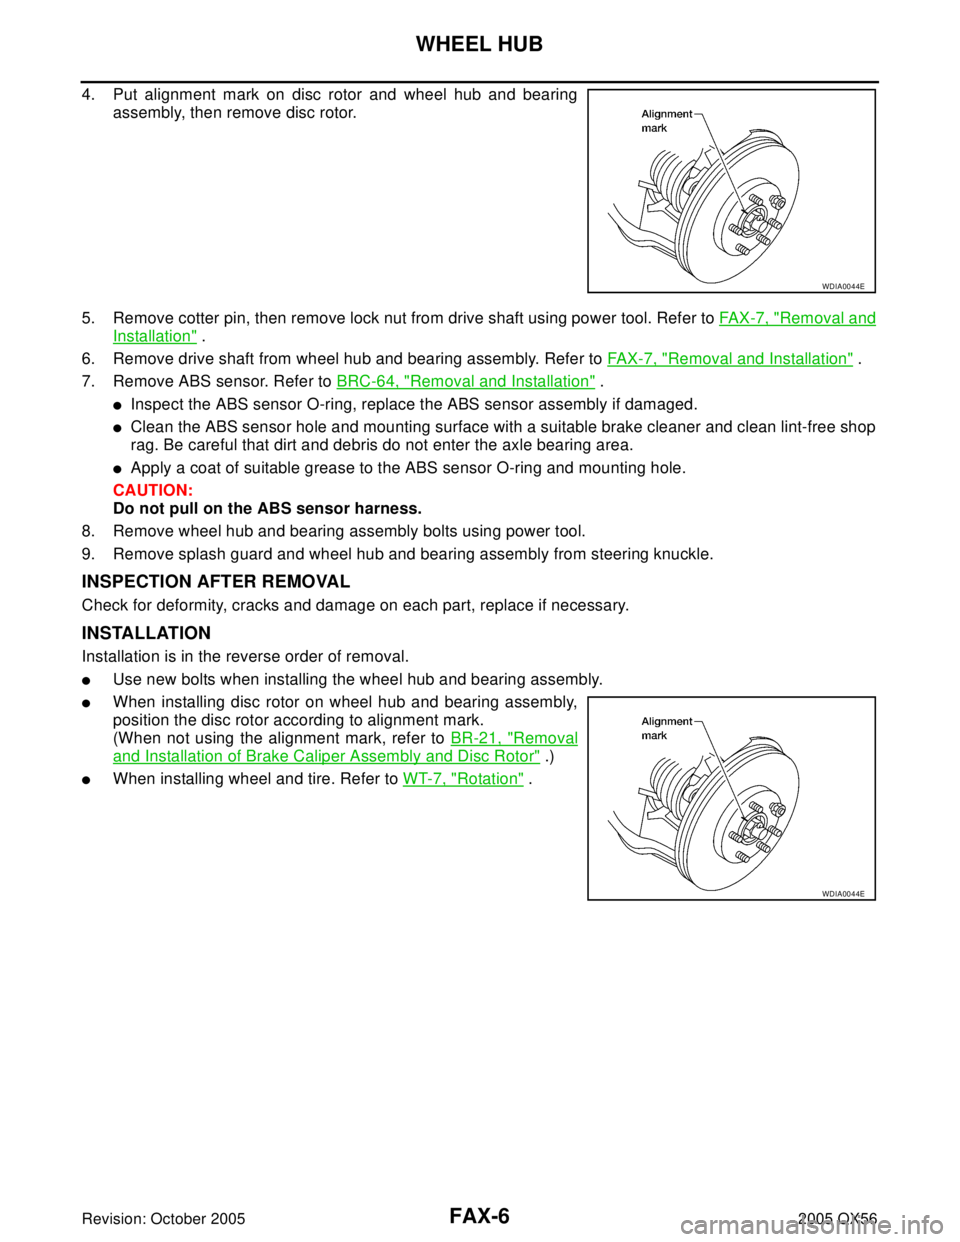
4. Put alignment mark on disc rotor and wheel hub and bearing
assembly, then remove disc rotor.
5. Remove cotter pin, then remove lock nut from drive shaft using power tool. Refer to FA X -7 , "
Removal and
Installation" .
6. Remove drive shaft from wheel hub and bearing assembly. Refer to FAX-7, "
Removal and Installation" .
7. Remove ABS sensor. Refer to BRC-64, "
Removal and Installation" .
�Inspect the ABS sensor O-ring, replace the ABS sensor assembly if damaged.
�Clean the ABS sensor hole and mounting surface with a suitable brake cleaner and clean lint-free shop
rag. Be careful that dirt and debris do not enter the axle bearing area.
�Apply a coat of suitable grease to the ABS sensor O-ring and mounting hole.
CAUTION:
Do not pull on the ABS sensor harness.
8. Remove wheel hub and bearing assembly bolts using power tool.
9. Remove splash guard and wheel hub and bearing assembly from steering knuckle.
INSPECTION AFTER REMOVAL
Check for deformity, cracks and damage on each part, replace if necessary.
INSTALLATION
Installation is in the reverse order of removal.
�Use new bolts when installing the wheel hub and bearing assembly.
�When installing disc rotor on wheel hub and bearing assembly,
position the disc rotor according to alignment mark.
(When not using the alignment mark, refer to BR-21, "
Removal
and Installation of Brake Caliper Assembly and Disc Rotor" .)
�When installing wheel and tire. Refer to WT-7, "Rotation" .
WDIA0044E
WDIA0044E
Page 2024 of 3419
DRIVE SHAFT
FAX-7
C
E
F
G
H
I
J
K
L
MA
B
FA X
Revision: October 20052005 QX56
DRIVE SHAFTPFP:39100
Removal and InstallationEDS001XF
REMOVAL
1. Remove wheel and tire using power tool.
2. Remove engine under cover using power tool.
3. Remove ABS sensor harness from mount on knuckle.
CAUTION:
Do not pull on ABS sensor harness.
4. Without disassembling the hydraulic lines, remove brake caliper using power tool. Reposition it aside with
wire. Refer to BR-21, "
Removal and Installation of Brake Caliper Assembly and Disc Rotor" .
NOTE:
Avoid depressing brake pedal while brake caliper is removed.
5. Remove coil spring and shock absorber assembly using power tool. Refer to FSU-10, "
Removal and
Installation" .
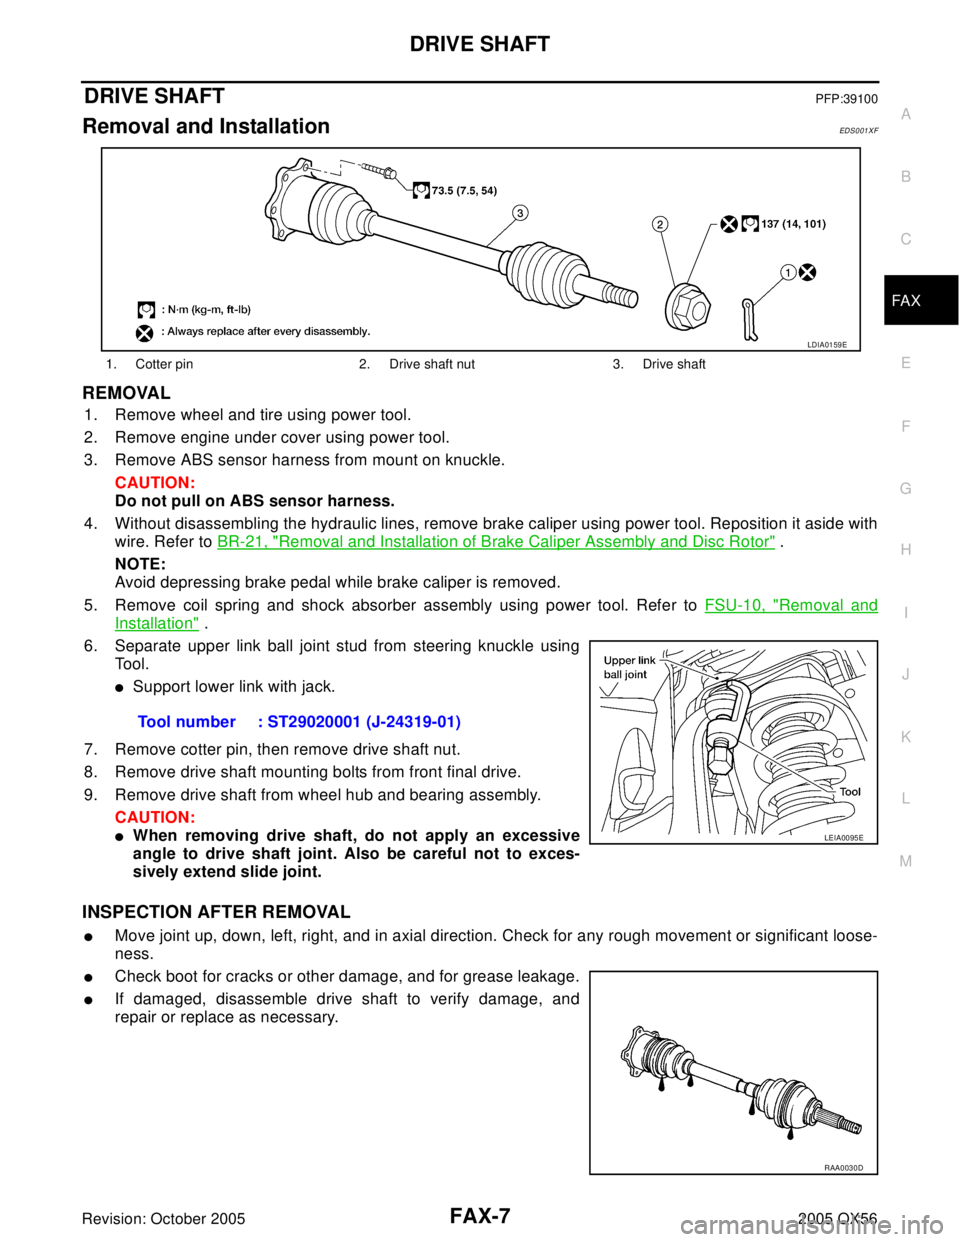
6. Separate upper link ball joint stud from steering knuckle using
Tool.
�Support lower link with jack.
7. Remove cotter pin, then remove drive shaft nut.
8. Remove drive shaft mounting bolts from front final drive.
9. Remove drive shaft from wheel hub and bearing assembly.
CAUTION:
�When removing drive shaft, do not apply an excessive
angle to drive shaft joint. Also be careful not to exces-
sively extend slide joint.
INSPECTION AFTER REMOVAL
�Move joint up, down, left, right, and in axial direction. Check for any rough movement or significant loose-
ness.
�Check boot for cracks or other damage, and for grease leakage.
�If damaged, disassemble drive shaft to verify damage, and
repair or replace as necessary.
1. Cotter pin 2. Drive shaft nut 3. Drive shaft
LDIA0159E
Tool number : ST29020001 (J-24319-01)
LEIA0095E
RAA0030D
Page 2037 of 3419
FFD-6
NOISE, VIBRATION AND HARSHNESS (NVH) TROUBLESHOOTING
Revision: October 20052005 QX56
NOISE, VIBRATION AND HARSHNESS (NVH) TROUBLESHOOTINGPFP:00003
NVH Troubleshooting ChartEDS003PG
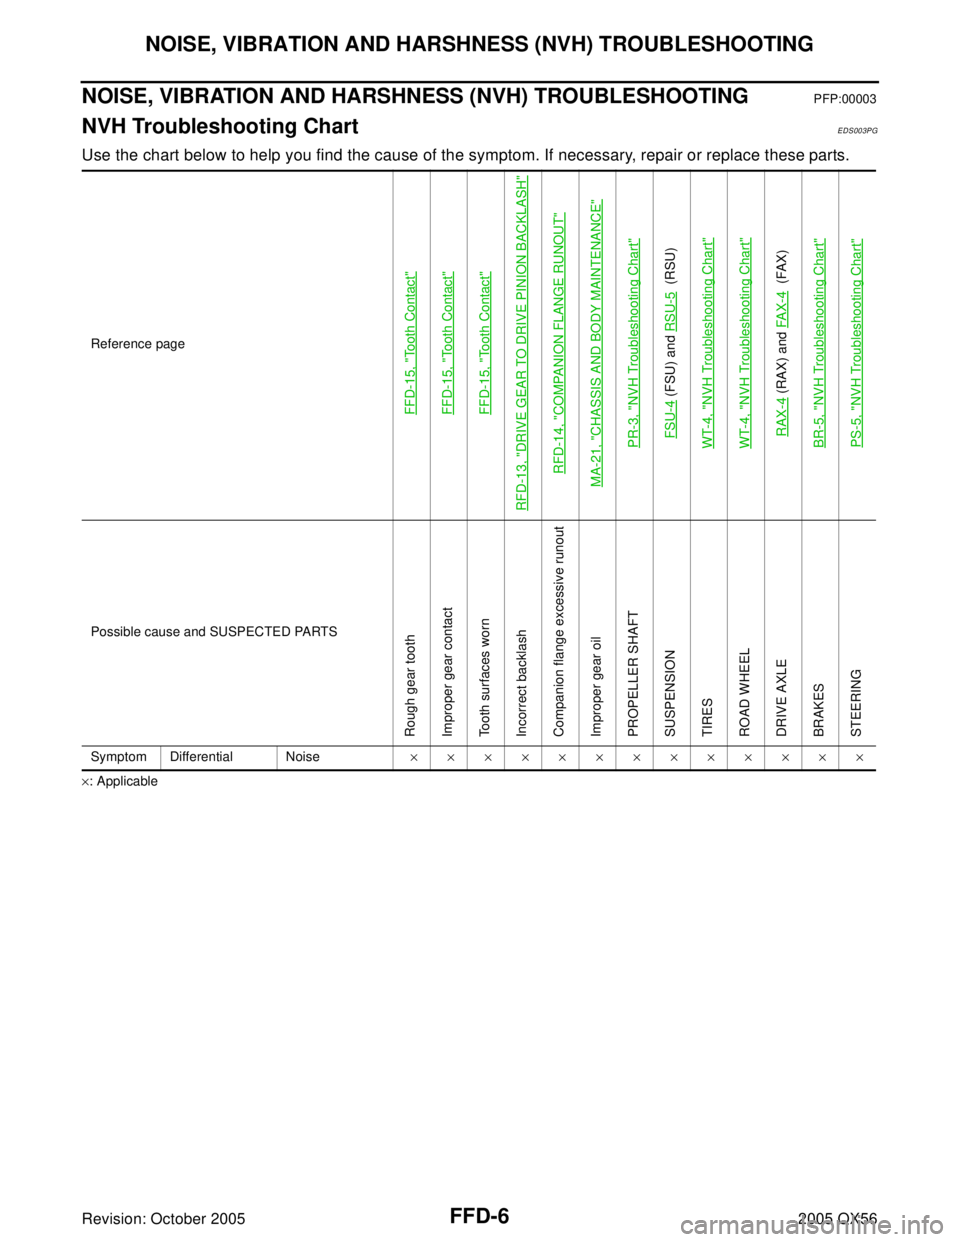
Use the chart below to help you find the cause of the symptom. If necessary, repair or replace these parts.
×: ApplicableReference page
FFD-15, "
Tooth Contact
"
FFD-15, "
Tooth Contact
"
FFD-15, "
Tooth Contact
"
RFD-13, "
DRIVE GEAR TO DRIVE PINION BACKLASH
"
RFD-14, "
COMPANION FLANGE RUNOUT
"
MA-21, "
CHASSIS AND BODY MAINTENANCE
"
PR-3, "
NVH Troubleshooting Chart
"
FSU-4
(FSU) and RSU-5
(RSU)
WT-4, "
NVH Troubleshooting Chart
"
WT-4, "
NVH Troubleshooting Chart
"
RAX-4
(RAX) and FA X - 4
(FAX)
BR-5, "
NVH Troubleshooting Chart
"
PS-5, "
NVH Troubleshooting Chart
"
Possible cause and SUSPECTED PARTS
Rough gear tooth
Improper gear contact
Tooth surfaces worn
Incorrect backlash
Companion flange excessive runout
Improper gear oil
PROPELLER SHAFT
SUSPENSION
TIRES
ROAD WHEEL
DRIVE AXLE
BRAKES
STEERING
Symptom Differential Noise×××××××××××××
Page 2083 of 3419
FSU-4
NOISE, VIBRATION, AND HARSHNESS (NVH) TROUBLESHOOTING
Revision: October 20052005 QX56
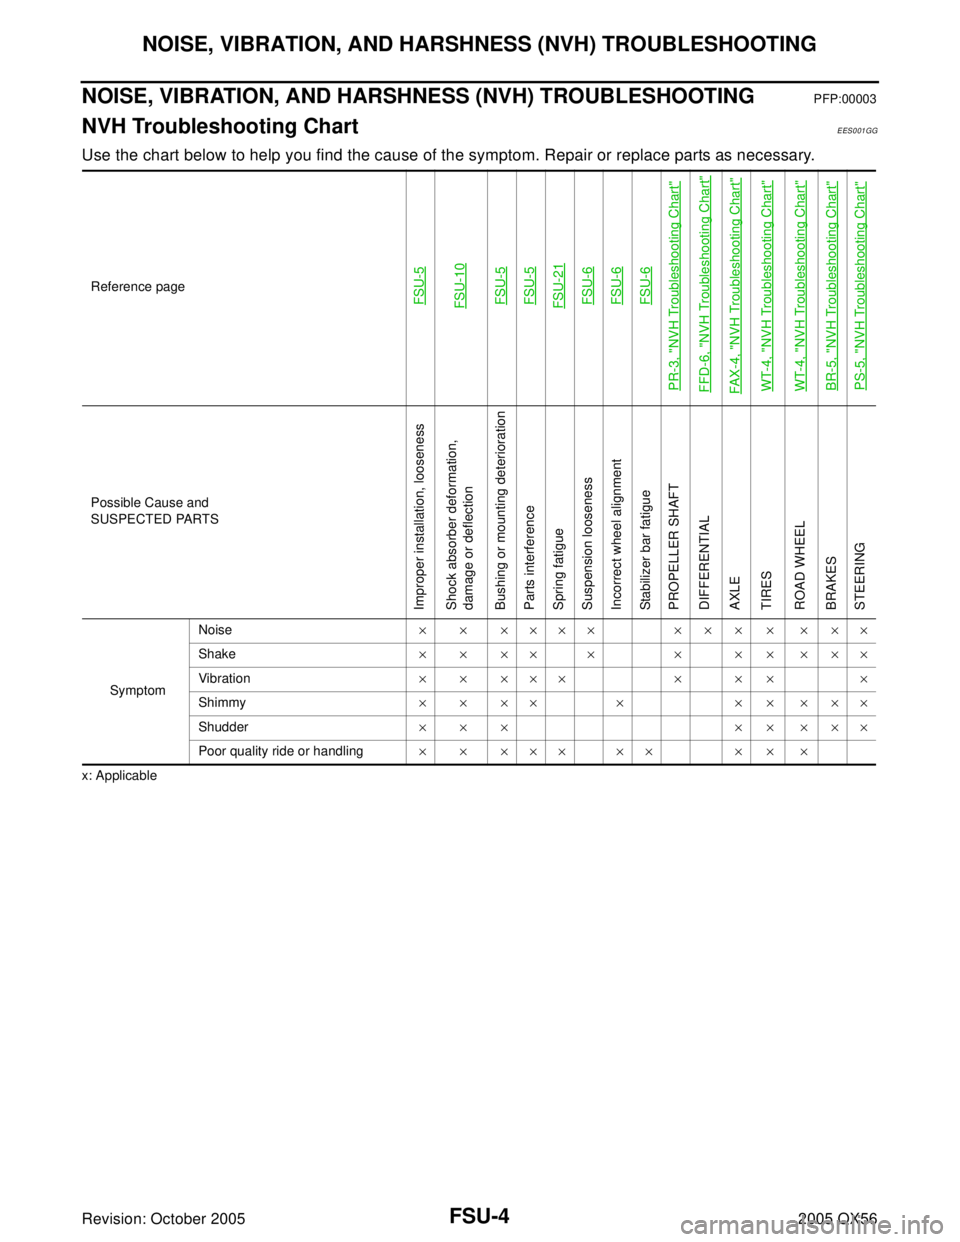
NOISE, VIBRATION, AND HARSHNESS (NVH) TROUBLESHOOTINGPFP:00003
NVH Troubleshooting ChartEES001GG
Use the chart below to help you find the cause of the symptom. Repair or replace parts as necessary.
x: ApplicableReference page
FSU-5FSU-10FSU-5FSU-5FSU-21FSU-6FSU-6FSU-6
PR-3, "
NVH Troubleshooting Chart
"
FFD-6, "
NVH Troubleshooting Chart
"
FAX -4, "
NVH Troubleshooting Chart
"
WT-4, "
NVH Troubleshooting Chart
"
WT-4, "
NVH Troubleshooting Chart
"
BR-5, "
NVH Troubleshooting Chart
"
PS-5, "
NVH Troubleshooting Chart
"
Possible Cause and
SUSPECTED PARTS
Improper installation, looseness
Shock absorber deformation,
damage or deflection
Bushing or mounting deterioration
Parts interference
Spring fatigue
Suspension looseness
Incorrect wheel alignment
Stabilizer bar fatigue
PROPELLER SHAFT
DIFFERENTIAL
AXLE
TIRES
ROAD WHEEL
BRAKES
STEERING
SymptomNoise× × ×××× × × × × × ××
Shake×××× × × ×××××
Vib ratio n××××× × ×× ×
Shimmy× × ×× × × × × ××
Shudder××× ×××××
Poor quality ride or handling××××× ×× ×××
Page 2084 of 3419
FRONT SUSPENSION ASSEMBLY
FSU-5
C
D
F
G
H
I
J
K
L
MA
B
FSU
Revision: October 20052005 QX56
FRONT SUSPENSION ASSEMBLYPFP:54010
ComponentsEES001GH
1. Dust cover 2. Shock absorber 3. Upper link
4. Steering knuckle 5. Cotter pin 6. Bolt
7. Jounce bumper 8. Washer 9. Lower link
10. Stabilizer bar 11. Stabilizer bar bushing 12. Stabilizer bar mounting bracket
13. Connecting rod 14. Coil spring 15. Upper seat
16. Upper spring seat 17. Shock absorber bushing 18. Shock absorber mounting insulator
19. Spacer 20. Washer⇐Front
WEIA0156E
Page 2085 of 3419
FSU-6
ON-VEHICLE SERVICE
Revision: October 20052005 QX56
ON-VEHICLE SERVICEPFP:00000
Front Suspension PartsEES001GI
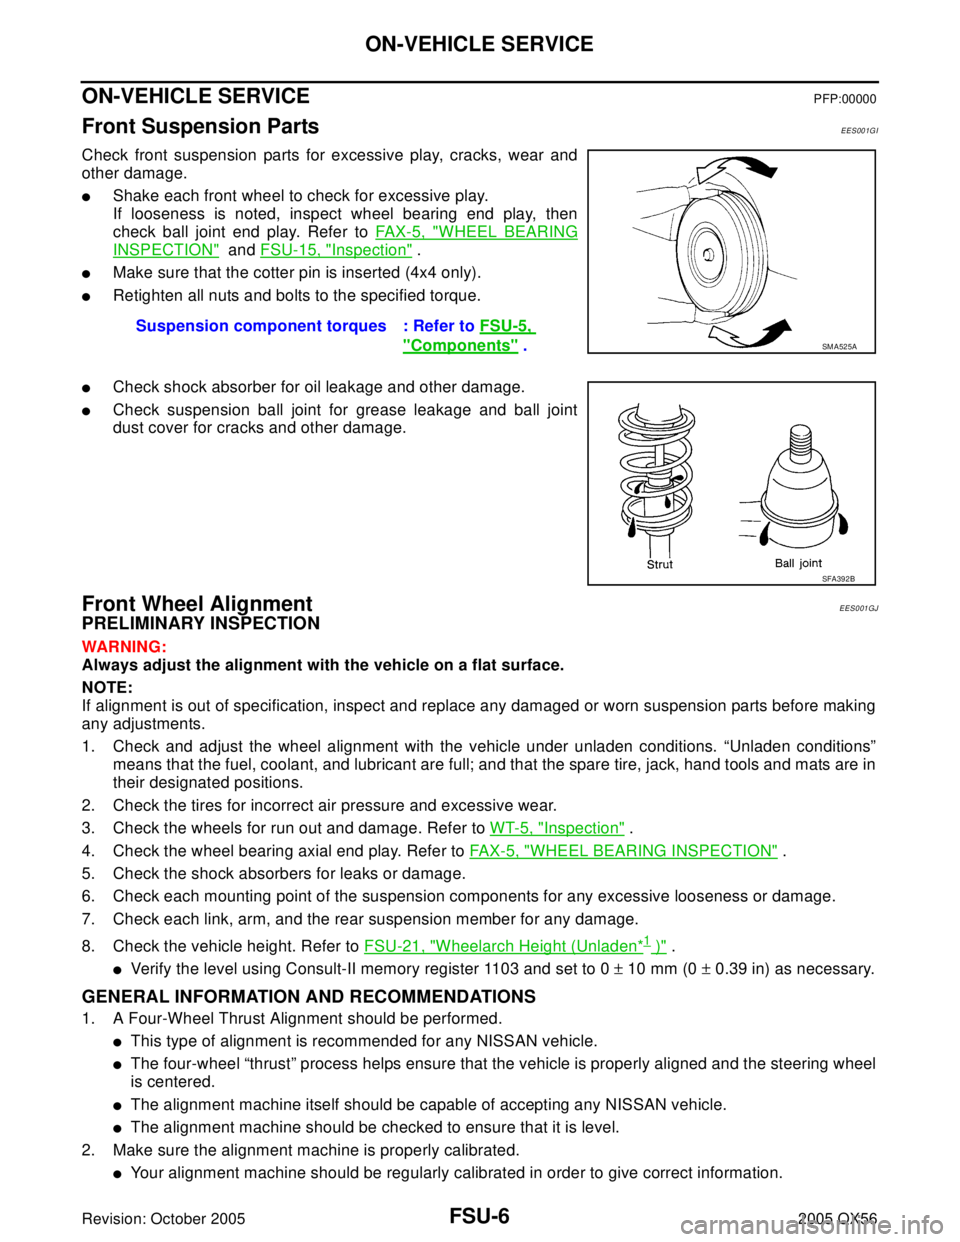
Check front suspension parts for excessive play, cracks, wear and
other damage.
�Shake each front wheel to check for excessive play.
If looseness is noted, inspect wheel bearing end play, then
check ball joint end play. Refer to FAX-5, "
WHEEL BEARING
INSPECTION" and FSU-15, "Inspection" .
�Make sure that the cotter pin is inserted (4x4 only).
�Retighten all nuts and bolts to the specified torque.
�Check shock absorber for oil leakage and other damage.
�Check suspension ball joint for grease leakage and ball joint
dust cover for cracks and other damage.
Front Wheel AlignmentEES001GJ
PRELIMINARY INSPECTION
WAR NIN G:
Always adjust the alignment with the vehicle on a flat surface.
NOTE:
If alignment is out of specification, inspect and replace any damaged or worn suspension parts before making
any adjustments.
1. Check and adjust the wheel alignment with the vehicle under unladen conditions. “Unladen conditions”
means that the fuel, coolant, and lubricant are full; and that the spare tire, jack, hand tools and mats are in
their designated positions.
2. Check the tires for incorrect air pressure and excessive wear.
3. Check the wheels for run out and damage. Refer to WT-5, "
Inspection" .
4. Check the wheel bearing axial end play. Refer to FAX-5, "
WHEEL BEARING INSPECTION" .
5. Check the shock absorbers for leaks or damage.
6. Check each mounting point of the suspension components for any excessive looseness or damage.
7. Check each link, arm, and the rear suspension member for any damage.
8. Check the vehicle height. Refer to FSU-21, "
Wheelarch Height (Unladen*1 )" .
�Verify the level using Consult-II memory register 1103 and set to 0 ± 10 mm (0 ± 0.39 in) as necessary.
GENERAL INFORMATION AND RECOMMENDATIONS
1. A Four-Wheel Thrust Alignment should be performed.
�This type of alignment is recommended for any NISSAN vehicle.
�The four-wheel “thrust” process helps ensure that the vehicle is properly aligned and the steering wheel
is centered.
�The alignment machine itself should be capable of accepting any NISSAN vehicle.
�The alignment machine should be checked to ensure that it is level.
2. Make sure the alignment machine is properly calibrated.
�Your alignment machine should be regularly calibrated in order to give correct information.Suspension component torques : Refer to FSU-5,
"Components" .SM A52 5A
SFA392B
Page 2087 of 3419
FSU-8
ON-VEHICLE SERVICE
Revision: October 20052005 QX56
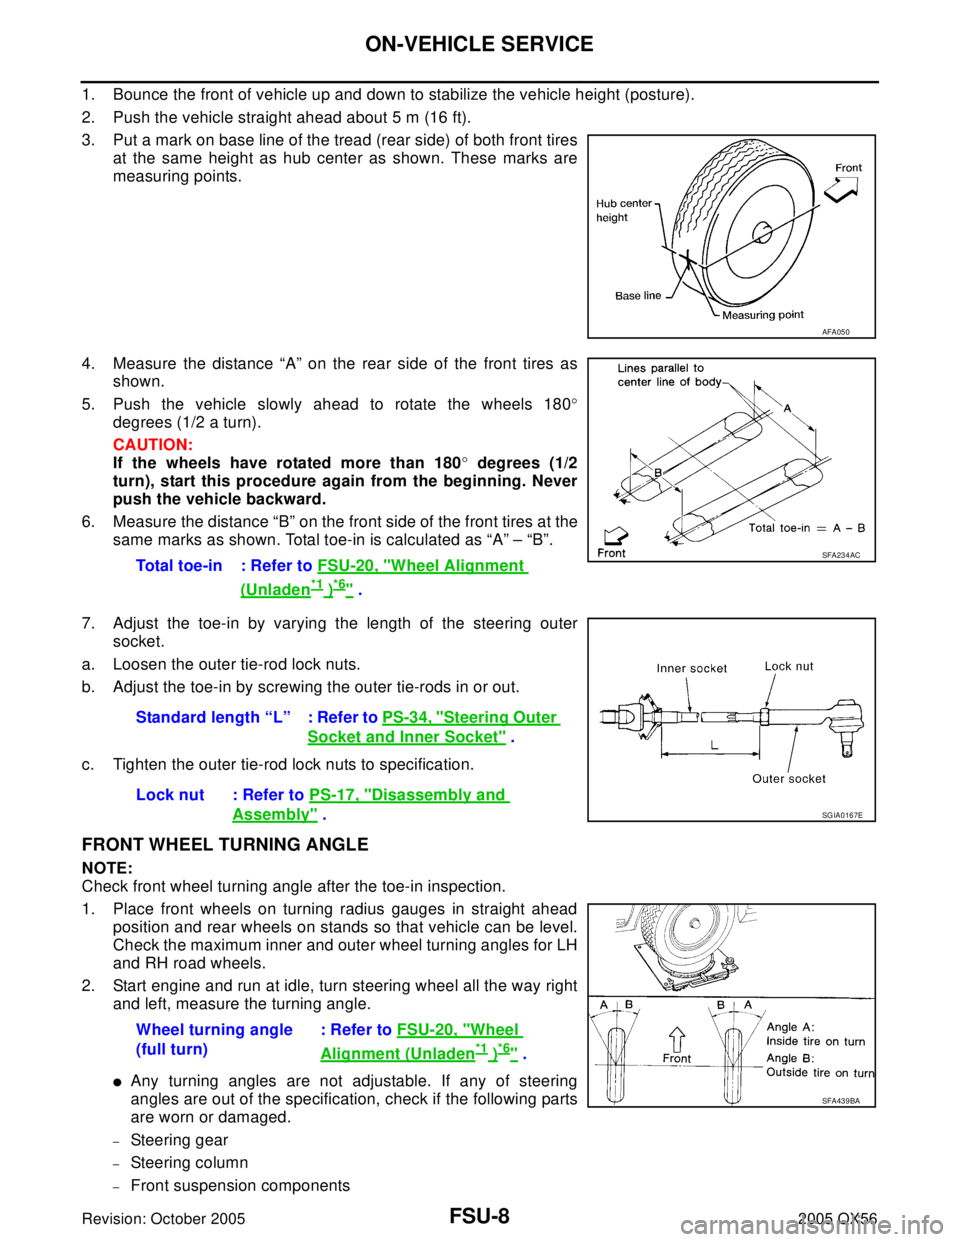
1. Bounce the front of vehicle up and down to stabilize the vehicle height (posture).
2. Push the vehicle straight ahead about 5 m (16 ft).
3. Put a mark on base line of the tread (rear side) of both front tires
at the same height as hub center as shown. These marks are
measuring points.
4. Measure the distance “A” on the rear side of the front tires as
shown.
5. Push the vehicle slowly ahead to rotate the wheels 180°
degrees (1/2 a turn).
CAUTION:
If the wheels have rotated more than 180° degrees (1/2
turn), start this procedure again from the beginning. Never
push the vehicle backward.
6. Measure the distance “B” on the front side of the front tires at the
same marks as shown. Total toe-in is calculated as “A” – “B”.
7. Adjust the toe-in by varying the length of the steering outer
socket.
a. Loosen the outer tie-rod lock nuts.
b. Adjust the toe-in by screwing the outer tie-rods in or out.
c. Tighten the outer tie-rod lock nuts to specification.
FRONT WHEEL TURNING ANGLE
NOTE:
Check front wheel turning angle after the toe-in inspection.
1. Place front wheels on turning radius gauges in straight ahead
position and rear wheels on stands so that vehicle can be level.
Check the maximum inner and outer wheel turning angles for LH
and RH road wheels.
2. Start engine and run at idle, turn steering wheel all the way right
and left, measure the turning angle.
�Any turning angles are not adjustable. If any of steering
angles are out of the specification, check if the following parts
are worn or damaged.
–Steering gear
–Steering column
–Front suspension components
AFA05 0
Total toe-in : Refer to FSU-20, "Wheel Alignment
(Unladen*1 )*6" .
SFA234AC
Standard length “L” : Refer to PS-34, "Steering Outer
Socket and Inner Socket" .
Lock nut : Refer to PS-17, "
Disassembly and
Assembly" .SGIA0167E
Wheel turning angle
(full turn): Refer to FSU-20, "Wheel
Alignment (Unladen*1 )*6" .
SFA439BA