Page 4522 of 4731
AUTOMATIC DRIVE POSITIONER SE-49
C
D E
F
G H
J
K L
M A
B
SE
Revision: 2005 July 2005 FX
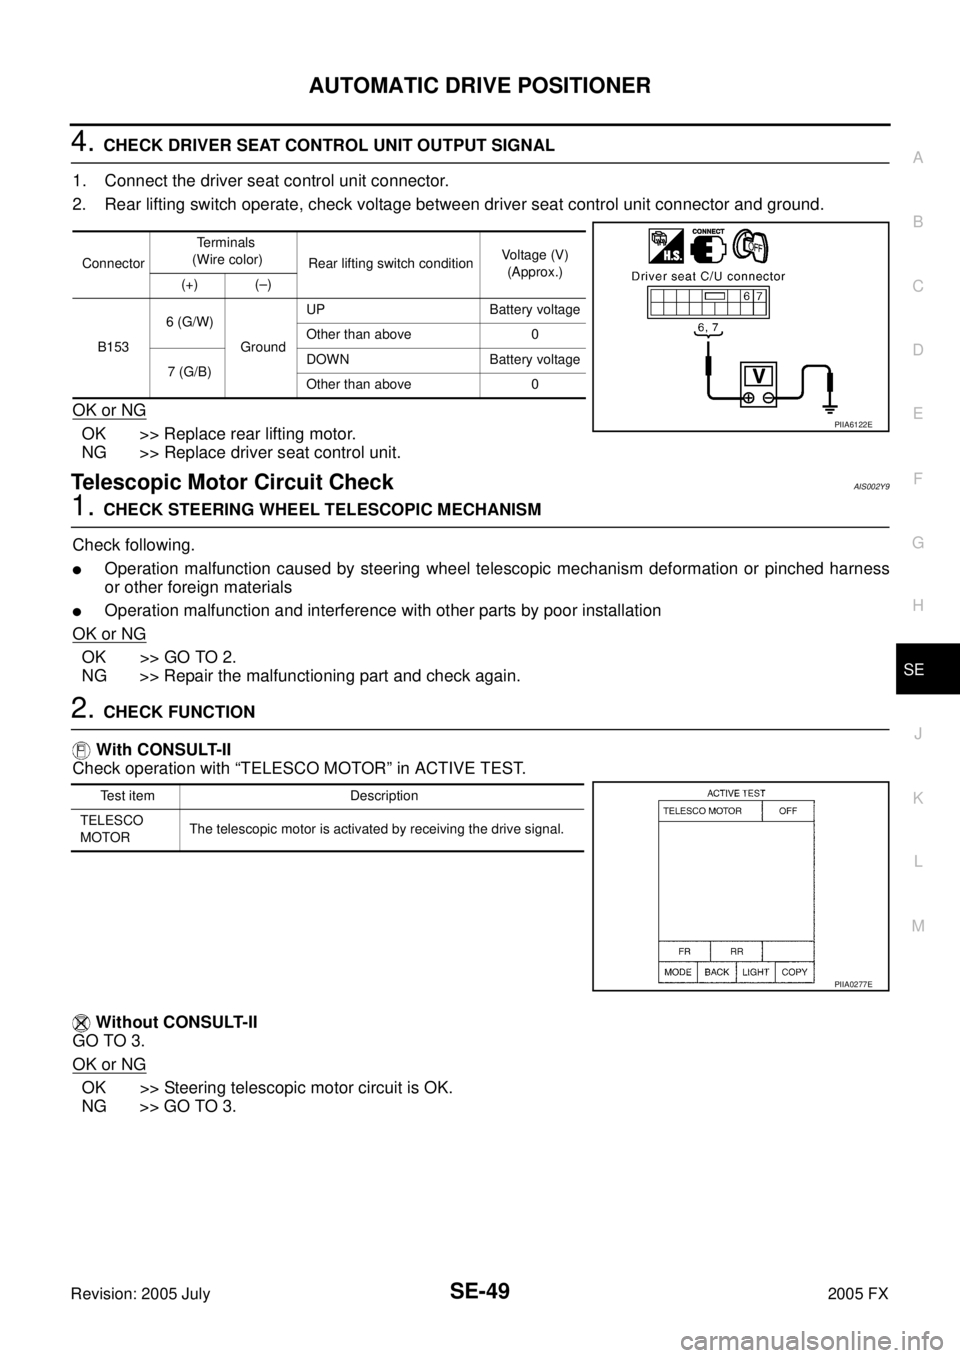
4. CHECK DRIVER SEAT CONTROL UNIT OUTPUT SIGNAL
1. Connect the driver seat control unit connector.
2. Rear lifting switch operate, check voltage between driver seat control unit connector and ground.
OK or NG
OK >> Replace rear lifting motor.
NG >> Replace driver seat control unit.
Telescopic Motor Circuit CheckAIS002Y9
1. CHECK STEERING WHEEL TELESCOPIC MECHANISM
Check following.
�Operation malfunction caused by steering wheel telescopic mechanism deformation or pinched harness
or other foreign materials
�Operation malfunction and interference with other parts by poor installation
OK or NG
OK >> GO TO 2.
NG >> Repair the malfunctioning part and check again.
2. CHECK FUNCTION
With CONSULT-II
Check operation with “TELESCO MOTOR” in ACTIVE TEST.
Without CONSULT-II
GO TO 3.
OK or NG
OK >> Steering telescopic motor circuit is OK.
NG >> GO TO 3.
Connector Te r m i n a l s
(Wire color) Rear lifting switch condition Voltage (V)
(Approx.)
(+) (–)
B153 6 (G/W)
Ground UP Battery voltage
Other than above 0
7 (G/B) DOWN Battery voltage
Other than above 0
PIIA6122E
Test item Description
TELESCO
MOTOR The telescopic motor is activated by receiving the drive signal.
PIIA0277E
Page 4523 of 4731
SE-50
AUTOMATIC DRIVE POSITIONER
Revision: 2005 July 2005 FX
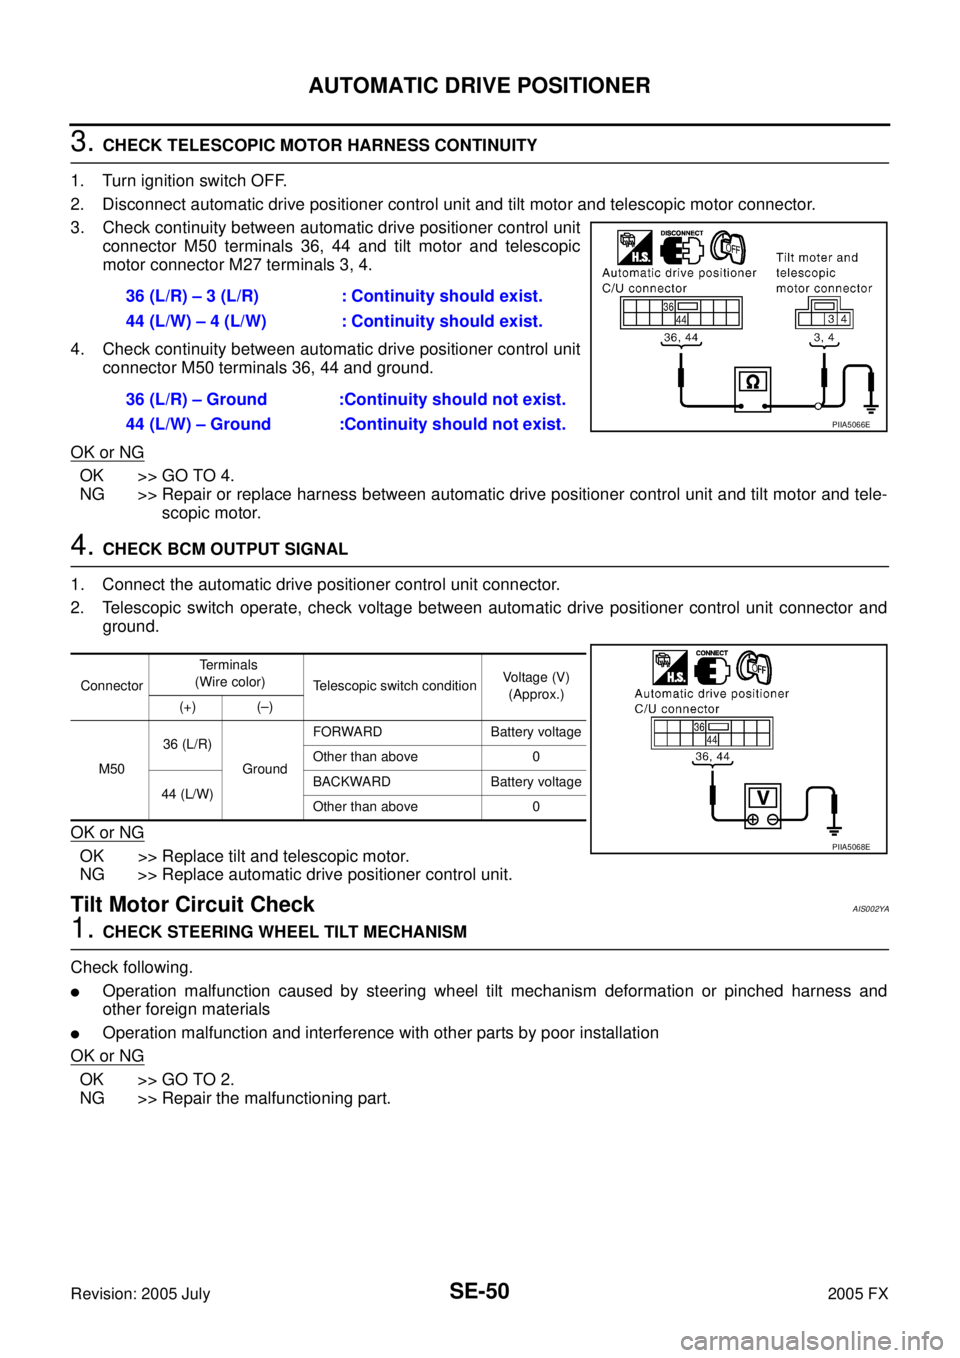
3. CHECK TELESCOPIC MOTOR HARNESS CONTINUITY
1. Turn ignition switch OFF.
2. Disconnect automatic drive positioner control unit and tilt motor and telescopic motor connector.
3. Check continuity between automatic drive positioner control unit connector M50 terminals 36, 44 and tilt motor and telescopic
motor connector M27 terminals 3, 4.
4. Check continuity between automatic drive positioner control unit connector M50 terminals 36, 44 and ground.
OK or NG
OK >> GO TO 4.
NG >> Repair or replace harness between automatic drive positioner control unit and tilt motor and tele-
scopic motor.
4. CHECK BCM OUTPUT SIGNAL
1. Connect the automatic drive positioner control unit connector.
2. Telescopic switch operate, check voltage between automatic drive positioner control unit connector and ground.
OK or NG
OK >> Replace tilt and telescopic motor.
NG >> Replace automatic drive positioner control unit.
Tilt Motor Circuit CheckAIS002YA
1. CHECK STEERING WHEEL TILT MECHANISM
Check following.
�Operation malfunction caused by steering wheel tilt mechanism deformation or pinched harness and
other foreign materials
�Operation malfunction and interference with other parts by poor installation
OK or NG
OK >> GO TO 2.
NG >> Repair the malfunctioning part. 36 (L/R) – 3 (L/R) : Continuity should exist.
44 (L/W) – 4 (L/W) : Continuity should exist.
36 (L/R) – Ground :Continuity should not exist.
44 (L/W) – Ground :Continuity should not exist.
PIIA5066E
Connector Terminals
(Wire color) Telescopic switch condition Voltage (V)
(Approx.)
(+) (–)
M50 36 (L/R)
Ground FORWARD Battery voltage
Other than above 0
44 (L/W) BACKWARD Battery voltage
Other than above 0
PIIA5068E
Page 4524 of 4731
AUTOMATIC DRIVE POSITIONER SE-51
C
D E
F
G H
J
K L
M A
B
SE
Revision: 2005 July 2005 FX
2. CHECK FUNCTION
With CONSULT-II
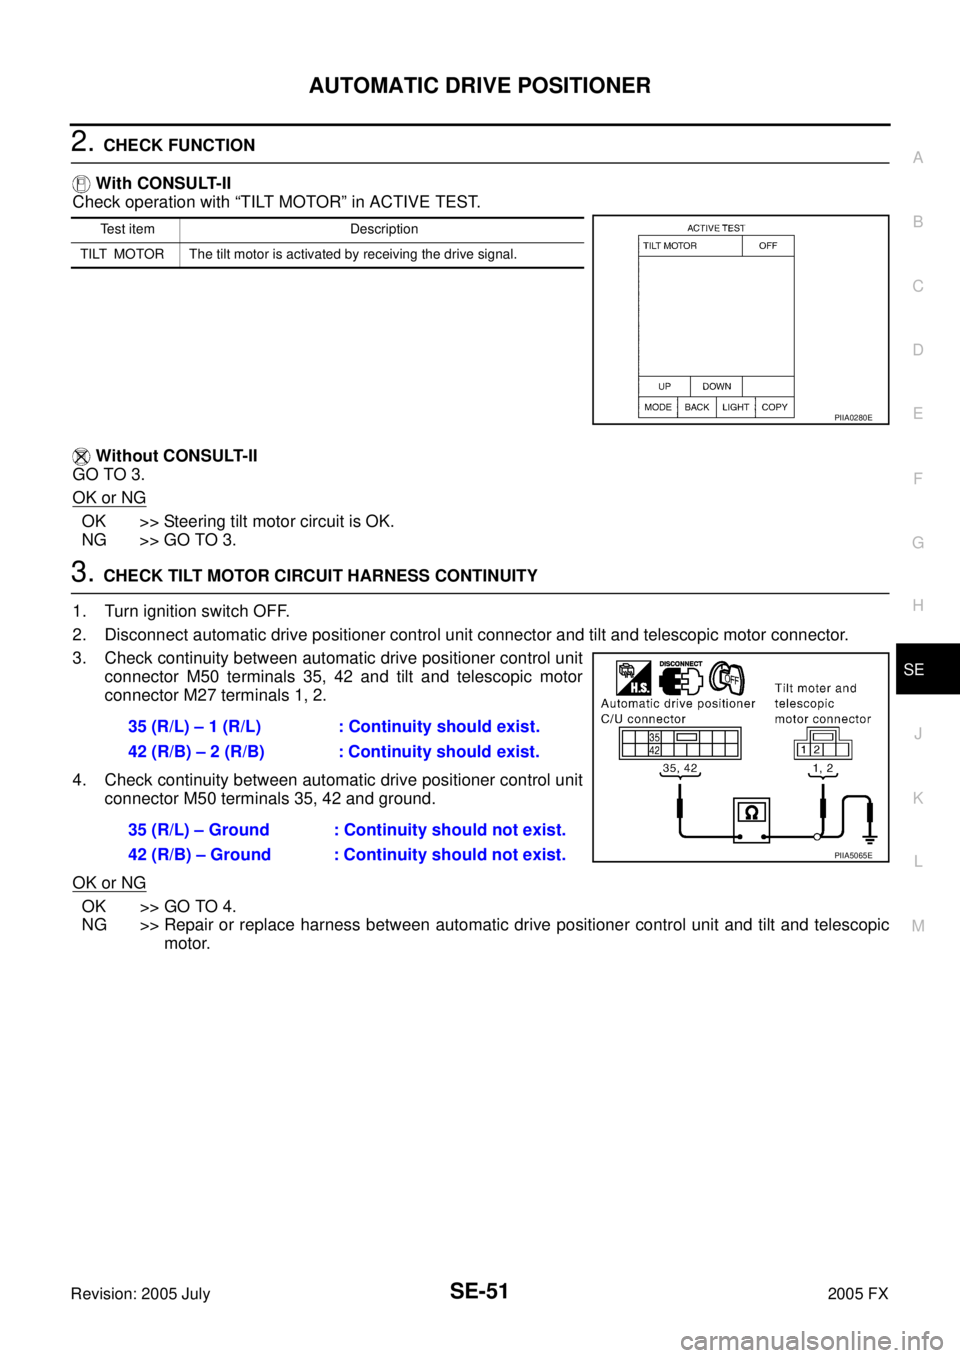
Check operation with “TILT MOTOR” in ACTIVE TEST.
Without CONSULT-II
GO TO 3.
OK or NG
OK >> Steering tilt motor circuit is OK.
NG >> GO TO 3.
3. CHECK TILT MOTOR CIRCUIT HARNESS CONTINUITY
1. Turn ignition switch OFF.
2. Disconnect automatic drive positioner control unit connector and tilt and telescopic motor connector.
3. Check continuity between automatic drive positioner control unit connector M50 terminals 35, 42 and tilt and telescopic motor
connector M27 terminals 1, 2.
4. Check continuity between automatic drive positioner control unit connector M50 terminals 35, 42 and ground.
OK or NG
OK >> GO TO 4.
NG >> Repair or replace harness between automatic drive positioner control unit and tilt and telescopic
motor.
Test item Description
TILT MOTOR The tilt motor is activated by receiving the drive signal.
PIIA0280E
35 (R/L) – 1 (R/L) : Continuity should exist.
42 (R/B) – 2 (R/B) : Continuity should exist.
35 (R/L) – Ground : Continuity should not exist.
42 (R/B) – Ground : Continuity should not exist.
PIIA5065E
Page 4538 of 4731

AUTOMATIC DRIVE POSITIONER SE-65
C
D E
F
G H
J
K L
M A
B
SE
Revision: 2005 July 2005 FX
4. CHECK HARNESS CONTINUITY 2
1. Check continuity between automatic drive positioner control unit connector M49 terminal 5, 21 and door mirror (passenger side)
connector D32 terminal 4, 11.
2. Check continuity between automatic drive positioner control unit connector M49 terminal 5, 21 and ground.
OK or NG
OK >> Check the condition of the harness and connector.
NG >> Repair or replace harness between automatic drive positioner control unit and door mirror (pas-
senger side).
Steering and Door Mirror Sensor Power and Ground Circuit CheckAIS003GA
1. CHECK MIRROR SENSOR POWER SUPPLY
1. Turn ignition switch OFF.
2. Check voltage between automatic drive positioner control unit connector M50 terminal 33 and ground.
OK or NG
OK >> GO TO 2.
NG >> Replace automatic drive positioner control unit.
2. CHECK MIRROR SENSOR GROUND CIRCUIT
Check continuity between automatic drive positioner control unit
connector M50 terminal 41 and ground.
OK or NG
OK >> GO TO 3.
NG >> Replace automatic drive positioner control unit. 5 (OR) – 4 (LG) : Continuity should exist.
21 (G/Y) – 11 (P) : Continuity should exist.
5 (OR) – Ground : Continuity should not exist.
21 (G/Y) – Ground : Continuity should not exist.
PIIA6128E
33 (G/W) – Ground : Approx. 5V
PIIA4778E
41 (B/Y) – Ground : Continuity should exist.
PIIA4779E
Page 4547 of 4731
SE-74
AUTOMATIC DRIVE POSITIONER
Revision: 2005 July 2005 FX
Front Lifting Switch and Rear Lifting Switch Ground Circuit CheckAIS003L3
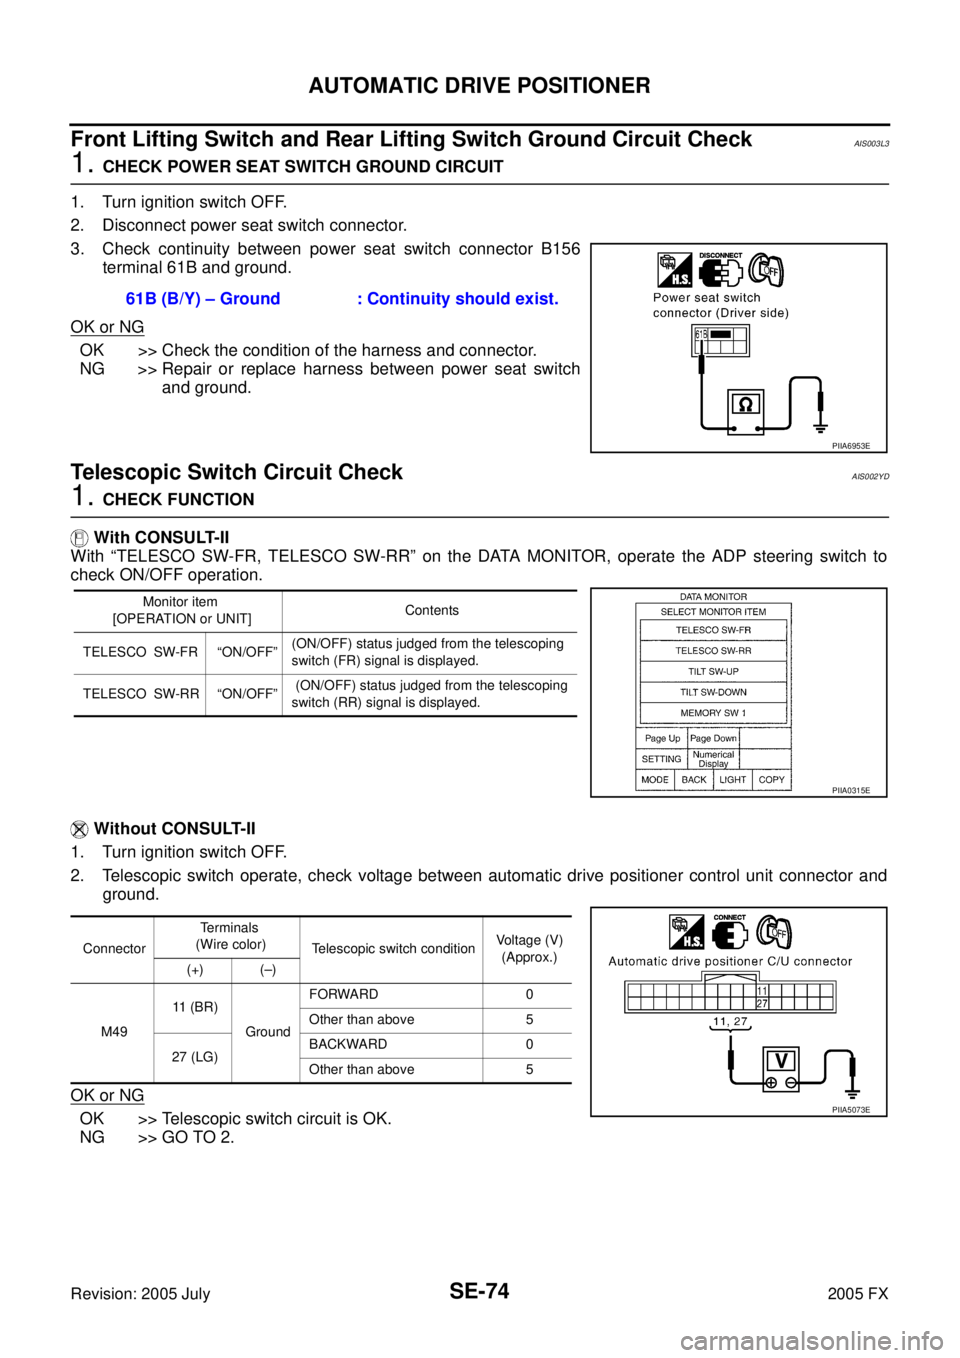
1. CHECK POWER SEAT SWITCH GROUND CIRCUIT
1. Turn ignition switch OFF.
2. Disconnect power seat switch connector.
3. Check continuity between power seat switch connector B156 terminal 61B and ground.
OK or NG
OK >> Check the condition of the harness and connector.
NG >> Repair or replace harness between power seat switch and ground.
Telescopic Switch Circuit CheckAIS002YD
1. CHECK FUNCTION
With CONSULT-II
With “TELESCO SW-FR, TELESCO SW-RR” on the DATA MONITOR, operate the ADP steering switch to
check ON/OFF operation.
Without CONSULT-II
1. Turn ignition switch OFF.
2. Telescopic switch operate, check voltage between automatic drive positioner control unit connector and ground.
OK or NG
OK >> Telescopic switch circuit is OK.
NG >> GO TO 2. 61B (B/Y) – Ground : Continuity should exist.
PIIA6953E
Monitor item
[OPERATION or UNIT] Contents
TELESCO SW-FR “ON/OFF” (ON/OFF) status judged from the telescoping
switch (FR) signal is displayed.
TELESCO SW-RR “ON/OFF” (ON/OFF) status judged from the telescoping
switch (RR) signal is displayed.
PIIA0315E
Connector Terminals
(Wire color) Telescopic switch condition Voltage (V)
(Approx.)
(+) (–)
M49 11 ( B R )
Ground FORWARD 0
Other than above 5
27 (LG) BACKWARD 0
Other than above 5
PIIA5073E
Page 4548 of 4731
AUTOMATIC DRIVE POSITIONER SE-75
C
D E
F
G H
J
K L
M A
B
SE
Revision: 2005 July 2005 FX
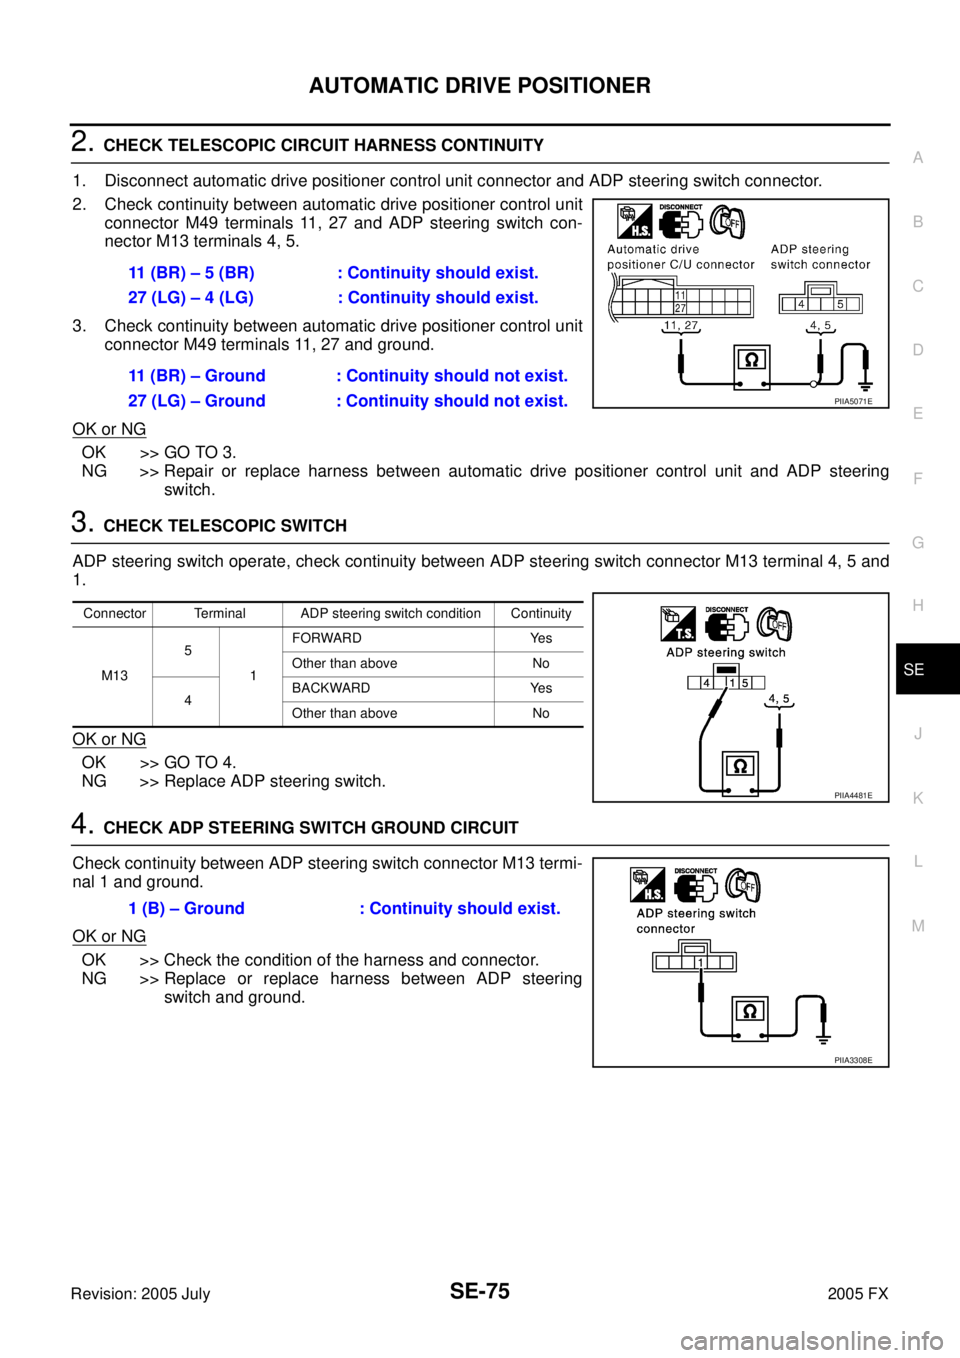
2. CHECK TELESCOPIC CIRCUIT HARNESS CONTINUITY
1. Disconnect automatic drive positioner control unit connector and ADP steering switch connector.
2. Check continuity between automatic drive positioner control unit connector M49 terminals 11, 27 and ADP steering switch con-
nector M13 terminals 4, 5.
3. Check continuity between automatic drive positioner control unit connector M49 terminals 11, 27 and ground.
OK or NG
OK >> GO TO 3.
NG >> Repair or replace harness between automatic drive positioner control unit and ADP steering switch.
3. CHECK TELESCOPIC SWITCH
ADP steering switch operate, check continuity between ADP steering switch connector M13 terminal 4, 5 and
1.
OK or NG
OK >> GO TO 4.
NG >> Replace ADP steering switch.
4. CHECK ADP STEERING SWITCH GROUND CIRCUIT
Check continuity between ADP steering switch connector M13 termi-
nal 1 and ground.
OK or NG
OK >> Check the condition of the harness and connector.
NG >> Replace or replace harness between ADP steering switch and ground.
11 (BR) – 5 (BR) : Continuity should exist.
27 (LG) – 4 (LG) : Continuity should exist.
11 (BR) – Ground : Continuity should not exist.
27 (LG) – Ground : Continuity should not exist.
PIIA5071E
Connector Terminal ADP steering switch condition Continuity
M13 5
1 FORWARD Yes
Other than above No
4 BACKWARD Yes
Other than above No
PIIA4481E
1 (B) – Ground : Continuity should exist.
PIIA3308E
Page 4549 of 4731
SE-76
AUTOMATIC DRIVE POSITIONER
Revision: 2005 July 2005 FX
Tilt Switch Circuit CheckAIS002YE
1. CHECK FUNCTION
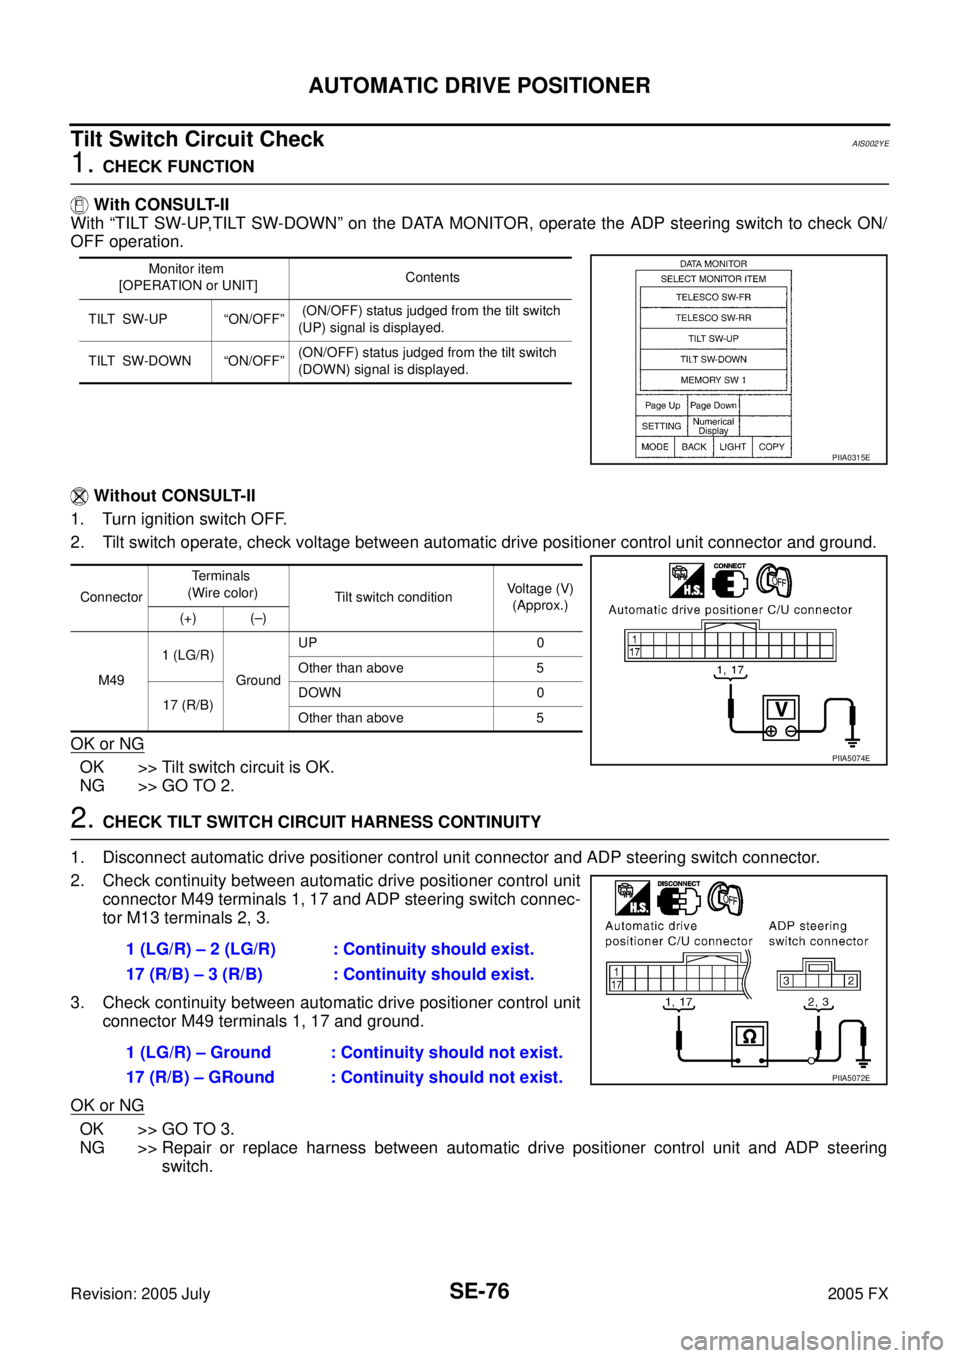
With CONSULT-II
With “TILT SW-UP,TILT SW-DOWN” on the DATA MONITOR, operate the ADP steering switch to check ON/
OFF operation.
Without CONSULT-II
1. Turn ignition switch OFF.
2. Tilt switch operate, check voltage between automatic drive positioner control unit connector and ground.
OK or NG
OK >> Tilt switch circuit is OK.
NG >> GO TO 2.
2. CHECK TILT SWITCH CIRCUIT HARNESS CONTINUITY
1. Disconnect automatic drive positioner control unit connector and ADP steering switch connector.
2. Check continuity between automatic drive positioner control unit connector M49 terminals 1, 17 and ADP steering switch connec-
tor M13 terminals 2, 3.
3. Check continuity between automatic drive positioner control unit connector M49 terminals 1, 17 and ground.
OK or NG
OK >> GO TO 3.
NG >> Repair or replace harness between automatic drive positioner control unit and ADP steering
switch.
Monitor item
[OPERATION or UNIT] Contents
TILT SW-UP “ON/OFF” (ON/OFF) status judged from the tilt switch
(UP) signal is displayed.
TILT SW-DOWN “ON/OFF” (ON/OFF) status judged from the tilt switch
(DOWN) signal is displayed.
PIIA0315E
Connector Te r m i n a l s
(Wire color) Tilt switch condition Voltage (V)
(Approx.)
(+) (–)
M49 1 (LG/R)
Ground UP 0
Other than above 5
17 (R/B) DOWN 0
Other than above 5
PIIA5074E
1 (LG/R) – 2 (LG/R) : Continuity should exist.
17 (R/B) – 3 (R/B) : Continuity should exist.
1 (LG/R) – Ground : Continuity should not exist.
17 (R/B) – GRound : Continuity should not exist.
PIIA5072E
Page 4550 of 4731
AUTOMATIC DRIVE POSITIONER SE-77
C
D E
F
G H
J
K L
M A
B
SE
Revision: 2005 July 2005 FX
3. CHECK ADP TILT STEERING SWITCH
ADP steering switch operate, check continuity between ADP steering switch.
OK or NG
OK >> GO TO 6.
NG >> Replace ADP steering switch.
4. CHECK ADP STEERING SWITCH GROUND CIRCUIT
Check continuity between ADP steering switch connector M13 termi-
nal 1 and ground.
OK or NG
OK >> Check the condition of the harness and connector.
NG >> Repair or replace harness between ADP steering switch and ground.
Connector Terminal ADP steering switch condition Continuity
M13 2
1 UP Yes
Other than above No
3 DOWN Yes
Other than above No
PIIA4482E
1 (B) – Ground : Continuity should exist.
PIIA3310E