Page 97 of 271

1FEATURES OF YOUR HYUNDAI84
!
then rapidly after several seconds upon suc-
cessful training.
Operating HomeLink
®
To operate, simply press and release the pro-
grammed HomeLink
® button. Activation will now
occur for the trained device (i.e. garage door
opener, gate operator, security system, entry
door lock, home/office lighting, etc.). For con-
venience, the hand-held transmitter of the de-
vice may also be used at any time.
Reprogramming a Single HomeLink
® But-
ton
To program a new device to a previously trained
HomeLink
® button, follow these steps:
1. Press and hold the desired HomeLink
® but-
ton. Do NOT release until step 4 has been
completed.
2. When the indicator light begins to flash slowly
(after 20 seconds), position the handheld
transmitter 1 to 3 inches away from the
HomeLink
® surface.
3. Press and hold the handheld transmitter
button. The HomeLink
® indicator light will
flash, first slowly and then rapidly.
4. When the indicator light begins to flash rap-
idly, release both buttons.
5. Press and hold the just-trained HomeLink
®
button and observe the red Status Indicator
LED. If the indicator light stays on constantly,
programming is complete and your new
device should activate.
Erasing HomeLink
® Buttons
Individual buttons cannot be erased. However,
to erase all three programmed buttons:
1. Press and hold the two outer HomeLink
®
buttons until the indicator light begins to
flash-after 20 seconds.
2. Release both buttons. Do not hold for longer
than 30 seconds.
The Integrated HomeLink
® Wireless Control
System is now in the training (learn) mode and
can be programmed at any time following the
appropriate steps in the Programming sections
above.
FCC ID: NZLZTVHL3
IC: 4112A-ZTVHL3This device complies with Part 15 FCC Rules.
Operation is subject to the following two condi-
tions: (1) this device may not cause harmful
interference, and (2) this device must accept
any interference received, including interfer-
ence that may cause undesired operation.
WARNING:
The transceiver has been tested and com-
plies with FCC and Industry Canada rules.
Changes or modifications not expressly
approved by the party responsible for com-
pliance could void the user's authority to
operate the device.
NVS
® is a registered trademark and Z-Nav™ is
a trademark of the Gentex Corporation, Zeeland,
Michigan. HomeLink
® is a registered trademark
owned by Johnson Controls, Incorporated,
Milwaukee, Wisconsin.
Page 98 of 271

1
FEATURES OF YOUR HYUNDAI
85
!
WARNING:
The trunk lid should always be kept com-
pletely closed while the vehicle is in motion.
If it is left open or ajar, poisonous exhaust
gases may enter the car and serious illness
or death may result. See additional warn-
ings concerning exhaust gases on page 2-
2.B540B04Y-AATTrunk Lid Lock Knob
HNF2014-A
If the trunk lid lock knob (located near the latch)
is in the "LOCK" position when the trunk lid is
closed, it will not be possible to open the trunk
PARKING BRAKEB530A01A-AATAlways engage the parking brake before leav-
ing the vehicle. This also turns on the parking
brake indicator light when the key is in the "ON"
or "START" position. Before driving away, be
sure that the parking brake is fully released and
the indicator light is off.
o To engage the parking brake, pull the lever
up as far as possible.
o To release the parking brake, pull up and
press the thumb button. Then, while holding
the button in, lower the brake lever.
B530A01NF
TRUNK LIDB540A01S-GATRemote Trunk Lid ReleaseTo open the trunk lid without using the key, pull
up the lid release lever.
To close, lower the trunk lid, then press down
on it until it locks. To be sure the trunk lid is
securely fastened, always check by trying to
pull it up again.
B540A01NF
Page 99 of 271

1FEATURES OF YOUR HYUNDAI86
!
HNF2016 B540B02E-AAT
Trunk Lid Emergency Latch ReleaseYour vehicle is equipped with a glow-in-the dark
emergency trunk release lever located inside
the trunk. It will glow after the trunk is closed.
When pulled, this lever will release the trunk
latch mechanism and open the trunk. lid by using the remote release. In this instance,
use the master key to unlock and open the trunk
lid.
To allow the trunk lid to be opened with the
remote release, push the trunk lid lock knob
down, then to the opposite direction of the
"LOCK" position.
WARNING:
Doors and trunk should be kept locked and
keys be kept out of the reach of children.
Parents also should teach their children
about the dangers of playing in trunks.
!
WARNING:
o If a person is locked in the trunk, pull the
emergency trunk release lever on the
driver's side of the inside panel of the
trunk to open the trunk lid.
o HYUNDAI recommends that cars be kept
locked and keys be kept out of the reach
of children, and that parents teach their
children about the dangers of playing in
trunks.
o Parents should teach children about the
emergency trunk release lever in their
vehicle and how to open the trunk lid if
they are accidentally locked in the trunk.
Page 100 of 271
1
FEATURES OF YOUR HYUNDAI
87
REMOTE FUEL-FILLER LID RELEASEB560A03Y-AATThe fuel-filler lid may be opened from inside the
vehicle by pushing the fuel-filler lid opener switch
located on the driver's door.NOTE:If the fuel-filler lid will not open because ice
has formed around it, tap lightly or push on
the lid to break the ice and release the lid. Do
not pry on the lid. If necessary, spray around
the lid with an approved de-icer fluid (do
not use radiator anti-freeze) or move the
vehicle to a warm place and allow the ice to
melt.
B560A02NF
HNF2012 B540C01Y-AAT
To unlock using the keyTo open the trunk lid, insert the key and turn it
clockwise to unlock. The trunk compartment
light illuminates when the trunk lid is opened.
HIGH-MOUNTED REAR STOP LIGHTB550A02Y-AATIn addition to the lower-mounted rear stop lights
on either side of the car, the high mounted rear
stop light in the center of the rear window also
lights when the brakes are applied.
B550A01NF
Page 101 of 271

1FEATURES OF YOUR HYUNDAI88
WARNING:
o If you open the fuel filler cap during high
ambient temperatures, a slight "pres-
sure sound" may be heard. This is nor-
mal and not a cause for concern.
Whenever you open the fuel filler cap,
turn it slowly.
o Make sure the fuel filler cap is replaced
and securely seated after fueling. Failure
to replace or fully seat the fuel filler cap
will result in fuel vapors escaping into
the atmosphere and the check engine
" " indicator illuminating.
o Do not "TOP-OFF" after the first nozzle
shut off when refueling.
o Automotive fuels are flammable/explo-
sive materials. When refueling, please
note the following guidelines carefully.
- Before touching the fuel nozzle or fuel
filler cap, have one's hands in contact
with metal parts away from the filler
neck to discharge static electricity.
!
!
WARNING:
o The fuel cap must be tightened until the
cap clicks, otherwise " " light will
illuminate.
o Gasoline vapors are dangerous. Before
refueling, always stop the engine and
never allow sparks or open flames near
the filler area. If you need to replace the
filler cap, use a genuine Hyundai re-
placement part.
HNF2021
!
WARNING:
- Do not get back in the vehicle while
refueling. Do not operate anything that
can produce static electricity. Static
electricity discharge can ignite fuel
vapors resulting in an explosion.
- When using a portable fuel container,
be sure to place the container on the
ground while refueling. Static electric-
ity discharge from the container can
ignite fuel vapors causing a fire. While
starting refueling, contact should be
maintained until the filling is complete.
- Do not use cellular phones around a
gas station. The electric current or elec-
tronic interference from cellular phones
can ignite fuel vapors causing a fire.
- When refueling, always turn the engine
off. Sparks by engine compartment
electrical equipment can ignite fuel
vapors causing a fire. After refueling,
check to make sure the fuel filler cap is
securely closed, and then start the
engine.
- Do not smoke or try to light cigarettes
around a gas station. Automotive fuels
are flammable.
Page 102 of 271
1
FEATURES OF YOUR HYUNDAI
89
!
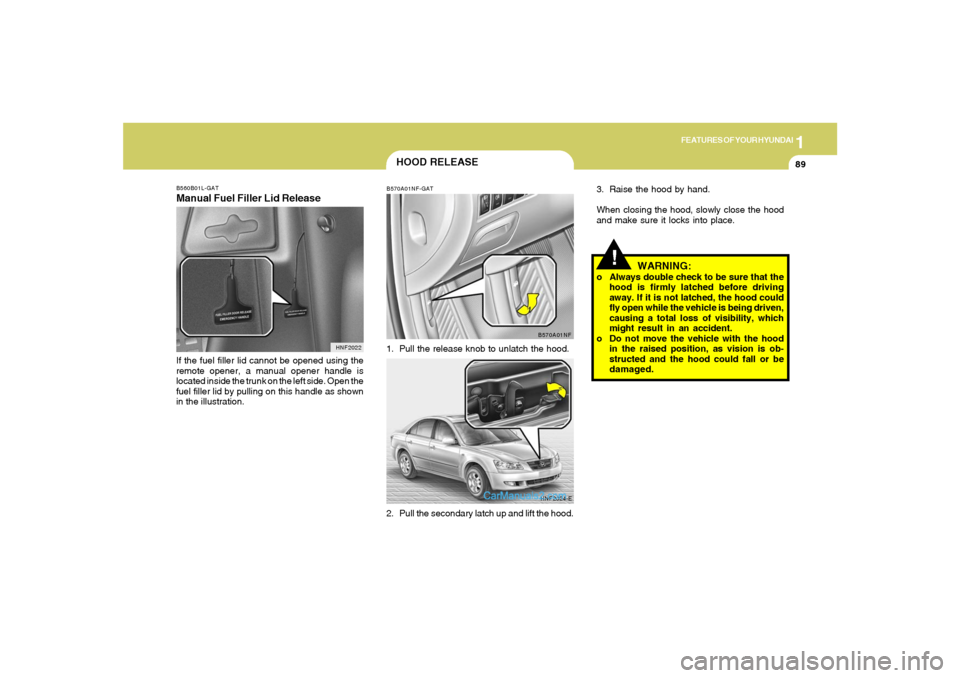
3. Raise the hood by hand.
When closing the hood, slowly close the hood
and make sure it locks into place.
WARNING:
o Always double check to be sure that the
hood is firmly latched before driving
away. If it is not latched, the hood could
fly open while the vehicle is being driven,
causing a total loss of visibility, which
might result in an accident.
o Do not move the vehicle with the hood
in the raised position, as vision is ob-
structed and the hood could fall or be
damaged.
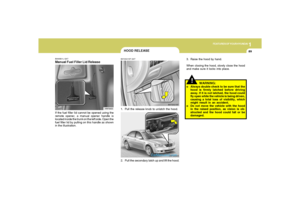
B560B01L-GATManual Fuel Filler Lid ReleaseIf the fuel filler lid cannot be opened using the
remote opener, a manual opener handle is
located inside the trunk on the left side. Open the
fuel filler lid by pulling on this handle as shown
in the illustration.
HNF2022
HOOD RELEASEB570A01NF-GAT1. Pull the release knob to unlatch the hood.
2. Pull the secondary latch up and lift the hood.
B570A01NF
HNF2024-E
Page 103 of 271
1FEATURES OF YOUR HYUNDAI90
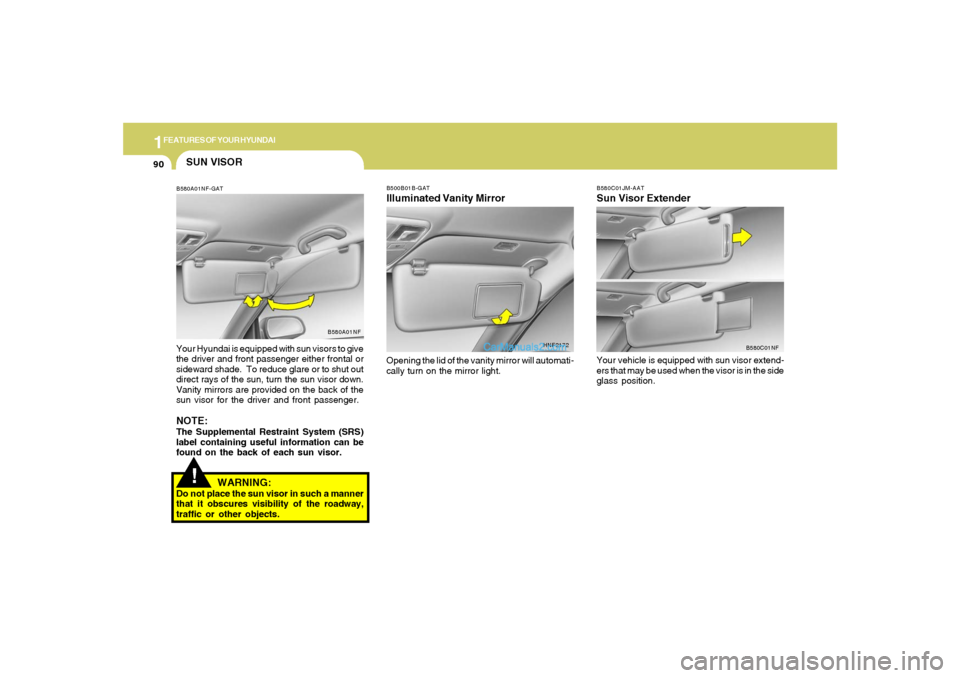
!SUN VISORB580A01NF-GATYour Hyundai is equipped with sun visors to give
the driver and front passenger either frontal or
sideward shade. To reduce glare or to shut out
direct rays of the sun, turn the sun visor down.
Vanity mirrors are provided on the back of the
sun visor for the driver and front passenger.NOTE:The Supplemental Restraint System (SRS)
label containing useful information can be
found on the back of each sun visor.
B580A01NF
WARNING:
Do not place the sun visor in such a manner
that it obscures visibility of the roadway,
traffic or other objects.
B500B01B-GATIlluminated Vanity MirrorOpening the lid of the vanity mirror will automati-
cally turn on the mirror light.
HNF2172B580C01JM-AAT
Sun Visor ExtenderYour vehicle is equipped with sun visor extend-
ers that may be used when the visor is in the side
glass position.
B580C01NF
Page 104 of 271
1
FEATURES OF YOUR HYUNDAI
91
!
CAUTION:
After adjusting the steering wheel, try mov-
ing it up and down to make sure it is locked
in position.
!
WARNING:
Do not attempt to adjust the steering wheel
while driving as this may result in loss of
control of the vehicle and serious injury or
death.
B600B01NF-GATTilt and telescopic type
(If Installed)To adjust the steering wheel:
1. Push the lever downward fully to unlock.
2. Adjust upward or downward and forward or
backward to set the steering wheel to the
desired position.
3. After adjustment, securely tighten the lever
by pulling it upward.
B600B01NF-A
STEERING WHEELB600A01NF-GATTilt typeTo adjust the steering wheel:
1. Pull the lever toward you and hold it to unlock.
2. Raise or lower the steering wheel to the
desired position.
3. After adjustment, release the lever.
HNF2067