Page 105 of 164

105
CONNECT NAV+
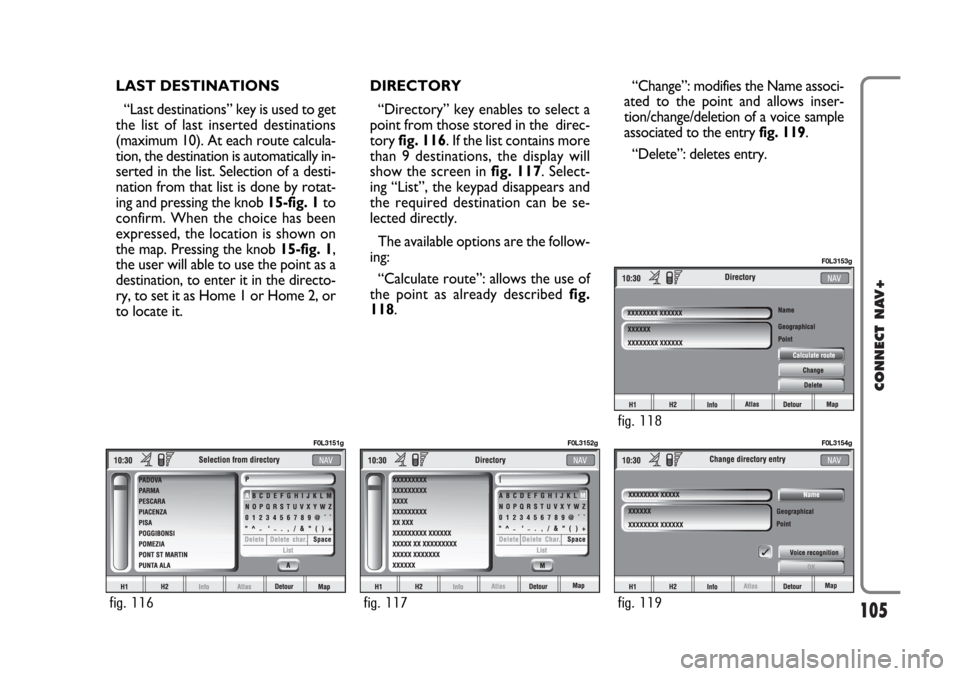
LAST DESTINATIONS
“Last destinations” key is used to get
the list of last inserted destinations
(maximum 10). At each route calcula-
tion, the destination is automatically in-
serted in the list. Selection of a desti-
nation from that list is done by rotat-
ing and pressing the knob 15-fig. 1to
confirm. When the choice has been
expressed, the location is shown on
the map. Pressing the knob 15-fig. 1,
the user will able to use the point as a
destination, to enter it in the directo-
ry, to set it as Home 1 or Home 2, or
to locate it.DIRECTORY
“Directory” key enables to select a
point from those stored in the direc-
tory fig. 116. If the list contains more
than 9 destinations, the display will
show the screen in fig. 117. Select-
ing “List”, the keypad disappears and
the required destination can be se-
lected directly.
The available options are the follow-
ing:
“Calculate route”: allows the use of
the point as already described fig.
118.“Change”: modifies the Name associ-
ated to the point and allows inser-
tion/change/deletion of a voice sample
associated to the entry fig. 119.
“Delete”: deletes entry.
fig. 116
F0L3151g
fig. 117
F0L3152g
fig. 119
F0L3154g
fig. 118
F0L3153g
Page 106 of 164
106
CONNECT NAV+
1.Queue.
2.Accident.
3.Generic danger.
4.Works in progress.
5.Closed road.
6.Narrow road.
7.No entry road.
8.Slippery road.
9.Ice / snow.
10.
Fog.
11.Wind.
12.Procession,
protest.
13.Danger of explosions.
14.Slow down.
15.Traffic signs out of order.
16.Parking.
17.Forecast.
RDS-TMC
Select this function by rotating the
knob 15-fig. 1and then press it to
confirm.
The display shows the following op-
tions fig. 120:
– Near car;
– Near address.“RDS-TMC” icon allows the user to
select a geographical point to get re-
lated RDS-TMC information: RDS-
TMC events are pictured through
dedicated icons on the map. A TMC
event cannot be used to identify a des-
tination.
IMPORTANTTMC information
can be displayed provided that the fol-
lowing two conditions take place: 1)
the active radio station provides such
service; 2) the same station transmits
messages next to the point shown.
fig. 120
F0L3155g
Page 107 of 164
107
CONNECT NAV+
“Near car”
“Near car” option enables to get in-
formation on events near the current
car position.
The menu fig. 121includes the fol-
lowing keys:
“Category”: specifies the event cat-
egory: “Traffic”, “Weather”, “Info”,
“All”.
“List of events”: to open the event
list and to choose the event of inter-
est.“Info”: press 16-fig. 1to get info
about the selected event.
To select the required function, ro-
tate the knob 15-fig. 1and then press
it to confirm.“Near address”
“Near address” enables to get infor-
mation on events near a specific ad-
dress. The following functions are
available fig. 122:
“Category”: specifies the event cat-
egory: “Traffic”, “Weather”, “Info”,
“All”.
“Place name”, “Street”, “Street num-
ber”: inputs resort address.
“List of events”: opens the event list
and choose the event of interest.
fig. 121
F0L3156g
fig. 122
F0L3157g
Page 108 of 164
108
CONNECT NAV+
The following options are available
for both functions:
– “Calculate route”: to start route
calculation to the point in Home 1
(Home 2);
– “Delete”: to delete from Home 1
(Home 2) the selected point.
To select the required function, ro-
tate the knob 15-fig. 1and then press
it to confirm. “Info”: press 16-fig. 1to get info
about the selected event.
To select the required function, ro-
tate the knob 15-fig. 1and then press
it to confirm.Home 1 - Home 2
From screen in fig. 107: selecting
“Other menus” will display the screen
in fig. 123with the options “Home 1”
and “Home 2”.
Selecting and confirming “Home 1”
or “Home 2” by rotating and press-
ing the knob 15-fig. 1, will display in-
formation about the points stored as
“Home 1” or “Home 2”.
fig. 123
F0L3158g
fig. 124
F0L3159g
Page 109 of 164
109
CONNECT NAV+
SET ROUTE
“Set route” allows to define the
route calculation parameters.
When selecting this function by ro-
tating the knob 15-fig. 1and pressing
it to confirm, the display shows the fol-
lowing options fig. 125:Route type
Selecting and confirming “Route
type” by rotating and pressing the
knob 15-fig. 1, makes it possible to
set the route calculation criteria ac-
cording to two different modes:
“Shortest time” or “Shortest dis-
tance”.Highway
Select and confirm “Highway” by ro-
tating and pressing the knob 15-fig.
1to define if route can include high-
way segments or not.
To activate set calculation parame-
ters, select icon “OK” turning the
knob 15-fig. 1and pressing it to con-
firm.
fig. 125
F0L3161g
Page 110 of 164
110
CONNECT NAV+
CHANGE DISPLAY
From the main navigation menu, se-
lect icon “Other menus” by turning
and pressing knob 15-fig. 1to confirm
to pass to the second navigation menu.
To select “ Change display” rotate
the knob 15-fig. 1and press it to con-
firm.This function allows to choose the
desired map display by means of the
following options fig. 126:
Map: displays the map centered with
respect to the car position (standard
map).Whole route: displays the entire
calculated route from the present po-
sition to the destination fig. 127. This
option is available only if a route is ac-
tive.
fig. 126
F0L3162g
fig. 127
F0L3163g
Page 111 of 164
111
CONNECT NAV+
Highway Info: provides information
about next two gas stations and high-
way exits fig. 128. This option is en-
abled only if the car is on a highway
and a route has been previously cal-
culated. If the car gets out from the
highway, the system gets back to
“Map” view.Graphic symbols: displays naviga-
tion icons only fig. 129and not the
map. This option is enabled only if a
route has been previously calculated.
To select the required function, ro-
tate the knob 15-fig. 1and press it to
confirm.DELETE DESTINATION
Select and confirm “Delete destina-
tion” by rotating and pressing the knob
15-fig. 1to delete the last entered
destination.
fig. 128
F0L3164g
fig. 129
F0L3165g
Page 112 of 164

112
CONNECT NAV+
Draw areas: allows to set the map
through three different options:
– “2D”: the map is shown by seg-
ments and coloured areas;
– “3D”: the map is shown by seg-
ments, coloured areas and 3D images;
– “NO”: the map is shown by graph-
ic segments only. MAP OPTIONS
To select “Map options”, rotate the
knob 15-fig. 1and then press it to
confirm.
This function allows set up of map
displaying with the following options
fig. 130:Draw map: to set map orientation:
– “Oriented towards north”: map is
displayed North-oriented, cursor (car)
moves accordingly;
– “Oriented automatically”: cursor
(car) is displayed in central position
and the map is oriented according to
car direction.
- “Bird view”: the map is oriented ac-
cording to car direction. With per-
spective towards the horizon, the
point of view is set behind the car at
a certain height and preset angle
fig. 131.
This option, if active, will force the
following submenu options: ddraw ar-
eas (forced at 2D), draw icons (forced
at NO), draw RDS-TMC (forced at
NO).
fig. 130
F0L3166g
fig. 131
F0L3172g