Page 187 of 420
You may add a second station to each push-button by
repeating the above procedure with this exception: Press
the SET button twice and SET 2 will show in the display
window. Each button can be set for SET 1 and SET 2 in
both AM and FM. This allows a total of 10 AM and 10 FM
stations to be locked into memory. You can recall the
stations stored in SET 2 memory by pressing the push-
button twice.
To Change From Clock To Radio Mode
Press the TIME button to change the display between
radio frequency and time.
General Information
This radio complies with Part 15 of FCC rules and with
RSS-210 of Industry Canada. Operation is subject to the
following conditions:
1. This device may not cause harmful interference,2. This device must accept any interference received,
including interference that may cause undesired opera-
tion.
NOTE:Changes or modifications not expressively ap-
proved by the party responsible for compliance could
void the user’s authority to operate the equipment.
CD Player Operation
NOTE:
•The ignition switch must be in the ON or ACC
position and the volume control ON before the CD
player will operate.
•This Radio is capable of playing compact discs (CD),
recordable compact discs (CD-R), rewritable compact
discs (CD-RW) compact discs with MP3 tracks and
multisession compact discs with CD and MP3 tracks.
UNDERSTANDING YOUR INSTRUMENT PANEL 187
4
Page 188 of 420
Inserting The Compact Disc
CAUTION!
This CD player will accept only 4–3/4 inch (12cm)
discs only. The use of other sized discs may damage
the CD player mechanism.
You may either insert or eject a disc with the radio OFF.
If you insert a disc with the ignition ON and the radio
OFF, the display will show the time of day. If you insert
a disc with the ignition OFF, the display will show the
time of day for about 5 seconds, then go out.
If the power is ON, the unit will switch from radio to CD
mode and begin to play when you insert the disc. The
display will show the track number and index time in
minutes and seconds. Play will begin at the start of track
one.
Seek
Press the top of the SEEK button for the next selection on
the CD. Press the bottom of the button to return to the
beginning of the current selection, or return to the
beginning of the previous selection if the CD is within the
first 10 seconds of the current selection.
EJT—Eject
Press the EJT button and the disc will unload and move
to the entrance for easy removal. The unit will switch to
the radio mode.
If you do not remove the disc within 15 seconds, it will be
reloaded. The radio mode will continue to appear.
The disc can be ejected with the radio OFF.
FF/TUNE/RW
Press FF (Fast Forward) and the CD player will begin to
fast forward until FF is released. The RW ( Reverse)
button works in a similar manner.
188 UNDERSTANDING YOUR INSTRUMENT PANEL
Page 194 of 420
Radio Operation
Power/Volume Control
Press the ON/VOL control to turn the radio on. Turn the
volume control to the right to increase the volume.
NOTE:Power to operate the radio is supplied through
the ignition switch. It must be in the ON or ACC position
to operate the radio.
PTY (Program Type) Button
Pressing this button once will turn on the PTY mode for
5 seconds. If no action is taken during the 5 second time
out the PTY icon will turn off. Pressing the PTY button
within 5 seconds will allow the program format type to
be selected. Many radio stations do not currently broad-
cast PTY information.
Toggle the PTY button to select the following format
types:
Program Type Radio Display
Adult Hits Adlt Hit
Classical Classicl
Classic Rock Cls Rock
College College
Country Country
Information Inform
Jazz Jazz
Foreign Language Language
News News
Nostalgia Nostalga
Oldies Oldies
Personality Persnlty
Public Public
Rhythm and Blues R & B
Religious Music Rel Musc
Religious Talk Rel Talk
194 UNDERSTANDING YOUR INSTRUMENT PANEL
Page 199 of 420
Rewind—RW
Press the RW button down momentarily to reverse the
tape direction. The tape will rewind until the button is
pressed again or until the beginning of the tape is
reached. At the beginning of the tape, the tape will play
in the opposite direction.
EJT Tape
Press the EJT TAPE button and the cassette will disen-
gage and eject from the radio.
Metal Tape Selection (70µs)
If a standard 70 µ (metal) tape is inserted into the player,
the player will automatically select the correct equaliza-
tion.
Pinch Roller Release
If ignition power or the radio ON/OFF switch are turned
off, the pinch roller will automatically retract to protectthe tape from any damage. When power is restored to the
tape player, the pinch roller will automatically reengage
and the tape will resume play.
Dolby Noise Reduction
The Dolby Noise Reduction System* is on when-
ever the tape player is on, but may be switched
on/off.
To turn the Dolby Noise Reduction System on/off: Press
the Dolby NR button (button 2) after you insert the tape.
The NR light in the display will go off when the Dolby
System is off.
*”Dolby”noise reduction manufactured under license
from Dolby Laboratories Licensing Corporation. Dolby
and the double-D symbol are trademarks of Dolby Labo-
ratories Licensing Corporation.
UNDERSTANDING YOUR INSTRUMENT PANEL 199
4
Page 200 of 420

CD Player Operation
NOTE:The ignition switch must be in the ON or ACC
position and the volume control ON before the CD player
will operate.
Inserting The Compact Disc
You may either insert or eject a disc with the radio OFF.
If you insert a disc with the ignition ON and the radio off,
the display will show CD and the time of day will be
displayed.
If the power is on, the unit will switch from radio to CD
mode and begin to play when you insert the disc. The
display will show the track number and index time in
minutes and seconds. Play will begin at the start of track
one.
Seek
Press the top of the SEEK button for the next selection on
the CD. Press the bottom of the button to return to the
beginning of the current selection, or return to the
beginning of the previous selection if the CD is within the
first second of the current selection.
Scan
Press the SCAN button to play 10 seconds of each
selection. Press the SCAN button a second time to cancel
this feature.
EJT CD
Press the EJT CD button and the disc will unload and
move to the entrance for easy removal. The unit will
switch to the radio mode.
If you do not remove the disc within 15 seconds, it will be
reloaded. The unit will continue in radio mode.
The disc can be ejected with the radio and ignition off.
200 UNDERSTANDING YOUR INSTRUMENT PANEL
Page 203 of 420
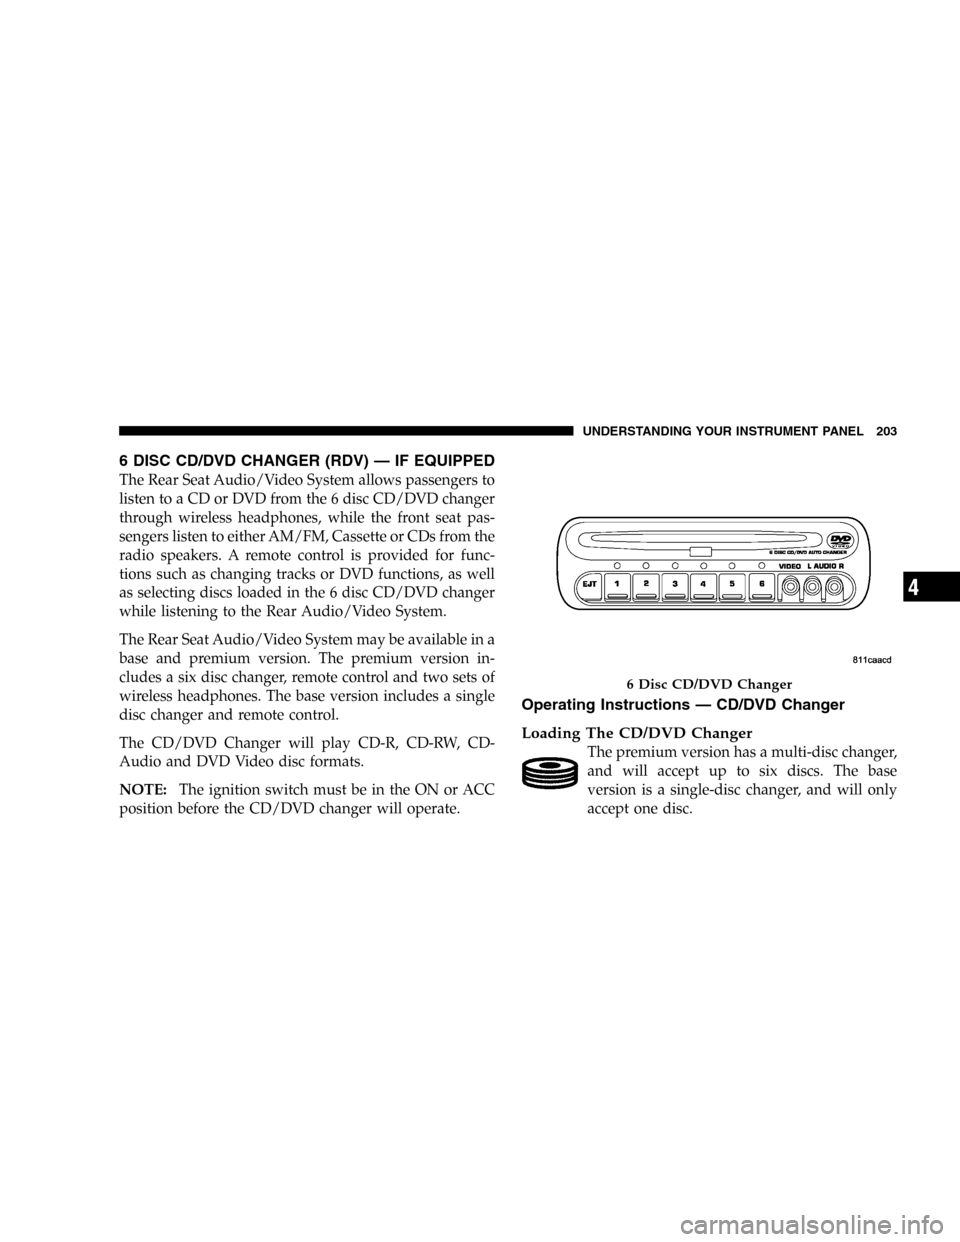
6 DISC CD/DVD CHANGER (RDV)—IF EQUIPPED
The Rear Seat Audio/Video System allows passengers to
listen to a CD or DVD from the 6 disc CD/DVD changer
through wireless headphones, while the front seat pas-
sengers listen to either AM/FM, Cassette or CDs from the
radio speakers. A remote control is provided for func-
tions such as changing tracks or DVD functions, as well
as selecting discs loaded in the 6 disc CD/DVD changer
while listening to the Rear Audio/Video System.
The Rear Seat Audio/Video System may be available in a
base and premium version. The premium version in-
cludes a six disc changer, remote control and two sets of
wireless headphones. The base version includes a single
disc changer and remote control.
The CD/DVD Changer will play CD-R, CD-RW, CD-
Audio and DVD Video disc formats.
NOTE:The ignition switch must be in the ON or ACC
position before the CD/DVD changer will operate.
Operating Instructions—CD/DVD Changer
Loading The CD/DVD Changer
The premium version has a multi-disc changer,
and will accept up to six discs. The base
version is a single-disc changer, and will only
accept one disc.
6 Disc CD/DVD Changer
UNDERSTANDING YOUR INSTRUMENT PANEL 203
4
Page 205 of 420
•If you insert a disc with the ignition ON and the radio
OFF, the DVD will automatically be pulled into the
DVD changer and the display will show the time of
day.
•It is recommended to label home made burned discs
with a permanent marker instead of adhesive labels.
These types of labels may become loose and cause the
disc to be stuck in the DVD player. This may cause
permanent damage to the DVD mechanism.
EJECT (EJT) Button
If there is a disc in the changer, press the EJT button and
the disc will eject. If you do not remove the disc within 10
seconds, it will be reloaded and the display will show
PAUSE. The radio mode will continue to operate.To eject additional discs from the premium version
multi-disc changer, first select the numbered button
where the disc is located and then press the EJT button.
The disc can be ejected with the radio OFF.
Operating Instructions—Remote Control
NOTE:Aim the remote control at the DVD changer
located on the center of the instrument panel and press
the desired button. Direct sunlight or objects blocking the
line of sight may affect the function of the remote control.
UNDERSTANDING YOUR INSTRUMENT PANEL 205
4
Page 215 of 420
ESN/SID Access With RBB, RAH and RBK Radios
With the ignition switch in the ACCESSORY position and
the radio OFF, press the Tape Eject or CD Eject (depend-
ing on the radio type) and Time buttons simultaneously
for 3 seconds. The first four digits of the twelve-digit
ESN/SID number will be displayed. Press the SEEK UP
button to display the next four digits. Continue to press
the SEEK UP button until all twelve ESN/SID digits have
been displayed. The SEEK DOWN will page down until
the first four digits are displayed. The radio will exit the
ESN/SID mode when any other button is pushed, the
ignition is turned OFF, or 5 minutes has passed since any
button was pushed.
ESN/SID Access With RBP, RBU, RAZ, RB1 and
RBQ Radios
With the ignition switch in the ACCESSORY position and
the radio OFF, press the CD Eject and TIME buttons
simultaneously for 3 seconds. All twelve ESN/SID num-
bers will be displayed. The radio will exit the ESN/SIDmode when any other button is pushed, the ignition is
turned OFF, or 5 minutes has passed since any button
was pushed.
Selecting Satellite Mode in RBB, RAH and RBK
Radios
Press the MODE button repeatedly until�SA�appears in
the display. A CD or tape may remain in the radio while
in the Satellite radio mode.
Selecting Satellite Mode in RBP, RBU, RAZ, RB1
and RBQ Radios
Press the MODE button repeatedly until the word
�SIRIUS�appears in the display. These radios will also
display the following:
•After 3 seconds, the current channel name and channel
number will be displayed for 5 seconds.
•The current program type and channel number will
then be displayed for 5 seconds.
UNDERSTANDING YOUR INSTRUMENT PANEL 215
4