2005 CHEVROLET SILVERADO automatic transmission
[x] Cancel search: automatic transmissionPage 167 of 580

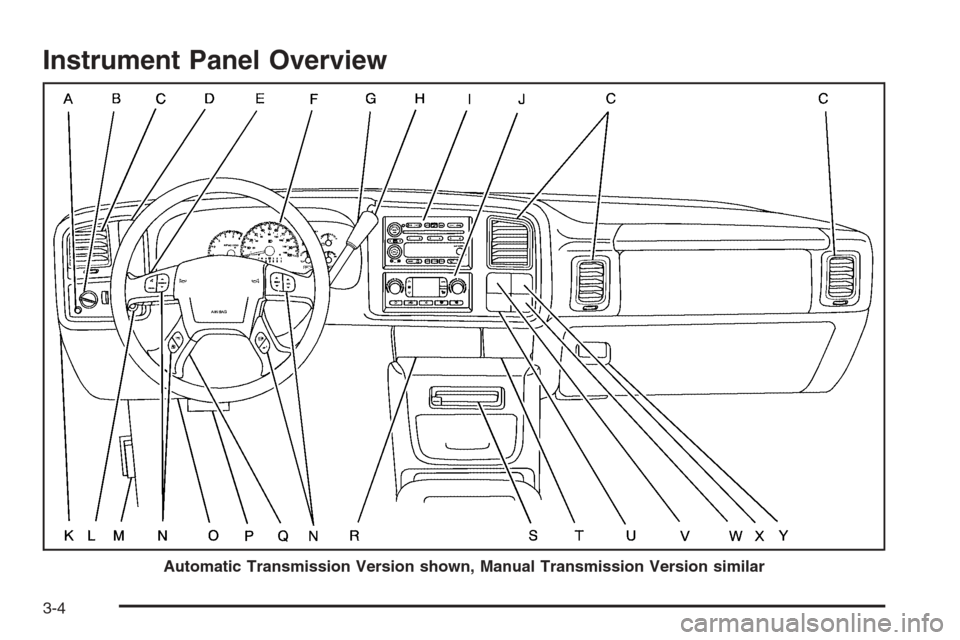
Instrument Panel Overview...............................3-4
Hazard Warning Flashers................................3-6
Other Warning Devices...................................3-6
Horn .............................................................3-6
Tilt Wheel.....................................................3-6
Turn Signal/Multifunction Lever.........................3-7
Turn and Lane-Change Signals........................3-7
Headlamp High/Low-Beam Changer..................3-8
Flash-to-Pass.................................................3-9
Windshield Wipers..........................................3-9
Windshield Washer.......................................3-10
Cruise Control..............................................3-10
Headlamps..................................................3-13
Headlamps on Reminder................................3-14
Daytime Running Lamps (DRL).......................3-14
Automatic Headlamp System..........................3-15
Fog Lamps ..................................................3-16
Auxiliary Roof Mounted Lamp.........................3-17
Instrument Panel Brightness...........................3-17
Dome Lamps ...............................................3-17
Dome Lamp Override....................................3-18
Entry Lighting...............................................3-18
Exit Lighting.................................................3-18Front Reading Lamps....................................3-18
Cargo Lamp.................................................3-19
Accessory Power Outlet(s).............................3-19
Ashtray(s) and Cigarette Lighter......................3-20
Climate Controls............................................3-20
Climate Control System.................................3-20
Dual Climate Control System..........................3-22
Dual Automatic Climate Control System...........3-24
Outlet Adjustment.........................................3-30
Warning Lights, Gages, and Indicators............3-31
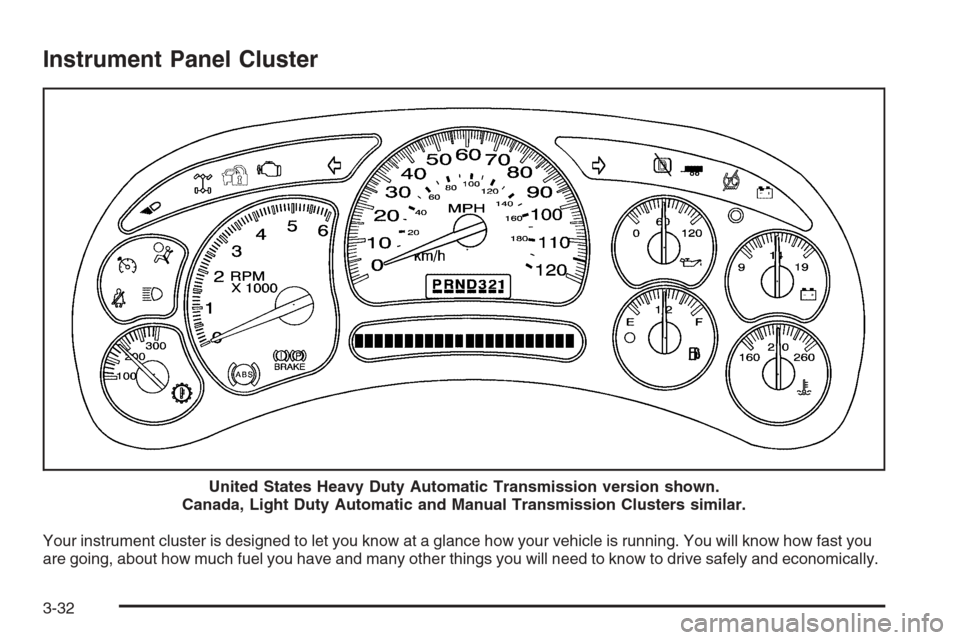
Instrument Panel Cluster................................3-32
Speedometer and Odometer...........................3-33
Trip Odometer..............................................3-33
Tachometer.................................................3-33
Safety Belt Reminder Light.............................3-33
Airbag Readiness Light..................................3-34
Airbag Off Light............................................3-34
Passenger Airbag Status Indicator...................3-36
Battery Warning Light....................................3-38
Voltmeter Gage............................................3-39
Up-Shift Light (Manual Transmission)...............3-39
Brake System Warning Light..........................3-40
Section 3 Instrument Panel
3-1
Page 170 of 580

Instrument Panel Overview
Automatic Transmission Version shown, Manual Transmission Version similar
3-4
Page 171 of 580

The main components of your instrument panel are the following:
A. Dome Lamp Button. SeeDome Lamps on page 3-17.
B. Headlamp Controls. SeeHeadlamps on page 3-13.
C. Air Outlets. SeeOutlet Adjustment on page 3-30.
D. Automatic Transfer Case/Electronic Transfer Case/
Traction Assist System (TAS). SeeFour-Wheel Drive
on page 2-37andTraction Assist System (TAS)
on page 4-8.
E. Multifunction Lever. SeeTurn Signal/Multifunction
Lever on page 3-7.
F. Instrument Panel Cluster. SeeInstrument Panel
Cluster on page 3-32.
G. Gearshift Lever (Automatic Transmission).
SeeAutomatic Transmission Operation on page 2-26
orManual Transmission Operation on page 2-32
for manual transmissions.
H. Tow/Haul Selector and Overdrive Disable
(Allison Transmission
®Only) Button (If Equipped).
SeeTow/Haul Mode on page 2-30.
I. Audio System. SeeAudio System(s) on page 3-69.
J. Climate Control System. SeeClimate Control
System on page 3-20,Dual Climate Control System
on page 3-22andDual Automatic Climate Control
System on page 3-24.
K. Instrument Panel Fuse Block.Instrument Panel Fuse
Block on page 5-124.
L. Cargo Lamp Button. SeeCargo Lamp on page 3-19.M. Hood Release. SeeHood Release on page 5-13.
N. Steering Wheel Control Buttons (If Equipped).
SeeDriver Information Center (DIC) on page 3-50
orAudio Steering Wheel Controls on page 3-124.
O. Center Instrument Panel Block. SeeCenter
Instrument Panel Fuse Block on page 5-126.
P. Parking Brake Release. SeeParking Brake on
page 2-51.
Q. Tilt Wheel Lever. SeeTilt Wheel on page 3-6.
R. Lighter and Accessory Power Outlet. SeeAccessory
Power Outlet(s) on page 3-19, andAshtray(s) and
Cigarette Lighter on page 3-20.
S. Storage Area. SeeFront Storage Area on page 2-75.
T. Ashtray. SeeAshtray(s) and Cigarette Lighter on
page 3-20.
U. Manual Selectable Ride Control (If Equipped).
SeeManual Selectable Ride on page 4-11.
V. 4-Wheel Steer Button (If Equipped).
SeeQUADRASTEER™ on page 4-14.
W. Passenger Airbag Off Switch (If Equipped).
SeeAirbag Off Switch on page 1-70.
X. Auxiliary Roof Mounted Lamp Button (If Equipped).
SeeAuxiliary Roof Mounted Lamp on page 3-17.
Y. Glove Box. SeeGlove Box on page 2-75.
3-5
Page 179 of 580

Using Cruise Control on Hills
How well your cruise control will work on hills depends
upon your speed, load and the steepness of the
hills. When going up steep hills, you may want to step
on the accelerator pedal to maintain your speed.
When going downhill, you may have to brake or shift to
a lower gear to keep your speed down. Of course,
applying the brake takes you out of cruise control. Many
drivers �nd this to be too much trouble and don’t use
cruise control on steep hills.
Ending Cruise Control
There are four ways to turn off the cruise control:
Step lightly on the brake pedal,
move the cruise control switch to off, or
shift the transmission to NEUTRAL (N).
If the accelerator pedal is held for 60 seconds or
longer, cruise control will turn off.
Erasing Speed Memory
When you turn off the cruise control or the ignition, your
cruise control set speed memory is erased.
Headlamps
The control on the driver’s side of your instrument panel
operates the headlamps.
Turn the control clockwise to operate the lamps.
The headlamp control has four positions:
9(Off):Turning the control to this position turns off
the Daytime Running Lamps (DRL) and the automatic
headlamps.
3-13
Page 180 of 580

AUTO (Automatic):Turning the control to this position
puts the system into automatic headlamp mode.
;(Parking Lamps):Turning the control to this
position turns on the parking lamps, together with the
following:
Sidemarker Lamps
Taillamps
License Plate Lamps
Instrument Panel Lights
Roof Marker Lamps (If Equipped)
5(Headlamps):Turning the control to this position
turns on the headlamps, together with the previously
listed lamps and lights.
You can switch your headlamps from high to low-beam
by pushing the turn signal/high-beam lever towards
the instrument panel.
A circuit breaker protects your headlamps. If you have
an electrical overload, your headlamps will �icker on and
off. Have your headlamp wiring checked right away if
this happens.
Headlamps on Reminder
A reminder chime will sound when your headlamps or
parking lamps are manually turned on and your ignition is
off, in LOCK, ACCESSORY, or a door is open. To disable
the chime, turn the light off then back on.
Daytime Running Lamps (DRL)
Daytime Running Lamps (DRL) can make it easier for
others to see the front of your vehicle during the
day. DRL can be helpful in many different driving
conditions, but they can be especially helpful in the short
periods after dawn and before sunset. Fully functional
daytime running lamps are required on all vehicles
�rst sold in Canada.
The DRL system will come on when the following
conditions are met:
The ignition is on
The exterior lamps control is in AUTO
The automatic transmission is not in PARK (P)
The light sensor determines it is daytime
3-14
Page 181 of 580

When the DRL are on, only your DRL lamps will be on.
The taillamps, sidemarker and other lamps won’t be
on. The instrument panel won’t be lit up either.
When it begins to get dark, the automatic headlamp
system will switch from DRL to the headlamps.
When you turn the headlamp switch off, the headlamps
will go off, and your DRL lamps will illuminate,
provided it is not dark outside.
Shifting the transmission into PARK (P) will allow you to
idle the vehicle with the DRL off. The DRL will stay
off until you shift the transmission out of PARK (P).
This procedure applies only to vehicles �rst sold in the
United States.
Automatic Headlamp System
When it is dark enough outside, your automatic
headlamp system will turn on your headlamps at the
normal brightness along with other lamps such as
the taillamps, sidemarker, parking lamps and the
instrument panel lights. The radio lights will also
be dim.To turn off the automatic headlamp system, turn the
exterior lamps switch to the off position and then
release. Turning off the automatic headlamp system
with the headlamp switch is not available for vehicles
�rst sold in Canada. For vehicles �rst sold in Canada,
you can turn off the automatic headlamp system
when parked at night by applying the parking brake
before starting your vehicle. The headlamps will remain
off once the vehicle is started for as long as you are
parked. If you release the parking brake, the lights will
turn on. If the parking brake is not released before
you begin to drive, the exterior lamps will turn on above
2 mph (3.2 km/h).
Your vehicle is equipped with a light sensor located on
the top of the instrument panel in the defroster grille.
Be sure it is not covered, or the system will be on
whenever the ignition is on.
The system may also turn on your headlamps when
driving through a parking garage, heavy overcast
weather or a tunnel. This is normal.
3-15
Page 198 of 580

Instrument Panel Cluster
Your instrument cluster is designed to let you know at a glance how your vehicle is running. You will know how fast you
are going, about how much fuel you have and many other things you will need to know to drive safely and economically.United States Heavy Duty Automatic Transmission version shown.
Canada, Light Duty Automatic and Manual Transmission Clusters similar.
3-32
Page 229 of 580

TURN SIGNAL ON
If a turn signal is left on for 3/4 of a mile (1.2 km),
this message will appear on the display and you will
hear a chime. Move the turn signal/multifunction lever to
the off position. Pressing any of the four DIC buttons,
if equipped, will acknowledge the message and
clear it from the DIC display. If your vehicle is not
equipped with the four DIC buttons, pressing the trip
odometer reset stem will acknowledge the message
and clear it from the DIC display.
DIC Vehicle Customization
Your vehicle may have customization capabilities that
allow you to program some features to one setting
based on your preference. All of the customizable
options listed may not be available on your vehicle.
Only the options available will be displayed on
your Driver Information Center (DIC).
The default settings for the customization features were
set when your vehicle left the factory, but may have
been changed from their default state since then.
To change feature preferences, make sure the ignition
is on and the vehicle is in PARK (P). Press the
customization button to scroll through the available
customizable options.
After pressing the customization button, VEHICLE
SETTINGS will momentarily display before going to a
customization option.
Lock Doors
(Automatic Transmission only)
If you have an automatic transmission vehicle, press the
customization button until LOCK DOORS appears in
the display. To select your preference for automatic
locking, press the select button while LOCK DOORS is
displayed on the DIC. Pressing the select button will
scroll through the following choices:
LOCK DOORS: IN GEAR (default):The doors will lock
when the vehicle is shifted out of PARK (P).
LOCK DOORS: WITH SPEED:The doors will lock
when the vehicle speed is above 8 mph (13 km/h) for
three seconds.
Choose one of the available options and press the
customization button while it is displayed on the DIC to
select it and move on to the next feature. For more
information on automatic door locks, seeProgrammable
Automatic Door Locks on page 2-11.
3-63