Page 77 of 194

RADIO73
General operation
RADIO, CD
NAME, TEL
NAV, INFO
CAR, SETUP
Applies to vehicles: with Satellite Digital Audio Radio ServiceDelete stored stationsDelete individual stations
– Press the function button in the satellite radio
menu.
–Select Delete stored stations �page 71, fig.72.
–Select Delete individually.
– Rotate and press the control knob to delete individual
stations from the memory list.
Delete all stations
– Press the function button in the satellite radio
menu.
–Select Delete stored stations.
–Select Delete all. All entries on the memory list are
deleted.Applies to vehicles: with Satellite Digital Audio Radio ServiceSystem informationThe following system messages can be displayed:XM Satellite Radio
Sirius Satellite Radio
SETUPSETUP
System mes-
sages
Meaning
ANTENNA
No antenna is connected to the tuner, or
there are loose plug contacts on the
antenna cable.
UPDATING
Your system is being updating.
NO SIGNAL
The tuner is presently not receiving any
satellite signal.
LOADING
Yo u r p ro v i d e r i s s e n d i n g i n fo r ma t i o n w h ich
the system is currently storing.
OFF AIR
The station selected has shut down its pro-
gram (e.g. children's channel at night)
INVALID
The channel is invalid or not used.
System mes-
sages
Meaning
LINKING
The tuner is presently not receiving any
satellite signal.
CALL 888-539-SIRIUS
TO SUBSCRIBE
First possibility: the tuner has not been
enabled yet. Second possibility: the station
selected is not enabled, for example
because the station requires a subscrip-
tion.
Page 107 of 194
NAME (directory) 102
– Search and select the entry that is to be changed
�page 101, fig.105 and make your changes.Selecting a text field automatically activates a speller which allows
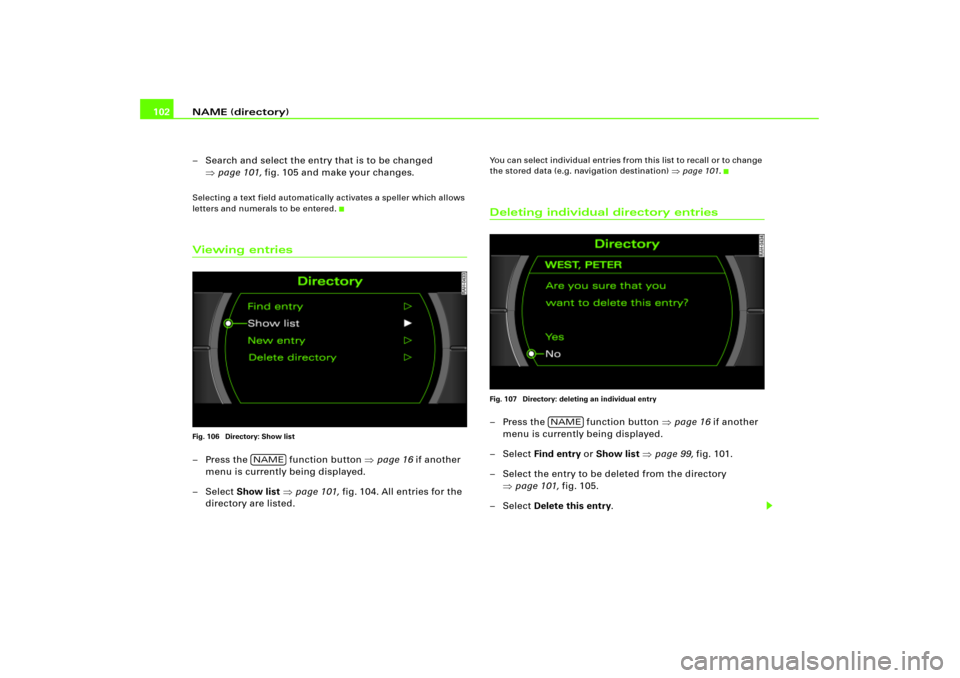
letters and numerals to be entered.Viewing entriesFig. 106 Directory: Show list– Press the function button �page 16 if another
menu is currently being displayed.
– Select Show list �page 101, fig.104. All entries for the
directory are listed.
You can select individual entries from this list to recall or to change
the stored data (e.g. navigation destination)
�page 101.
Deleting individual directory entriesFig. 107 Directory: deleting an individual entry– Press the function button �page 16 if another
menu is currently being displayed.
– Select Find entry or Show list �page 99, fig.101.
– Select the entry to be deleted from the directory
�page 101, fig.105.
– Select Delete this entry.
NAME
NAME
Page 108 of 194
NAME (directory)103
General operation
RADIO, CD
NAME, TEL
NAV, INFO
CAR, SETUP
–Confirm Are you sure you want to delete this entry? w ith
Ye s. The selected directory entry is deleted.Deleting all directory entriesFig. 108 Directory: Delete directory– Press the function button �page 16 if another
menu is currently being displayed.
–Select Delete directory �fig.108.
–Confirm Are you sure you want to delete all entries from
the directory? with Ye s. All directories entries are
deleted.
Setting directory navigation destinationFig. 109 Directory: Select category
Fig. 110 Directory: Enter navigation destination for an entry
NAME
Page 121 of 194
Navigation (NAV) 116
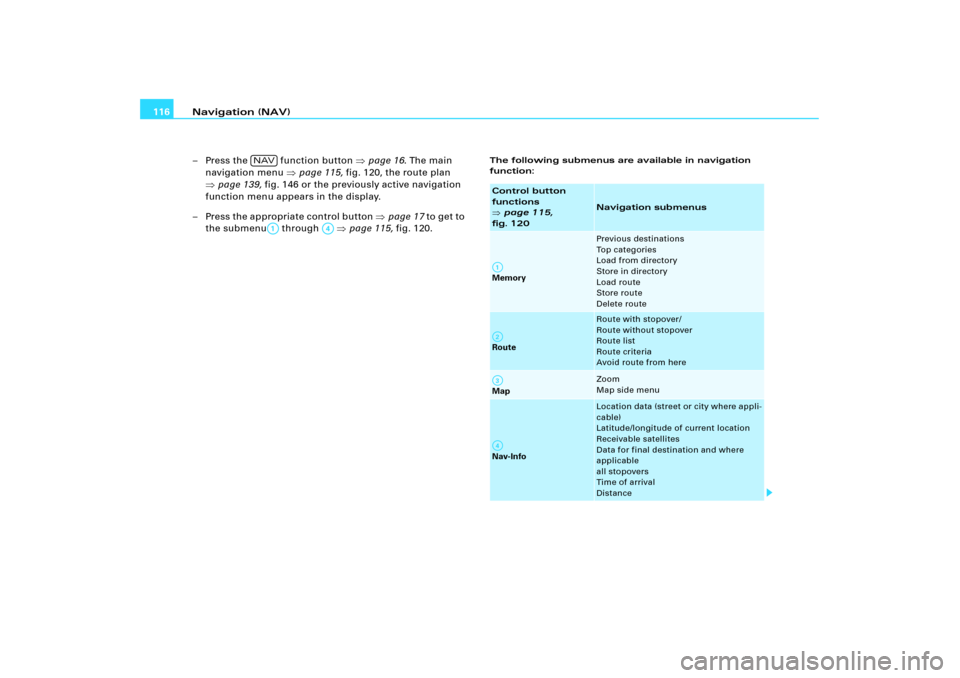
– Press the function button �page 16. The main
navigation menu �page 115, fig.120, the route plan
�page 139, fig.146 or the previously active navigation
function menu appears in the display.
– Press the appro priate control button �page 17 to get to
the submenu through �page 115, fig.120.
The following submenus are available in navigation
function:
NAV
A1
A�
Control button
functions �
page 115,
fig. 120
Navigation submenus
Memory
Previous destinations
To p c a t e g o r i e s
Load from directory
Store in directory
Load route
Store route
Delete route
Route
Route with stopover/
Route without stopover
Route list
Route criteria
Avoid route from here
Map
Zoom
Map side menu
Nav-Info
Location data (street or city where appli-
cable)
Latitude/longitude of current location
Receivable satellites
Data for final destination and where
applicable
all stopovers
Time of arrival
Distance
A1A�A A�
Page 122 of 194
Navigation (NAV)117
General operation
RADIO, CD
NAME, TEL
NAV, INFO
CAR, SETUP The following submenus are available in navigation
Setup function:
Main navigation menuEntering a navigation destination
Destinations can be easily entered in various ways.Fig. 121 Navigation: Destination entry menu (main menu)First determined whether you would like to navigate to a final desti-
nation with or without stopovers
�page 139. After you have
decided on the type of guidance (with/without stopovers), you can
enter a destination over different routes. Entering destination data
in the entry menu
�fig.121 is handled in the same way in single
destination and route planning mode.
Navigation submenus
Press the
function button in
the NAV function �page 151
Map scheme (day/night)
Orientation
Map type
Map contents
Voice information
Delete previous destinations
Turn list
Highway info
Intersection map
Auto intersection zoom
Compass
Version information
Demo mode
Set position/direction
SETUP
Page 124 of 194
119
General operation
RADIO, CD
NAME, TEL
NAV, INFO
CAR, SETUP
– Press the function button �page 16.
– Press the control button with the Route function.
–Select Route without s")
Navigation (NAV)119
General operation
RADIO, CD
NAME, TEL
NAV, INFO
CAR, SETUP
– Press the function button �page 16.
– Press the control button with the Route function.
–Select Route without stopover to switch to single desti-
nation mode �page 119 �page 139. The destination
entry menu �page 117, fig.121 appears, or
–Select Route with stopover to switch to route plan
�page 121 and then select Destin.. The destination
entry menu �page 117, fig.121 appears.
–Select Region �page 118, fig.122.
–Select another Region from the list �page 118, fig.123
by rotating and pressing the control knob.When selecting a country, destination data (street, city and catego-
ries) that was previously stored in the destination entry menu is
deleted.
Entering single destination (Route without stopover)Fig. 124 Navigation: Entering the destination using the speller–Press the function button �page 16.
– If necessary,Press the control button with the Route fu n c -
tion and confirm the Route without stopover function to
s w i t ch to si n g l e d e st i n at i o n m o de �page 139. Th e de s t i -
nation input menu �page 117, fig.121 appears.
– Select ggf. Region �page 118.
– Select City and enter the name using the speller,
�fig.124 or
– In the speller display, select LIST �fig.124 and select
the city from the list.
NAV
NAV
Page 128 of 194
Navigation (NAV)123
General operation
RADIO, CD
NAME, TEL
NAV, INFO
CAR, SETUP
Destination input street
Wi thi n a se le cted reg ion, a stre et c an b e select ed e ve n
without specifying a city.Fig. 126 Navigation: Entering a street as destination using the spellerFig. 127 Navigation: Set more detailed street information
– In a destination input menu �page 117, fig.121, select
another Region �page 118 from the list by rotating and
pressing the control knob or confirm the region already
being shown. This deletes all existing entries in the desti-
nation input menu �page 117, fig.121.
– Select Street �page 117, fig.121 and enter the street
name using the speller, or
– In the speller display, select LIST �fig.126 and select
the street from the list.
– Select a location from the following list.
– Select End entry �fig.127.
– Geben Sie ggf. Enter stopovers for route guidance with
stopovers �page 139.
Page 129 of 194
 124
– Select Start route guidance �page 129.I f y o u s e l e c t a re g io n
�page 118, existing entries in the destination
input menu
�page 117, fig.121 (city, street and sp")
Navigation (NAV) 124
– Select Start route guidance �page 129.I f y o u s e l e c t a re g io n
�page 118, existing entries in the destination
input menu
�page 117, fig.121 (city, street and special destina-
tion) are deleted. This allows you to search for a street within a
region.
If the street entered exists in different cities, these cities are listed
for you. Select one of the cities suggested.
After selecting the street, you can set more detailed destination
criteria by entering an Intersection or a Street number
�page 128.Destination input cityFig. 128 Navigation: Entering the destination using the spellerFig. 129 Navigation: More information about destination
– In a destination input menu �page 117, fig.121, enter
another Region as applicable �page 118.
– Select City.
– Using the speller, enter the desired city �page 119,
fig.124 and confirm the city entry with OK, or
– In the speller display, select LIST and select the city from
the list.
– Select Select city center �fig.129 to navigate to the
center of the selected locality.
– Select Start route guidance �page 129.Instead of the city center, you can also enter the street, select a
special destination in the city or select on the map display.
103
General operation
RADIO, CD
NAME, TEL
NAV, INFO
CAR, SETUP
–Confirm Are you sure you want to delete this entry? w ith
Ye s. The selected directory entry is deleted.Deleting all")
117
General operation
RADIO, CD
NAME, TEL
NAV, INFO
CAR, SETUP The following submenus are available in navigation
Setup function:
Main navigation menuEntering a navigation destination")
123
General operation
RADIO, CD
NAME, TEL
NAV, INFO
CAR, SETUP
Destination input street
Wi thi n a se le cted reg ion, a stre et c an b e select ed e ve n
without specifying a city.")