Page 200 of 491

4-11
Climate control
– CONTINUED –
Semi-automatic climate control sys-
tem (if equipped)
With the fan speed control dial in the “AUTO” position,
the climate control system automatically controls the
air temperature and fan speed to achieve and main-
tain the desired interior temperature, which is set with
the temperature control dial.
The temperature can be set within a range of 65 ° –
85 °F (18 ° – 32 °C).
NOTE
The temperature is shown in units of Fahrenheit
for the US model and in Centigrade for the Canadi-
an model.
NOTE
The automatic climate control system functions
only when the engine is running. !
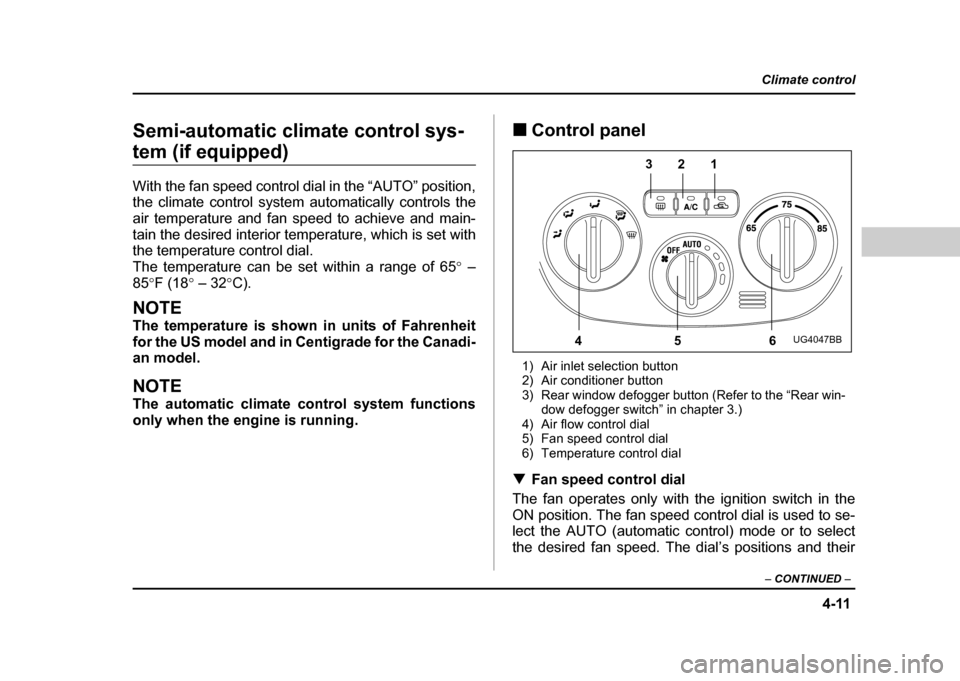
Control panel
1) Air inlet selection button
2) Air conditioner button
3) Rear window defogger button (Refer to the “Rear win- dow defogger switch” in chapter 3.)
4) Air flow control dial
5) Fan speed control dial
6) Temperature control dial
! Fan speed control dial
The fan operates only with the ignition switch in the
ON position. The fan speed control dial is used to se-
lect the AUTO (automatic control) mode or to select
the desired fan speed. The dial’s positions and their
321
456
UG4047BB
Page 202 of 491
4-13
Climate control
– CONTINUED –
!Air inlet selection button
ON position (Recirculation): Interior air is recirculat-
ed inside the vehicle. Push the air inlet selection but-
ton to the ON position for fast cooling with the air con-
ditioner or when driving on a dusty road. The indicator
light will come on.
OFF position (Outside Air): Outside air is drawn into
the passenger compartment. Push the air inlet selec-
tion button to the OFF position when the interior has
cooled to a comfortable temperature and the road is
no longer dusty. The indicator light will go off.
Continued operation in the ON position may fog
up the windows. Switch to the OFF position as
soon as the outside dusty condition clears.
! Air conditioner button
The button’s positions and their functions are as fol-
lows:
ON: The air conditioner operates while the fan is run-
ning.
Push the button to select this position. The indicator
light will illuminate.
UG4048BA
UG4517BA
Page 215 of 491
5-2
Audio
AudioAntenna system !
Printed antenna
Do not use sharp instruments or window clean-
er containing abrasives to clean the inner sur-
face of the window on which the antenna is
printed. Doing so may damage the antenna
printed on the window.
! Sedan The antenna is printed on the inside of the rear window glass. !
Wagon and OUTBACK SPORT
The antenna is printed on the inside of the rear window glass. ! FM reception
Although FM is normally static free, reception can be
affected by the surrounding area, atmospheric condi-
tions, station strength and transmitter distance. Build-
ings or other obstructions may cause momentary stat-
ic, flutter or station interference. If reception continues
to be unsatisfactory, switch to a stronger station.
UG5032BA
UG5502CA
Page 218 of 491
5-5
Audio
– CONTINUED –
Type A audio set (if equipped)
The radio will operate only when the ignition switch is in the “ACC” or “ON” position. !Radio operation
(1)
(6) (5)
(2)
(3) (4)
US5510BB
(1) SCAN button
(2) Power switch, Volume control,
Bass/Middle/Treble control and
Fader/Balance control dial
(3) Tuning buttons
(4) FM/AM selection button
(5) Preset buttons
(6) Tone/Balance button
Page 219 of 491
5-6
Audio
!
Power switch and volume/bass/treble/fader/
balance control (PWR/VOL)
The dial (2) is used for both power (ON/OFF) and vol-
ume control. The radio is turned ON and OFF by push-
ing the dial and the volume is controlled by turning the
dial. " Tone and balance control
The “VOLUME” control knob normally function as vol-
ume control. This knob become a control for Treble,
Bass, Fader or Balance when you select the appropri-
ate audio mode.
Choose desired volume level for each mode by turning
the “VOLUME” control knob. The control function re-
turns to volume control mode after about 5 seconds.
To change control modes: Each brief press of the
“T/B” button changes control modes in the following
sequence starting from volume control mode. (When
the radio is first turned on, the control mode is in the
volume control.)
Volume
(VOL) Bass(BAS)Treble(TRE)Balance(BAL)
Fader
(FAD)
Page 225 of 491

5-12
Audio
mode, press the button again. Then the “RPT” indica-
tor goes out, and normal playback mode is restored. !
Random playback
Press the “RPT/RDM” button (10) and hold it in for
more than 2 seconds while a disc is being played back
to play all songs on the disc in a random order. The
“RDM” indicator will come on and all songs on the disc
will be played in a random order.
To cancel the random mode, press the button again.
Then the “RDM” indicator goes out, and normal play-
back mode is restored. ! To eject a disc from the player
When a disc is being played back or when a disc is in
the player, press the eject button “ ” (7). The disc
will be ejected.
The disc may be removed even when the ignition
switch is in the “LOCK” position.
NOTE
Avoid driving the vehicle with a CD sticking out,
because vibration might make it fall out. !
CD changer control (If optional in-dash
CD changer is connected)
An optional CD changer can be connected to this au-
dio unit. Consult the instructions that accompany the
CD changer for operating the CD changer itself (e.g.,
how to load or unload CDs). See your SUBARU dealerfor more information.
Page 229 of 491
5-16
Audio
Type B audio set (if equipped)
The radio will operate only when the ignition switch is in the “ACC” or “ON”
position. !
Radio operation
(1) (2) (3)
(8) (7) (6) (5) (4)
UG5031BB
(1) FM button
(2) AM button
(3) SCAN button
(4) Tuning knob
(5) Preset buttons
(6) Fader/Balance selection button
(7) Power switch, Volume control, Bass/Treble control and Fader/
Balance control dial
(8) Bass/Treble selection button
Page 230 of 491
5-17
Audio
– CONTINUED –
!Power switch and volume/bass/treble/fader/
balance control (PWR/VOL)
The dial (7) is used for both power (ON/OFF) and vol-
ume control. The radio is turned ON and OFF by push-
ing the dial and the volume is controlled by turning the
dial.
This dial is used for bass/treble controls when the “BAS/TRE” button (8) is in the depressed position. It is
also used for fader/balance controls when the “BAL/
FAD” button (6) is in the depressed position.