2004 SUBARU IMPREZA WRX start stop button
[x] Cancel search: start stop buttonPage 120 of 491
2-17
Keys and doors
– CONTINUED –
7. Close the door. An electronic chirp will sound one
time, the turn signal lights will flash one time and the
indicator light will start flashing slowly (approximately
once every two seconds) to inform you that the system
has armed.
NOTE
The system can be armed even if the engine hood
and/or the windows are opened. Always make
sure that they are fully closed before arming the
system. !Disarming the system
Briefly press the “UNLOCK/DISARM” button (for less
than two seconds) on the remote transmitter. The driv-
er’s door will unlock, an electronic chirp will sound two
times, the turn signal lights will flash two times and the
indicator light will go off.
To unlock all other doors (and the rear gate on the
wagon), briefly press the “UNLOCK/DISARM” button a
second time. ! Emergency disarming
If you cannot disarm the system using the transmitter
(i.e. the transmitter is lost, broken or the transmitter
battery is too weak), you can disarm the system with-
out using the transmitter. To disarm the system:
1. Unlock the door with the key and then open the
door.
2. The alarm will sound.
3. Insert the key into the ignition switch and cycle it
from the “LOCK” to the “ON” position three (3) times
within 5 seconds
.
! Valet mode
When you choose the valet mode, the security system
does not operate. In valet mode, the remote transmit-
ter is used only for locking and unlocking the doors
(and rear gate on the wagon) and panic activation.
To enter the valet mode, open the driver’s door and
keep the “UNLOCK/DISARM” button depressed for
more than two seconds . The security system status
indicator light will continue to flash two times per sec-
ond indicating that the system is in the valet mode.
To exit valet mode, open the driver’s door and keep
the “UNLOCK/DISARM” button pressed for more
than two seconds . The indicator will stop flashing.
NOTE
If the remote transmitter is used to lock or unlock
the doors while the valet mode is selected, the
turn signal lights do not flash but an electronic
Page 224 of 491
5-11
Audio
– CONTINUED –
!To play back a compact disc
" When CD is not in the player
Hold a disc with a finger in the center hole while grip-
ping the edge of the disc, then insert it in to the slot
(with the label side up) and the player will automatical-
ly pull the disc into position.
A single CD (8 cm/3 inch CD) may also be used with-
out any adapter.
NOTE " Make sure to always insert a disc with the label
side up. If a disc is inserted with the label side
down, it might be ejected or the player might shut off." After the last song finishes, the player will auto-
matically return to track 1 (the first song on the
disc). " When CD is in the player
Press the “DISC” button (9). The display will show
“CD” and the player will start playback.
NOTE
After the last song finishes, playback will automat-
ically return to track 1 (the first song on the disc). !
To select a song from its beginning
" Forward direction
Briefly press the “ ” button (11) to skip to the begin-
ning of the next track. Each time the button is pressed,
the indicated track number will increase. " Backward direction
Briefly press the “ ” button (11) to skip to the begin-
ning of the current track. Each time the button is
pressed, the indicated truck number will decrease. ! Fast forwarding and fast reverse
" Fast forwarding
Press the “ ” button (11) continuously for more than
1 second to fast forward the disc.
Release the button to stop fast forwarding. " Fast reverse
Press the “ ” button (11) continuously for more than
1 second to fast reverse the disc.
Release the button to stop fast reverse. ! Repeat playback
Press the “RPT/RDM” button (10) and release it in less
than 2 seconds while a song is playing to play the song
repeatedly. The “RPT” indicator will come on and the
song will be played continuously. To cancel the repeat
Page 227 of 491
5-14
Audio
!
To start playback
When the “CD” button (13) is pressed, the CD changer
will start playback. The display shows the current disc
number, track number and the elapsed time during
playback.
NOTE " If a disc is in the player, the “DISC” button is
used to change from CD player operation to DISC
changer operation. Each time the “DISC” button is
pressed, the operating mode will change alter-
nately. " At the end of the disc, the player automatically
continues with the next disc. " After playback on the last disc finishes, play-
back will automatically return to the first disc. " If you have loaded fewer than 6 discs, any miss-
ing disc is automatically skipped. ! Selection of a desired disc
You can select a desired disc from among the discs
contained in the CD changer only by pressing the cor-
responding number on one of the disc select buttons.
If you are to listen to the 5th disc in the CD changer,
press the “5” button of the disc select buttons. All other
discs in the CD changer can also be selected in a sim-
ilar way.
NOTE " No disc change takes place if the button corre-
sponding to the storage tray in which no disc is
loaded is pressed." If the disc select button corresponding to the
disc now in playback is pressed again, the disc
will be replayed from its beginning. ! To select a song from its beginning
" Forward direction
Briefly press the “ ” button (12) to skip to the begin-
ning of the next track. Each time the button is pressed,
the indicated track number will increase. " Backward direction
Briefly press the “ ” button (12) to skip to the begin-
ning of the current track. Each time the button is
pressed, the indicated track number will decrease. ! Fast forwarding and fast reverse
" Fast forwarding
Press the “ ” button (12) continuously for more than
1 second to fast forward the disc.
Release the button to stop fast forwarding.
If you continue fast forwarding to the end of the disc,
the CD changer will automatically stop fast forwarding
and start playback beginning with the first track on the
Page 228 of 491
5-15
Audio
– CONTINUED –
current disc. "Fast reverse
Press the “ ” button (12) continuously for more than
1 second to fast reverse the disc.
Release the button to stop fast reverse.
If you continue fast reverse to the beginning of the
disc, the CD changer will automatically stop fast re-
verse and start playback beginning with the first track
on the current disc. ! Repeat playback
Use this to play a certain track repeatedly. During
playback, press the “RPT/RDM” button (14) and re-
lease it in less than 2 seconds. The “RPT” indicator will
come on and the song will be played continuously. To
cancel the repeat mode, press the button again. Then
the “RPT” indicator goes out, and normal playback
mode is restored. ! Random playback
Use this to play the tracks on the disc in random order.
During playback, press the “RPT/RDM” button (14)
and hold it in for more than 2 seconds. The “RDM” in-
dicator will come on and all songs on the disc will be
played in a random order.
To cancel the random mode, press the button again.
Then the “RDM” indicator goes out, and normal play- back mode is restored.
Page 236 of 491
5-23
Audio
– CONTINUED –
NOTE "Only use good quality cassettes (cassettes
longer than C-90 are not recommended). " Put cassettes back in their boxes immediately
after use to protect them from dust and dirt and to
prevent the tape from unwinding. " Never expose cassettes to heat, direct sunlight
or moisture. " Clean the tape head (once or twice a month) us-
ing a wet-type cleaning cassette .
! To play back a cassette tape
" When cassette tape is not in the player
When a cassette is partially inserted, it is automatically
drawn in and starts tape playback. " When cassette tape is in the player
When the “TAPE” button (12) is pressed, the display
will show “PLAY” and the player will start playback. ! Tape travel indicators
These indicate the direction the cassette tape is mov-
ing.
: indicates that the top side of the cassette is being
played back.
: indicates that the bottom side of the cassette is be-
ing played back. !
Program switching button (PROG)
When the program switching button “PROG” (16) is
pressed during playback, the tape travel indicators will
switch and the player will begin playing back the oppo-
site side of the tape. The same mechanism is auto-
matically activated when the end of the tape is
reached. This allows the opposite side of the tape to
play, providing continuous playback. ! Fast-forward button (FF)
To fast-forward the tape, press the “FF” button (15).
The display will show “FF”. To stop fast-forwarding,
press the “FF” or “TAPE” (12) button. ! Rewind button (REW)
To rewind the tape, press the “REW” button (17). The
display will indicate “REW”. To stop rewinding, press
the “REW” or “TAPE” (12) button. ! Eject button ( )
When “ ” button (10) is pressed, play back stops
and the cassette tape is ejected.
The ejection function also operates when the ignition
switch is in the “LOCK” position. Always make certain
that you remove the cassette tape.
Page 241 of 491
5-28
Audio
“TAPE” (12), the player will enter standby mode. Press
the “CD” button to start playback. "
Loading all the magazine (Full disc loading mode)
1. If you continue to press the “LOAD” button for more
than 1.5 seconds, the player will produce beep sound
and will enter the full disc loading mode.
2. A “DISC” indicator will blink, and the “IN” will be on
display for a period of 15 seconds. If a disc is success-
fully loaded during this period, the “DISC” indicator will
stop blinking and will steadily light.
3. When the loading of a disc is complete, the next
“DISC” indicator will blink. Then repeat Step 2.
4. When the magazine is filled with discs by repeating
Steps 2 and 3, the player will start playback of the
discs, beginning with the one inserted first.
If you fail to insert any disc during each 15-second in-
terval, the full disc loading mode will be canceled, and
the player will start playback of the disc inserted first. ! How to play back a CD or make a pause
" When there is no CD inserted:
Insert a CD by referring to “How to Insert a CD(s)”.
When a CD is loaded, the player will start playback of
the CD, beginning with the first number. "
When there are CDs loaded:
Press a desired one of the “DISC SELECT” buttons
(26) the “DISC” indicator of which steadily lights up.
The player will then start playback of the selected CD,
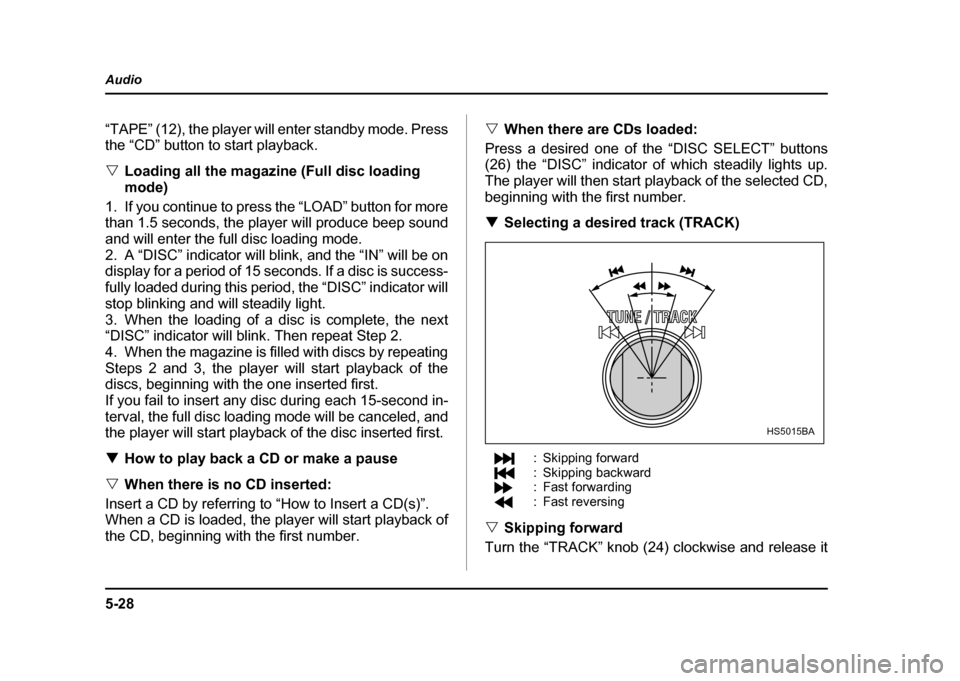
beginning with the first number. ! Selecting a desired track (TRACK)
: Skipping forward
: Skipping backward
: Fast forwarding
: Fast reversing
" Skipping forward
Turn the “TRACK” knob (24) clockwise and release it
HS5015BA