Page 196 of 491

4-7
Climate control
– CONTINUED –
gardless of the position of the air conditioner button to
defog the windshield quickly.
However, the air conditioner indicator light does not
come on at this time.
NOTE
Warm air also comes out from the right and left air
outlets. To stop warm air flow from these outlets,
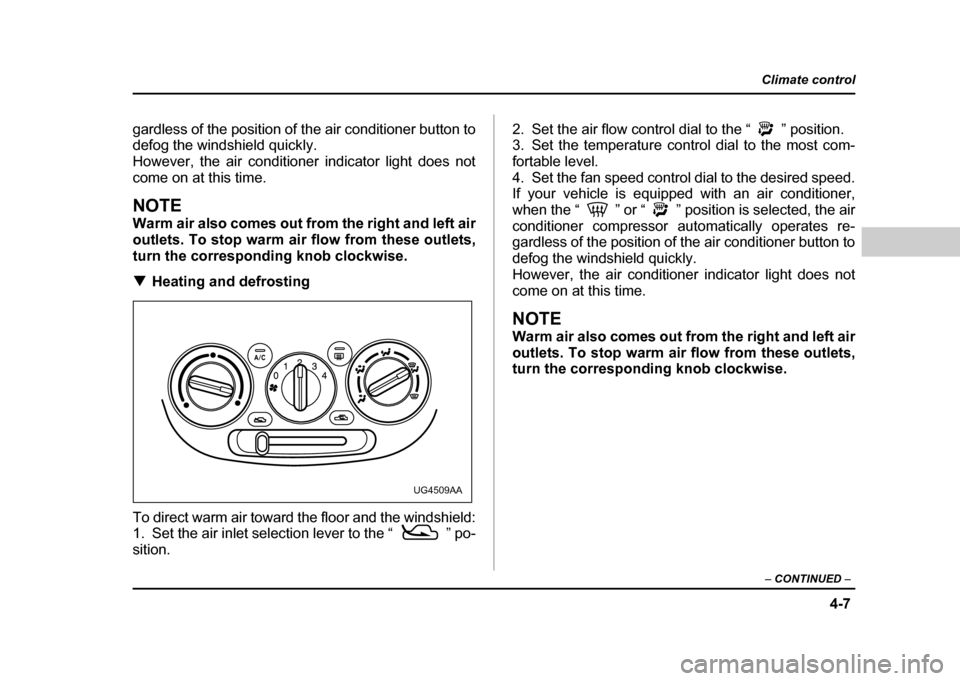
turn the corresponding knob clockwise. !Heating and defrosting
To direct warm air toward the floor and the windshield:
1. Set the air inlet selection lever to the “ ” po- sition. 2. Set the air flow control dial to the “ ” position.
3. Set the temperature control dial to the most com-
fortable level.
4. Set the fan speed control dial to the desired speed.
If your vehicle is equipped with an air conditioner,
when the “ ” or “ ” position is selected, the air
conditioner compressor automatically operates re-
gardless of the position of the air conditioner button to
defog the windshield quickly.
However, the air conditioner indicator light does not
come on at this time.
NOTE
Warm air also comes out from the right and left air
outlets. To stop warm air flow from these outlets,
turn the corresponding knob clockwise.
UG4509AA
Page 197 of 491

4-8
Climate control
!
Heating
To direct warm air toward the floor:
1. Set the air inlet selection lever to the “ ” po-sition.
2. Set the air flow control dial to the “ ” position.
3. Set the temperature control dial to the most com-
fortable level.
4. Set the fan speed control dial to the desired speed.
NOTE
Warm air also comes out from the right and left air
outlets. To stop warm air flow from these outlets,
turn the corresponding knob clockwise. !
Bi-level heating
This setting allows you to direct air of different temper-
atures from the instrument panel and foot outlets. The
air from the foot outlets is slightly warmer than from the
instrument panel outlets.
1. Set the air inlet selection lever to the “ ” po-sition.
2. Set the air flow control dial to the “ ” position.
3. Set the temperature control dial to the desired tem-perature level.
4. Set the fan speed control dial to the desired speed.
Setting the temperature control dial fully turned to the
red area or blue area decreases the temperature dif-
UG4510AAUG4511AA
Page 201 of 491

4-12
Climate control
functions are as follows:
OFF:
The fan does not operate.
AUTO: The fan speed is adjusted automatically in ac-
cordance with the air temperature inside and outside
the passenger compartment, the intensity of sunlight,
and other factors. Subaru recommends using the
AUTO position.
Other positions: The fan speed can be adjusted in
four steps.
NOTE
With the fan speed control dial in the AUTO posi-
tion and the air flow control dial in the “ ”,
“ ”, or “ ” position, the fan does not oper-
ate during engine warmup until the engine coolant
temperature exceeds approx. 122 °F (50 °C).
! Temperature control dial
This dial is used to set the desired interior tempera-
ture. With the dial set to your desired temperature, the
system automatically adjusts the temperature of air
supplied from the outlets such that the desired temper-
ature is achieved and maintained.
If the dial is turned fully counterclockwise, the system
gives maximum cooling performance. If the dial is
turned fully clockwise, the system gives maximum
heating performance. !
Air flow control dial
This dial has the following five positions. The outlets
from which air is supplied in each position are as fol-
lows:
: Instrument panel outlets: Instrument panel outlets and foot outlets
: Foot outlets and windshield defroster outlets (rel-
atively little air from windshield defroster outlets)
: Windshield defroster outlets and foot outlets
: Windshield defroster outlets
NOTE
When the dial is placed in the “ ” or “ ” po-
sition, the air conditioner compressor operates
automatically to defog the windshield quickly. At
the same time, the air inlet selection is automati-
cally set to “outside air” mode.
Page 204 of 491

4-15
Climate control
– CONTINUED –
1. Fan speed control dial: AUTO position
2. Air flow control dial: position
3. Air temperature control dial: desired position
4. Air inlet selection button: OFF position
5. Air conditioner button: OFF position
NOTE "To heat the passenger compartment rapidly, set
the air temperature control dial to the 85 (30) posi-
tion and the air inlet selection button to the ON po-
sition. When the passenger compartment has
warmed up sufficiently, return the air inlet selec-
tion button to the OFF position. " Warm air also comes out from the right and left
air outlets. To stop warm air flow from these out-
lets, turn the corresponding knob clockwise. !
Rapid cooling
To cool the passenger compartment rapidly, make the
following settings:
1. Fan speed control dial: All the way to the right
2. Air flow control dial: “ ” position
3. Air temperature control dial: 65 (20) position
4. Air inlet selection button: ON position
5. Air conditioner button: ON position
NOTE
From time to time, return the air inlet selection but-
ton to the OFF position to draw outside air into the
passenger compartment.
UG4041BA
Page 206 of 491

4-17
Climate control
– CONTINUED –
NOTE "For rapid defrosting or defogging, set the fan
speed control dial to the highest speed position. " If air supplied from the outlets is too cold, the
windshield may become fogged on the outside.
Turn up the air temperature control dial slightly if
this happens." Warm air also comes out from the right and left
air outlets. To stop warm air flow from these out-
lets, turn the corresponding knob clockwise. ! Heating and defrosting
To direct warm air toward the floor and windshield,
make the following settings: 1. Fan speed control dial: desired position
2. Air flow control dial: position
3. Air temperature control dial: in 75 – 85 (25 – 30)
range
When the dial is placed in the “ ” position, the air
conditioner compressor operates automatically to de-
fog the windshield quickly. At the same time, the air in-
let selection is automatically set to “outside air” mode.
However, the air conditioner does not operate auto-
matically when the dial is placed in the “ ” position
after the dial has been placed in the “ ” position
and the air conditioner has been turned off manually.
NOTE "
If air supplied from the outlets is too cold, the
windshield may become fogged on the outside.
Turn up the air temperature control dial slightly if
this happens. " Warm air also comes out from the right and left
air outlets. To stop warm air flow from these out-
lets, turn the corresponding knob clockwise.
UG4043AA
Page 220 of 491
5-7
Audio
– CONTINUED –
Display Control mode
Turn counterclockwise Turn clockwise
BAS Bass control For less bass For more bass
TRE Treble control For less treble For more treble
BAL Balance control To increase left speaker volume and
decrease right speaker volume To increase right speaker volume and
decrease left speaker volume
FAD Fader control To increase rear speaker volume and
decrease front speaker volume To increase front speaker volume and
decrease rear speaker volume
VOL Volume control For less volume For more volume
HS5014BA
Page 231 of 491
5-18
Audio
Display Control mode
Turn counterclockwise Turn clockwise
BAS Bass control For less bass For more bass
TRE Treble control For less treble For more treble
BAL Balance control To increase left speaker volume and
decrease right speaker volume To increase right speaker volume and
decrease left speaker volume
FAD Fader control To increase rear speaker volume and
decrease front speaker volume To increase front speaker volume and
decrease rear speaker volume
VOL Volume control For less volume For more volume
HS5014BA
Page 233 of 491

5-20
Audio
!
Manual tuning (TUNE)
: Tuning to a higher frequency
: Tuning to a lower frequency
Turn the tuning knob (4) clockwise and release it im-
mediately to increase the tuning frequency and turn
the tuning knob counterclockwise and release it imme-
diately to decrease the tuning frequency.
Each time the knob is turned, the frequency changes
10 kHz in the AM waveband and 0.2 MHz in the FM
waveband.
If you turn the tuning knob (4) clockwise and hold it in
that position, the tuning frequency will increase contin-
uously. If you turn the tuning knob counterclockwise and hold it in that position, the tuning frequency will de-
crease continuously. Release the knob to stop the in-
crease or decrease. !
Automatic tuning (SCAN)
Press the “SCAN” button (3) to change the radio to the
SCAN mode. In this mode, the radio scans through the
radio band until a station is found. The radio will stop
at the station for five seconds while displaying the fre-
quency, after which scanning will continue until the en-
tire band has been scanned from the low end to the
high end.
Press the “SCAN” button again to cancel the SCAN
mode and to stop on any displayed frequency.
When the “SCAN” button is pressed for automatic tun-
ing, stations are scanned in the direction of low fre-
quencies to high frequencies only.
Automatic tuning may not function properly if the sta-
tion reception is weakened by distance from the sta-
tion or proximity to tall buildings and hills. ! Selecting preset stations
Presetting a station with a preset button (5) allows you
to select that station in a single operation. Up to six
AM, FM1 and FM2 stations each may be preset. ! How to preset stations
1. Press the “FM/AM” selection button to select AM,
US5508CA