2004 SUBARU IMPREZA clock
[x] Cancel search: clockPage 128 of 491

2-25
Keys and doors
– CONTINUED –
Trunk lid (Sedan)
"To prevent dangerous exhaust gas from en-
tering the vehicle, always keep the trunk lid
closed while driving." Help prevent young children from locking
themselves in the trunk. When leaving the vehi-
cle, either close all windows and lock all doors
or cancel the inside trunk lid release. Also make
certain that the trunk is closed.
On hot or sunny days, the temperature in the
trunk could quickly become high enough to
cause death or serious heat-related injuries in-
cluding brain damage, particularly for small
children. !
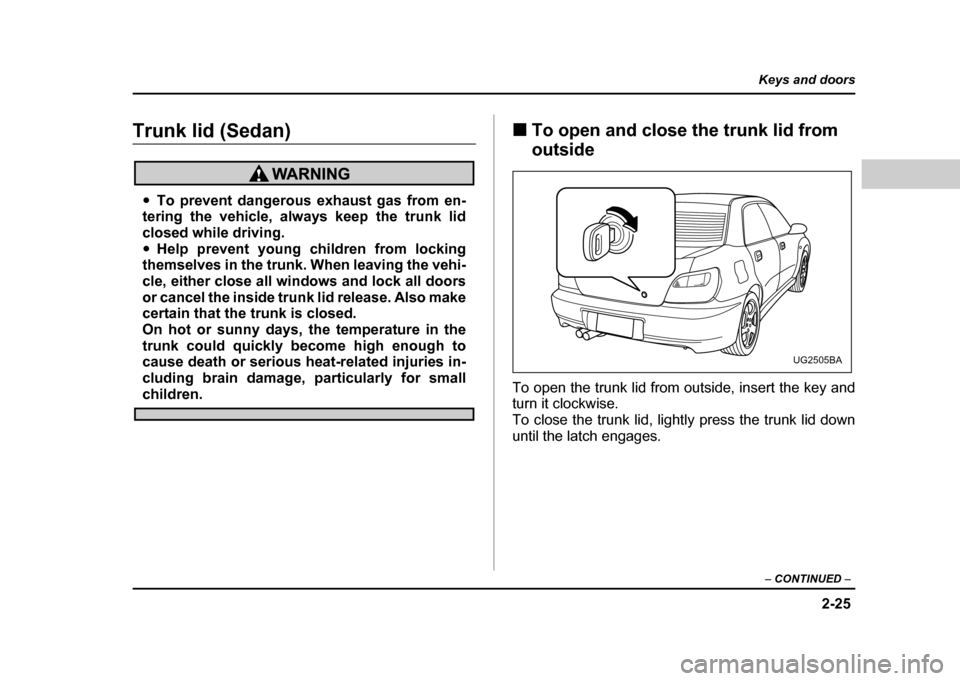
To open and close the trunk lid from
outside
To open the trunk lid from outside, insert the key and
turn it clockwise.
To close the trunk lid, lightly press the trunk lid down
until the latch engages.
UG2505BA
Page 138 of 491

3-1
3
Instruments and controls
Ignition switch .............................................. 3-3 LOCK .................................................................. 3-3
ACC .................................................................... 3-4
ON ....................................................................... 3-4
START ................................................................ 3-4
Key reminder chime .......................................... 3-4
Ignition switch light (if equipped) .................... 3-5
Key interlock release (AT vehicles only) ........ 3-5
Hazard warning flasher ................................ 3-6
Meters and gauges (WRX-STi) .................... 3-7 Combination meter illumination ...................... 3-7
Cancelling sequential illumination of the combination meter ......................................... 3-7
Speedometer ..................................................... 3-7
Odometer/Trip meter ........................................ 3-8
Tachometer ........................................................ 3-9
Fuel gauge ......................................................... 3-9
Temperature gauge ........................................... 3-10
Ambient temperature gauge ............................ 3-11
REV indicator light and buzzer (WRX-STi) . 3-12 Setting the alarm-level engine speed .............. 3-13
Deactivating the REV alarm system ................ 3-14
Meters and gauges (Except WRX-STi) ........ 3-15 Speedometer ..................................................... 3-15
Odometer/Trip meter ........................................ 3-15
Tachometer ........................................................ 3-16
Fuel gauge ......................................................... 3-16
Temperature gauge ........................................... 3-17
Ambient temperature gauge (if equipped) ...... 3-18
Warning and indicator lights ....................... 3-19 Seatbelt warning light and chime .................... 3-19 SRS airbag system warning light .................... 3-20
CHECK ENGINE warning light/Malfunction
indicator lamp ................................................. 3-20
Charge warning light ........................................ 3-21
Oil pressure warning light ............................... 3-21
AT OIL TEMPerature warning light (for AT vehicles) ............................................. 3-22
Rear differential oil temperature warning light
(WRX-STi) ........................................................ 3-22
ABS warning light ............................................. 3-23
Brake system warning light ............................. 3-24
Door open warning lights ................................ 3-25
Front-wheel drive warning light (for AT vehicles – if equipped) ...................... 3-25
Intercooler water spray warning light
(WRX-STi) ........................................................ 3-25
Selector lever position indicator (AT vehicles) 3-26
Turn signal indicator lights .............................. 3-26
High beam indicator light ................................. 3-26
Cruise control indicator light ........................... 3-26
Cruise control set indicator light .................... 3-26
Driver’s control center differential auto indicator light (WRX-STi) ............................... 3-26
Driver’s control center differential indicator
lights (WRX-STi) ............................................. 3-27
Headlight indicator light (WRX-STi) ................ 3-27
REV indicator light (WRX-STi) ......................... 3-27
Clock .............................................................. 3-28
Light control switch ...................................... 3-29 Headlights ......................................................... 3-29
High/low beam change (dimmer) .................... 3-30
Headlight flasher ............................................... 3-30
Page 144 of 491

3-7
Instruments and controls
– CONTINUED –
Meters and gauges (WRX-STi) !Combination meter illumination
When the ignition switch is turned to the “ON” position,
the various parts of the combination meter are illumi-
nated in the following sequence:
1. Meter needles and gauge needles light up.
2. Meter needles and gauge needles each show MAXposition.
3. Meter needles and gauge needles each show MIN
position, and REV indicator flashes.
4. Dials and indicators in meters and gauges light up.
5. “STi” mark lights up.
6. Regular illumination (for driving) begins. ! Cancelling sequential illumination of
the combination meter
With the ignition switch in the “ON” position, it is pos-
sible to cancel sequential illumination of the combina-
tion meter.
Press the trip knob while turning the REV setting knob
clockwise or counterclockwise. The buzzer will sound
briefly, and the ambient temperature gauge will show
“ON” or “– –”.
ON : sequential illumination – – : sequential illumination cancelled
The setting toggles between “ON” and “– –” each time
the trip knob is pressed.
Return the REV setting knob to its original position to
complete the setting process. The buzzer will sound
briefly. A few seconds later, the ambient temperature
gauge will return to showing the ambient temperature.
NOTE
It is not possible to cancel sequential illumination
of the combination meter while sequential illumi-
nation is actually taking place. Cancel sequential
illumination when regular illumination (for driving)
has begun. !
Speedometer
The speedometer shows the vehicle speed.
Page 150 of 491

3-13
Instruments and controls
– CONTINUED –
speed enters the tachometer’s red zone. !Setting the alarm-level engine speed
1. Turn the REV setting knob clockwise or counter-
clockwise, then release it and let it return to its initial
position. The buzzer will sound. The REV alarm sys-
tem is now ready to be set.
2. Turn the REV setting knob to select the desired
alarm-level engine speed.
At this time, the ambient temperature gauge will show
the engine-speed setting. "Counterclockwise ( −) for less than 0.5 second:
Speed setting changes downward by 100 rpm. "
Clockwise (+) for less than 0.5 second: Speed
setting changes upward by 100 rpm." Counterclockwise ( −) for 0.5 second or longer:
Speed setting changes downward by 1,000 rpm. " Clockwise (+) for 0.5 second or longer: Speed
setting changes upward by 1,000 rpm.
The speed setting will stop changing if it reaches 0
rpm or the maximum engine speed.
The alarm-level engine speed can be set (in 100 rpm
steps) within a range from 2000 rpm to 7500 rpm.
The indicator shows the setting as follows:
Approximately three seconds after you stop turning
the knob, the REV alarm system will automatically en-
ter its next setting mode (step 3 below), in which you
can enable or disable the buzzer.
3. Enable or disable the buzzer as desired using the REV setting knob. "Turn the knob clockwise (+) to enable the buzzer.
The indicator will show “ON”, and the buzzer will
sound three times. With the buzzer enabled, en-
UG3036AA
Speed (rpm) 0 2000 2100 ∼7400 7500
Indication 00 20 21 ∼74 75
Page 151 of 491

3-14
Instruments and controls
gine-speed warnings are given by both the REV in-
dicator light and the buzzer. "
Turn the knob counterclockwise ( −) to disable the
buzzer. The indicator will show “– –”, and the buzzer
will not sound. With the buzzer disabled, engine-
speed warnings are given only by the REV indicator
light.
Approximately three seconds after you stop turning
the knob, the buzzer will sound once to indicate the
end of the setting procedure. The indicator will return
to showing the ambient temperature.
Also, the tachometer needle will return to approxi- mately “0”.
NOTE " The REV alarm system does not operate while
settings are being entered. " The speed-setting mode terminates if 0 rpm is
selected." The speed-setting mode is canceled if the igni-
tion switch is turned to OFF or the vehicle starts
moving before the setting procedure is finished. " Speed setting is impossible when the vehicle is
moving. " The set engine speed may differ from the engine
speed shown by the tachometer. Use the engine
speed shown by the tachometer as a rough guide. !
Deactivating the REV alarm system
To deactivate the REV alarm system’s REV indicator
light and buzzer functions, set the alarm-level engine
speed to 0 (zero) rpm.
Page 165 of 491

3-28
Instruments and controls
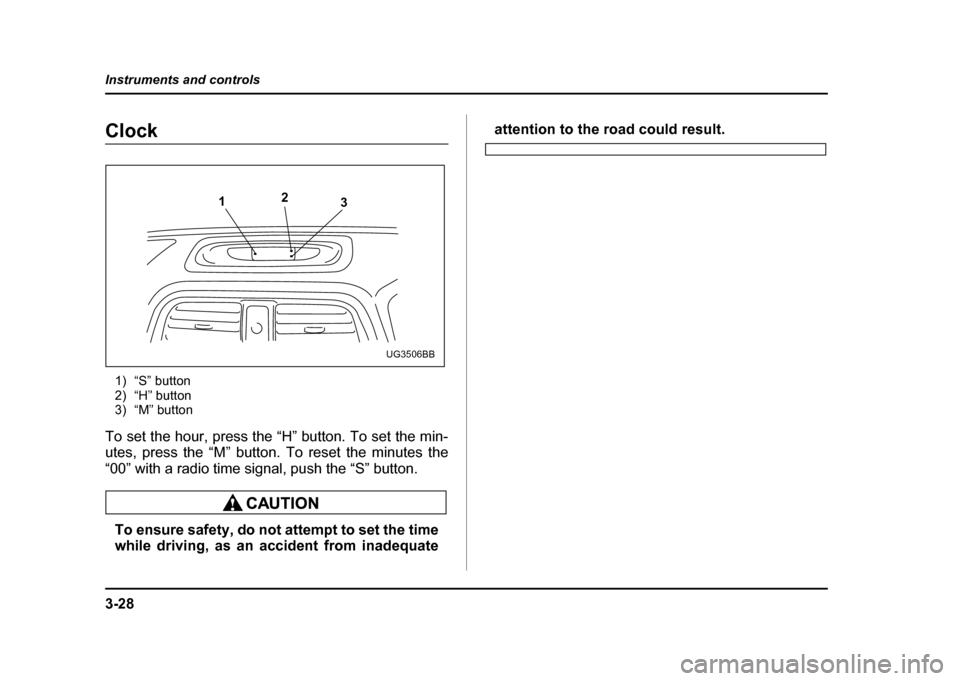
Clock
1) “S” button
2) “H” button
3) “M” button
To set the hour, press the “H” button. To set the min-
utes, press the “M” button. To reset the minutes the
“00” with a radio time signal, push the “S” button.
To ensure safety, do not attempt to set the time
while driving, as an accident from inadequate
attention to the road could result.
1 2
3
UG3506BB
Page 176 of 491

3-39
Instruments and controls
– CONTINUED –
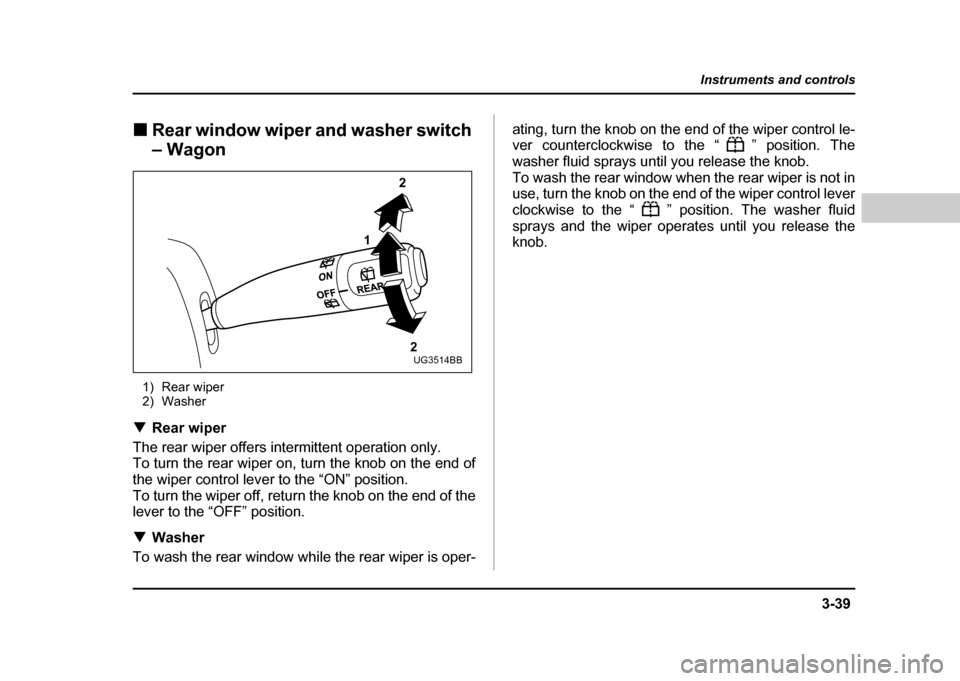
!Rear window wiper and washer switch – Wagon
1) Rear wiper
2) Washer
! Rear wiper
The rear wiper offers intermittent operation only.
To turn the rear wiper on, turn the knob on the end of
the wiper control lever to the “ON” position.
To turn the wiper off, return the knob on the end of the
lever to the “OFF” position. ! Washer
To wash the rear window while the rear wiper is oper- ating, turn the knob on the end of the wiper control le-
ver counterclockwise to the “ ” position. The
washer fluid sprays until you release the knob.
To wash the rear window when the rear wiper is not in
use, turn the knob on the end of the wiper control lever
clockwise to the “ ” position. The washer fluid
sprays and the wiper operates until you release the
knob.
1
2
2
UG3514BB
Page 192 of 491

4-3
Climate control
– CONTINUED –
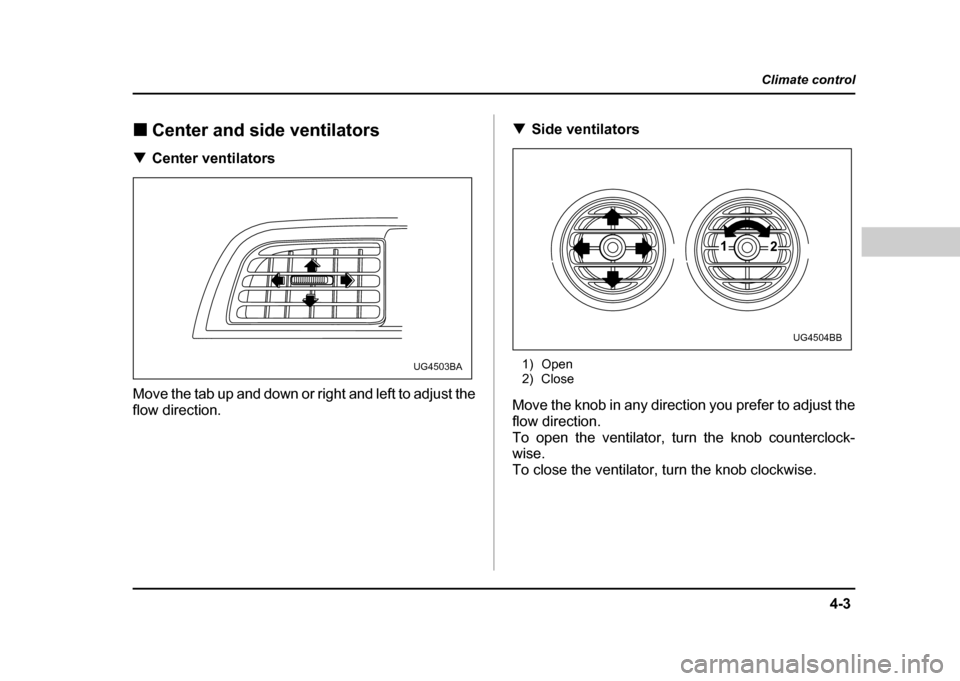
!Center and side ventilators
! Center ventilators
Move the tab up and down or right and left to adjust the
flow direction. !
Side ventilators
1) Open
2) Close
Move the knob in any direction you prefer to adjust the
flow direction.
To open the ventilator, turn the knob counterclock- wise.
To close the ventilator, turn the knob clockwise.
UG4503BA
1 2
UG4504BB