2004 PONTIAC BONNEVILLE display
[x] Cancel search: displayPage 94 of 446
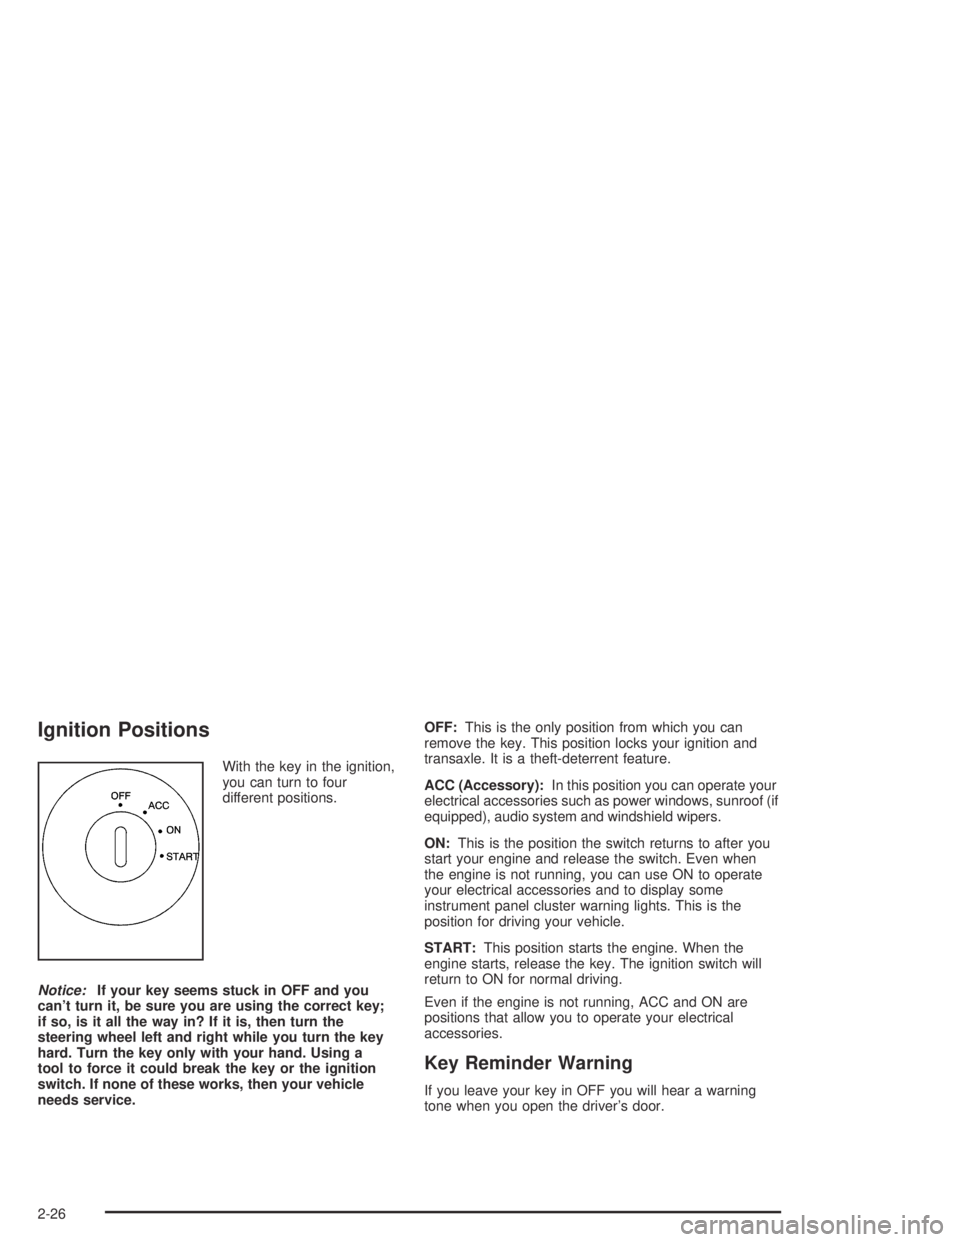
Ignition Positions
With the key in the ignition,
you can turn to four
different positions.
Notice:If your key seems stuck in OFF and you
can’t turn it, be sure you are using the correct key;
if so, is it all the way in? If it is, then turn the
steering wheel left and right while you turn the key
hard. Turn the key only with your hand. Using a
tool to force it could break the key or the ignition
switch. If none of these works, then your vehicle
needs service.OFF:This is the only position from which you can
remove the key. This position locks your ignition and
transaxle. It is a theft-deterrent feature.
ACC (Accessory):In this position you can operate your
electrical accessories such as power windows, sunroof (if
equipped), audio system and windshield wipers.
ON:This is the position the switch returns to after you
start your engine and release the switch. Even when
the engine is not running, you can use ON to operate
your electrical accessories and to display some
instrument panel cluster warning lights. This is the
position for driving your vehicle.
START:This position starts the engine. When the
engine starts, release the key. The ignition switch will
return to ON for normal driving.
Even if the engine is not running, ACC and ON are
positions that allow you to operate your electrical
accessories.
Key Reminder Warning
If you leave your key in OFF you will hear a warning
tone when you open the driver’s door.
2-26
Page 119 of 446

2. Adjust the driver’s seat and lumbar position to a
safe and comfortable driving position. Adjust both
outside mirrors to suit you. SeeDIC Vehicle
Personalization on page 3-64.
3. Press and hold the MEMORY button corresponding
with your DRIVER # displayed on the DIC for longer
than three seconds. You will hear two beeps
con�rming that the seat and mirror positions have
been entered into memory.
To set the seat and mirror positions for a second driver,
follow the previous steps, but start by pressing the
unlock button on the transmitter that displays the other
DRIVER # on the DIC. Be sure to use the MEMORY
button which corresponds to the DRIVER # identi�ed by
the second transmitter.
To recall your memory positions, your vehicle must be
in PARK (P). Push and release the MEMORY button
corresponding to the desired driving position. The seat
and mirrors will move to the position previously
stored for the identi�ed driver. You will hear one beep.
To store the exit position for an easy exit, use the
following procedure:
1. First identify the DRIVER # by pressing MEMORY
button 1 or 2 or by pressing the unlock button on
the transmitter.
2. Adjust the driver’s seat to the desired exit position.3. Press and hold the EXIT button for longer than
three seconds. You will hear two beeps con�rming
that the seat exit position has been entered into
memory.
To set the exit position for a second driver, follow the
previous steps, but start by pressing the unlock
button on the transmitter that displays the other
DRIVER # on the DIC. Be sure to use the MEMORY
button which corresponds to the DRIVER # identi�ed by
the other transmitter.
To recall the exit position, your vehicle must be in
PARK (P). Push and release the EXIT button and the
seat will move to the exit position previously stored
for the current identi�ed driver. You will hear one beep.
If an exit position has not been stored for the current
identi�ed driver, the seat will move all the way back.
To stop recall movement of the seat at any time, press
the driver’s power seat control located on the outboard
side of the front seat.
Mirrors and lumbar positions will not be stored or
recalled for the exit position.
If you would like your stored driving or exit position to
be recalled when unlocking your vehicle with the
transmitter, seeDIC Vehicle Personalization on
page 3-64.
2-51
Page 121 of 446
Instrument Panel Overview...............................3-4
Hazard Warning Flashers................................3-6
Other Warning Devices...................................3-6
Horn.............................................................3-7
Tilt Wheel.....................................................3-7
Turn Signal/Multifunction Lever.........................3-7
Windshield Wiper Lever.................................3-13
Exterior Lamps.............................................3-14
Interior Lamps..............................................3-18
Head-Up Display (HUD).................................3-22
Accessory Power Outlets...............................3-25
Ashtrays and Cigarette Lighter........................3-26
Climate Controls............................................3-27
Climate Control System.................................3-27
Automatic Climate Control System...................3-29
Outlet Adjustment.........................................3-34
Climate Controls Personalization.....................3-35
Warning Lights, Gages, and Indicators............3-36
Instrument Panel Cluster................................3-37
Speedometer and Odometer...........................3-39
Tachometer.................................................3-40
Safety Belt Reminder Light.............................3-40
Air Bag Readiness Light................................3-41
Voltmeter Gage............................................3-42Brake System Warning Light..........................3-42
Anti-Lock Brake System Warning Light.............3-44
Traction Control System (TCS) Warning Light......3-45
Low Traction Active Light...............................3-46
Engine Coolant Temperature Gage..................3-47
Tire Pressure Light.......................................3-48
Malfunction Indicator Lamp.............................3-48
Oil Pressure Gage........................................3-52
Check Oil Level Light....................................3-53
Security Light...............................................3-53
Low Washer Fluid Warning Light.....................3-53
Check Gages Warning Light...........................3-54
Door Ajar Light.............................................3-54
Trunk Ajar Light............................................3-55
Service Vehicle Soon Light............................3-55
Fuel Gage...................................................3-56
Systems Monitor............................................3-57
Driver Information Center (DIC).......................3-58
DIC Controls and Displays.............................3-58
DIC Warnings and Messages.........................3-61
Driver Identi�er DIC Display...........................3-63
DIC Vehicle Personalization............................3-64
Secondary Information Center (SIC).................3-70
Electronic Compass......................................3-70
Section 3 Instrument Panel
3-1
Page 138 of 446
Interior Lamps
Instrument Panel Brightness
When it is dark outside, you can brighten or dim your
instrument panel cluster lights using the DIM knob,
located to the left of the steering wheel on the instrument
panel.
Turn the knob clockwise to brighten the instrument
panel cluster lights and displays. Turn the knob
clockwise all the way to turn on the interior courtesy
lamps. Turn the knob counterclockwise to dim the
instrument panel cluster lights and displays and to turn
off the courtesy lamps.
Courtesy Lamps
If it is dark enough outside, when any door is opened,
several lamps will come on. They make it easier for you
to enter and leave the vehicle. Turn the dimmer knob all
the way clockwise to turn the interior courtesy lamps on.
Entry Lighting
If it is dark enough outside and you press the unlock
button on the remote keyless entry transmitter (if
equipped), the interior courtesy lamps will come on and
stay on for about 25 seconds. The lamps will turn off
immediately by pressing the lock button on the remote
keyless entry transmitter, by turning the ignition key
to ON or by activating the power door locks.
If a door is left ajar, your interior lamps will turn off after
10 minutes to save your battery.
Delayed Entry Lighting
When you open the door to enter your vehicle, the
interior lamps will come on if it is dark enough outside.
When you close the door with the ignition off, the
interior lamps will stay on for 25 seconds or until the
ignition is turned on. Locking the doors with the power
door lock switch, or with the lock button on the
remote keyless entry transmitter (if equipped), will
override the delayed entry lighting and the lamps will
turn off immediately.
3-18
Page 139 of 446
Theater Dimming
This feature allows for a three to �ve-second fade out of
the courtesy lamps instead of immediate turn off after
you remove the key from the ignition.
Delayed Exit Lighting
This feature will turn on the interior lamps for 25 seconds
after you remove the key from the ignition while the
doors are closed and it is night. This will give you time
to �nd the door handle or lock switches as you exit
the vehicle.
This lighting will only be deactivated if the key is
reinserted into the ignition switch or the power door
locks are activated.
Parade Dimming
To activate the instrument panel backlighting during the
day, turn the exterior lamp switch to the parking lamp or
headlamp position. Dimming of the instrument panel
display is not possible during daylight hours. The
instrument panel display can only be adjusted when the
parking lamps or headlamps are on and it is dark outside.
Perimeter Lighting
When the unlock button on the remote keyless entry
transmitter (if equipped) is pressed, the DRL headlamps,
parking lamps and back-up lamps will turn on if it is
dark enough outside.
Personal Choice Programming
This feature can be programmed in the on or off mode
for each transmitter.
If your vehicle is equipped with the Driver Information
Center (DIC), you must program this feature through the
DIC. SeeDIC Vehicle Personalization on page 3-64.
To turn the feature off do the following:
1. Keep all doors closed, the vehicle in PARK (P) and
the ignition on throughout this procedure.
2. Press and hold LOCK on the power door lock
switch throughout this procedure. All the doors
will lock.
3. Press the remote alarm button on the transmitter.
Perimeter lighting remains on at this time and the
horn will chirp twice.
4. Press the remote alarm button again. Perimeter
lighting is disabled and the horn will chirp once.
5. Release the door lock switch. The perimeter lighting
feature is now off.
3-19
Page 142 of 446
Battery Load Management
The battery load management feature is designed to
monitor the vehicle’s electrical load and determine when
the battery is in a heavy discharge condition. During
times of high electrical loading, the engine may idle at
higher revolutions per minute (RPM) than normal to make
sure the battery charges. High electrical loads may occur
when several of the following are on: headlamps, high
beams, fog lamps, rear window defogger, fan on high
speed, heated seats and engine cooling fans.
If your vehicle’s battery remains in a heavy discharge
condition for a long period of time, the fan, rear
defogger, heated seats and heated mirrors will be
disabled and the DIC will display BATTERY SAVER
ACTIVE. This can happen either under long periods of
idling or low speed driving with high electrical loading,
or in the event of a charging system fault.
Monitor the battery voltage when in the BATTERY
SAVER ACTIVE mode.
If the voltmeter remains in the shaded area (below
11 volts) when driving then have the charging
system serviced immediately.
If the voltage increases above 12 volts then the
battery needs to be recharged. Try driving on
the highway with as few electrical accessories on
as possible.
Head-Up Display (HUD)
{CAUTION:
If the HUD image is too bright, or too high in
your �eld of view, it may take you more time to
see things you need to see when it is dark
outside. Be sure to keep the HUD image dim
and placed low in your �eld of view.
If you have the optional Head-Up Display (HUD), you
can see some of the driver information also available on
your instrument panel cluster. The information may
be displayed in English or metric units and appears as a
re�ection on the windshield. The HUD shows the
following:
Speedometer Reading
Turn Signal Indicators
High-beam Indicator Symbol
CHECK GAGES Message (for low oil pressure,
high coolant temperature, low oil level, high/low
battery, brake, ABS and air bag)
Low Fuel Warning Symbol
Radio Frequency and Playback Mode (with the
exception of the XM™ radio)
3-22
Page 143 of 446
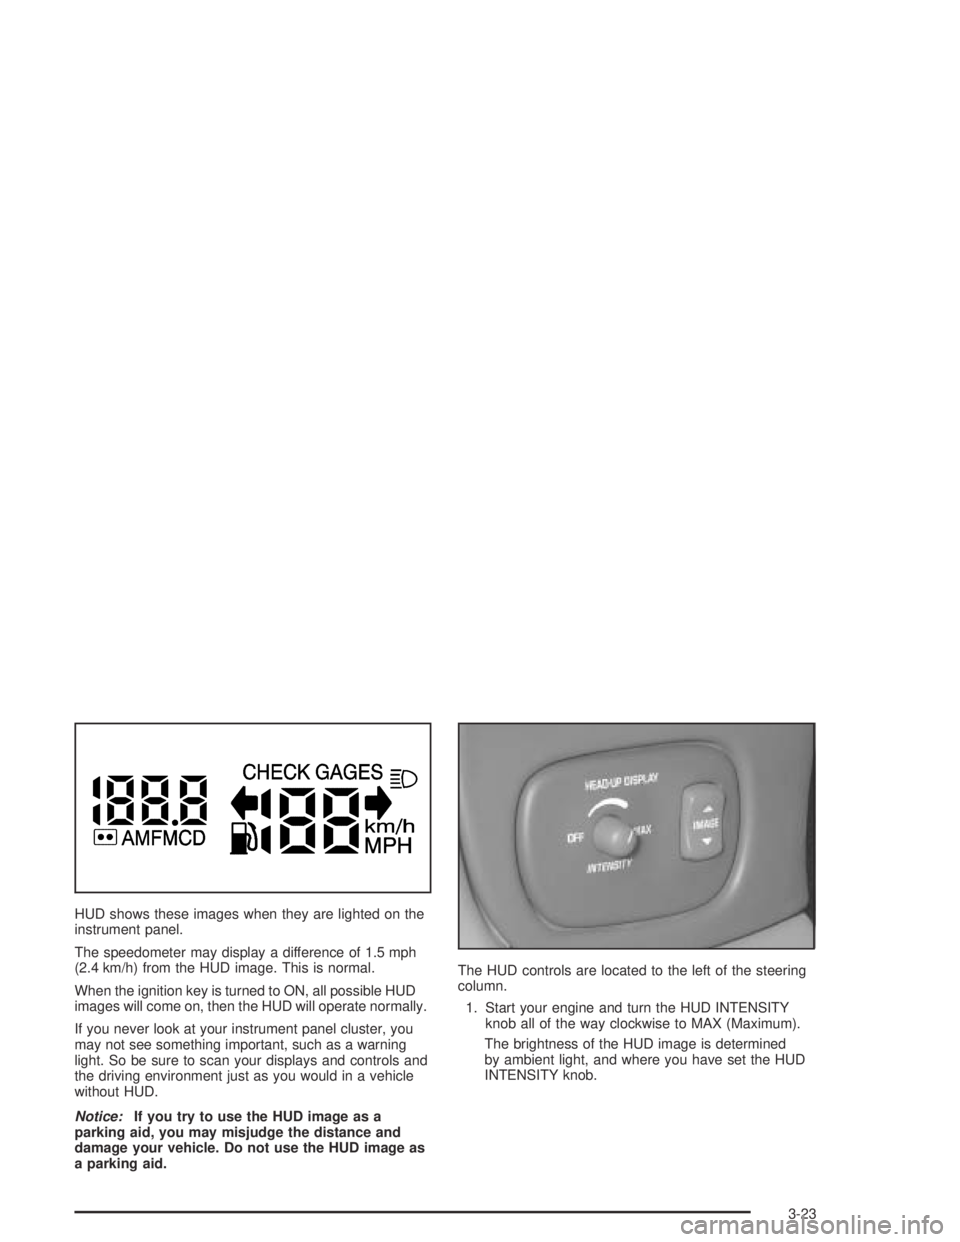
HUD shows these images when they are lighted on the
instrument panel.
The speedometer may display a difference of 1.5 mph
(2.4 km/h) from the HUD image. This is normal.
When the ignition key is turned to ON, all possible HUD
images will come on, then the HUD will operate normally.
If you never look at your instrument panel cluster, you
may not see something important, such as a warning
light. So be sure to scan your displays and controls and
the driving environment just as you would in a vehicle
without HUD.
Notice:If you try to use the HUD image as a
parking aid, you may misjudge the distance and
damage your vehicle. Do not use the HUD image as
a parking aid.The HUD controls are located to the left of the steering
column.
1. Start your engine and turn the HUD INTENSITY
knob all of the way clockwise to MAX (Maximum).
The brightness of the HUD image is determined
by ambient light, and where you have set the HUD
INTENSITY knob.
3-23
Page 150 of 446

Automatic Operation
AUTO (Automatic):Press the AUTO button for
automatic control of the inside temperature, the air
delivery mode and the fan speed.
1. Press the AUTO button. Whenever this button is
pressed, the display will show the current settings
for �ve seconds before returning the display to
the exterior temperature.
2. Adjust the temperature to 75°F (24°C).
Choosing the coldest or warmest temperature
setting will not cause the system to cool or heat any
faster. If you set the system at the coldest or
warmest temperature setting, the system will remain
at the maximum cold or hot setting and fan speed.
In cold weather, the system will start at reduced fan
speeds to avoid blowing cold air into your vehicle
until warmer air is available. The system will
start out blowing air at the �oor but may change
modes automatically as the vehicle warms up
to maintain the chosen temperature setting. The
length of time needed for warm up will depend on
the outside temperature and the length of time
that has elapsed since your vehicle was last driven.3. Wait for the system to regulate. This may take from
10 to 30 minutes. Then adjust the temperature, if
necessary.
Do not cover the solar sensor located in the center of
the instrument panel, near the windshield. For more
information on the solar sensor, see “Sensors” later in
this section.
Manual Operation
DRIVER (Driver’s Side Temperature):The knob on
the left is used to change the temperature of the
air coming through the system on the driver’s side of
the vehicle. Push this knob to turn the system on and off.
Turn the knob toward the blue area to decrease the
set temperature, and toward the red area to increase the
set temperature. When this knob is adjusted, the word
DRIVER will be displayed under the set temperature.
When the passenger’s set temperature is not active, this
knob controls both the driver’s and passenger’s side,
and both DRIVER and PASS will be displayed under the
set temperature.
3-30