2004 PONTIAC BONNEVILLE buttons
[x] Cancel search: buttonsPage 182 of 446
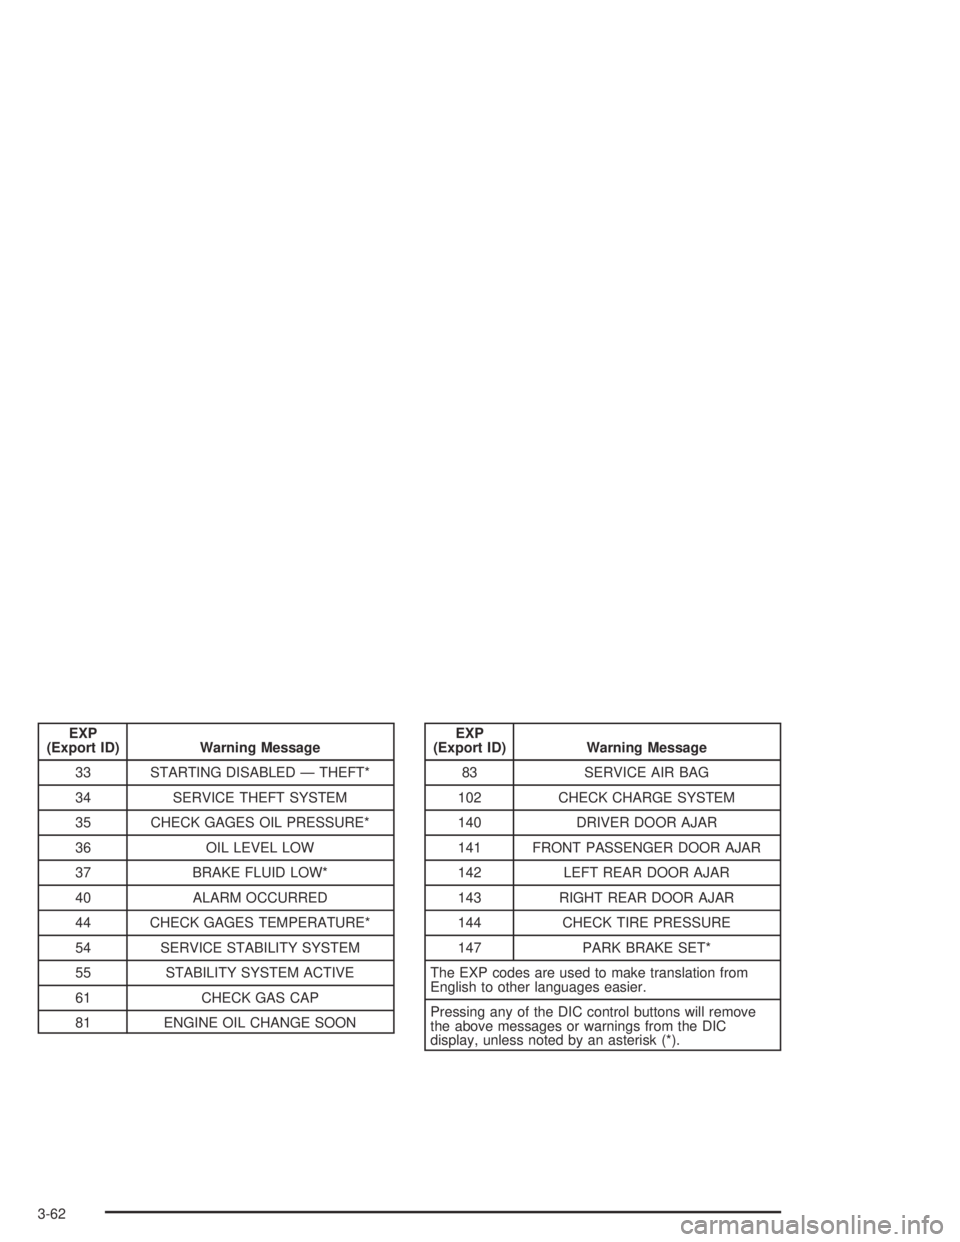
EXP
(Export ID) Warning Message
33 STARTING DISABLED — THEFT*
34 SERVICE THEFT SYSTEM
35 CHECK GAGES OIL PRESSURE*
36 OIL LEVEL LOW
37 BRAKE FLUID LOW*
40 ALARM OCCURRED
44 CHECK GAGES TEMPERATURE*
54 SERVICE STABILITY SYSTEM
55 STABILITY SYSTEM ACTIVE
61 CHECK GAS CAP
81 ENGINE OIL CHANGE SOONEXP
(Export ID) Warning Message
83 SERVICE AIR BAG
102 CHECK CHARGE SYSTEM
140 DRIVER DOOR AJAR
141 FRONT PASSENGER DOOR AJAR
142 LEFT REAR DOOR AJAR
143 RIGHT REAR DOOR AJAR
144 CHECK TIRE PRESSURE
147 PARK BRAKE SET*
The EXP codes are used to make translation from
English to other languages easier.
Pressing any of the DIC control buttons will remove
the above messages or warnings from the DIC
display, unless noted by an asterisk (*).
3-62
Page 183 of 446
SERVICE STABILITY SYSTEM – 54:If you ever see
the SERVICE STABILITY SYSTEM message, it
means there may be a problem with your stability
enhancement system. If you see this message, try to
reset the system: stop, turn off the engine, then start the
engine again. If the SERVICE STABILITY SYSTEM
message still comes on, it means there is a problem.
You should see your dealer for service. Reduce
your speed and drive accordingly.
STABILITY SYSTEM ACTIVE – 55:You may see the
STABILITY SYSTEM ACTIVE message on the Driver
Information Center. It means that an advanced,
computer-controlled system has come on to help your
vehicle continue to go in the direction in which you are
steering. This stability enhancement system activates
when the computer senses that your vehicle is just
starting to spin, as it might if you hit a patch of ice or other
slippery spot on the road. When the system is on, you
may hear a noise or feel a vibration in the brake pedal.
This is normal.
When the STABILITY SYSTEM ACTIVE message is on,
you should continue to steer in the direction you want to
go. The system is designed to help you in bad weather or
other difficult driving situations by making the most of
whatever road conditions will permit. If the STABILITY
SYSTEM ACTIVE message comes on, you will know that
something has caused your vehicle to start to spin, so
you should consider slowing down.Tire Pressure Status – 144:If you see the CHECK
TIRE PRESSURE message, you should stop as soon as
you can and check all your tires for damage. If a tire
is �at, seeIf a Tire Goes Flat on page 5-79. Also check
the tire pressure in all four tires as soon as you can.
SeeIn�ation - Tire Pressure on page 5-67andCheck
Tire Pressure System on page 5-68.
Driver Identi�er DIC Display
This feature allows two different drivers to store and
recall their own preferred display mode. The
personalization settings displayed on the DIC are
determined by the transmitter used to enter the vehicle.
After the unlock button on the remote keyless entry
transmitter (if equipped) is pressed and the ignition is in
ON, the DIC will display the identi�ed driver. The
settings can also be changed by brie�y pressing one of
the MEMORY buttons located on the driver’s door.
The DIC is used to program information for DRIVER #1
and DRIVER #2. The DIC will identify a person as
UNKNOWN DRIVER if neither DRIVER #1 nor
DRIVER #2 is identi�ed by the system.
3-63
Page 196 of 446
wSCANx:Press and hold either SCAN arrow for
two seconds until SCAN appears on the display and you
hear a beep. The radio will go to a station, play for a
few seconds, then go on to the next station. Press either
SCAN arrow again to stop scanning.
To scan preset stations, press and hold either SCAN
arrow for more than four seconds until PSCAN and the
preset number appear on the display and you will
hear a double beep. The radio will go to the �rst preset
station stored on your pushbuttons, play for a few
seconds, then go on to the next preset station. Press
either SCAN arrow again to stop scanning presets.
The radio will scan only to stations that are in the
selected band and only to those with a strong signal.Setting Preset Stations
The six numbered pushbuttons let you return to your
favorite stations. You can set up to 30 stations
(six FM1, six FM2, and six AM, six XM1 and six XM2
(48 contiguous US states, if equipped), by performing the
following steps:
1. Turn the radio on.
2. Press BAND to select FM1, FM2, or AM, or XM1
or XM2.
3. Tune in the desired station.
4. Press EQ to select the equalization.
5. Press and hold one of the six numbered
pushbuttons until you hear a beep. Whenever you
press that numbered pushbutton, the station
you set will return and the equalization that you
selected will be automatically stored for that
pushbutton.
6. Repeat the steps for each pushbutton.
3-76
Page 199 of 446
SCAN:You can scan the stations within a PTY by
performing the following:
1. Press PROG TYPE to activate program type select
mode. The PTY symbol will appear on the display.
2. Turn the SELECT knob to select a PTY.
3. Once the desired PTY is displayed, press and hold
either SCAN arrow, and the radio will begin
scanning the stations in the PTY.
4. Press either SCAN arrow to stop at a station.
If both PTY and TRAF are on, the radio will scan for the
selected PTY and traffic announcements.
BAND (Alternate Frequency):Alternate frequency
allows the radio to switch to a stronger station with the
same programming. To turn alternate frequency on,
press and hold BAND for two seconds. AF ON will
appear on the display. The radio may switch to stronger
stations.
To turn alternate frequency off, press and hold BAND
again for two seconds. AF OFF will appear on the
display. The radio will not switch to other stations.
This function does not apply for XM™ Satellite Radio
Service.Setting Preset PTYs (RDS Only)
The six numbered pushbuttons let you return to your
favorite program types (PTYs). These pushbuttons have
factory PTY presets. You can set up to 12 PTYs
(six FM1 and six FM2) by performing the following steps:
1. Press BAND to select FM1 or FM2.
2. Press PROG TYPE to activate program type select
mode. The PTY symbol will appear on the display.
3. Turn the SELECT knob to select a PTY.
4. Press and hold one of the six numbered
pushbuttons until you hear a beep. Whenever you
press that numbered pushbutton, the PTY you
set will return.
5. Repeat the steps for each pushbutton.
3-79
Page 208 of 446
For XM™ (48 contiguous US states, if equipped), push
the RCL knob while in XM™ mode to retrieve four
different categories of information related to the current
song or channel: Artist, Song Title, Category or PTY,
Channel Number/Channel Name.
To change the default on the display, push the RCL
knob until you see the display you want, then hold the
knob until the display �ashes. The selected display
will now be the default.
Finding a Station
BAND:Press this button to switch between FM1, FM2,
or AM, or XM1 or XM2 (48 contiguous US states, if
equipped). The display will show your selection.
TUNE:Turn this knob to select radio stations.
wSEEKx:Press the up or the down arrow to go to
the next or to the previous station and stay there.
The radio will seek only to stations that are in the
selected band and only to those with a strong signal.
wSCANx:Press and hold either SCAN arrow for
two seconds until SCAN appears on the display and you
hear a beep. The radio will go to a station, play for a
few seconds, then go on to the next station. Press either
SCAN arrow again to stop scanning.
To scan preset stations, press and hold either SCAN
arrow for more than four seconds until PSCAN and the
preset number appear on the display and you will
hear a double beep. The radio will go to the �rst preset
station stored on your pushbuttons, play for a few
seconds, then go on to the next preset station. Press
either SCAN arrow again to stop scanning presets.
The radio will scan only to stations that are in the
selected band and only to those with a strong signal.
3-88
Page 209 of 446
Setting Preset Stations
The six numbered pushbuttons let you return to your
favorite stations. You can set up to 30 stations (six FM1,
six FM2, and six AM, six XM1 and six XM2 (48
contiguous US states, if equipped), by performing the
following steps:
1. Turn the radio on.
2. Press BAND to select FM1, FM2, or AM, or XM1 or
XM2.
3. Tune in the desired station.
4. Press EQ to select the equalization.
5. Press and hold one of the six numbered
pushbuttons until you hear a beep. Whenever you
press that numbered pushbutton, the station
you set will return and the equalization that you
selected will be automatically stored for that
pushbutton.
6. Repeat the steps for each pushbutton.
Setting the Tone (Bass/Treble)
TONE:Press and release this button until BASS, MID,
or TREB appears on the display. The SELECT LED
indicator will light to show that the tone control can be
adjusted. Turn the SELECT knob to increase or to
decrease. If a station is weak or noisy, you may want to
decrease the treble.
To adjust all of the tone controls to the middle position,
press and hold TONE until FLAT appears on the
display.
EQ (Equalizer):Press this button to select customized
equalization settings.
You can set up to six customized equalization settings
by performing the following steps:
1. Turn the radio on.
2. Use the TONE button and the SELECT knob to
create the desired equalization.
3. Press and hold the EQ button for two seconds.
SELECT EQ # will appear on the display and the
EQ symbol will �ash.
4. Press EQ or turn the SELECT knob to select the
desired EQ number.
3-89
Page 211 of 446
SCAN:You can scan the stations within a PTY by
performing the following:
1. Press PROG TYPE to activate program type select
mode. The PTY symbol will appear on the display.
2. Turn the SELECT knob to select a PTY.
3. Once the desired PTY is displayed, press and hold
either SCAN arrow, and the radio will begin
scanning the stations in the PTY.
4. Press either SCAN arrow to stop at a station.
If both PTY and TRAF are on, the radio will scan for the
selected PTY and traffic announcements.
BAND (Alternate Frequency):Alternate frequency
allows the radio to switch to a stronger station with the
same programming. To turn alternate frequency on,
press and hold BAND for two seconds. AF ON will appear
on the display. The radio may switch to stronger stations.
To turn alternate frequency off, press and hold BAND
again for two seconds. AF OFF will appear on the display.
The radio will not switch to other stations.
This function does not apply for XM™ Satellite Radio
Service.Setting Preset PTYs (RDS Only)
The six numbered pushbuttons let you return to your
favorite program types (PTYs). These pushbuttons have
factory PTY presets. You can set up to 12 PTYs
(six FM1 and six FM2) by performing the following steps:
1. Press BAND to select FM1 or FM2.
2. Press PROG TYPE to activate program type select
mode. The PTY symbol will appear on the display.
3. Turn the SELECT knob to select a PTY.
4. Press and hold one of the six numbered
pushbuttons until you hear a beep. Whenever you
press that numbered pushbutton, the PTY you
set will return.
5. Repeat the steps for each pushbutton.
3-91
Page 223 of 446
Whenever a CD magazine with CDs is loaded in the
changer and the door is closed, the CD symbol
will appear on the radio display. If the CD changer is
checking the magazine for CDs, the CD symbol will �ash
on the display until the changer is ready to play. If CD
changer mode is entered during initialization, LOADING
will appear on the display. When a CD begins playing,
a CD and track number will appear on the radio display.
The CD numbers are listed on the front of the
magazine.
All of the CD functions are controlled by the radio
pushbuttons except for ejecting the magazine.
Playing a CD
If an error appears on the display, see “CD Messages”
later in this section.
The following radio buttons are used for the
trunk-mounted CD changer.
[1 (Forward):Press and hold this pushbutton to
quickly advance within a track. As the CD advances, the
elapsed time of the track will appear on the display.
]2 (Next):Press this pushbutton to select the next
CD in the magazine. Each time you press this
pushbutton, the CD number on the radio display will go
to that of the next available CD.RDM 3 (Random):Press this pushbutton to listen to
the tracks on all of the CDs in random, rather than
sequential, order. RANDOM ALL will appear on
the display.
Press and hold this pushbutton to listen to the tracks on
the current CD in random, rather than sequential,
order. RANDOM ONE will appear on the display and a
chime will sound. Press this button again to turn off
random play.
4
r(Reverse):Press and hold this pushbutton to
quickly reverse within a track. As the CD reverses, the
elapsed time of the track will appear on the display.
5 (Previous):Press this pushbutton to select the
previous CD in the magazine. Each time you press this
pushbutton, the CD number on the radio display will
go to that of the previous available CD.
RCL (Recall):Push this knob to see how long the
current track has been playing. To change what
is normally shown on the display (track or elapsed
time), push this knob until you see the display you want
and then hold the knob until the display �ashes.
3-103