2004 NISSAN QUEST washer fluid
[x] Cancel search: washer fluidPage 14 of 320

1. Power steering fluid reservoir (P. 8-13)
2. Engine oil filler cap (P. 8-8)
3. Brake fluid reservoir (P. 8-14)
4. Air cleaner (P. 8-18)
5. Battery (P. 8-15)
6. Fuse/fusible link box (P. 8-23)
7. Transmission dipstick (P. 8-11, P. 8-12)
8. Engine oil dipstick (P. 8-8)
9. Radiator cap (P. 8-7)
10. Fuse block (P. 8-23)
11. Windshield washer fluid reservoir
(P. 8-14)
12. Coolant reservoir (P. 8-7)
See the page number indicated in paren-
theses for operating details.
LII0017
ENGINE COMPARTMENT LOCATIONS
0-8Illustrated table of contents
ZREVIEW COPY:Ð2004 Quest(van)
Owners Manual(owners)ÐUSA English(nna)
10/08/03Ðtbrooks
X
Page 15 of 320
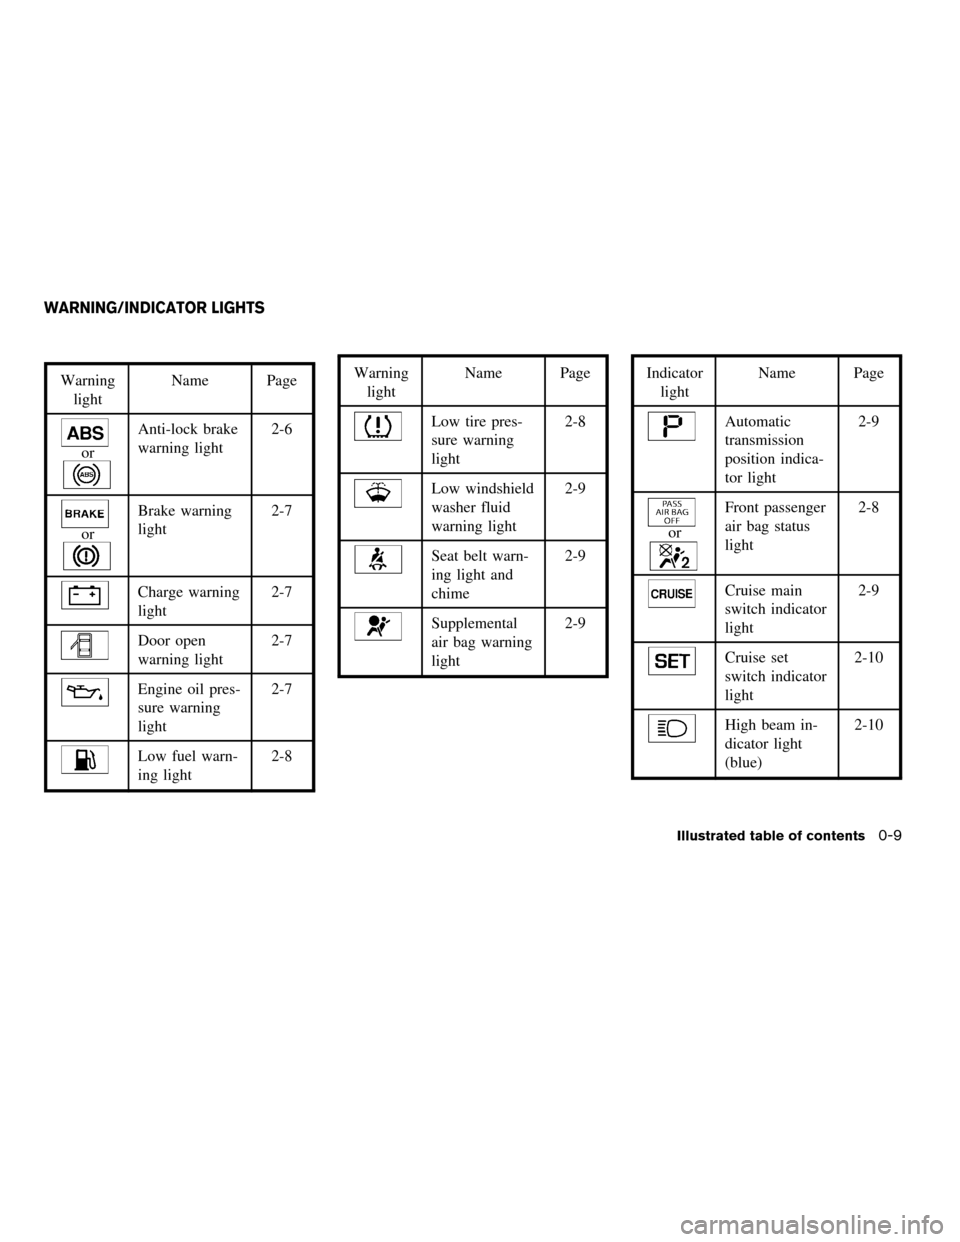
Warning
lightName Page
or
Anti-lock brake
warning light2-6
or
Brake warning
light2-7
Charge warning
light2-7
Door open
warning light2-7
Engine oil pres-
sure warning
light2-7
Low fuel warn-
ing light2-8
Warning
lightName Page
Low tire pres-
sure warning
light2-8
Low windshield
washer fluid
warning light2-9
Seat belt warn-
ing light and
chime2-9
Supplemental
air bag warning
light2-9
Indicator
lightName Page
Automatic
transmission
position indica-
tor light2-9
or
Front passenger
air bag status
light2-8
Cruise main
switch indicator
light2-9
Cruise set
switch indicator
light2-10
High beam in-
dicator light
(blue)2-10
WARNING/INDICATOR LIGHTS
Illustrated table of contents0-9
ZREVIEW COPY:Ð2004 Quest(van)
Owners Manual(owners)ÐUSA English(nna)
10/08/03Ðtbrooks
X
Page 82 of 320

orAnti-lock brake warning lightSeat belt warning light and chimeorFront passenger air bag status
light
orBrake warning lightSupplemental air bag warning lightSecurity indicator light (NVIS)
Charge warning lightAutomatic transmission position indicator lightSlip indicator light
Door open warning lightCruise main switch indicator lightTraction control system off indicator light (if so
equipped)
Engine oil pressure warning lightCruise set switch indicator lightTurn signal/hazard indicator lights
Low fuel warning lightHigh beam indicator light (Blue)Vehicle dynamic control off indicator light (if so
equipped)
Low tire pressure warning lightMalfunction indicator lamp (MIL)
Low windshield washer fluid warning lightOverdrive off indicator light
CHECKING BULBS
With all doors closed, apply the parking brake
and turn the ignition key to the ON position
without starting the engine. The following lights
will come on:
,or,,,
The following lights come on briefly and then go
off:
or,,,,,,
If any light fails to come on, it may indicate
a burned-out bulb or an open circuit in the
electrical system. Have the system repaired
promptly.
WARNING LIGHTS
orAnti-lock brake
warning light
If the light comes on while the engine is running,
it may indicate the anti-lock brake system is not
functioning properly. Have the system checked
by a NISSAN dealer.
WARNING/INDICATOR LIGHTS AND
AUDIBLE REMINDERS
2-6Instruments and controls
ZREVIEW COPY:Ð2004 Quest(van)
Owners Manual(owners)ÐUSA English(nna)
10/08/03Ðtbrooks
X
Page 85 of 320
CAUTION
cThe low tire pressure warning system is
not a substitute for the regular tire pres-
sure check. Be sure to check the tire
pressure regularly.
cIf the vehicle is being driven at speeds
of less than 20 MPH (32 km/h) , the low
tire pressure warning system may not
operate correctly.
cBe sure to install the specified size of
tires to the 4 wheels correctly.
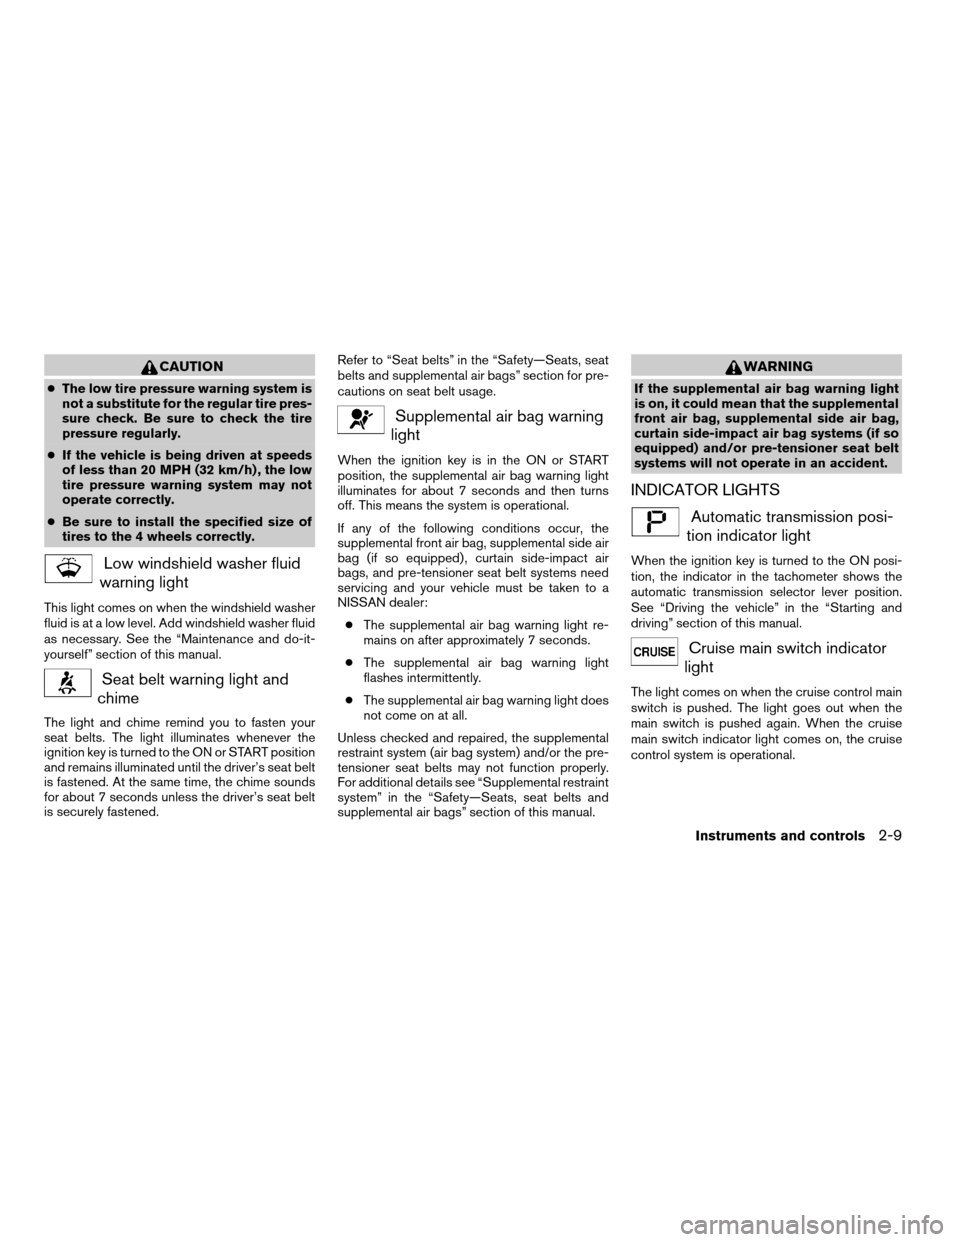
Low windshield washer fluid
warning light
This light comes on when the windshield washer
fluid is at a low level. Add windshield washer fluid
as necessary. See the “Maintenance and do-it-
yourself” section of this manual.
Seat belt warning light and
chime
The light and chime remind you to fasten your
seat belts. The light illuminates whenever the
ignition key is turned to the ON or START position
and remains illuminated until the driver’s seat belt
is fastened. At the same time, the chime sounds
for about 7 seconds unless the driver’s seat belt
is securely fastened.Refer to “Seat belts” in the “Safety—Seats, seat
belts and supplemental air bags” section for pre-
cautions on seat belt usage.
Supplemental air bag warning
light
When the ignition key is in the ON or START
position, the supplemental air bag warning light
illuminates for about 7 seconds and then turns
off. This means the system is operational.
If any of the following conditions occur, the
supplemental front air bag, supplemental side air
bag (if so equipped) , curtain side-impact air
bags, and pre-tensioner seat belt systems need
servicing and your vehicle must be taken to a
NISSAN dealer:
cThe supplemental air bag warning light re-
mains on after approximately 7 seconds.
cThe supplemental air bag warning light
flashes intermittently.
cThe supplemental air bag warning light does
not come on at all.
Unless checked and repaired, the supplemental
restraint system (air bag system) and/or the pre-
tensioner seat belts may not function properly.
For additional details see “Supplemental restraint
system” in the “Safety—Seats, seat belts and
supplemental air bags” section of this manual.
WARNING
If the supplemental air bag warning light
is on, it could mean that the supplemental
front air bag, supplemental side air bag,
curtain side-impact air bag systems (if so
equipped) and/or pre-tensioner seat belt
systems will not operate in an accident.
INDICATOR LIGHTS
Automatic transmission posi-
tion indicator light
When the ignition key is turned to the ON posi-
tion, the indicator in the tachometer shows the
automatic transmission selector lever position.
See “Driving the vehicle” in the “Starting and
driving” section of this manual.
Cruise main switch indicator
light
The light comes on when the cruise control main
switch is pushed. The light goes out when the
main switch is pushed again. When the cruise
main switch indicator light comes on, the cruise
control system is operational.
Instruments and controls2-9
ZREVIEW COPY:Ð2004 Quest(van)
Owners Manual(owners)ÐUSA English(nna)
10/08/03Ðtbrooks
X
Page 90 of 320
cDo not operate the washer if the reser-
voir tank is empty.
cDo not fill the window washer reservoir
tank with washer fluid concentrates at
full strength. Some methyl alcohol
based washer fluid concentrates may
permanently stain the grille if spilled
while filling the window washer reser-
voir tank.
cPre-mix washer fluid concentrates with
water to the manufacturer’s recom-
mended levels before pouring the fluid
into the window washer reservoir tank.
Do not use the window washer reservoir
tank to mix the washer fluid concen-
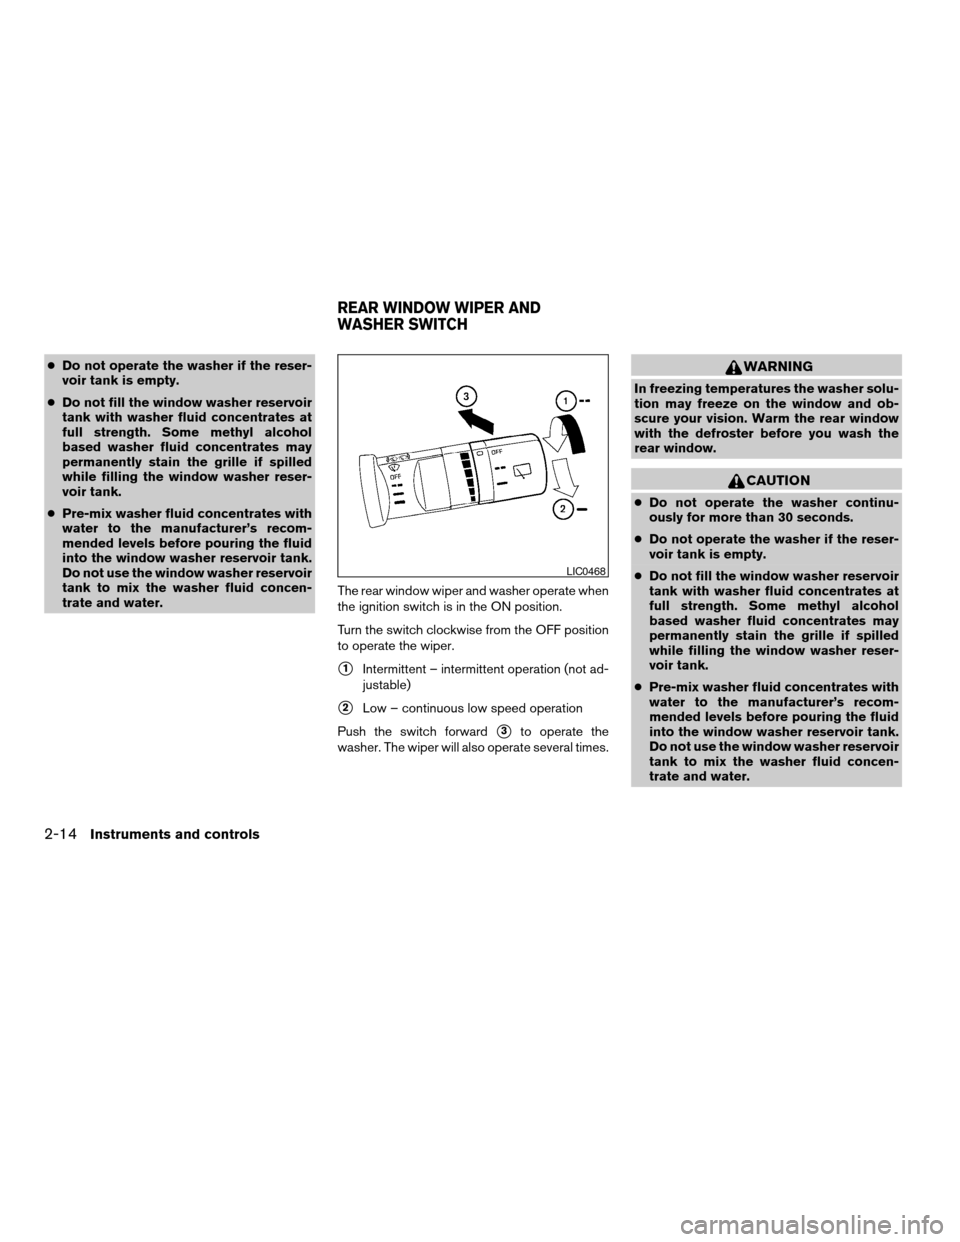
trate and water.The rear window wiper and washer operate when
the ignition switch is in the ON position.
Turn the switch clockwise from the OFF position
to operate the wiper.
s1Intermittent – intermittent operation (not ad-
justable)
s2Low – continuous low speed operation
Push the switch forward
s3to operate the
washer. The wiper will also operate several times.
WARNING
In freezing temperatures the washer solu-
tion may freeze on the window and ob-
scure your vision. Warm the rear window
with the defroster before you wash the
rear window.
CAUTION
cDo not operate the washer continu-
ously for more than 30 seconds.
cDo not operate the washer if the reser-
voir tank is empty.
cDo not fill the window washer reservoir
tank with washer fluid concentrates at
full strength. Some methyl alcohol
based washer fluid concentrates may
permanently stain the grille if spilled
while filling the window washer reser-
voir tank.
cPre-mix washer fluid concentrates with
water to the manufacturer’s recom-
mended levels before pouring the fluid
into the window washer reservoir tank.
Do not use the window washer reservoir
tank to mix the washer fluid concen-
trate and water.
LIC0468
REAR WINDOW WIPER AND
WASHER SWITCH
2-14Instruments and controls
ZREVIEW COPY:Ð2004 Quest(van)
Owners Manual(owners)ÐUSA English(nna)
10/08/03Ðtbrooks
X
Page 212 of 320
unlock the steering wheel, insert the key
and turn it gently while rotating the steer-
ing wheel slightly right and left.
WARNING
Never remove or turn the key to the LOCK
position while driving. The steering wheel
will lock. This may cause the driver to lose
control of the vehicle and could result in
serious vehicle damage or personal injury.
KEY POSITIONS
LOCK: Normal parking position (0)
OFF: (Not used) (1)
ACC: (Accessories) (2)
This position activates electrical accessories
such as the radio when the engine is not running.
ON: Normal operating position (3)
This position turns on the ignition system and the
electrical accessories.
START: (4)
This position starts the engine. As soon as the
engine has started, release the key. It automati-
cally returns to the ON position.
NISSAN VEHICLE IMMOBILIZER
SYSTEM (NVIS)
The NISSAN Vehicle Immobilizer System (NVIS)
will not allow the engine to start without the use of
the registered NVIS key.
If the engine fails to start using the registered
NVIS key, it may be due to interference caused by
another NVIS key, an automated toll road device
or automated payment device on the key ring.
Restart the engine using the following proce-
dures:
1. Leave the ignition switch in the ON position
for approximately 5 seconds.
2. Turn the ignition switch to the OFF or LOCK
position and wait approximately 5 seconds.
3. Repeat step 1 and 2 again.
4. Restart the engine while holding the device
(which may have caused the interference)
separate from the registered NVIS key.
If this procedure allows the engine to start,
NISSAN recommends placing the registered
NVIS key on a separate key ring to avoid interfer-
ence from other devices.cMake sure the area around the vehicle is
clear.
cCheck fluid levels such as engine oil, cool-
ant, brake fluid, and window washer fluid as
frequently as possible, or at least whenever
you refuel.
cCheck that all windows and lights are clean.
cVisually inspect tires for their appearance
and condition. Also check tires for proper
inflation.
cLock all doors.
cPosition seat and adjust head restraints.
cAdjust inside and outside mirrors.
cFasten seat belts and ask all passengers to
do likewise.
cCheck the operation of warning lights when
the key is turned to the ON (3) position. See
“Warning/indicator lights and audible re-
minders” in the “Instruments and controls”
section of this manual.
BEFORE STARTING THE ENGINE
5-6Starting and driving
ZREVIEW COPY:Ð2004 Quest(van)
Owners Manual(owners)ÐUSA English(nna)
10/08/03Ðtbrooks
X
Page 228 of 320
the tires on your vehicle and are installed
according to the chain manufacturer’s sug-
gestions.Use only SAE Class “S”
chains.Class “S” chains are used on ve-
hicles with restricted tire to vehicle clear-
ance. Vehicles that can use Class “S” chains
are designed to meet the minimum clear-
ances between the tire and the closest ve-
hicle suspension or body component re-
quired to accommodate the use of a winter
traction device (tire chains or cables) . The
minimum clearances are determined using
the factory equipped tire size. Other types
may damage your vehicle. Use chain ten-
sioners when recommended by the tire
chain manufacturer to ensure a tight fit.
Loose end links of the tire chain must be
secured or removed to prevent the possibil-
ity of whipping action damage to the fenders
or underbody. If possible, avoid fully loading
your vehicle when using tire chains. In addi-
tion, drive at a reduced speed. Otherwise,
your vehicle may be damaged and/or vehicle
handling and performance may be adversely
affected.
Never install tire chains on spare tires. Do
not use tire chains on dry roads.SPECIAL WINTER EQUIPMENT
It is recommended that the following items be
carried in the vehicle during winter:
cA scraper and stiff-bristled brush to remove
ice and snow from the windows and wiper
blades.
cA sturdy, flat board to be placed under the
jack to give it firm support.
cA shovel to dig the vehicle out of snowdrifts.
cExtra window washer fluid to refill the reser-
voir tank.
DRIVING ON SNOW OR ICE
WARNING
cWet ice (32°F, 0°C and freezing rain) ,
very cold snow or ice can be slick and
very hard to drive on. The vehicle will
have much less traction or “grip” under
these conditions. Try to avoid driving on
wet ice until the road is salted or
sanded.
cWhatever the condition, drive with cau-
tion. Accelerate and slow down with
care. If accelerating or downshifting too
fast, the drive wheels will lose even
more traction.cAllow more stopping distance under
these conditions. Braking should be
started sooner than on dry pavement.
cAllow greater following distances on
slippery roads.
cWatch for slippery spots (glare ice) .
These may appear on an otherwise
clear road in shaded areas. If a patch of
ice is seen ahead, brake before reach-
ing it. Try not to brake while on the ice,
and avoid any sudden steering
maneuvers.
cDo not use the cruise control on slip-
pery roads.
cSnow can trap dangerous exhaust
gases under your vehicle. Keep snow
clear of the exhaust pipe and from
around your vehicle.
5-22Starting and driving
ZREVIEW COPY:Ð2004 Quest(van)
Owners Manual(owners)ÐUSA English(nna)
10/08/03Ðtbrooks
X
Page 247 of 320

8 Maintenance and do-it-yourself
Maintenance requirements..........................8-2
General maintenance..............................8-2
Explanation of general maintenance items.........8-2
Maintenance precautions...........................8-5
Engine compartment check locations................8-6
Engine cooling system.............................8-7
Checking engine coolant level...................8-7
Changing engine coolant........................8-8
Engine oil.........................................8-8
Checking engine oil level........................8-8
Changing engine oil............................8-9
Changing engine oil filter.......................8-10
4-speed automatic transmission fluid...............8-11
Temperature conditions for checking.............8-11
5-speed automatic transmission fluid...............8-12
Power steering fluid...............................8-13
Brake fluid.......................................8-13
Brake fluid....................................8-14
Window washer fluid.............................8-14
Window washer fluid reservoir..................8-14
Battery..........................................8-15
Jump starting.................................8-16
Drive belts.......................................8-16
Spark plugs......................................8-17Replacing spark plugs.........................8-17
Air cleaner.......................................8-18
In-cabin microfilter.............................8-18
Windshield wiper blades..........................8-19
Cleaning.....................................8-19
Replacing....................................8-19
Parking brake and brake pedal.....................8-22
Checking parking brake........................8-22
Checking brake pedal..........................8-22
Brake booster.................................8-23
Fuses...........................................8-23
Engine compartment...........................8-23
Passenger compartment.......................8-24
Keyfob battery replacement........................8-25
Lights...........................................8-26
Headlights....................................8-26
Fog lights (if so equipped)......................8-26
Exterior and interior lights.......................8-27
Wheels and tires.................................8-31
Tire pressure..................................8-31
Tire labeling...................................8-33
Types of tires..................................8-36
Tire chains....................................8-36
Changing wheels and tires.....................8-37
ZREVIEW COPY:Ð2004 Quest(van)
Owners Manual(owners)ÐUSA English(nna)
10/08/03Ðtbrooks
X