2004 NISSAN QUEST cooling
[x] Cancel search: coolingPage 83 of 320

Turn off the engine, and start it again by
slowly turning the ignition key (quickly do-
ing so may cause the ABS light to stay on
when there is nothing wrong) . If the light
stays on, have the system checked by a
NISSAN dealer.
If an abnormality occurs in the system, the anti-
lock function ceases, but the regular braking
system continues to operate.
If the light comes on while you are driving,
contact a NISSAN dealer for repair.
orBrake warning light
This light functions for both the parking brake and
the foot brake systems.
When the ignition key is in the ON position, the
light comes on when the parking brake is applied,
and also warns of a low brake fluid level. If the
light comes on while the engine is running with
the parking brake not applied, stop the vehicle
and perform the following:
1. Check the brake fluid level. Add brake fluid
as necessary. See “Brake fluid” in the “Main-
tenance and do-it-yourself” section of this
manual.2. If the brake fluid level is correct, have the
brake system checked by a NISSAN dealer.
WARNING
cYour vehicle is equipped with an auto-
matic engine cooling fan. It may come
on at any time without warning, even if
the ignition key is in the OFF position
and the engine is not running. To avoid
injury, always disconnect the negative
battery cable before working near the
fan.
cPressing the brake pedal with the en-
gine stopped and/or a low brake fluid
level may increase your stopping dis-
tance and braking will require greater
pedal effort as well as pedal travel.
cIf the brake fluid level is below the
MINIMUM or MIN mark on the brake
fluid reservoir, do not drive until the
brake system has been checked at a
NISSAN dealer.
Charge warning light
If this light comes on while the engine is running,
it may indicate the charging system is not func-
tioning properly. Turn the engine off and checkthe generator belt. If the belt is loose, broken,
missing, or if the light remains on, see a NISSAN
dealer immediately.
CAUTION
Do not continue driving if the generator
belt is loose, broken or missing.
Door open warning light
This light comes on when any of the doors are not
closed securely while the ignition key is in the ON
position.
Engine oil pressure warning
light
This light warns of low engine oil pressure. If the
light flickers or comes on during normal driving,
pull off the road in a safe area, stop the engine
immediatelyand call a NISSAN dealer or other
authorized repair shop.
The engine oil pressure warning light is not
designed to indicate a low oil level.Use the
dipstick to check the oil level. See “Engine oil” in
the “Maintenance and do-it-yourself” section of
this manual.
Instruments and controls2-7
ZREVIEW COPY:Ð2004 Quest(van)
Owners Manual(owners)ÐUSA English(nna)
10/08/03Ðtbrooks
X
Page 169 of 320

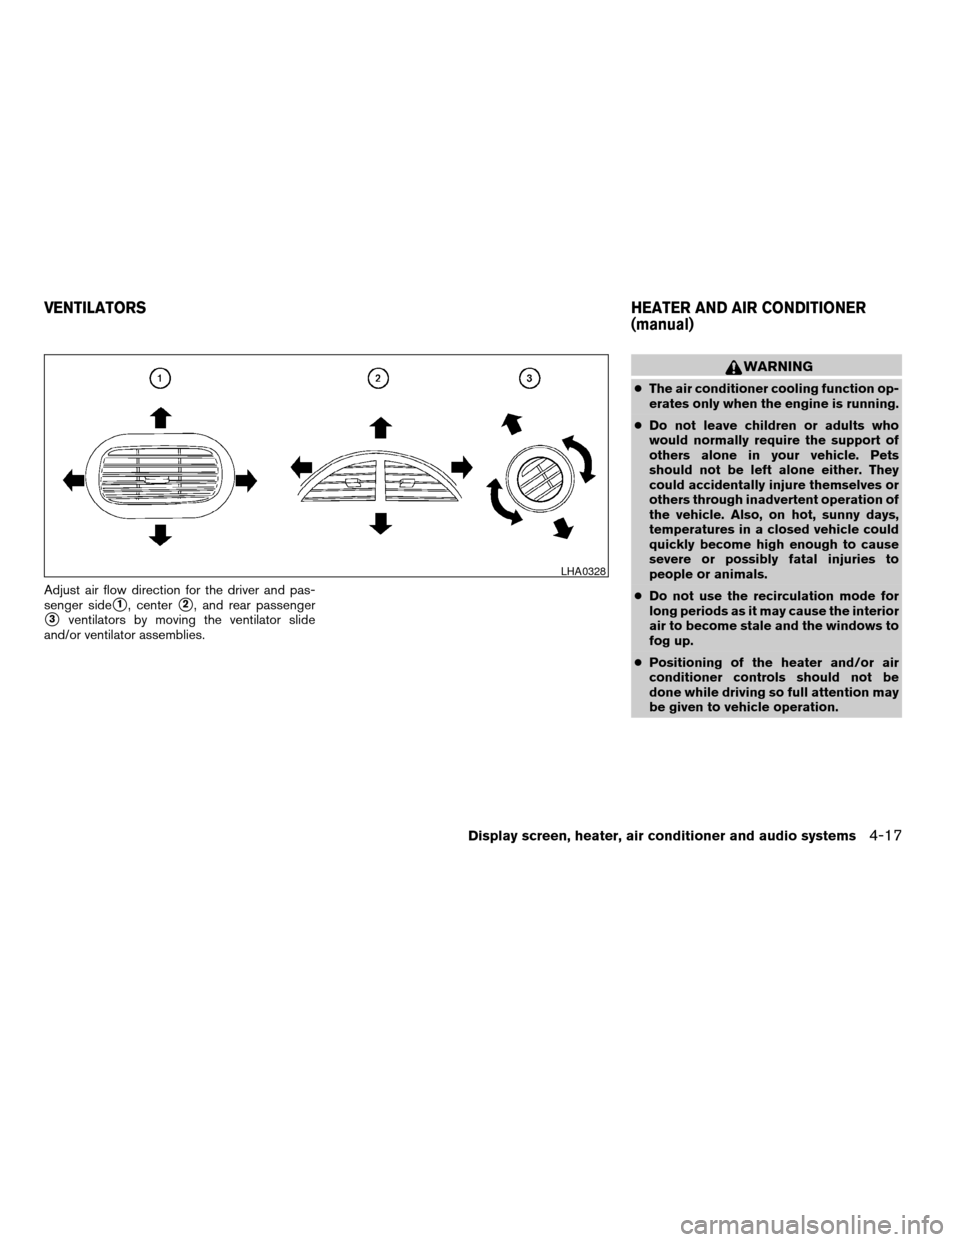
Adjust air flow direction for the driver and pas-
senger side
s1, centers2, and rear passenger
s3ventilators by moving the ventilator slide
and/or ventilator assemblies.
WARNING
cThe air conditioner cooling function op-
erates only when the engine is running.
cDo not leave children or adults who
would normally require the support of
others alone in your vehicle. Pets
should not be left alone either. They
could accidentally injure themselves or
others through inadvertent operation of
the vehicle. Also, on hot, sunny days,
temperatures in a closed vehicle could
quickly become high enough to cause
severe or possibly fatal injuries to
people or animals.
cDo not use the recirculation mode for
long periods as it may cause the interior
air to become stale and the windows to
fog up.
cPositioning of the heater and/or air
conditioner controls should not be
done while driving so full attention may
be given to vehicle operation.
LHA0328
VENTILATORSHEATER AND AIR CONDITIONER
(manual)
Display screen, heater, air conditioner and audio systems4-17
ZREVIEW COPY:Ð2004 Quest(van)
Owners Manual(owners)ÐUSA English(nna)
10/08/03Ðtbrooks
X
Page 170 of 320

1. Fan speed control dial
2. Air recirculation button
3. Temperature control dial
4. Air conditioner button
5. Air flow control dial
6. Rear window defroster switch
7. Rear fan speed dial
8. Rear mode control and temperature dialCONTROLS
Fan control dial
The fan control dial turns the fan on and off, and
controls fan speed.
Air flow control dial
The air flow control dial allows you to select the
air flow outlets.
MAX
A/C— Air flows from center and side
vents with maximum cooling (air
conditioning) .
— Air flows from center and side
ventilators.
— Air flows from center and side
ventilators and the front and rear
floor outlets.
— Air flows mainly from the front and
rear floor outlets.
— Air flows from defroster outlets
and the front and rear floor
outlets.
— Air flows mainly from defroster
outlets.
The air flow control dial also has intermediate
positions which allow the air flow to be distrib-
uted between 2 of the icon positions on the air
flow control dial.
Temperature control dial
The temperature control dial allows you to adjust
the temperature of the outlet air.
Air recirculation button
ON position:
Push thebutton to recirculate air inside
the vehicle. (will appear on the display.)
Push the
button to the on position when:
cdriving on a dusty road.
cto prevent traffic fumes from entering pas-
senger compartment.
LHA0312
4-18Display screen, heater, air conditioner and audio systems
ZREVIEW COPY:Ð2004 Quest(van)
Owners Manual(owners)ÐUSA English(nna)
10/08/03Ðtbrooks
X
Page 171 of 320

cfor maximum cooling when using the air con-
ditioner.
OFF position:
Push the
button again to turn air recircula-
tion off. (will appear on the display.) Out-
side air is drawn into the passenger compartment
and distributed through the selected outlet.
Use the off position for normal heater or air con-
ditioner operation.
Air conditioner button
Start the engine, turn the fan control dial to the
desired (1 to 4) position and push the
button to turn on the air conditioner. A/C will
appear on the display when the air conditioner is
operating. To turn off the air conditioner, push
the
button again, the display will show
A/C OFF.
The air conditioner cooling function oper-
ates only when the engine is running.
Rear window defroster switch
For more information about the rear window de-
froster switch, see “Rear window defroster
switch” in the “Instruments and controls” section
of this manual.
HEATER OPERATION
Heating
This mode is used to direct heated air to the foot
outlets. Some air also flows from the defrost
outlets.
1. Push the
button to the OFF position
for normal heating (shown on dis-
play) .
2. Turn the air flow control dial to the
position.
3. Turn the fan control dial to the desired posi-
tion.
4. Turn the temperature control dial to the de-
sired position between the middle and the
hot position.
Ventilation
This mode directs outside air to the side and
center ventilators.
1. Push the
button to the OFF position
(shown on display) .
2. Turn the air flow control dial to the
position.
3. Turn the fan control dial to the desired posi-
tion.4. Turn the temperature control dial to the de-
sired position.
Defrosting or defogging
This mode directs the air to the defrost outlets to
defrost/defog the windows.
1. Turn the air flow control dial to the
position.
2. Turn the fan control dial to the desired posi-
tion.
3. Turn the temperature control dial to the de-
sired position between the middle and the
hot position.
cTo quickly remove ice or fog from the win-
dows, turn the fan control dial to 4 and the
temperature control lever to the full HOT
position.
cWhen the
position is selected, the air
conditioner automatically turns on (however,
A/C will not appear on the display) if the
outside temperature is more than 36°F
(2°C) . The air conditioning system will con-
tinue to operate until the fan control dial is
turned to OFF or the vehicle is shut off, even
if the air flow control dial is turned to a
position other than the
position. This
dehumidifies the air which helps defog the
windshield. The
mode automatically
Display screen, heater, air conditioner and audio systems4-19
ZREVIEW COPY:Ð2004 Quest(van)
Owners Manual(owners)ÐUSA English(nna)
10/08/03Ðtbrooks
X
Page 172 of 320

turns off, allowing outside air to be drawn
into the passenger compartment to further
improve the defogging performance.
Bi-level heating
The bi-level mode directs warmed air to the side
and center vents and to the front and rear floor
outlets.
1. Push the
button to the OFF position
(shown on display) .
2. Turn the air flow control dial to the
position.
3. Turn the fan control dial to the desired posi-
tion.
4. Turn the temperature control dial to the de-
sired position.
Heating and defogging
This mode heats the interior and defogs the wind-
shield.
1. Turn the air flow control dial to the
position.
2. Turn the fan control dial to the desired posi-
tion.
3. Turn the temperature control dial to the de-
sired position between the middle and the
hot position.cWhen the
position is selected, the air
conditioner automatically turns on (however,
A/C will not appear on the display) if the
outside temperature is more than 36°F
(2°C) . The air conditioning system will con-
tinue to operate until the fan control dial is
turned to OFF or the vehicle is shut off, even
if the air flow control dial is turned to a
position other than the
position. This
dehumidifies the air which helps defog the
windshield. The
mode automatically
turns off, allowing outside air to be drawn
into the passenger compartment to further
improve the defogging performance.
Operating tips
Clear snow and ice from the wiper blades
and air inlet in front of the windshield. This
improves heater operation.
AIR CONDITIONER OPERATION
Start the engine, turn the fan control dial to the
desired (1 to 4) position, and push in the
button to activate the air conditioner. When the
air conditioner is on, cooling and dehumidifying
functions are added to the heater operation.
The air conditioner cooling function oper-
ates only when the engine is running.
Cooling
This mode is used to cool and dehumidify the air.
1. Push the
button to the OFF position.
2. Turn the air flow control dial to the
position.
3. Turn the fan control dial to the desired posi-
tion.
4. Push the
button. A/C will appear on
the display.
5. Turn the temperature control dial to the de-
sired position.
cFor quick cooling when the outside tem-
perature is high, push the
button to
the ON position (shown on display) .
Be sure to return theto the OFF po-
sition for normal cooling (shown on
display) . You may also select MAX A/C for
quick cooling.
Dehumidified heating
This mode is used to heat and dehumidify the air.
1. Push the
button to the OFF position
(shown on display) .
2. Turn the air flow control dial to the
position.
4-20Display screen, heater, air conditioner and audio systems
ZREVIEW COPY:Ð2004 Quest(van)
Owners Manual(owners)ÐUSA English(nna)
10/08/03Ðtbrooks
X
Page 173 of 320

3. Turn the fan control dial to the desired posi-
tion.
4. Push the
button. The display shows
A/C.
5. Turn the temperature control dial to the de-
sired position.
Operating tips
cKeep the windows and sunroof (if so
equipped) closed while the air conditioner is
in operation.
cAfter parking in the sun, drive for 2 or 3
minutes with the windows open to vent hot
air from the passenger compartment. Then,
close the windows. This allows the air con-
ditioner to cool the interior more quickly.
cThe air conditioning system should be
operated for approximately 10 minutes
at least once a month. This helps pre-
vent damage to the system due to lack
of lubrication.
cIf the engine coolant temperature
gauge indicates engine coolant tem-
perature over the normal range, turn
the air conditioner off. See “If your
vehicle overheats” in the “In case of
emergency” section of this manual.
AIR FLOW CHARTS
The following charts show the button and dial
positions forMAXIMUM AND QUICKheating,
cooling or defrosting. For additional information
on heating and cooling see “Heating” on page
4-19 and “Cooling” on page 4-20.The air re-
circulation (
) button should always
be in the OFF position for heating and
defrosting.
Display screen, heater, air conditioner and audio systems4-21
ZREVIEW COPY:Ð2004 Quest(van)
Owners Manual(owners)ÐUSA English(nna)
10/08/03Ðtbrooks
X
Page 179 of 320

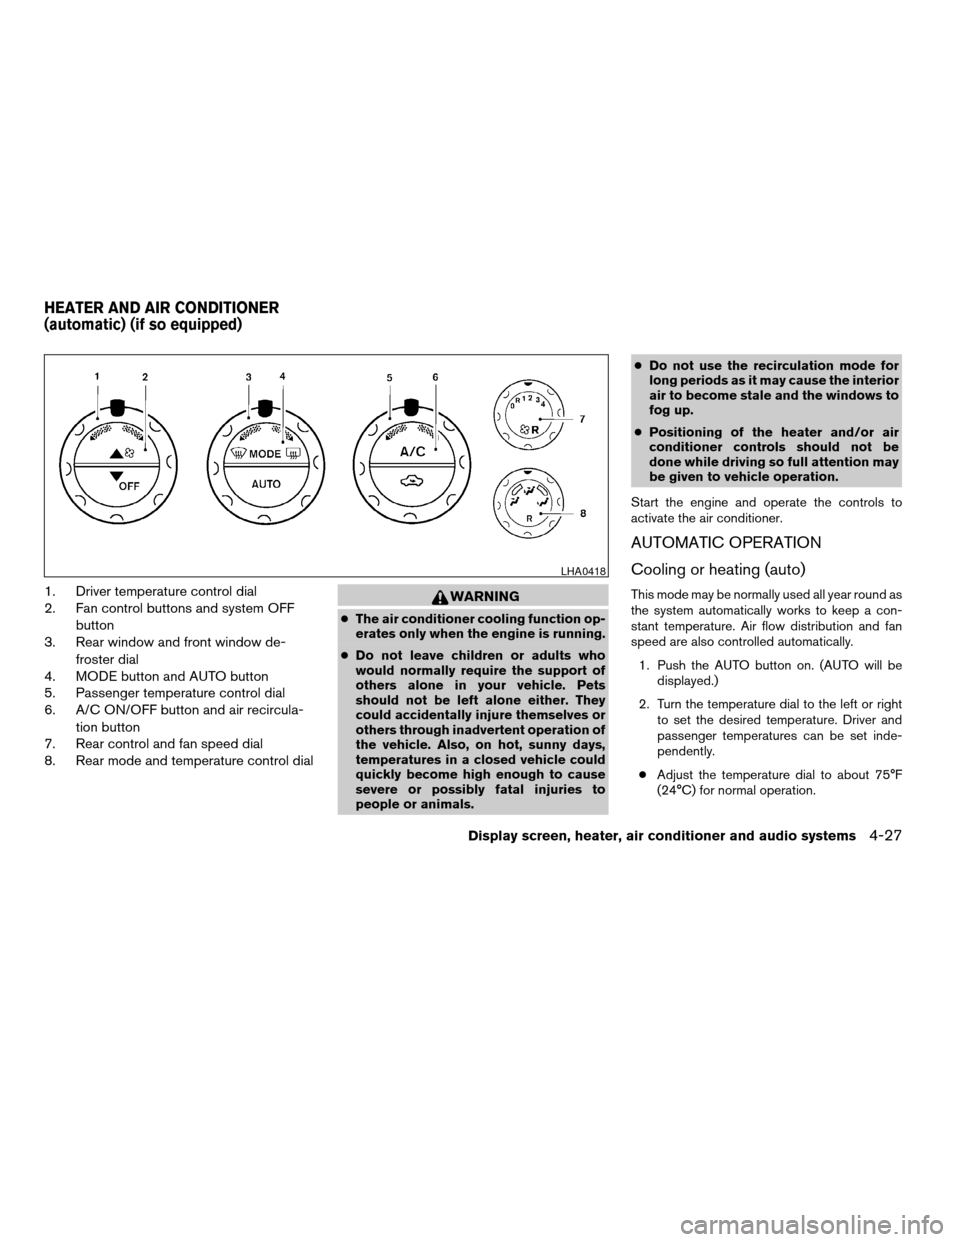
1. Driver temperature control dial
2. Fan control buttons and system OFF
button
3. Rear window and front window de-
froster dial
4. MODE button and AUTO button
5. Passenger temperature control dial
6. A/C ON/OFF button and air recircula-
tion button
7. Rear control and fan speed dial
8. Rear mode and temperature control dialWARNING
cThe air conditioner cooling function op-
erates only when the engine is running.
cDo not leave children or adults who
would normally require the support of
others alone in your vehicle. Pets
should not be left alone either. They
could accidentally injure themselves or
others through inadvertent operation of
the vehicle. Also, on hot, sunny days,
temperatures in a closed vehicle could
quickly become high enough to cause
severe or possibly fatal injuries to
people or animals.cDo not use the recirculation mode for
long periods as it may cause the interior
air to become stale and the windows to
fog up.
cPositioning of the heater and/or air
conditioner controls should not be
done while driving so full attention may
be given to vehicle operation.
Start the engine and operate the controls to
activate the air conditioner.
AUTOMATIC OPERATION
Cooling or heating (auto)
This mode may be normally used all year round as
the system automatically works to keep a con-
stant temperature. Air flow distribution and fan
speed are also controlled automatically.
1. Push the AUTO button on. (AUTO will be
displayed.)
2. Turn the temperature dial to the left or right
to set the desired temperature. Driver and
passenger temperatures can be set inde-
pendently.
cAdjust the temperature dial to about 75°F
(24°C) for normal operation.
LHA0418
HEATER AND AIR CONDITIONER
(automatic) (if so equipped)
Display screen, heater, air conditioner and audio systems4-27
ZREVIEW COPY:Ð2004 Quest(van)
Owners Manual(owners)ÐUSA English(nna)
10/08/03Ðtbrooks
X
Page 227 of 320

sound for only three seconds. Once the system
detects an object approaching, the tone will
sound again.
The RSS automatically turns on when the gear
selector is placed in R (Reverse) and the ignition
is ON. The RSS OFF switch on the instrument
panel allows the driver to turn the RSS on and off.
To turn the RSS off, the ignition must be ON, and
the gear selector in R (Reverse) . An indicator
light on the switch will illuminate when the system
is turned off. If the indicator light illuminates when
the RSS is not turned off, it may indicate a failure
in the RSS.
Keep the RSS sensors (located on the rear
bumper fascia) free from snow, ice and large
accumulations of dirt (do not clean the sensors
with sharp objects) . If the sensors are covered, it
will affect the accuracy of the RSS.FREEING A FROZEN DOOR LOCK
To prevent a door lock from freezing, apply de-
icer through the key hole. If the lock becomes
frozen, heat the key before inserting it into the key
hole.
ANTI-FREEZE
In the winter when it is anticipated that the tem-
perature will drop below 32°F (0°C) , check the
anti-freeze to assure proper winter protection.
For details, see ‘‘Engine cooling system’’ in the
‘‘Maintenance and do-it-yourself’’ section of this
manual.
BATTERY
If the battery is not fully charged during extremely
cold weather conditions, the battery fluid may
freeze and damage the battery. To maintain maxi-
mum efficiency, the battery should be checked
regularly. For details, see ‘‘Battery’’ in the ‘‘Main-
tenance and do-it-yourself’’ section of this
manual.
DRAINING OF COOLANT WATER
If the vehicle is to be left outside without anti-
freeze, drain the cooling system, including the
engine block. Refill before operating the vehicle.For details, see ‘‘Changing engine coolant’’ in the
‘‘Maintenance and do-it-yourself’’ section of this
manual.
TIRE EQUIPMENT
1. SUMMER tires have a tread designed to
provide superior performance on dry pave-
ment. However, the performance of these
tires will be substantially reduced in snowy
and icy conditions. If you operate your ve-
hicle on snowy or icy roads, NISSAN recom-
mends the use of MUD & SNOW or ALL
SEASON TIRES on all four wheels. Please
consult a NISSAN dealer for the tire type,
size, speed rating and availability informa-
tion.
2. For additional traction on icy roads, studded
tires may be used. However, some U.S.
states and Canadian provinces prohibit their
use. Check local, state and provincial laws
before installing studded tires.
Skid and traction capabilities of studded
snow tires on wet or dry surfaces may be
poorer than that of non-studded snow tires.
3. Tire chains may be used.
Use of tire chains may be prohibited accord-
ing to location. Check the local laws before
installing tire chains. When installing tire
chains, make sure they are of proper size for
COLD WEATHER DRIVING
Starting and driving5-21
ZREVIEW COPY:Ð2004 Quest(van)
Owners Manual(owners)ÐUSA English(nna)
10/08/03Ðtbrooks
X