2004 NISSAN QUEST clock
[x] Cancel search: clockPage 90 of 320

cDo not operate the washer if the reser-
voir tank is empty.
cDo not fill the window washer reservoir
tank with washer fluid concentrates at
full strength. Some methyl alcohol
based washer fluid concentrates may
permanently stain the grille if spilled
while filling the window washer reser-
voir tank.
cPre-mix washer fluid concentrates with
water to the manufacturer’s recom-
mended levels before pouring the fluid
into the window washer reservoir tank.
Do not use the window washer reservoir
tank to mix the washer fluid concen-
trate and water.The rear window wiper and washer operate when
the ignition switch is in the ON position.
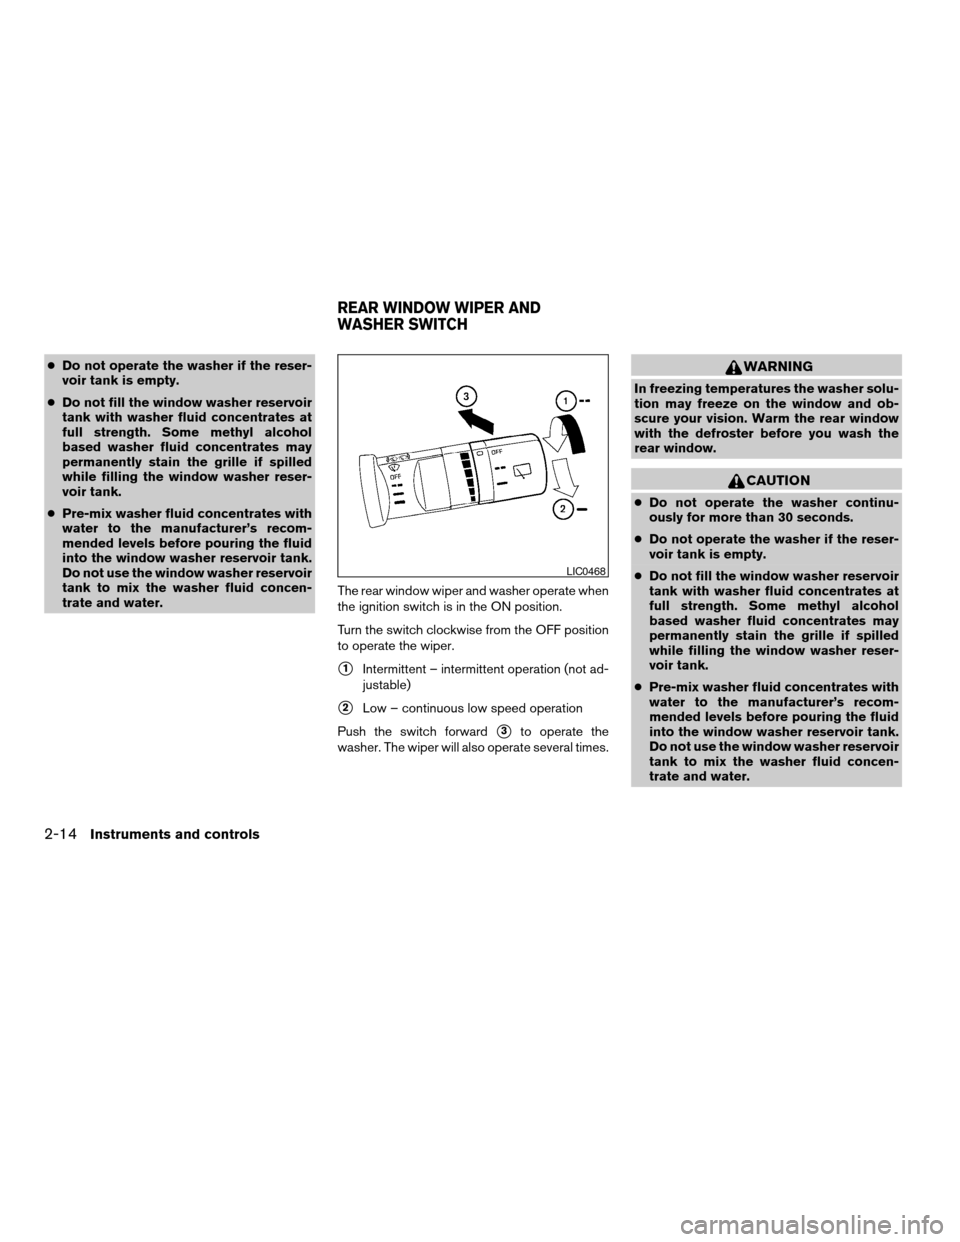
Turn the switch clockwise from the OFF position
to operate the wiper.
s1Intermittent – intermittent operation (not ad-
justable)
s2Low – continuous low speed operation
Push the switch forward
s3to operate the
washer. The wiper will also operate several times.
WARNING
In freezing temperatures the washer solu-
tion may freeze on the window and ob-
scure your vision. Warm the rear window
with the defroster before you wash the
rear window.
CAUTION
cDo not operate the washer continu-
ously for more than 30 seconds.
cDo not operate the washer if the reser-
voir tank is empty.
cDo not fill the window washer reservoir
tank with washer fluid concentrates at
full strength. Some methyl alcohol
based washer fluid concentrates may
permanently stain the grille if spilled
while filling the window washer reser-
voir tank.
cPre-mix washer fluid concentrates with
water to the manufacturer’s recom-
mended levels before pouring the fluid
into the window washer reservoir tank.
Do not use the window washer reservoir
tank to mix the washer fluid concen-
trate and water.
LIC0468
REAR WINDOW WIPER AND
WASHER SWITCH
2-14Instruments and controls
ZREVIEW COPY:Ð2004 Quest(van)
Owners Manual(owners)ÐUSA English(nna)
10/08/03Ðtbrooks
X
Page 91 of 320

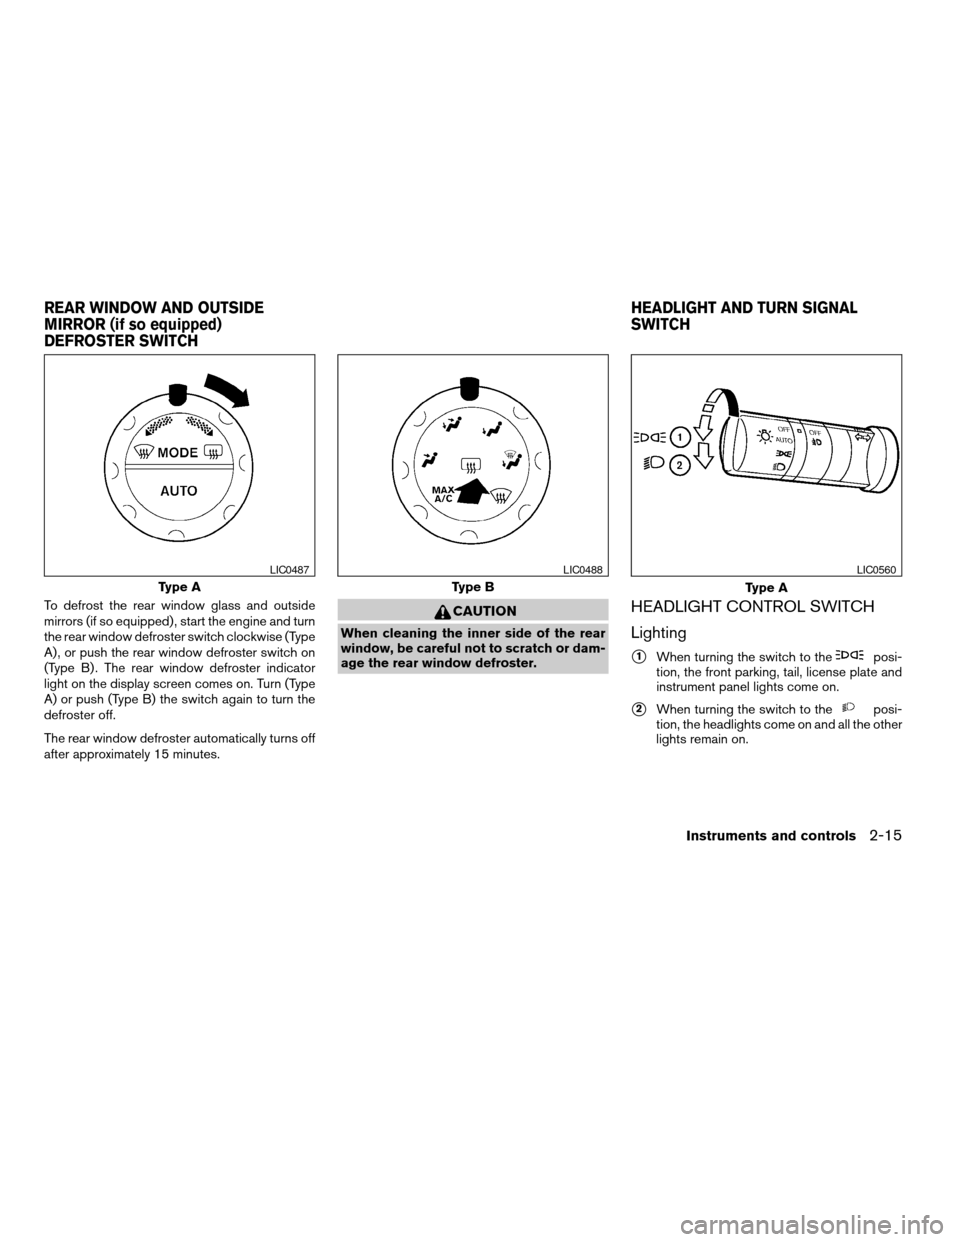
To defrost the rear window glass and outside
mirrors (if so equipped) , start the engine and turn
the rear window defroster switch clockwise (Type
A) , or push the rear window defroster switch on
(Type B) . The rear window defroster indicator
light on the display screen comes on. Turn (Type
A) or push (Type B) the switch again to turn the
defroster off.
The rear window defroster automatically turns off
after approximately 15 minutes.CAUTION
When cleaning the inner side of the rear
window, be careful not to scratch or dam-
age the rear window defroster.
HEADLIGHT CONTROL SWITCH
Lighting
s1When turning the switch to theposi-
tion, the front parking, tail, license plate and
instrument panel lights come on.
s2When turning the switch to theposi-
tion, the headlights come on and all the other
lights remain on.
Type A
LIC0487
Type B
LIC0488
Type A
LIC0560
REAR WINDOW AND OUTSIDE
MIRROR (if so equipped)
DEFROSTER SWITCHHEADLIGHT AND TURN SIGNAL
SWITCH
Instruments and controls2-15
ZREVIEW COPY:Ð2004 Quest(van)
Owners Manual(owners)ÐUSA English(nna)
10/08/03Ðtbrooks
X
Page 110 of 320

CARGO AREA STORAGE BIN
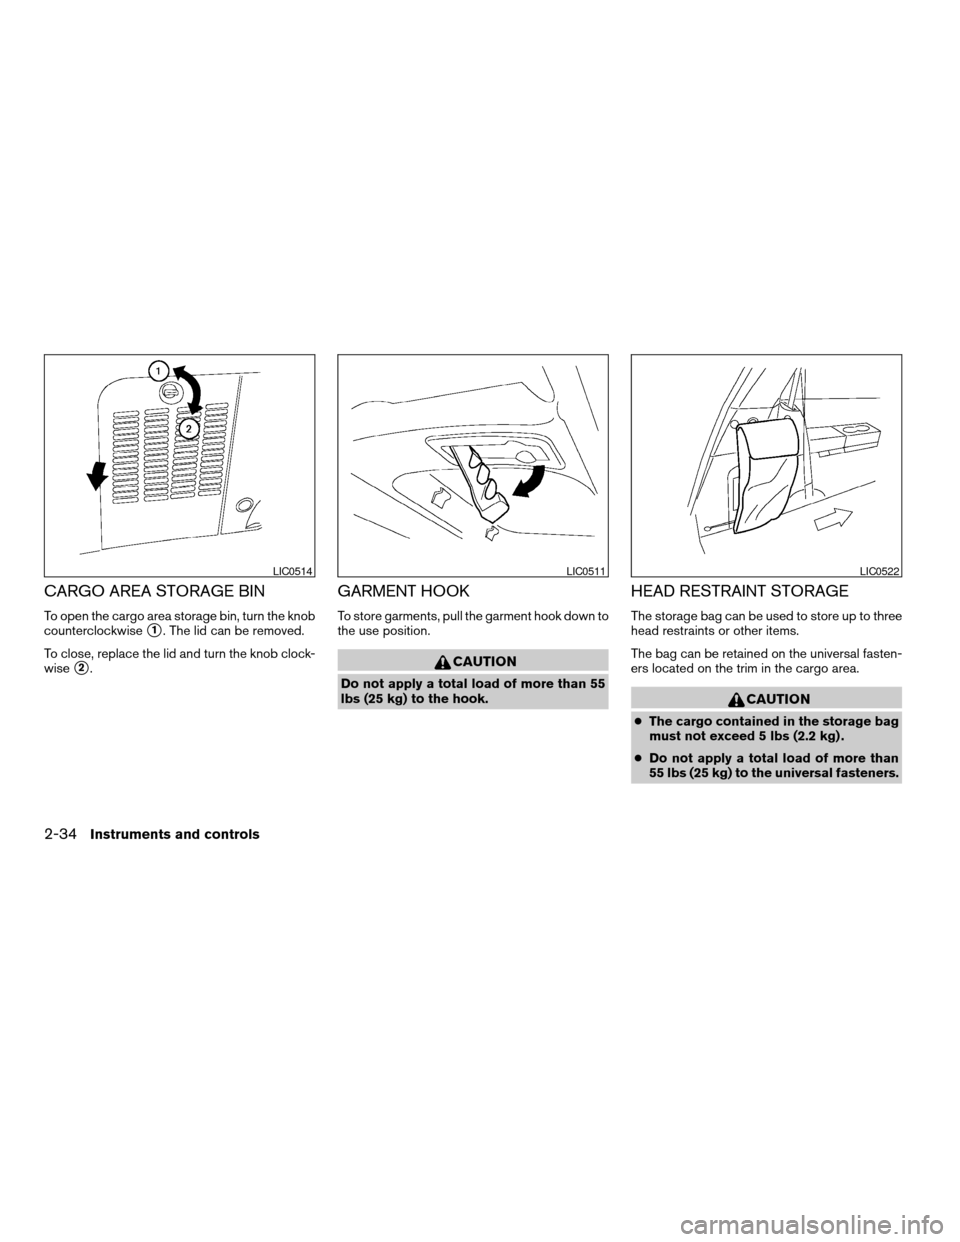
To open the cargo area storage bin, turn the knob
counterclockwise
s1. The lid can be removed.
To close, replace the lid and turn the knob clock-
wise
s2.
GARMENT HOOK
To store garments, pull the garment hook down to
the use position.
CAUTION
Do not apply a total load of more than 55
lbs (25 kg) to the hook.
HEAD RESTRAINT STORAGE
The storage bag can be used to store up to three
head restraints or other items.
The bag can be retained on the universal fasten-
ers located on the trim in the cargo area.
CAUTION
cThe cargo contained in the storage bag
must not exceed 5 lbs (2.2 kg) .
cDo not apply a total load of more than
55 lbs (25 kg) to the universal fasteners.
LIC0514LIC0511LIC0522
2-34Instruments and controls
ZREVIEW COPY:Ð2004 Quest(van)
Owners Manual(owners)ÐUSA English(nna)
10/08/03Ðtbrooks
X
Page 142 of 320

OPENER OPERATION
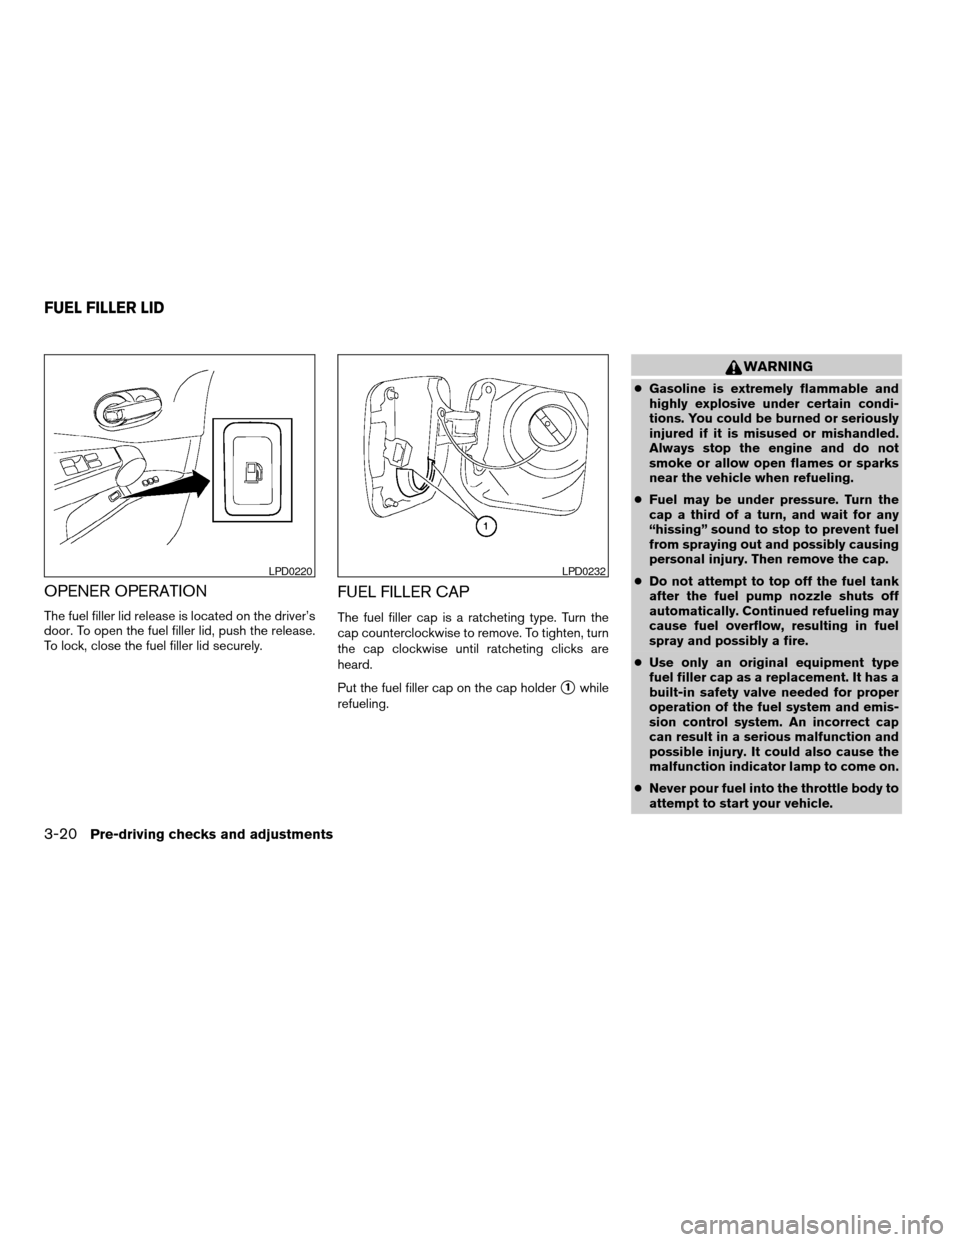
The fuel filler lid release is located on the driver’s
door. To open the fuel filler lid, push the release.
To lock, close the fuel filler lid securely.
FUEL FILLER CAP
The fuel filler cap is a ratcheting type. Turn the
cap counterclockwise to remove. To tighten, turn
the cap clockwise until ratcheting clicks are
heard.
Put the fuel filler cap on the cap holder
s1while
refueling.
WARNING
cGasoline is extremely flammable and
highly explosive under certain condi-
tions. You could be burned or seriously
injured if it is misused or mishandled.
Always stop the engine and do not
smoke or allow open flames or sparks
near the vehicle when refueling.
cFuel may be under pressure. Turn the
cap a third of a turn, and wait for any
“hissing” sound to stop to prevent fuel
from spraying out and possibly causing
personal injury. Then remove the cap.
cDo not attempt to top off the fuel tank
after the fuel pump nozzle shuts off
automatically. Continued refueling may
cause fuel overflow, resulting in fuel
spray and possibly a fire.
cUse only an original equipment type
fuel filler cap as a replacement. It has a
built-in safety valve needed for proper
operation of the fuel system and emis-
sion control system. An incorrect cap
can result in a serious malfunction and
possible injury. It could also cause the
malfunction indicator lamp to come on.
cNever pour fuel into the throttle body to
attempt to start your vehicle.
LPD0220LPD0232
FUEL FILLER LID
3-20Pre-driving checks and adjustments
ZREVIEW COPY:Ð2004 Quest(van)
Owners Manual(owners)ÐUSA English(nna)
10/08/03Ðtbrooks
X
Page 152 of 320

4 Display screen, heater, air conditioner
and audio systems
Control panel buttons — without navigation system....4-2
Names of components..........................4-3
How to use JOYSTICK and “ENTER” button.......4-3
How to use “PREV” button......................4-3
How to use “TRIP” button.......................4-3
How to use “FUEL ECON” button................4-4
Clock.........................................4-4
How to use “E/M” button........................4-4
How to use
(maintenance) button..........4-5
How to use the “SETTING” button................4-5
button...................................4-7
Control panel buttons — with navigation system.......4-8
Names of the components.......................4-8
How to use joystick and “ENTER” button..........4-9
How to use “PREV” button......................4-9
Setting up the start-up screen...................4-9
How to use the “TRIP” button....................4-9
How to use the “SETTING” button...............4-12
button..................................4-16
Ventilators.......................................4-17
Heater and air conditioner (manual).................4-17
Controls......................................4-18
Heater operation..............................4-19Air conditioner operation.......................4-20
Air flow charts.................................4-21
Heater and air conditioner (automatic)
(if so equipped)..................................4-27
Automatic operation...........................4-27
Manual operation..............................4-28
Rear control button............................4-29
Operating tips.................................4-29
Rear seat air conditioner..........................4-29
Controls......................................4-30
Servicing air conditioner...........................4-30
Audio system....................................4-30
Radio........................................4-30
FM radio reception............................4-31
AM radio reception............................4-31
Satellite radio reception (if so equipped).........4-31
Audio operation precautions....................4-32
FM-AM-SAT radio with compact disc (CD)
player (Type A)/CD changer (Type B)............4-34
CD care and cleaning..........................4-41
Steering wheel switch for audio control
(if so equipped)...............................4-41
Rear audio controls (if so equipped).............4-43
ZREVIEW COPY:Ð2004 Quest(van)
Owners Manual(owners)ÐUSA English(nna)
10/08/03Ðtbrooks
X
Page 155 of 320

“Display”key — This is a select key on the
screen. By selecting this key you can proceed to
the next function.
NAMES OF COMPONENTS
1.brightness control button (P. 4-7)
2. PREV (previous) button (P. 4-3)
3. Joystick and ENTER push button (P. 4-3)
4. SETTING button (P. 4-5)
5.
(maintenance) button (P. 4-5)
6. TRIP drive computer button (P. 4-3)
7. E/M (English/Metric) button (P. 4-4)
8. FUEL ECON button (P. 4-4)
9. TRIP RESET button (P. 4-3)
10. Clock adjust button (hours/minutes) (P. 4-4)
To turn off the screen, push the
button for
more than approximately 1.5 seconds. The
screen will change to “CONFIRM DISPLAY OFF
YES or NO”.
HOW TO USE JOYSTICK AND
“ENTER” BUTTON
Choose an item on the display using the joystick.
Push the“ENTER”button only when the use of it
is instructed on the display.
HOW TO USE “PREV” BUTTON
Finish setup:
If you touch“PREV”button after the setup is
completed, the setup will start over.
HOW TO USE “TRIP” BUTTON
When the“TRIP”button is pushed, the following
modes will display on the screen.
TRIP 1 (TIME, DIST, AVG)!TRIP 2 (TIME, DIST,
AVG)!OFF
TRIP 1 and TRIP 2 record journey time (TIME —
max 99 hours 59 minutes) , trip odometer (DIST
— mile or km) and average speed (AVG — MPH
or km/h) .
To reset the TRIP 1 or TRIP 2, push the“TRIP”
button or the“TRIP RESET”button for more
than approximately 1.5 seconds.
LHA0252
Display screen, heater, air conditioner and audio systems4-3
ZREVIEW COPY:Ð2004 Quest(van)
Owners Manual(owners)ÐUSA English(nna)
10/08/03Ðtbrooks
X
Page 156 of 320

HOW TO USE “FUEL ECON”
BUTTON
The average fuel consumption (MPG or L/100
km) and the distance to empty (dte — mi or km)
will appear on the screen when the“FUEL
ECON”button is pushed.
Average fuel consumption (MPG or
L/100 km)
The average fuel consumption mode shows the
average fuel consumption since the last reset.
Resetting is done by pressing the“TRIP RE-
SET”or“FUEL ECON”button for more than
approximately 1.5 seconds.The display is updated every 30 seconds. For
approximately the first 30 seconds and 1/3 miles
(500 m) after a reset or connecting the battery
cables, the display will show (----) .
Distance to empty (dte — mile or km)
The distance to empty (dte) mode provides you
with an estimation of the distance that can be
driven before refueling. The dte is constantly be-
ing calculated based on the amount of fuel in the
fuel tank and the actual fuel consumption.
The display is updated every 30 seconds.
When the fuel level is low, the dte display will
change to (*) .
NOTE:
cIf the amount of fuel added while the ignition
switch is OFF is small, the display just before
the ignition switch is turned OFF may con-
tinue to be displayed.
cWhen driving uphill or rounding curves, the
fuel in the tank shifts, which may momentarily
change the display.
CLOCK
The digital clock displays time when the ignition
key is in ACC or ON.
If the power supply is disconnected, the
clock will not indicate the correct time.
Readjust the time.
Adjusting the time
To adjust the time, push the“H”or“M”button
for more than approximately 1.5 seconds. The
time indicator will flash.
Touch the“H”button to adjust the hour.
Touch the“M”button to adjust the minute.
To finish the adjusting, press the“PREV”button
or the screen will return to normal after 10 sec-
onds.
HOW TO USE “E/M” BUTTON
You can change the unit as follows using the
“E/M”(English/Metric) button.
Unit: US — mile, °F, MPG
Metric — km, °C, L/100 km
LHA0253
4-4Display screen, heater, air conditioner and audio systems
ZREVIEW COPY:Ð2004 Quest(van)
Owners Manual(owners)ÐUSA English(nna)
10/08/03Ðtbrooks
X
Page 166 of 320

cHigher- more sensitive, automatic head-
lights will come on quicker when the head-
light sensor senses less ambient light.
Automatic headlights off delay:
This key allows you to set the length of time
before the automatic headlights turn off after
exiting the vehicle.
Speed dependent wiper:
This key allows you to turn on or turn off the
driving speed dependent intermittent wiper func-
tion.
Return all settings to default:
When this key is selected and turned on using
the“ENTER”button, all settings made by VE-
HICLE ELECTRONICS will return to the default
settings.
System settings
Language/Unit
The LANGUAGE/UNIT screen will appear when
selecting the“Language/Unit”key and push-
ing the“ENTER”button.
Language: English or French
Unit: US — mile, °F, MPG
Metric — km, °C, L/100 km
You can select the language and unit using the
joystick and“ENTER”button.Clock
Adjusting the time:
Select the“Hours”or“Minutes”key and move
the joystick to the right or left to adjust the time.
The time will change step by step.
After completion of the setting, press the
“PREV”button.
LHA0262LHA0270
4-14Display screen, heater, air conditioner and audio systems
ZREVIEW COPY:Ð2004 Quest(van)
Owners Manual(owners)ÐUSA English(nna)
10/08/03Ðtbrooks
X