2004 NISSAN QUEST CD player
[x] Cancel search: CD playerPage 152 of 320

4 Display screen, heater, air conditioner
and audio systems
Control panel buttons — without navigation system....4-2
Names of components..........................4-3
How to use JOYSTICK and “ENTER” button.......4-3
How to use “PREV” button......................4-3
How to use “TRIP” button.......................4-3
How to use “FUEL ECON” button................4-4
Clock.........................................4-4
How to use “E/M” button........................4-4
How to use
(maintenance) button..........4-5
How to use the “SETTING” button................4-5
button...................................4-7
Control panel buttons — with navigation system.......4-8
Names of the components.......................4-8
How to use joystick and “ENTER” button..........4-9
How to use “PREV” button......................4-9
Setting up the start-up screen...................4-9
How to use the “TRIP” button....................4-9
How to use the “SETTING” button...............4-12
button..................................4-16
Ventilators.......................................4-17
Heater and air conditioner (manual).................4-17
Controls......................................4-18
Heater operation..............................4-19Air conditioner operation.......................4-20
Air flow charts.................................4-21
Heater and air conditioner (automatic)
(if so equipped)..................................4-27
Automatic operation...........................4-27
Manual operation..............................4-28
Rear control button............................4-29
Operating tips.................................4-29
Rear seat air conditioner..........................4-29
Controls......................................4-30
Servicing air conditioner...........................4-30
Audio system....................................4-30
Radio........................................4-30
FM radio reception............................4-31
AM radio reception............................4-31
Satellite radio reception (if so equipped).........4-31
Audio operation precautions....................4-32
FM-AM-SAT radio with compact disc (CD)
player (Type A)/CD changer (Type B)............4-34
CD care and cleaning..........................4-41
Steering wheel switch for audio control
(if so equipped)...............................4-41
Rear audio controls (if so equipped).............4-43
ZREVIEW COPY:Ð2004 Quest(van)
Owners Manual(owners)ÐUSA English(nna)
10/08/03Ðtbrooks
X
Page 153 of 320

Antenna......................................4-43
DVD entertainment system (if so equipped)..........4-44
Digital video disc (DVD) player controls..........4-45
Remote control................................4-46
Flip-down screen..............................4-46Playing a digital video disc (DVD)...............4-48
Care and maintenance.........................4-51
How to handle the DVD........................4-52
Car phone or CB radio............................4-53
ZREVIEW COPY:Ð2004 Quest(van)
Owners Manual(owners)ÐUSA English(nna)
10/08/03Ðtbrooks
X
Page 184 of 320

AUDIO OPERATION PRECAUTIONS
Compact disc (CD) player
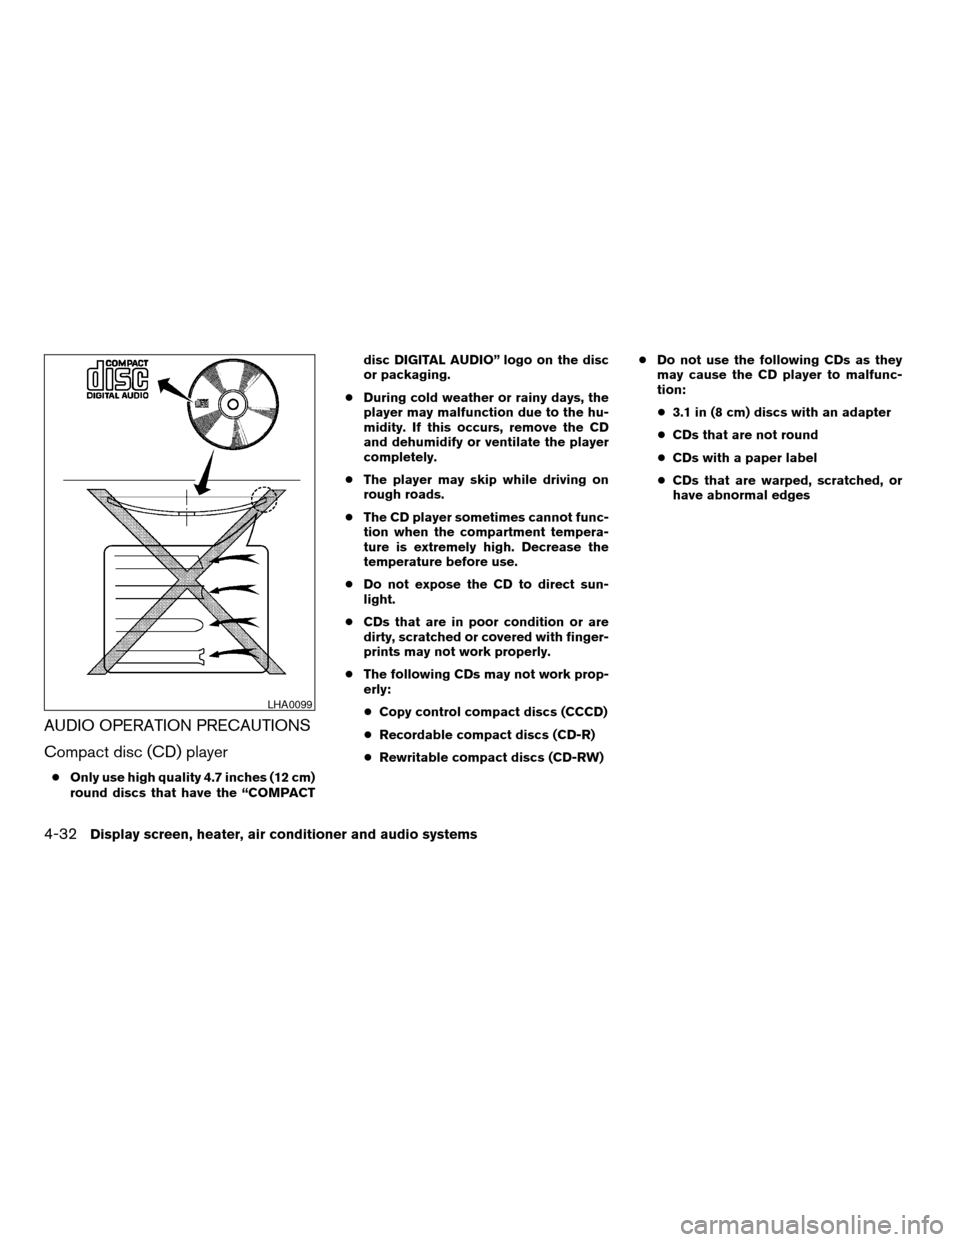
cOnly use high quality 4.7 inches (12 cm)
round discs that have the “COMPACTdisc DIGITAL AUDIO” logo on the disc
or packaging.
cDuring cold weather or rainy days, the
player may malfunction due to the hu-
midity. If this occurs, remove the CD
and dehumidify or ventilate the player
completely.
cThe player may skip while driving on
rough roads.
cThe CD player sometimes cannot func-
tion when the compartment tempera-
ture is extremely high. Decrease the
temperature before use.
cDo not expose the CD to direct sun-
light.
cCDs that are in poor condition or are
dirty, scratched or covered with finger-
prints may not work properly.
cThe following CDs may not work prop-
erly:
cCopy control compact discs (CCCD)
cRecordable compact discs (CD-R)
cRewritable compact discs (CD-RW)cDo not use the following CDs as they
may cause the CD player to malfunc-
tion:
c3.1 in (8 cm) discs with an adapter
cCDs that are not round
cCDs with a paper label
cCDs that are warped, scratched, or
have abnormal edges
LHA0099
4-32Display screen, heater, air conditioner and audio systems
ZREVIEW COPY:Ð2004 Quest(van)
Owners Manual(owners)ÐUSA English(nna)
10/08/03Ðtbrooks
X
Page 186 of 320

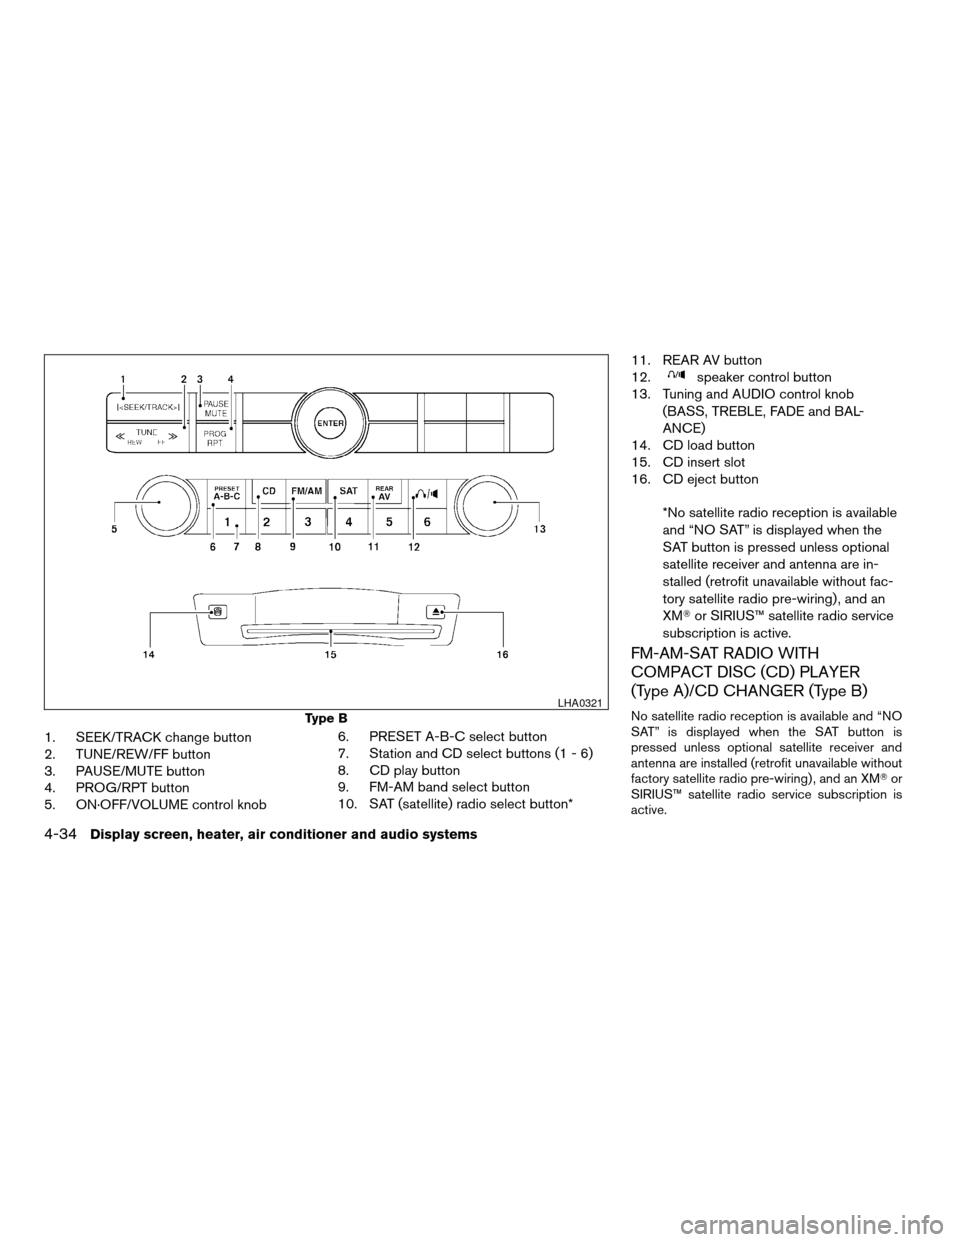
1. SEEK/TRACK change button
2. TUNE/REW/FF button
3. PAUSE/MUTE button
4. PROG/RPT button
5. ON·OFF/VOLUME control knob6. PRESET A-B-C select button
7. Station and CD select buttons (1 - 6)
8. CD play button
9. FM-AM band select button
10. SAT (satellite) radio select button*11. REAR AV button
12.
speaker control button
13. Tuning and AUDIO control knob
(BASS, TREBLE, FADE and BAL-
ANCE)
14. CD load button
15. CD insert slot
16. CD eject button
*No satellite radio reception is available
and “NO SAT” is displayed when the
SAT button is pressed unless optional
satellite receiver and antenna are in-
stalled (retrofit unavailable without fac-
tory satellite radio pre-wiring) , and an
XMTor SIRIUS™ satellite radio service
subscription is active.
FM-AM-SAT RADIO WITH
COMPACT DISC (CD) PLAYER
(Type A)/CD CHANGER (Type B)
No satellite radio reception is available and “NO
SAT” is displayed when the SAT button is
pressed unless optional satellite receiver and
antenna are installed (retrofit unavailable without
factory satellite radio pre-wiring) , and an XMTor
SIRIUS™ satellite radio service subscription is
active.Type B
LHA0321
4-34Display screen, heater, air conditioner and audio systems
ZREVIEW COPY:Ð2004 Quest(van)
Owners Manual(owners)ÐUSA English(nna)
10/08/03Ðtbrooks
X
Page 189 of 320

equipped) mode, the PTY name of the current
tuned station is displayed. During this time if the
PTY data code is zero or the data is unreadable,
the display will show NONE.
To change the PTY:
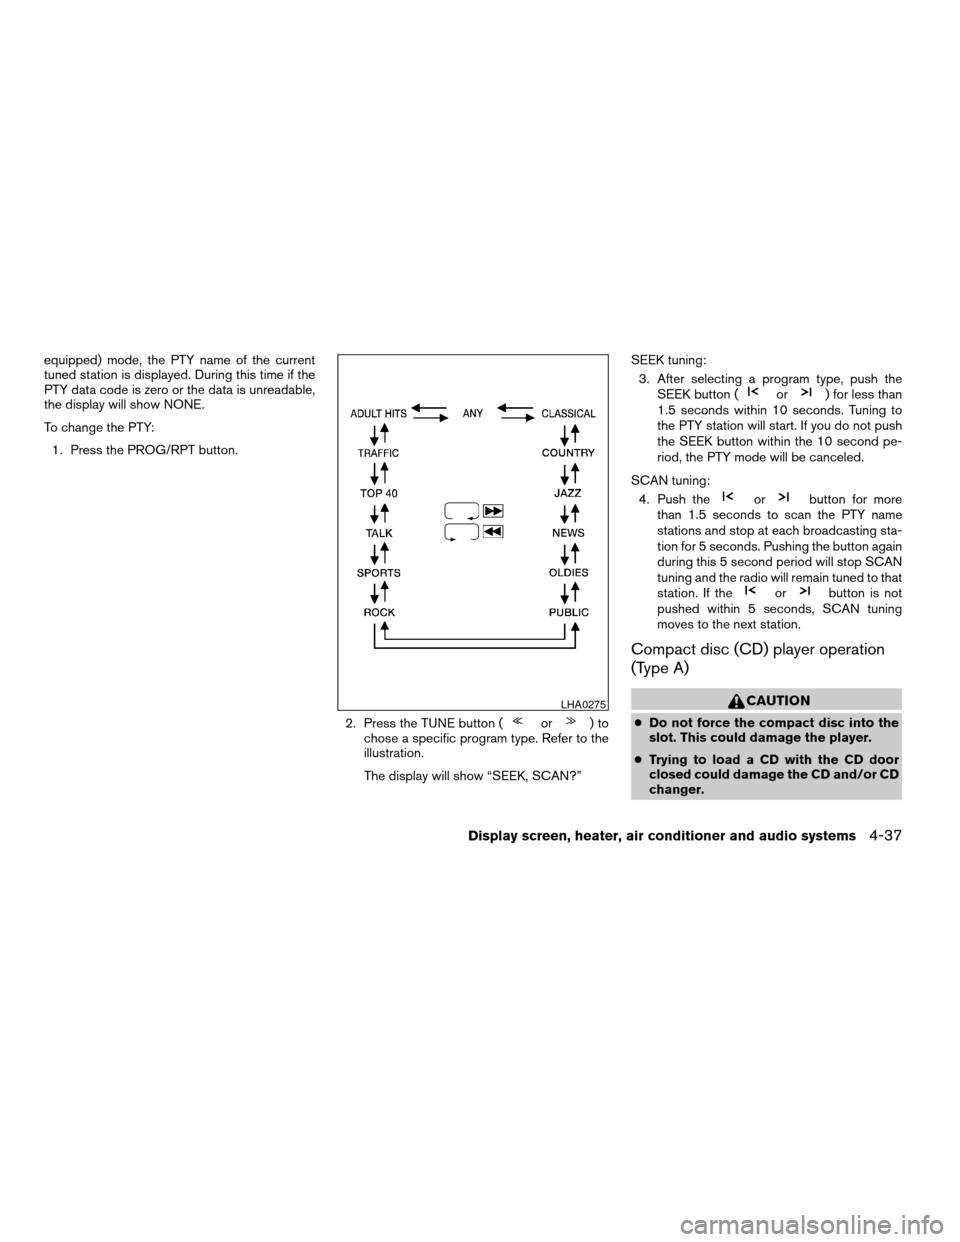
1. Press the PROG/RPT button.
2. Press the TUNE button (
or)to
chose a specific program type. Refer to the
illustration.
The display will show “SEEK, SCAN?”SEEK tuning:
3. After selecting a program type, push the
SEEK button (
or) for less than
1.5 seconds within 10 seconds. Tuning to
the PTY station will start. If you do not push
the SEEK button within the 10 second pe-
riod, the PTY mode will be canceled.
SCAN tuning:
4. Push the
orbutton for more
than 1.5 seconds to scan the PTY name
stations and stop at each broadcasting sta-
tion for 5 seconds. Pushing the button again
during this 5 second period will stop SCAN
tuning and the radio will remain tuned to that
station. If the
orbutton is not
pushed within 5 seconds, SCAN tuning
moves to the next station.
Compact disc (CD) player operation
(Type A)
CAUTION
cDo not force the compact disc into the
slot. This could damage the player.
cTrying to load a CD with the CD door
closed could damage the CD and/or CD
changer.
LHA0275
Display screen, heater, air conditioner and audio systems4-37
ZREVIEW COPY:Ð2004 Quest(van)
Owners Manual(owners)ÐUSA English(nna)
10/08/03Ðtbrooks
X
Page 190 of 320

Turn the ignition key to the ACC or ON position and
insert the compact disc into the slot with the label
side facing up. The compact disc will be guided
automatically into the slot and start playing.
If the radio is already operating, it will automati-
cally turn off and the compact disc will play.
If the system has been turned off while the com-
pact disc was playing, pushing the ON·OFF/VOL
control knob will start the compact disc.
3.1 in (8 cm) diameter compact discs can also be
used without an adapter.
CD button:
When the CD button is pushed with the system
off and the compact disc loaded, the system will
turn on and the compact disc will start to play.
When the CD button is pushed with the compact
disc loaded but the radio playing, the radio will
automatically be turned off and the compact disc
will start to play.
REW (Rewind) , FF (Fast
Forward):
When the
(rewind) or(fast forward)
button is pushed while the compact disc is being
played, the compact disc will play while rewind-
ing or fast forwarding. When the button is re-
leased, the compact disc will return to normal
play speed.
SEEK/TRACK:
When the
button is pushed for less than
1.5 seconds while a compact disc is playing, the
track being played returns to its beginning. Push
several times to skip back through tracks. The
compact disc will go back the number of times
the button is pushed.
When the
button is pushed for less than
1.5 seconds while a compact disc is playing, the
next track will start to play from its beginning.
Push several times to skip through tracks. The
compact disc will advance the number of times
the button is pushed. (When the last track on the
compact disc is skipped through, the first track
will be played.)
When the
orbutton is pushed for
more than 1.5 seconds, each track will play for
about 10 seconds. To stop playing, push
the
button.
REPEAT (RPT):
When the PROG/RPT button is pushed while the
compact disc is being played, the play pattern
can be changed as follows:
ALL DISC RPT!1 TRACK RPT!1 DISC RDM
!ALL DISC RPTALL DISC RPT: the entire disk will be repeated
1 TRACK RPT: the current track will be repeated
1 DISC RDM: all tracks will be played randomly
REAR AV:
Pushing the REAR AV button for less than 1.5
seconds turns the rear seat audio controller on.
Pushing it again will turn the rear seat audio
controller off. If the vehicle is not equipped with a
rear seat audio controller, the display will show
“REAR AV N/A”.
If a DVD is loaded in the DVD entertainment
system (if so equipped) , pushing the REAR AV
button for more than 1.5 seconds will turn the
DVD player on.
When the REAR AV button is pushed for more
than 1.5 seconds with a DVD loaded and another
audio source playing, the other source will auto-
matically be turned off and the DVD will start to
play.
(SPEAKER CONTROL) button:
Push this button to turn the rear speakers off and
headphones on. Push this button again to turn
rear seat speakers back on and headphones off.
4-38Display screen, heater, air conditioner and audio systems
ZREVIEW COPY:Ð2004 Quest(van)
Owners Manual(owners)ÐUSA English(nna)
10/08/03Ðtbrooks
X
Page 191 of 320

CD EJECT:
When the
button is pushed with the com-
pact disc loaded, the compact disc will be
ejected.
When
button is pushed while the compact
disc is being played, the compact disc will eject
and the system will turn off.
If the compact disc ejects and is not re-
moved, it will be pulled back into the slot to
protect it (except 3.1 in (8 cm) diameter
compact discs) .
CD IN indicator:
CD IN indicator appears on the display when the
CD is loaded with the system on.
Compact disc (CD) changer operation
(Type B)
CAUTION
cDo not force a compact disc into the CD
insert slot. This could damage the CD
and/or CD changer/player.
cTrying to load a CD with the CD door
closed could damage the CD and/or CD
changer.Turn the ignition key to the ACC or ON position
and insert the compact disc into the slot with the
label side facing up. The compact disc will be
guided automatically into the slot and start play-
ing. To insert the disc, first push the LOAD button.
If the radio is already operating, it will automati-
cally turn off and the compact disc will play.
If the system has been turned off while the com-
pact disc was playing, pushing the ON·OFF/VOL
control knob will start the compact disc.
LOAD button:
To insert a CD in the CD changer, push the LOAD
button for less than 1.5 seconds. Select the
loading slot by pushing the CD insert select
button (1 - 6) , then insert the CD.
To insert 6 CDs to the CD changer, push the
LOAD button for more than 1.5 seconds.
The slot numbers (1 - 6) will illuminate on the
display when CDs are loaded into the changer.
CD button:
When the CD button is pushed with the system
off and the compact disc loaded, the system will
turn on and the compact disc will start to play.When the CD button is pushed with the compact
disc loaded with the radio playing, the radio will
automatically be turned off and the compact disc
will start to play.
REW (Rewind) , FF (Fast
Forward):
When the
(rewind) or(fast forward)
button is pushed while a compact disc is playing,
the compact disc will play while rewinding or fast
forwarding . When the button is released, the
compact disc will return to normal play speed.
When the CD button is pushed with the system
off and the compact disc loaded, the system will
turn on and the compact disc will start to play.
When the CD button is pushed with the compact
disc loaded with the tape or the radio playing, the
tape or radio will automatically be turned off and
the compact disc will start to play.
SEEK/TRACK:
When the
button is pushed for less than 1.5
seconds while a compact disc is playing, the
track being played returns to its beginning. Push
several times to skip back through tracks. The
compact disc will go back the number of times
the button is pushed.
Display screen, heater, air conditioner and audio systems4-39
ZREVIEW COPY:Ð2004 Quest(van)
Owners Manual(owners)ÐUSA English(nna)
10/08/03Ðtbrooks
X
Page 192 of 320

When thebutton is pushed for less than 1.5
seconds while the compact disc is playing, the
next track will start to play from its beginning.
Push several times to skip through tracks. The
compact disc will advance the number of times
the button is pushed. (When the last track on the
compact disc is skipped through, the first track
will be played.)
When pushing the
orbutton for more
than 1.5 seconds, each track will play for about
10 seconds. To stop playing, push
the
button again.
CD select buttons:
To play another CD that has been loaded, push a
CD select button (1 - 6) .
REPEAT (RPT):
When the PROG/RPT play button is pushed
while the compact disc is played, the play pattern
can be changed as follows:
ALL DISC RPT!1 DISC RPT!1 TRACK RPT
!ALL DISC RDM!1 DISC RDM!ALL DISC
RPT
ALL DISC RPT: All discs loaded will be repeated.
1 DISC RPT: The disc that is currently playing will
be repeated.
1 TRACK RPT: The track that is currently playing
will be repeatedALL DISC RDM: Tracks from all discs will be
played randomly
1 DISC RDM: Tracks from the disc that is cur-
rently playing will be played randomly
REAR AV:
Pushing the REAR AV button for less than 1.5
seconds turns the rear seat audio controller on.
Pushing it again will turn the rear seat audio
controller off. If the vehicle is not equipped with a
rear seat audio controller, the display will show
“REAR AV N/A”.
If a DVD is loaded in the DVD entertainment
system (if so equipped) , pushing the REAR AV
button for more than 1.5 seconds will turn the
DVD player on.
When the REAR AV button is pushed for more
than 1.5 seconds with a DVD loaded and another
audio source playing, the other source will auto-
matically be turned off and the DVD will start to
play.
(SPEAKER CONTROL) button:
Push this button to turn the rear speakers off and
headphones on. Push this button again to turn
rear seat speakers back on and headphones off.
CD EJECT:
Current disc:
cPress the slot number (1 - 6) for the desired
disc, then press the
button. The com-
pact disc will be ejected. If the disc is not
removed within 15 seconds, the disc will
reload (except 3.1 in [8 cm] diameter com-
pact discs) .
All discs:
cPress and hold the
button for more
than 1.5 seconds. The compact discs will be
ejected one by one. If a disc is not removed
within 15 seconds, or the
button is
pressed again during the eject sequence,
the entire disc eject sequence will be can-
celed.
When this button is pushed while the compact
disc is being played, the compact disc will eject
and the last source will be played.
CD IN indicator:
The slot numbers (1 - 6) will illuminate if CDs
have been loaded into the changer.
4-40Display screen, heater, air conditioner and audio systems
ZREVIEW COPY:Ð2004 Quest(van)
Owners Manual(owners)ÐUSA English(nna)
10/08/03Ðtbrooks
X