2004 NISSAN QUEST driver seat adjustment
[x] Cancel search: driver seat adjustmentPage 18 of 320

WARNING
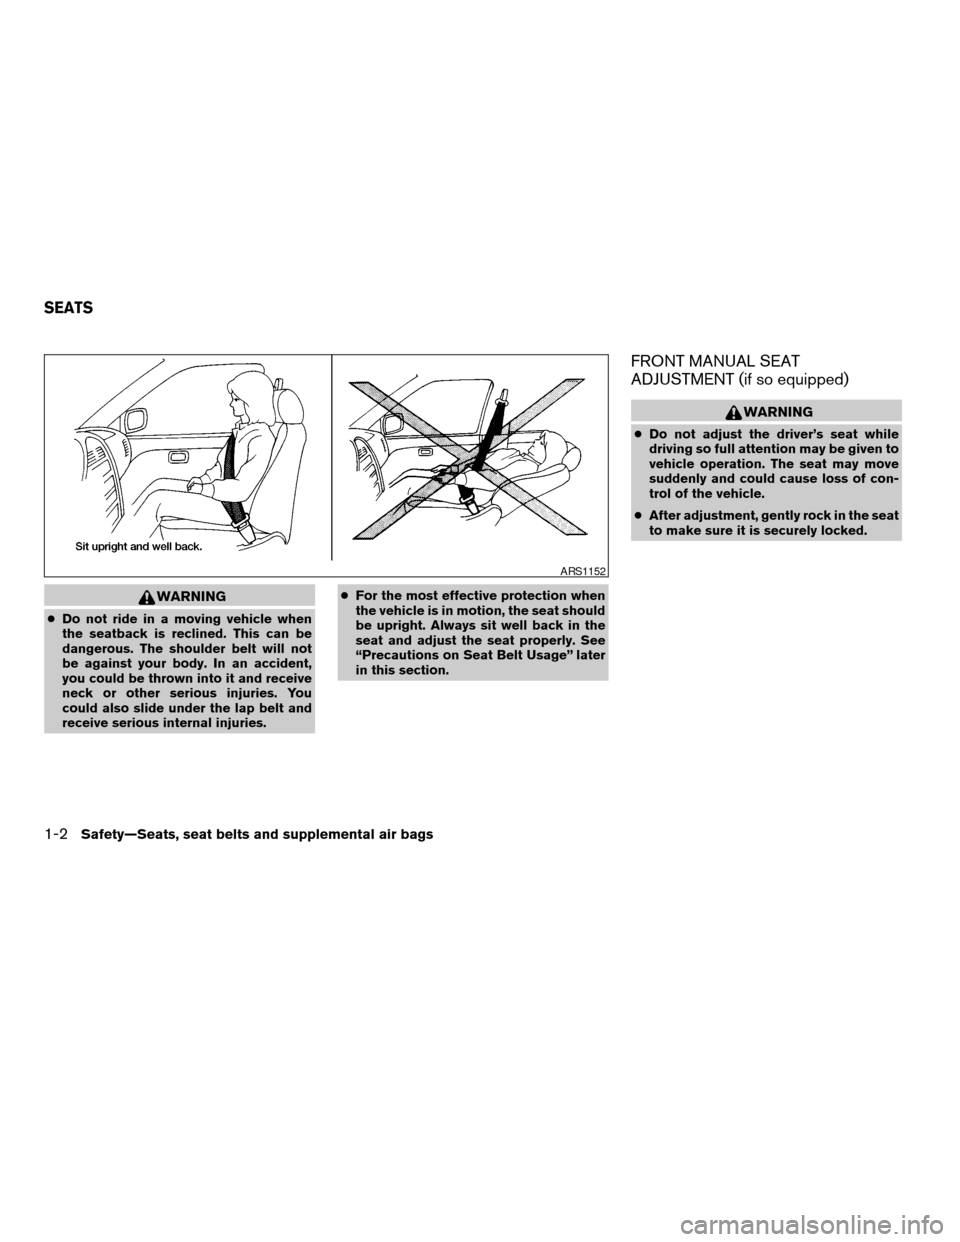
cDo not ride in a moving vehicle when
the seatback is reclined. This can be
dangerous. The shoulder belt will not
be against your body. In an accident,
you could be thrown into it and receive
neck or other serious injuries. You
could also slide under the lap belt and
receive serious internal injuries.cFor the most effective protection when
the vehicle is in motion, the seat should
be upright. Always sit well back in the
seat and adjust the seat properly. See
“Precautions on Seat Belt Usage” later
in this section.
FRONT MANUAL SEAT
ADJUSTMENT (if so equipped)
WARNING
cDo not adjust the driver’s seat while
driving so full attention may be given to
vehicle operation. The seat may move
suddenly and could cause loss of con-
trol of the vehicle.
cAfter adjustment, gently rock in the seat
to make sure it is securely locked.
ARS1152
SEATS
1-2Safety—Seats, seat belts and supplemental air bags
ZREVIEW COPY:Ð2004 Quest(van)
Owners Manual(owners)ÐUSA English(nna)
10/08/03Ðtbrooks
X
Page 21 of 320

FRONT POWER SEAT
ADJUSTMENT (if so equipped)
WARNING
cDo not adjust the driver’s seat while
driving so full attention may be given to
vehicle operation. The seat may move
suddenly and could cause loss of con-
trol of the vehicle.cDo not leave children unattended inside
the vehicle. They could unknowingly ac-
tivate switches or controls and become
trapped in a window. Unattended chil-
dren could become involved in serious
accidents.
Operating tips
cThe power seat motor has an auto-reset
overload protection circuit. If the motor
stops during operation, wait 30 seconds,
then reactivate the switch.cDo not operate the power seat switch for a
long period of time when the engine is off.
This will discharge the battery.
See “Automatic drive positioner (if so equipped)”
in “Pre-driving checks and adjustments” for auto-
matic drive positioner operation.
Forward and backward
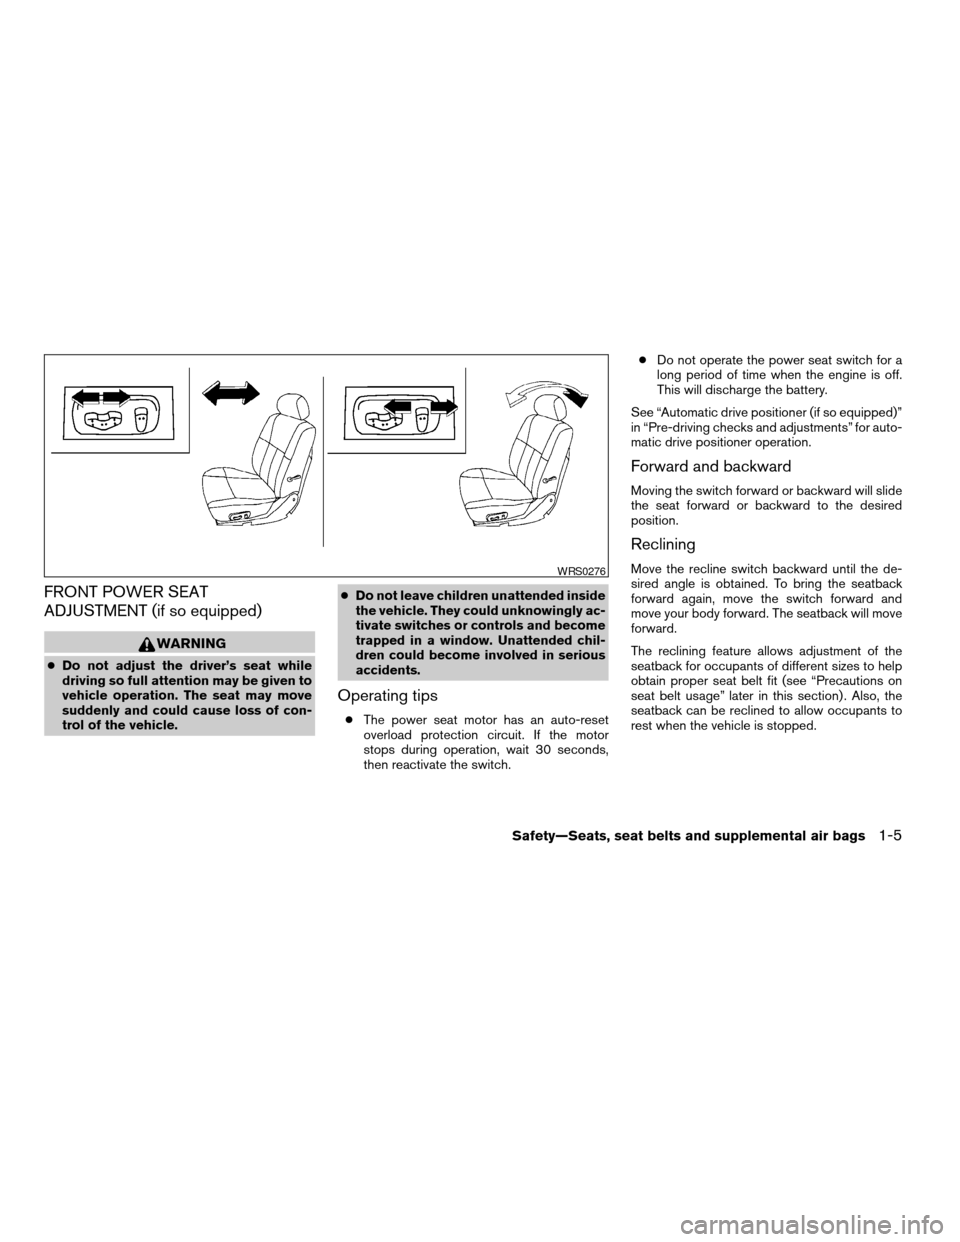
Moving the switch forward or backward will slide
the seat forward or backward to the desired
position.
Reclining
Move the recline switch backward until the de-
sired angle is obtained. To bring the seatback
forward again, move the switch forward and
move your body forward. The seatback will move
forward.
The reclining feature allows adjustment of the
seatback for occupants of different sizes to help
obtain proper seat belt fit (see “Precautions on
seat belt usage” later in this section) . Also, the
seatback can be reclined to allow occupants to
rest when the vehicle is stopped.WRS0276
Safety—Seats, seat belts and supplemental air bags1-5
ZREVIEW COPY:Ð2004 Quest(van)
Owners Manual(owners)ÐUSA English(nna)
10/08/03Ðtbrooks
X
Page 22 of 320

Seat lifter (if so equipped for driver’s
seat)
Push the front or rear end of the switch up or
down to adjust the angle and height of the seat
cushion.
Lumbar support (driver’s seat)
The lumbar support feature provides lower back
support to the driver. Move the lever up or down
to adjust the seat lumbar area.
2ND ROW CAPTAIN’S CHAIR
ADJUSTMENT
Forward and backward
Pull the lever ups1and hold it while you slides2
the seat forward or backward to the desired
position. Release the lever to lock the seat in
position.
WRS0277LRS0278LRS0279
1-6Safety—Seats, seat belts and supplemental air bags
ZREVIEW COPY:Ð2004 Quest(van)
Owners Manual(owners)ÐUSA English(nna)
10/08/03Ðtbrooks
X
Page 125 of 320

WARNING
cAlways have the doors locked while
driving. Along with the use of seat belts,
this provides greater safety in the event
of an accident by helping to prevent
persons from being thrown from the
vehicle. This also helps keep children
and others from unintentionally open-
ing the doors, and will help keep out
intruders.
cBefore opening any door, always look
for and avoid oncoming traffic.
cDo not leave children unattended inside
the vehicle. They could unknowingly ac-
tivate switches or controls. Unattended
children could become involved in seri-
ous accidents.
CAUTION
cAlways use the door handle to open or
close a sliding door. Do not attempt to
open or close the doors by merely plac-
ing your hand on the door edge or door
slide roller, as this may cause injury.
cAlways be sure that hands and feet are
clear of the door frame to avoid injury
while closing a sliding door.cWhen opening a sliding door on a slope,
ensure that it is fully open and that it
does not close by itself.
LOCKING WITH KEY
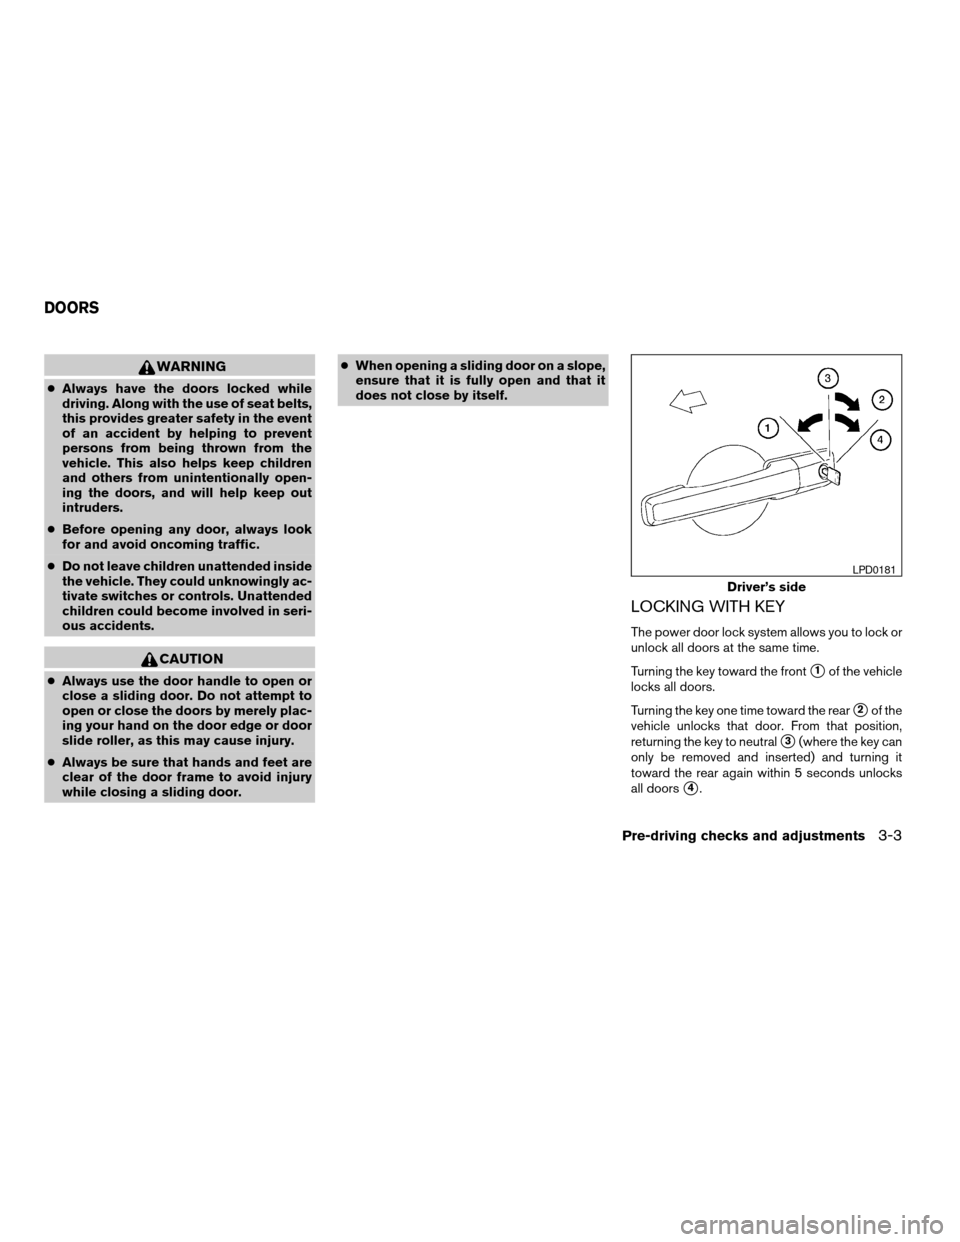
The power door lock system allows you to lock or
unlock all doors at the same time.
Turning the key toward the front
s1of the vehicle
locks all doors.
Turning the key one time toward the rear
s2of the
vehicle unlocks that door. From that position,
returning the key to neutral
s3(where the key can
only be removed and inserted) and turning it
toward the rear again within 5 seconds unlocks
all doors
s4.
Driver’s side
LPD0181
DOORS
Pre-driving checks and adjustments3-3
ZREVIEW COPY:Ð2004 Quest(van)
Owners Manual(owners)ÐUSA English(nna)
10/08/03Ðtbrooks
X
Page 148 of 320

MEMORY STORAGE FUNCTION
Two positions for the driver’s seat, accelerator
and brake pedals, and outside mirrors can be
stored in the automatic drive positioner memory.
Follow these procedures to use the memory sys-
tem.
1. Set the automatic transmission selector le-
ver to the P (Park) position.
2. Turn the ignition ON.3. Adjust the driver’s seat, accelerator and
brake pedals, and outside mirrors to the
desired positions by manually operating
each adjusting switch. For additional infor-
mation, see “Seats” in the “Safety—Seats,
seat belts and supplemental air bags” sec-
tion and “Pedal position adjustment” and
“Outside mirrors” earlier in this section.
During this step, do not turn the ignition to
any position other than ON.
4. Push the SET switch and, within 5 seconds,
push the memory switch (1 or 2) fully for at
least 1 second.
The indicator light for the pushed memory
switch will come on and stay on for approxi-
mately 5 seconds after pushing the switch.
After the indicator light goes off, the se-
lected positions are stored in the selected
memory (1 or 2) .
If memory is stored in the same memory switch,
the previous memory will be deleted.
Linking a keyfob to a stored memory
position
A keyfob can be linked to a stored memory posi-
tion with the following procedure.
1. Follow the steps for storing a memory posi-
tion.2. While the indicator light for the memory
switch being set is illuminated for 5 sec-
onds, press the
button on the keyfob.
The indicator light will blink. After the indica-
tor light goes off, the keyfob is linked to that
memory setting.
With the key removed from the ignition switch,
press the
button on the keyfob. The driv-
er’s seat and outside mirrors will move to the
memorized position.
Procedure for storing the outside mir-
ror positions for best visibility when
backing up
Two outside mirror positions for backing up can
be stored in the automatic drive positioner
memory.
1. Set the parking brake.
2. Turn the ignition ON. (Do not start the en-
gine.)
3. Push the memory switch 1 or 2 fully for at
least 1 second to operate the automatic
drive positioner.
4. Turn the outside mirror control switch to L
(left) .
5. Depress the brake pedal.
LPD0219
3-26Pre-driving checks and adjustments
ZREVIEW COPY:Ð2004 Quest(van)
Owners Manual(owners)ÐUSA English(nna)
10/08/03Ðtbrooks
X
Page 149 of 320

6. Move the automatic transmission shift lever
to R (Reverse) .
7. Adjust the mirror to the desired viewing po-
sition for backing up by operating the out-
side mirror control switch.
8. Push the SET switch and, within 5 seconds,
push the memory switch 1 or 2 selected in
step 3 fully for at least 1 second.
cThe indicator light for the pushed memory
switch will come on and stay on for approxi-
mately 5 seconds after pushing the switch.
After the indicator light goes off, the se-
lected mirror position is stored in the se-
lected memory (1 or 2) .
9. Turn the outside mirror control switch to R
(right) . Repeat the above procedure to ad-
just the right mirror position and store in the
selected memory.
cWhen the driver’s seat, outside mirror and
steering column are not in the memorized
position, the outside mirror will move with
the initial tilt-down angle.
Confirming memory storage
cTurn the ignition ON and push the SET
switch. If the main memory has not been
stored, the indicator light will come on for
approximately 0.5 seconds. When thememory has stored the position, the indica-
tor light will stay on for approximately 5 sec-
onds.
cIf the battery cable is disconnected, or if the
fuse blows, the memory will be canceled. In
such a case, reset the desired positions
using the following procedures.
1. Open and close the driver’s door more than
two times with the ignition key in the LOCK
position.
2. Reset the desired position using the previ-
ous procedure.
Selecting the memorized position
1. Set the automatic transmission selector le-
ver to the P (Park) position.
2. Turn the ignition ON.
3. Push the memory switch (1 or 2) fully for at
least 1 second.
The driver’s seat, accelerator and brake
pedals, and outside mirrors will move to the
memorized position with the indicator light
blinking, and then the light will stay on for
approximately 5 seconds.
ENTRY/EXIT FUNCTION
This system is designed so that the driver’s seat
will automatically move when the automatic
transmission selector lever is in the P (Park)
position. This allows the driver to get into and out
of the driver’s seat more easily.
The driver’s seat will slide backward:
cWhen the key is removed from the ignition
switch.
cWhen the driver’s door is opened with the
key turned to LOCK.
cWhen the key is turned from ACC to LOCK
with the driver’s door open while the auto-
matic transmission selector lever is in the P
(Park) position.
The driver’s seat will return to previous position:
cWhen the key is inserted into the ignition
switch.
cWhen the driver’s door is closed with the key
turned to LOCK.
cWhen the key is turned from ACC to ON
while the automatic transmission selector
lever is in the P (Park) position.
The entry/exit function can be adjusted or can-
celed. See “Personalized settings menu” (ve-
hicles without navigation system) or “Vehicle
Pre-driving checks and adjustments3-27
ZREVIEW COPY:Ð2004 Quest(van)
Owners Manual(owners)ÐUSA English(nna)
10/08/03Ðtbrooks
X
Page 150 of 320

electronic systems” (vehicles with navigation sys-
tem) in the “Display screen, heater, air condi-
tioner and audio systems” section of this manual.
SYSTEM OPERATION
The automatic drive positioner system will not
work or will stop operating under the following
conditions:
cwhen the vehicle speed is above 4 MPH (7
km/h) .
cwhen any two or more of the memory
switches are simultaneously pushed while
the automatic drive positioner is operating.
cwhen the adjusting switch for the driver’s
seat is turned on while the automatic drive
positioner is operating.
cwhen the memory switch (1 or 2) is not
pushed for at least 1 second.
cwhen the seat has been already moved to
the memorized position.
cwhen no seat position is stored in the
memory switch.
The automatic drive positioner system can be
adjusted and canceled. See “Personalized set-
tings menu” (vehicles without navigation system)
or “Vehicle electronic systems” (vehicles withnavigation system) in the “Display screen, heater,
air conditioner and audio systems” section of this
manual.
3-28Pre-driving checks and adjustments
ZREVIEW COPY:Ð2004 Quest(van)
Owners Manual(owners)ÐUSA English(nna)
10/08/03Ðtbrooks
X