2004 NISSAN QUEST ECO mode
[x] Cancel search: ECO modePage 2 of 320
This manual includes information for all options
available on this model. Therefore, you may find
some information that does not apply to your
vehicle.
All information, specifications and illustrations in
this manual are those in effect at the time of
printing. NISSAN reserves the right to change
specifications or design without notice and with-
out obligation.
IMPORTANT INFORMATION ABOUT
THIS MANUAL
You will see various symbols in this manual. They
are used in the following ways:
WARNING
This is used to indicate the presence of a
hazard that could cause death or serious
personal injury. To avoid or reduce the
risk, the procedures must be followed
precisely.
CAUTION
This is used to indicate the presence of a
hazard that could cause minor or moder-
ate personal injury or damage to your ve-
hicle. To avoid or reduce the risk, the pro-
cedures must be followed carefully.If you see this symbol, it means“Do not do this”
or“Do not let this happen.”
If you see a symbol similar to these in an illustra-
tion, it means the arrow points to the front of the
vehicle.
Arrows in an illustration that are similar to these
indicate movement or action.
Arrows in an illustration that are similar to these
call attention to an item in the illustration.
CALIFORNIA PROPOSITION 65
WARNING
WARNING
Engine exhaust, some of its constituents,
and certain vehicle components contain
or emit chemicals known to the State of
California to cause cancer and birth de-
fects or other reproductive harm. In addi-
tion, certain fluids contained in vehicles
and certain products of component wear
contain or emit chemicals known to the
State of California to cause cancer and
birth defects or other reproductive harm.
© 2003 NISSAN NORTH AMERICA, INC.
GARDENA, CALIFORNIA
All rights reserved. No part of this Owner’s
Manual may be reproduced or stored in a retrieval
system, or transmitted in any form, or by any
means, electronic, mechanical, photocopying,
recording or otherwise, without the prior written
permission of Nissan North America, Inc., Gar-
dena, California.
APD1005
WHEN READING THE MANUAL
ZREVIEW COPY:Ð2004 Quest(van)
Owners Manual(owners)ÐUSA English(nna)
10/08/03Ðtbrooks
X
The inside pages of this manual contain
a minimum of 50% recycled fibers,
including 10% post-consumer fibers.
Page 41 of 320
tected on the seat belt, the advanced air bag
system determines whether the front passenger
air bag should be automatically turned OFF as
required by the regulations.
Front passenger seat adult occupants who are
properly seated and using the seat belt as out-
lined in this manual should not cause the passen-
ger air bag to be automatically turned OFF. For
small adults it may be turned OFF. Also, if the
occupant takes his/her weight off the seat cush-
ion (for example, by not sitting upright, by sitting
on an edge of the seat, or by otherwise being out
of position) , this could cause the sensor to turn
the air bag OFF. In addition, if the occupant
improperly uses the seat belt in the automatic
locking mode (child restraint mode) , this could
cause the air bag to be turned OFF. Always be
sure to be seated and wearing the seat belt
properly for the most effective protection by the
seat belt and supplemental air bag.
NISSAN recommends that pre-teens and chil-
dren be properly restrained in a rear seat.
NISSAN also recommends that appropriate child
restraints and booster seats be properly installed
in a rear seat. If this is not possible, the weight
sensor and seat belt sensors are designed to
operate as described above to turn the front
passenger air bag OFF for specified child re-
straints as required by the regulations. Failing to
properly secure child restraints and to use theautomatic locking mode (child restraint mode)
may allow the restraint to tip or move in an acci-
dent or sudden stop. This can also result in the
passenger air bag inflating in a crash instead of
being OFF. See “Child restraints” later in this
section for proper use and installation.
If the front passenger seat is not occupied and
the seat belt is not buckled, the passenger air bag
is designed not to inflate in a crash. However,
heavy objects placed on the seat could result in
air bag inflation, because of the object’s weight
detected by the weight sensor. Other conditions
could also result in air bag inflation, such as if a
child is standing on the seat, or if two children are
on the seat, contrary to the instructions in this
manual. Always be sure that you and all vehicle
occupants are seated and restrained properly.
Using the passenger air bag status light, you can
monitor when the front passenger air bag is au-
tomatically turned OFF. The light will illuminate
(indicating the air bag is OFF and will not inflate)
when the front passenger seat is not occupied.
If an adult occupant is in the seat and the pas-
senger air bag status light is illuminated (indicat-
ing that the air bag is OFF) , it could be that the
person is a small adult, not sitting on the seat, or
using the seat belt properly. If a child restraint
must be used in the front seat, but the status light
is not lit (indicating that the air bag might inflate ina crash) , it could be that the child restraint or seat
belt is not being used properly. If such situations
happen, properly position and restrain the occu-
pant or child restraint. Otherwise reposition the
occupant or child restraint in a rear seat.
If a malfunction occurs in the front passenger air
bag system, the passenger air bag status
light
orwill illuminate and the
supplemental air bag warning light, located
in the meter and gauges area in the center of the
instrument panel, will blink. Have the system
checked by a NISSAN dealer.
Other supplemental front air bag precau-
tions
WARNING
cDo not place any objects on the steer-
ing wheel pad or on the instrument
panel. Also, do not place any objects
between any occupant and the steering
wheel or instrument panel. Such ob-
jects may become dangerous projec-
tiles and cause injury if the supplemen-
tal front air bag inflates.
cImmediately after inflation, several
front air bag system components will be
hot. Do not touch them; you may se-
verely burn yourself.
Safety—Seats, seat belts and supplemental air bags1-25
ZREVIEW COPY:Ð2004 Quest(van)
Owners Manual(owners)ÐUSA English(nna)
10/08/03Ðtbrooks
X
Page 58 of 320
cFollow all of the child restraint manu-
facturer’s instructions for installation
and use. When purchasing a child re-
straint, be sure to select one which will
fit your child and vehicle. It may not be
possible to properly install some types
of child restraints in your vehicle.
cIf the child restraint is not anchored
properly, the risk of a child being in-
jured in a collision or a sudden stop
greatly increases.
cAdjustable seatbacks should be posi-
tioned to fit the child restraint, but as
upright as possible.
cAfter attaching the child restraint, test it
before you place the child in it. Tilt it
from side to side. Try to tug it forward
and check to see if the belt holds the
restraint in place. The child restraint
should not move more than 1 inch. If the
restraint is not secure, tighten the belt
as necessary, or put the restraint in an-
other seat and test it again.cFor a front-facing child restraint, check
to make sure the shoulder belt does not
go in front of the child’s face or neck. If
it does, put the shoulder belt behind the
child restraint. If you must install a front
facing child restraint in the front seat,
see “Installation on front passenger
seat” later in this section.
cWhen your child restraint is not in use,
keep it secured with a seat belt to pre-
vent it from being thrown around in
case of a sudden stop or accident.
CAUTION
Remember that a child restraint left in a
closed vehicle can become very hot.
Check the seating surface and buckles
before placing your child in the child
restraint.
INSTALLATION ON 2ND ROW
CAPTAIN’S CHAIRS
WARNING
cThe three-point seat belt in your vehicle
is equipped with an automatic locking
mode retractor which must be used
when installing a child restraint.cFailure to use the retractor’s locking
mode will result in the child restraint
not being properly secured. The re-
straint could tip over or otherwise be
unsecured and cause injury to the child
in a sudden stop or collision.
1-42Safety—Seats, seat belts and supplemental air bags
ZREVIEW COPY:Ð2004 Quest(van)
Owners Manual(owners)ÐUSA English(nna)
10/08/03Ðtbrooks
X
Page 117 of 320

The lights on demand switch allows the driver to
select one of three lighting modes for the room
lights. The room lights are the map lights, per-
sonal lights and puddle lamps (if so equipped) .
The lights on demand switch operates regardless
of ignition switch position.
: The room lights illuminate. The lights will
turn off automatically after 30 minutes to prevent
the battery from becoming discharged.
OFF: The room lights do not illuminate.
: The room lights illuminate when a door is
opened.If the lights on demand switch is in the
position, the lights will stay on for about 30 sec-
onds when:
cThe doors are unlocked by the keyfob, a key
or the power door lock switch while all doors
are closed and the ignition switch is in the
OFF position.
cThe driver’s door is opened and then closed
while the key is removed from the ignition
switch.
cThe key is removed from the ignition switch
while all doors are closed.
The room lights will turn off while the 30 second
timer is activated when:
cThe driver’s door is locked by the keyfob, a
key, or the power door lock switch.
cThe ignition switch is turned ON.
The lights will turn off automatically after 30 min-
utes while doors are open to prevent the battery
from becoming discharged.NOTE:
The foot well and door step lights illumi-
nate when the driver and passenger doors
are open regardless of the lights on de-
mand switch position. These lights will turn
off automatically after 30 minutes while
doors are open to prevent the battery from
becoming discharged.
LIC0472
LIGHTS ON DEMAND SWITCH
Instruments and controls2-41
ZREVIEW COPY:Ð2004 Quest(van)
Owners Manual(owners)ÐUSA English(nna)
10/08/03Ðtbrooks
X
Page 120 of 320

PROGRAMMING HOMELINKT
1. To begin, press and hold the two outer
HomeLinkTbuttons (to clear the memory)
until the indicator light
s1blinks slowly (after
20 seconds) . Release both buttons.
2. Position the end of the hand-held transmitter
1 - 3 inches (26 - 76 mm) away from the
HomeLinkTsurface.3. Using both hands, simultaneously press and
hold both the HomeLinkTbutton you want to
program and the hand-held transmitter but-
ton.
DO NOT release the buttons until step 4 has
been completed.4. Hold down both buttons until the indicator
light on the HomeLinkTflashes, changing
from a “slow blink” to a “rapidly flashing
blink”. This could take up to 90 seconds.
When the indicator light flashes rapidly, both
buttons may be released. The rapidly flash-
ing light indicates successful programming.
To activate the garage door or other pro-
grammed device, press and hold the pro-
grammed HomeLinkTbutton — releasing
when the device begins to activate.
5. If the indicator light on the HomeLinkTblinks
rapidly for 2 seconds and then turns solid,
HomeLinkThas picked up a “rolling code”
garage door opener signal. You will need to
proceed with the next steps to train the
HomeLinkTto complete the programming
which may require a ladder and another per-
son for convenience.
6. Press and release the “smart” or “learn” pro-
gram button located on the garage door
opener’s motor to activate the “training
mode”. This button is usually located near
the antenna wire that hangs down from the
motor. If the wire originates from under a
light lens, you will need to remove the lens to
access the program button.
LIC0526LIC0527
2-44Instruments and controls
ZREVIEW COPY:Ð2004 Quest(van)
Owners Manual(owners)ÐUSA English(nna)
10/08/03Ðtbrooks
X
Page 130 of 320
Power Close:
The door automatically moves from the fully open
position to the secondary position. When the
sliding door reaches the secondary position, the
cinching motor engages and pulls the door to its
primary latch position. Power close takes ap-
proximately 5 seconds. The power close feature
can be activated by the switches on the keyfob,
the overhead console and the door pillar.
cIf the inside or outside handle is activated
while the cinching motor is engaged, the
cinching motor will disengage and release
the latch.
cThe keyfob button must be held for 0.5 sec-
ond before the door closes.
cThe switch on the door pillar can only be
used to close the door if the main ON/OFF
switch is ON.
Reverse:
The door will reverse direction immediately dur-
ing power open or power close if the keyfob,
overhead console or door pillar switch is
pressed. A chime will sound to announce the
reversal.
Auto Reverse:
If an obstacle is detected during power open or
power close, a warning chime will sound and the
door will reverse direction and return to the fullopen or full close position. If a second obstacle is
detected, the door motion will stop and the clutch
mode will be engaged.
WARNING
There are some small distances immedi-
ately before the closed position which
cannot be detected. Make sure that all
passengers have their hands, etc., inside
the vehicle before closing the door.
Clutch Mode:
To help prevent unexpected slams due to gravity,
the clutch mode is engaged intermittently for up
to 6 seconds when power open or close is inter-
rupted due to multiple obstacles, low battery
voltage or the main ON/OFF switch turned to
OFF. The door must then be opened or closed
manually.
Restarting the power sliding door
Some power sliding door functions will become
disabled after the battery terminal is discon-
nected and/or the electrical supply is interrupted.
The following procedure must be used to restart
the power sliding door so that all functions are
enabled.
1. Turn the main on/off switch to ON.2. If the power sliding door is open, press and
hold the power sliding door switch on the
overhead console until the door closes.
3. Release the switch.
4. Press and hold the power sliding door
switch on the overhead console until the
door opens as far as it can.
5. Release the switch.
6. Press and hold the power sliding door
switch on the overhead console until the
door closes.
7. Release the switch.
The power sliding door should now work prop-
erly.
NOTE:
The restarting procedure must be com-
pleted for both the left-hand and right-
hand power sliding doors (if so equipped) .
3-8Pre-driving checks and adjustments
ZREVIEW COPY:Ð2004 Quest(van)
Owners Manual(owners)ÐUSA English(nna)
10/08/03Ðtbrooks
X
Page 138 of 320
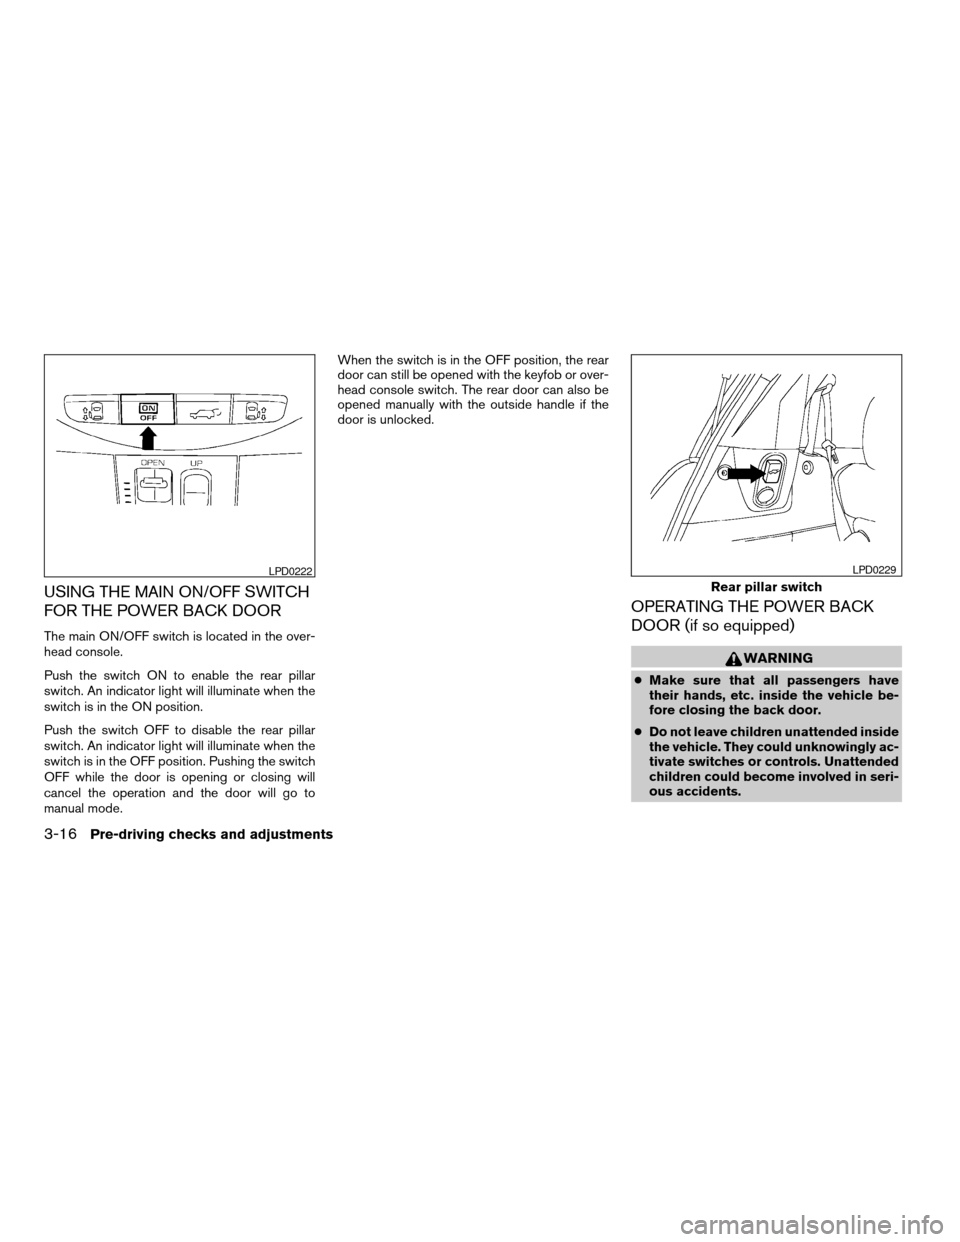
USING THE MAIN ON/OFF SWITCH
FOR THE POWER BACK DOOR
The main ON/OFF switch is located in the over-
head console.
Push the switch ON to enable the rear pillar
switch. An indicator light will illuminate when the
switch is in the ON position.
Push the switch OFF to disable the rear pillar
switch. An indicator light will illuminate when the
switch is in the OFF position. Pushing the switch
OFF while the door is opening or closing will
cancel the operation and the door will go to
manual mode.When the switch is in the OFF position, the rear
door can still be opened with the keyfob or over-
head console switch. The rear door can also be
opened manually with the outside handle if the
door is unlocked.
OPERATING THE POWER BACK
DOOR (if so equipped)
WARNING
cMake sure that all passengers have
their hands, etc. inside the vehicle be-
fore closing the back door.
cDo not leave children unattended inside
the vehicle. They could unknowingly ac-
tivate switches or controls. Unattended
children could become involved in seri-
ous accidents.
LPD0222
Rear pillar switch
LPD0229
3-16Pre-driving checks and adjustments
ZREVIEW COPY:Ð2004 Quest(van)
Owners Manual(owners)ÐUSA English(nna)
10/08/03Ðtbrooks
X
Page 139 of 320

NOTE:
To open, close or reverse the power back
door, the shift selector lever must be in P
(Park) . Also, the power back door will not
operate if battery voltage is low.
Power Open:
The power back door automatically moves from
the fully closed position to the fully open position
in approximately 6 seconds. The power open
feature can be activated by the switch on the
keyfob and the overhead console and by the
outside opener handle. The hazard lights flashand a chime sounds to indicate the power open
sequence has been started.
cThe back door can be opened by the over-
head console switch and the keyfob even if
the vehicle is locked. The door will individu-
ally unlock and open. Once the back door is
closed, its lock will align to the vehicle’s lock
or unlock status.
cThe keyfob button must be held for 0.5 sec-
ond before the door opens.
cThe back door must be unlocked to open it
with the outside opener handle.
cThe switch on the rear pillar cannot be used
to open the back door.
A warning chime will sound if the shift selector
lever is moved out of P (Park) during a power
open operation.
Power Close:
The power back door automatically moves from
the fully open position to the secondary position.
When the door reaches the secondary position,
the cinching motor engages and pulls the door to
its primary latch position. Power close takes ap-
proximately 8 seconds. The power close feature
can be activated by the switch on the keyfob, the
overhead console and the rear pillar. The hazard
lights flash and a chime sounds to indicate the
power close sequence has been started.cIf the outside opener handle is activated
while the cinching motor is engaged, the
cinching motor will disengage and release
the latch.
cThe keyfob button must be held for 0.5 sec-
ond before the door closes.
cThe switch on the rear pillar can only be used
to close the back door if the main ON/OFF
switch is ON.
Reverse:
The power back door will reverse direction imme-
diately during power open or power close if the
keyfob, overhead console or rear pillar switch is
pressed. A chime will sound to announce the
reversal.
Auto Reverse:
If an obstacle is detected during power open or
power close, a warning chime will sound and the
door will reverse direction and return to the full
open or full close position. If a second obstacle is
detected, the door motion will stop and the drive
motor will disengage. The back door will enter
manual mode.
A pinch strip is mounted on each side of the back
door. If an obstacle is detected by a pinch strip
during power close, the door will reverse direc-
tion and return to the full open position.
Overhead console switch
LPD0223
Pre-driving checks and adjustments3-17
ZREVIEW COPY:Ð2004 Quest(van)
Owners Manual(owners)ÐUSA English(nna)
10/08/03Ðtbrooks
X