2004 NISSAN QUEST reset
[x] Cancel search: resetPage 21 of 320

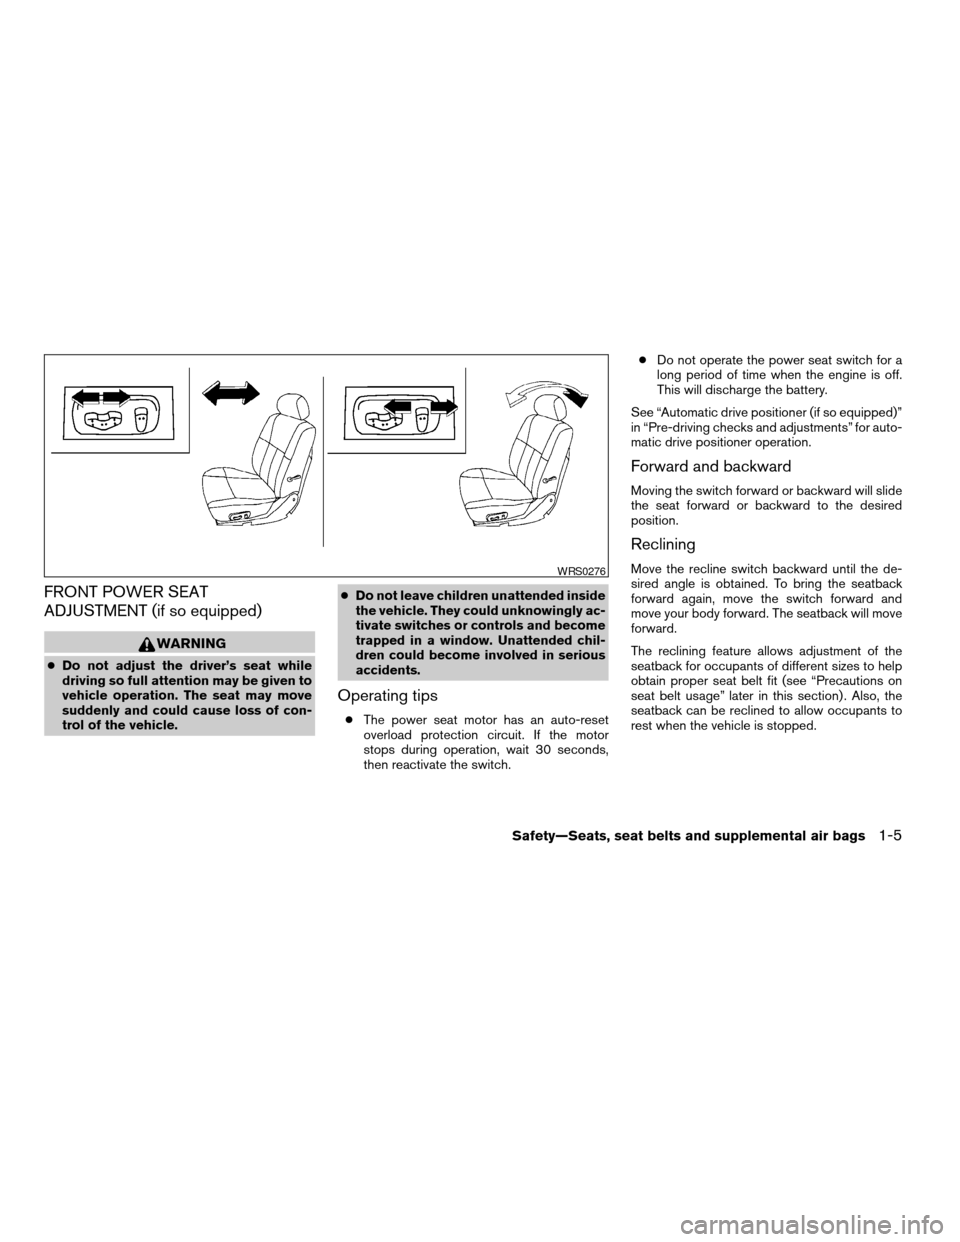
FRONT POWER SEAT
ADJUSTMENT (if so equipped)
WARNING
cDo not adjust the driver’s seat while
driving so full attention may be given to
vehicle operation. The seat may move
suddenly and could cause loss of con-
trol of the vehicle.cDo not leave children unattended inside
the vehicle. They could unknowingly ac-
tivate switches or controls and become
trapped in a window. Unattended chil-
dren could become involved in serious
accidents.
Operating tips
cThe power seat motor has an auto-reset
overload protection circuit. If the motor
stops during operation, wait 30 seconds,
then reactivate the switch.cDo not operate the power seat switch for a
long period of time when the engine is off.
This will discharge the battery.
See “Automatic drive positioner (if so equipped)”
in “Pre-driving checks and adjustments” for auto-
matic drive positioner operation.
Forward and backward
Moving the switch forward or backward will slide
the seat forward or backward to the desired
position.
Reclining
Move the recline switch backward until the de-
sired angle is obtained. To bring the seatback
forward again, move the switch forward and
move your body forward. The seatback will move
forward.
The reclining feature allows adjustment of the
seatback for occupants of different sizes to help
obtain proper seat belt fit (see “Precautions on
seat belt usage” later in this section) . Also, the
seatback can be reclined to allow occupants to
rest when the vehicle is stopped.WRS0276
Safety—Seats, seat belts and supplemental air bags1-5
ZREVIEW COPY:Ð2004 Quest(van)
Owners Manual(owners)ÐUSA English(nna)
10/08/03Ðtbrooks
X
Page 84 of 320

CAUTION
Running the engine with the engine oil
pressure warning light on could cause se-
rious damage to the engine almost imme-
diately. Such damage is not covered by
warranty. Turn off the engine as soon as it
is safe to do so.
Low fuel warning light
This light comes on when the fuel level in the fuel
tank is getting low. Refuel as soon as it is conve-
nient, preferably before the fuel gauge reaches E
(Empty) .There will be a small reserve of fuel
in the tank when the fuel gauge needle
reaches E (Empty) .
Low tire pressure warning
light
This light warns of low tire pressure.
NISSAN’s low tire pressure warning system is a
tire pressure monitoring system. It monitors tire
pressure of all tires except the spare. When the
tire pressure monitoring system warning light is
lit, one or more of your tires is significantly under-
inflated. You should stop and check your tires as
soon as possible, and inflate them to the proper
pressure as indicated on the vehicle’s tire infor-
mation placard. Driving on a significantly under-inflated tire causes the tire to overheat and can
lead to tire failure. Under-inflation also reduces
fuel efficiency and tire tread life, and may affect
the vehicle’s handling and stopping ability. Each
tire, including the spare, should be checked
monthly when cold and set to the recommended
inflation pressure as specified in the vehicle plac-
ard and owner’s manual.
The recommended inflation pressure may also be
found on the Tire and Loading Information Label.
Low tire pressure warning:
If the vehicle is being driven with very low tire
pressure (lower than 28 psi, 193 kPa) , the light
will illuminate and the chime will sound for about
10 seconds.
For additional information, see “Low tire pressure
warning system” in the “Starting and driving”
section and “Low tire pressure warning system”
in the “In case of emergency” section.
WARNING
cIf the light does not come on with the
key switch turned ON, have the vehicle
checked by a NISSAN dealer as soon as
possible.cIf the light comes on while driving,
avoid sudden steering maneuvers or
abrupt braking, reduce vehicle speed,
pull off the road to a safe location and
stop the vehicle as soon as possible.
Serious vehicle damage could occur
and may lead to an accident and could
result in serious personal injury. Check
the tire pressure for all four tires. Adjust
the tire pressure to the recommended
COLD tire pressure shown on the Tire
and Loading Information label to turn
the low tire pressure warning light OFF.
If the light still comes on while driving
after adjusting the tire pressure, a tire
may be flat. If you have a flat tire, re-
place it with a spare tire as soon as
possible.
cWhen a spare tire is mounted or a wheel
is replaced, tire pressure will not be
indicated and the low tire pressure
warning system will not function. Con-
tact your NISSAN dealer as soon as
possible for tire replacement and/or
system resetting.
2-8Instruments and controls
ZREVIEW COPY:Ð2004 Quest(van)
Owners Manual(owners)ÐUSA English(nna)
10/08/03Ðtbrooks
X
Page 93 of 320

NOTE:
Autolight activation sensitivity and the
time delay for autolight shutoff can be ad-
justed. See “Personalized settings menu”
(vehicles without navigation system) or
“Vehicle electronic systems” (vehicles with
navigation system) in the “Display screen,
heater, air conditioner and audio systems”
section later in this manual.
To turn on the autolight system:
1. Make sure the headlight switch is in the
AUTO position.
2. Turn the ignition key to ON.
3. The autolight system automatically turns the
headlights on and off.
Initially, if the ignition switch is turned OFF and a
door is opened and left open, the headlights
remain on for 5 minutes. During that 5 minutes:
cif all doors are closed, the headlights remain
on for 45 seconds, then turn off.
cif another door is opened, then the 5 minute
timer is reset.
To turn the autolight system off, turn the switch to
the OFF,
,orposition.Be sure you do not put anything on top of
the autolight sensor located on top of the
instrument panel. The autolight sensor
controls the autolight; if it is covered, the
autolight sensor reacts as if it is dark out
and the headlights will illuminate. If this
occurs while parked with the engine off
and the key in the ON position, your vehi-
cle’s battery could become discharged.
Headlight beam select
s1To select the high beam function, push the
lever forward. The high beam lights come on
and the
light illuminates.
s2Pull the lever back to select the low beam.
s3Pulling and releasing the lever flashes the
headlight high beams on and off.
Battery saver system
If the ignition switch is turned OFF while the
headlight switch is in theorposi-
tion, the headlights will turn off after 5 minutes.
LIC0390
Instruments and controls2-17
ZREVIEW COPY:Ð2004 Quest(van)
Owners Manual(owners)ÐUSA English(nna)
10/08/03Ðtbrooks
X
Page 99 of 320

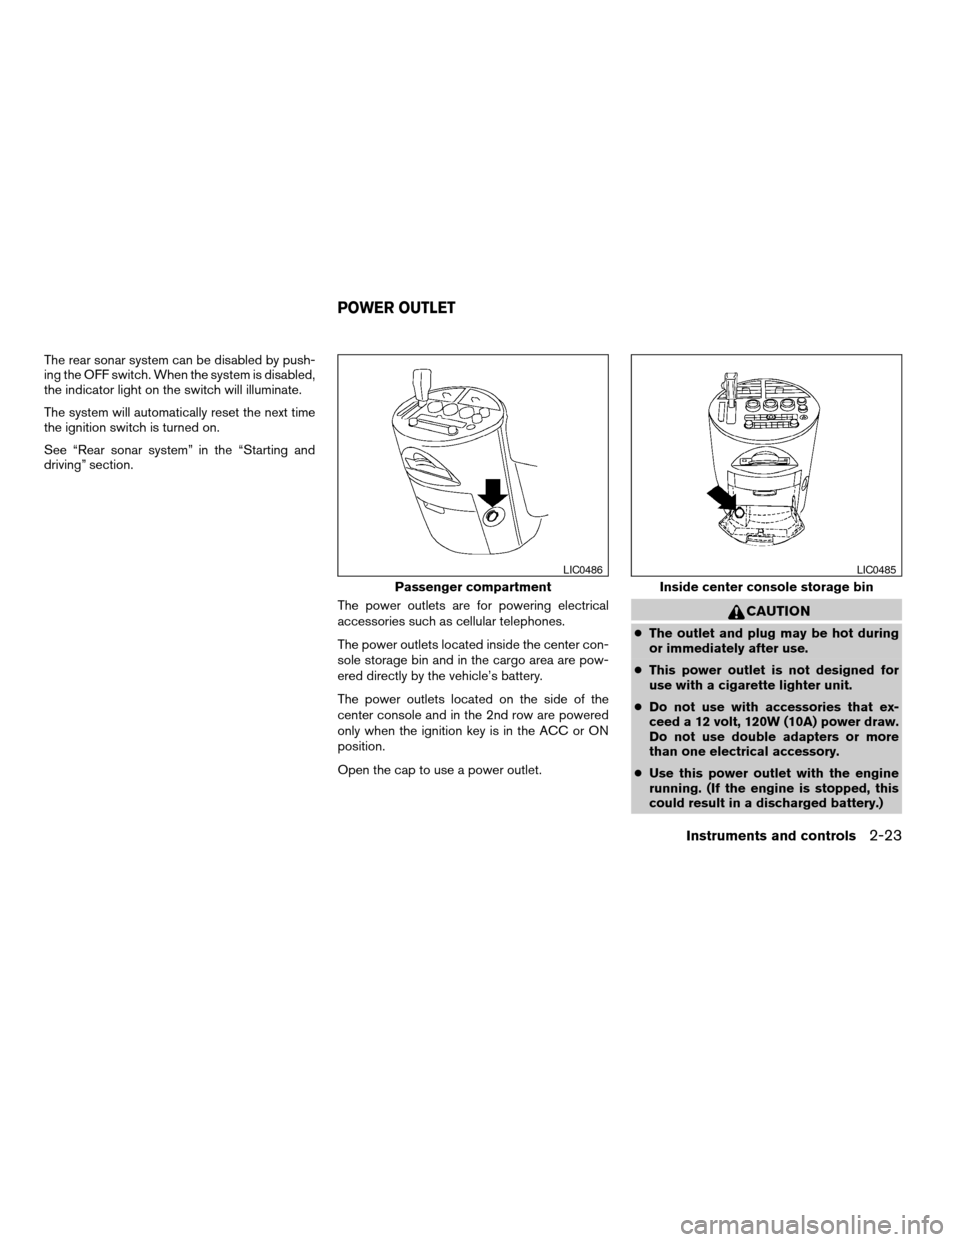
The rear sonar system can be disabled by push-
ing the OFF switch. When the system is disabled,
the indicator light on the switch will illuminate.
The system will automatically reset the next time
the ignition switch is turned on.
See “Rear sonar system” in the “Starting and
driving” section.
The power outlets are for powering electrical
accessories such as cellular telephones.
The power outlets located inside the center con-
sole storage bin and in the cargo area are pow-
ered directly by the vehicle’s battery.
The power outlets located on the side of the
center console and in the 2nd row are powered
only when the ignition key is in the ACC or ON
position.
Open the cap to use a power outlet.
CAUTION
cThe outlet and plug may be hot during
or immediately after use.
cThis power outlet is not designed for
use with a cigarette lighter unit.
cDo not use with accessories that ex-
ceed a 12 volt, 120W (10A) power draw.
Do not use double adapters or more
than one electrical accessory.
cUse this power outlet with the engine
running. (If the engine is stopped, this
could result in a discharged battery.)
Passenger compartment
LIC0486
Inside center console storage bin
LIC0485
POWER OUTLET
Instruments and controls2-23
ZREVIEW COPY:Ð2004 Quest(van)
Owners Manual(owners)ÐUSA English(nna)
10/08/03Ðtbrooks
X
Page 115 of 320

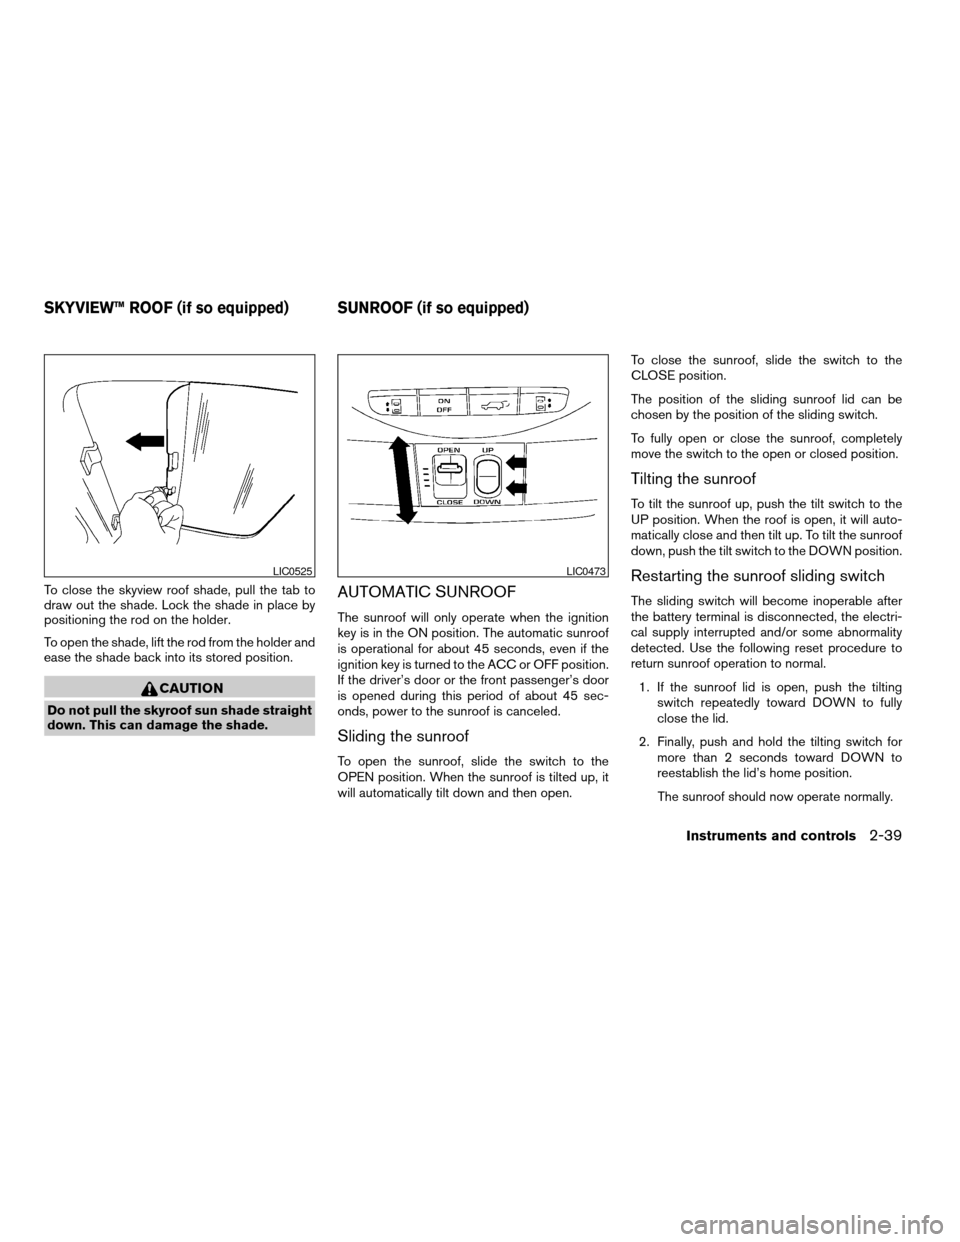
To close the skyview roof shade, pull the tab to
draw out the shade. Lock the shade in place by
positioning the rod on the holder.
To open the shade, lift the rod from the holder and
ease the shade back into its stored position.
CAUTION
Do not pull the skyroof sun shade straight
down. This can damage the shade.
AUTOMATIC SUNROOF
The sunroof will only operate when the ignition
key is in the ON position. The automatic sunroof
is operational for about 45 seconds, even if the
ignition key is turned to the ACC or OFF position.
If the driver’s door or the front passenger’s door
is opened during this period of about 45 sec-
onds, power to the sunroof is canceled.
Sliding the sunroof
To open the sunroof, slide the switch to the
OPEN position. When the sunroof is tilted up, it
will automatically tilt down and then open.To close the sunroof, slide the switch to the
CLOSE position.
The position of the sliding sunroof lid can be
chosen by the position of the sliding switch.
To fully open or close the sunroof, completely
move the switch to the open or closed position.
Tilting the sunroof
To tilt the sunroof up, push the tilt switch to the
UP position. When the roof is open, it will auto-
matically close and then tilt up. To tilt the sunroof
down, push the tilt switch to the DOWN position.
Restarting the sunroof sliding switch
The sliding switch will become inoperable after
the battery terminal is disconnected, the electri-
cal supply interrupted and/or some abnormality
detected. Use the following reset procedure to
return sunroof operation to normal.
1. If the sunroof lid is open, push the tilting
switch repeatedly toward DOWN to fully
close the lid.
2. Finally, push and hold the tilting switch for
more than 2 seconds toward DOWN to
reestablish the lid’s home position.
The sunroof should now operate normally.
LIC0525LIC0473
SKYVIEW™ ROOF (if so equipped) SUNROOF (if so equipped)
Instruments and controls2-39
ZREVIEW COPY:Ð2004 Quest(van)
Owners Manual(owners)ÐUSA English(nna)
10/08/03Ðtbrooks
X
Page 149 of 320

6. Move the automatic transmission shift lever
to R (Reverse) .
7. Adjust the mirror to the desired viewing po-
sition for backing up by operating the out-
side mirror control switch.
8. Push the SET switch and, within 5 seconds,
push the memory switch 1 or 2 selected in
step 3 fully for at least 1 second.
cThe indicator light for the pushed memory
switch will come on and stay on for approxi-
mately 5 seconds after pushing the switch.
After the indicator light goes off, the se-
lected mirror position is stored in the se-
lected memory (1 or 2) .
9. Turn the outside mirror control switch to R
(right) . Repeat the above procedure to ad-
just the right mirror position and store in the
selected memory.
cWhen the driver’s seat, outside mirror and
steering column are not in the memorized
position, the outside mirror will move with
the initial tilt-down angle.
Confirming memory storage
cTurn the ignition ON and push the SET
switch. If the main memory has not been
stored, the indicator light will come on for
approximately 0.5 seconds. When thememory has stored the position, the indica-
tor light will stay on for approximately 5 sec-
onds.
cIf the battery cable is disconnected, or if the
fuse blows, the memory will be canceled. In
such a case, reset the desired positions
using the following procedures.
1. Open and close the driver’s door more than
two times with the ignition key in the LOCK
position.
2. Reset the desired position using the previ-
ous procedure.
Selecting the memorized position
1. Set the automatic transmission selector le-
ver to the P (Park) position.
2. Turn the ignition ON.
3. Push the memory switch (1 or 2) fully for at
least 1 second.
The driver’s seat, accelerator and brake
pedals, and outside mirrors will move to the
memorized position with the indicator light
blinking, and then the light will stay on for
approximately 5 seconds.
ENTRY/EXIT FUNCTION
This system is designed so that the driver’s seat
will automatically move when the automatic
transmission selector lever is in the P (Park)
position. This allows the driver to get into and out
of the driver’s seat more easily.
The driver’s seat will slide backward:
cWhen the key is removed from the ignition
switch.
cWhen the driver’s door is opened with the
key turned to LOCK.
cWhen the key is turned from ACC to LOCK
with the driver’s door open while the auto-
matic transmission selector lever is in the P
(Park) position.
The driver’s seat will return to previous position:
cWhen the key is inserted into the ignition
switch.
cWhen the driver’s door is closed with the key
turned to LOCK.
cWhen the key is turned from ACC to ON
while the automatic transmission selector
lever is in the P (Park) position.
The entry/exit function can be adjusted or can-
celed. See “Personalized settings menu” (ve-
hicles without navigation system) or “Vehicle
Pre-driving checks and adjustments3-27
ZREVIEW COPY:Ð2004 Quest(van)
Owners Manual(owners)ÐUSA English(nna)
10/08/03Ðtbrooks
X
Page 155 of 320

“Display”key — This is a select key on the
screen. By selecting this key you can proceed to
the next function.
NAMES OF COMPONENTS
1.brightness control button (P. 4-7)
2. PREV (previous) button (P. 4-3)
3. Joystick and ENTER push button (P. 4-3)
4. SETTING button (P. 4-5)
5.
(maintenance) button (P. 4-5)
6. TRIP drive computer button (P. 4-3)
7. E/M (English/Metric) button (P. 4-4)
8. FUEL ECON button (P. 4-4)
9. TRIP RESET button (P. 4-3)
10. Clock adjust button (hours/minutes) (P. 4-4)
To turn off the screen, push the
button for
more than approximately 1.5 seconds. The
screen will change to “CONFIRM DISPLAY OFF
YES or NO”.
HOW TO USE JOYSTICK AND
“ENTER” BUTTON
Choose an item on the display using the joystick.
Push the“ENTER”button only when the use of it
is instructed on the display.
HOW TO USE “PREV” BUTTON
Finish setup:
If you touch“PREV”button after the setup is
completed, the setup will start over.
HOW TO USE “TRIP” BUTTON
When the“TRIP”button is pushed, the following
modes will display on the screen.
TRIP 1 (TIME, DIST, AVG)!TRIP 2 (TIME, DIST,
AVG)!OFF
TRIP 1 and TRIP 2 record journey time (TIME —
max 99 hours 59 minutes) , trip odometer (DIST
— mile or km) and average speed (AVG — MPH
or km/h) .
To reset the TRIP 1 or TRIP 2, push the“TRIP”
button or the“TRIP RESET”button for more
than approximately 1.5 seconds.
LHA0252
Display screen, heater, air conditioner and audio systems4-3
ZREVIEW COPY:Ð2004 Quest(van)
Owners Manual(owners)ÐUSA English(nna)
10/08/03Ðtbrooks
X
Page 156 of 320

HOW TO USE “FUEL ECON”
BUTTON
The average fuel consumption (MPG or L/100
km) and the distance to empty (dte — mi or km)
will appear on the screen when the“FUEL
ECON”button is pushed.
Average fuel consumption (MPG or
L/100 km)
The average fuel consumption mode shows the
average fuel consumption since the last reset.
Resetting is done by pressing the“TRIP RE-
SET”or“FUEL ECON”button for more than
approximately 1.5 seconds.The display is updated every 30 seconds. For
approximately the first 30 seconds and 1/3 miles
(500 m) after a reset or connecting the battery
cables, the display will show (----) .
Distance to empty (dte — mile or km)
The distance to empty (dte) mode provides you
with an estimation of the distance that can be
driven before refueling. The dte is constantly be-
ing calculated based on the amount of fuel in the
fuel tank and the actual fuel consumption.
The display is updated every 30 seconds.
When the fuel level is low, the dte display will
change to (*) .
NOTE:
cIf the amount of fuel added while the ignition
switch is OFF is small, the display just before
the ignition switch is turned OFF may con-
tinue to be displayed.
cWhen driving uphill or rounding curves, the
fuel in the tank shifts, which may momentarily
change the display.
CLOCK
The digital clock displays time when the ignition
key is in ACC or ON.
If the power supply is disconnected, the
clock will not indicate the correct time.
Readjust the time.
Adjusting the time
To adjust the time, push the“H”or“M”button
for more than approximately 1.5 seconds. The
time indicator will flash.
Touch the“H”button to adjust the hour.
Touch the“M”button to adjust the minute.
To finish the adjusting, press the“PREV”button
or the screen will return to normal after 10 sec-
onds.
HOW TO USE “E/M” BUTTON
You can change the unit as follows using the
“E/M”(English/Metric) button.
Unit: US — mile, °F, MPG
Metric — km, °C, L/100 km
LHA0253
4-4Display screen, heater, air conditioner and audio systems
ZREVIEW COPY:Ð2004 Quest(van)
Owners Manual(owners)ÐUSA English(nna)
10/08/03Ðtbrooks
X