Page 1057 of 3870
Fig. 41: Removing/Installing Window Glass Runchannel And Door Opening Weatherstrip Components (3 Of 3)
Courtesy of MITSUBISHI MOTOR SALES OF AMERICA.
DOUBLE-SIDED TAPE POSITION
2004 Mitsubishi Endeavor LS
2004 BODY & ACCESSORIES Door - Endeavor
Page 1063 of 3870
Fig. 46: Identifying Door Opening Inner Weatherstrip Installation Order
Courtesy of MITSUBISHI MOTOR SALES OF AMERICA.
>>D<< DOOR WINDOW GLASS RUNCHANNEL INSTALLATION
2004 Mitsubishi Endeavor LS
2004 BODY & ACCESSORIES Door - Endeavor
Page 1064 of 3870
Install the door window glass runchannel in the sequence shown.
Fig. 47: Identifying Door Window Glass Runchannel Installation order
2004 Mitsubishi Endeavor LS
2004 BODY & ACCESSORIES Door - Endeavor
Page 1093 of 3870

2004 MITSUBISH
I
Endeavor
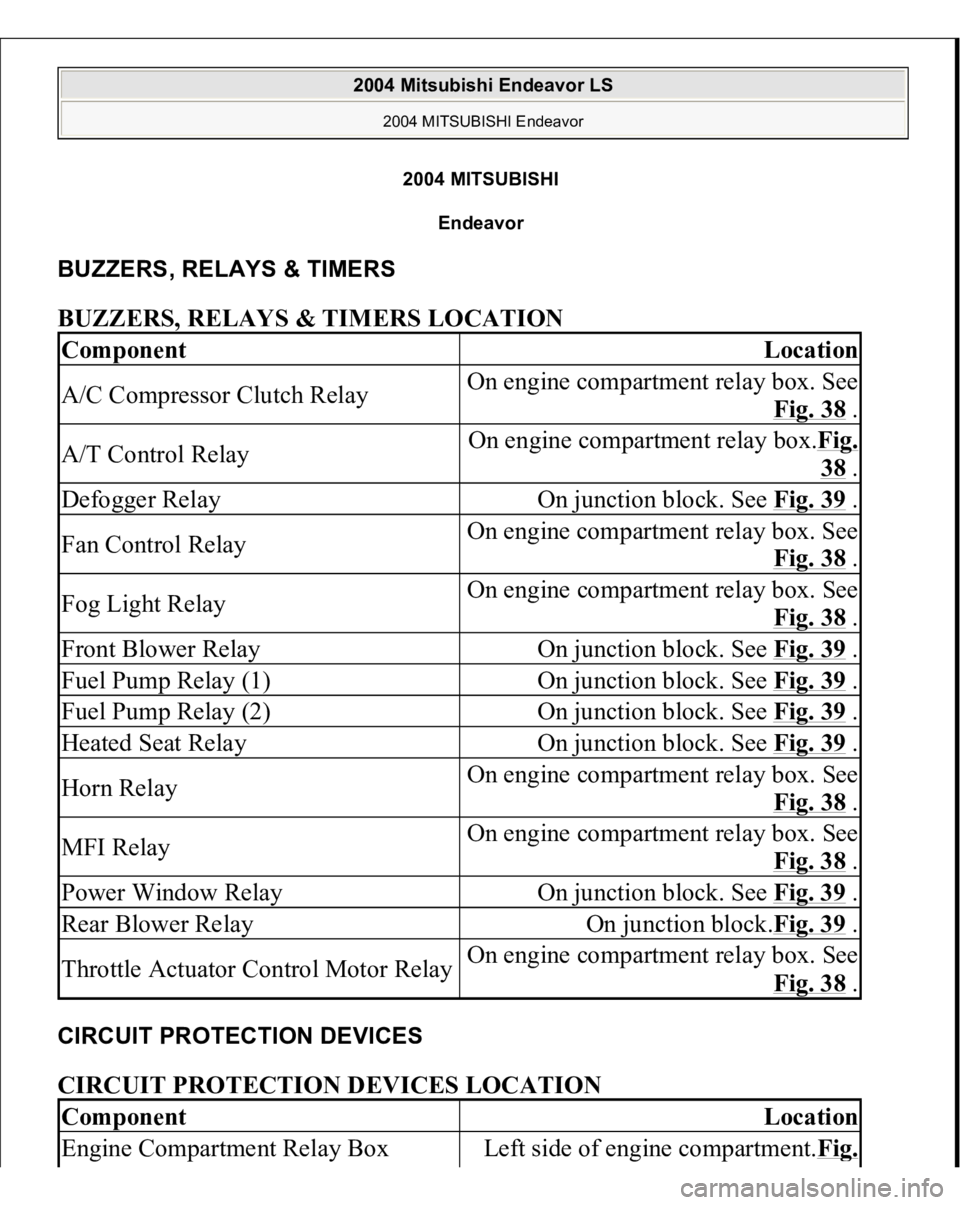
BUZZERS, RELAYS & TIMERS BUZZERS, RELAYS & TIMERS LOCATION CIRCUIT PROTECTION DEVICES CIRCUIT PROTECTION DEVICES LOCATION Component
Location
A/C Compressor Clutch Relay
On engine compartment relay box. See
Fig. 38
.
A/T Control Relay
On engine compartment relay box.Fig.
38 .
Defogger Relay
On junction block. See Fig. 39
.
Fan Control Relay
On engine compartment relay box. See
Fig. 38
.
Fog Light Relay
On engine compartment relay box. See
Fig. 38
.
Front Blower Relay
On junction block. See Fig. 39
.
Fuel Pump Relay (1)
On junction block. See Fig. 39
.
Fuel Pump Relay (2)
On junction block. See Fig. 39
.
Heated Seat Relay
On junction block. See Fig. 39
.
Horn Relay
On engine compartment relay box. See
Fig. 38
.
MFI Relay
On engine compartment relay box. See
Fig. 38
.
Power Window Relay
On junction block. See Fig. 39
.
Rear Blower Relay
On junction block.Fig. 39
.
Throttle Actuator Control Motor Relay
On engine compartment relay box. See
Fig. 38
.
Component
Location
Engine Compartment Relay Box
Left side of engine compartment.Fi
g.
2004 Mitsubishi Endeavor LS
2004 MITSUBISHI Endeavor
2004 Mitsubishi Endeavor LS
2004 MITSUBISHI Endeavor
Page 1095 of 3870

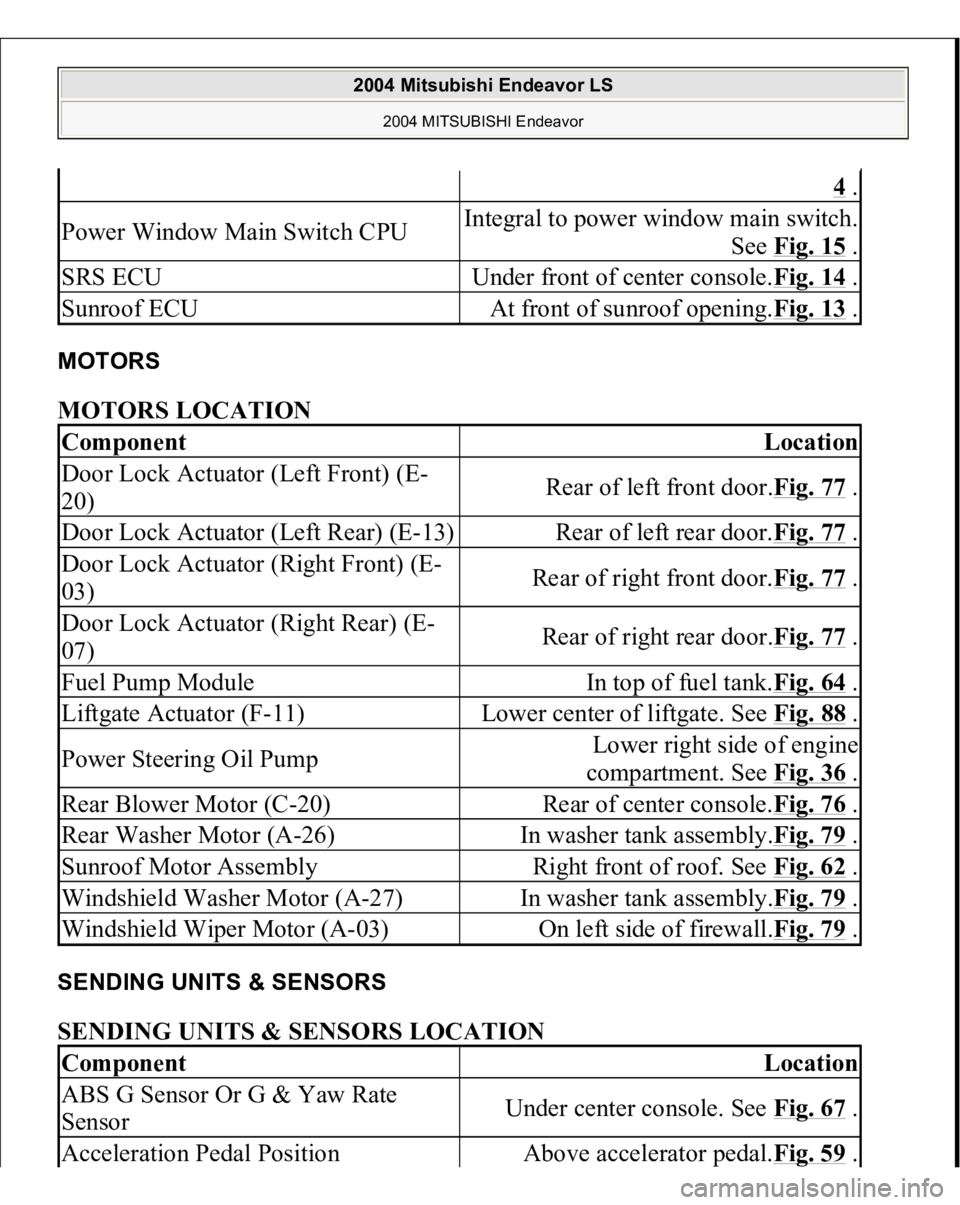
MOTORS MOTORS LOCATION SENDING UNITS & SENSORS SENDING UNITS & SENSORS LOCATION
4 .
Power Window Main Switch CPU
Integral to power window main switch.
See Fig. 15
.
SRS ECU
Under front of center console.Fig. 14
.
Sunroof ECU
At front of sunroof opening.Fig. 13
.
Component
Location
Door Lock Actuator (Left Front) (E-
20)
Rear of left front door.Fig. 77
.
Door Lock Actuator (Left Rear) (E-13)
Rear of left rear door.Fig. 77
.
Door Lock Actuator (Right Front) (E-
03)
Rear of right front door.Fig. 77
.
Door Lock Actuator (Right Rear) (E-
07)
Rear of right rear door.Fig. 77
.
Fuel Pump Module
In top of fuel tank.Fig. 64
.
Liftgate Actuator (F-11)
Lower center of liftgate. See Fig. 88
.
Power Steering Oil Pump
Lower right side of engine
compartment. See Fig. 36
.
Rear Blower Motor (C-20)
Rear of center console.Fig. 76
.
Rear Washer Motor (A-26)
In washer tank assembly.Fig. 79
.
Sunroof Motor Assembly
Right front of roof. See Fig. 62
.
Windshield Washer Motor (A-27)
In washer tank assembly.Fig. 79
.
Windshield Wiper Motor (A-03)
On left side of firewall.Fig. 79
.
Component
Location
ABS G Sensor Or G & Yaw Rate
Sensor
Under center console. See Fig. 67
.
Acceleration Pedal Position
Above accelerator pedal.Fig. 59
.
2004 Mitsubishi Endeavor LS
2004 MITSUBISHI Endeavor
Page 2328 of 3870
NO:
Repair or replace the wiring harness. Refer to
HARNESS
CONNECTOR INSPECTION
. Check that the defogger system works
normally.
Fig. 239: Locating Connector F
-05
Courtesy of MITSUBISHI MOTOR SALES OF AMERICA.
STEP 16. Check the defogger.
1. Let the engine run at 2,000 r/min, and check the printed heater with the
battery fully charged.
2. Turn on the defogger switch, and use a voltmeter to measure the voltage in
each printed heater at middle point A on the rear window glass.
The value should be approximately 6 volts.
Q: Does the defogger work normally?
2004 Mitsubishi Endeavor LS
2004 HVAC Heater Air Conditioning, Ventilation - Endeavor
Page 2368 of 3870

Courtesy of MITSUBISHI MOTOR SALES OF AMERICA
.
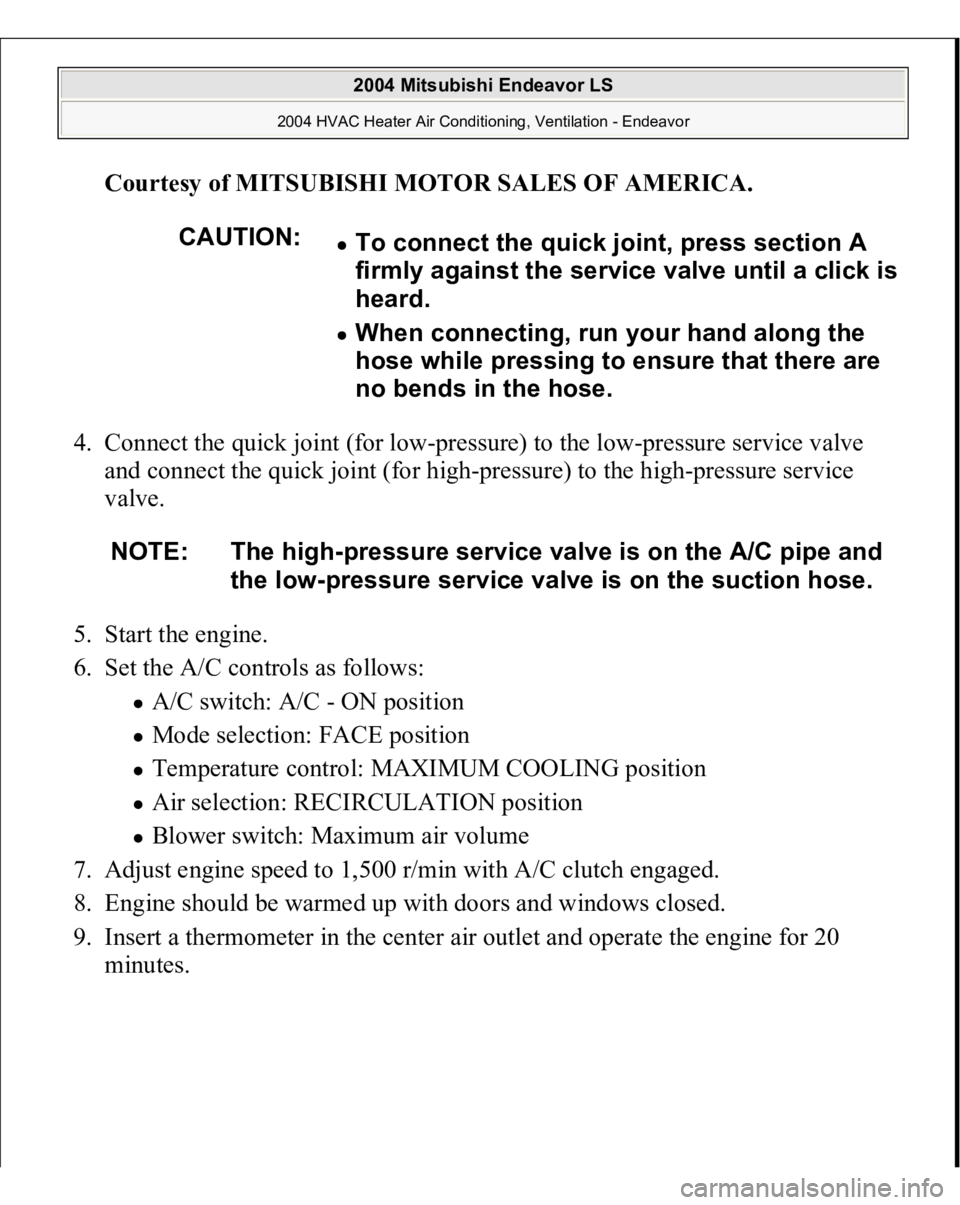
4. Connect the quick joint (for low-pressure) to the low-pressure service valve
and connect the quick joint (for high-pressure) to the high-pressure service
valve.
5. Start the engine.
6. Set the A/C controls as follows:
A/C switch: A/C - ON position Mode selection: FACE position Temperature control: MAXIMUM COOLING position Air selection: RECIRCULATION position Blower switch: Maximum air volume
7. Adjust engine speed to 1,500 r/min with A/C clutch engaged.
8. Engine should be warmed up with doors and windows closed.
9. Insert a thermometer in the center air outlet and operate the engine for 20
minutes.
CAUTION:
To connect the quick joint, press section A
firmly against the service valve until a click is
heard. When connecting, run your hand along the
hose while pressing to ensure that there are
no bends in the hose.
NOTE: The high-pressure service valve is on the A/C pipe and
the low-pressure service valve is on the suction hose.
2004 Mitsubishi Endeavor LS
2004 HVAC Heater Air Conditioning, Ventilation - Endeavor
Page 2741 of 3870

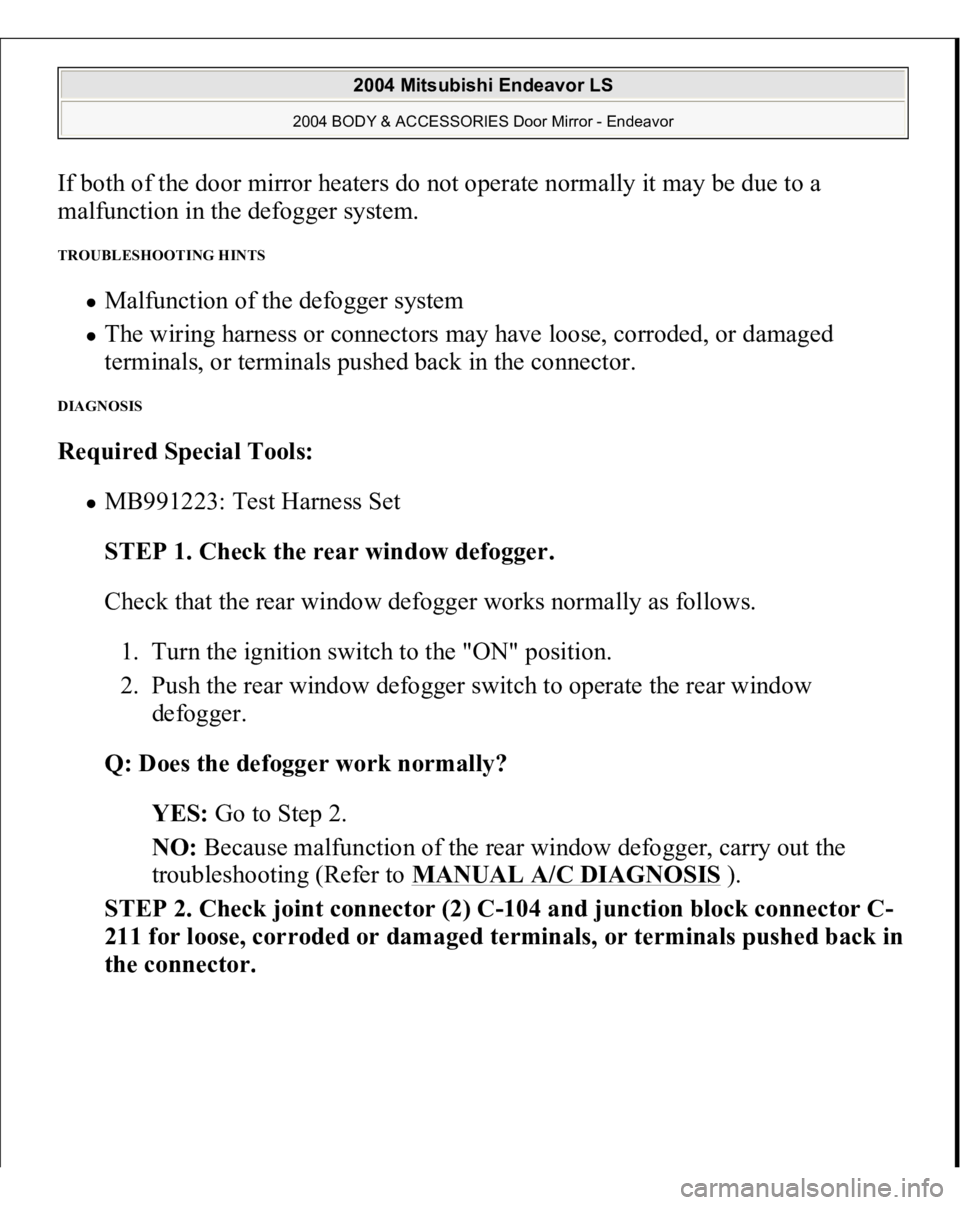
If both of the door mirror heaters do not operate normally it may be due to a
malfunction in the defogger system. TROUBLESHOOTING HINTS
Malfunction of the defogger system The wiring harness or connectors may have loose, corroded, or damaged
terminals, or terminals pushed back in the connector.
DIAGNOSIS Required Special Tools:
MB991223: Test Harness Set
STEP 1. Check the rear window defogger.
Check that the rear window defogger works normally as follows.
1. Turn the ignition switch to the "ON" position.
2. Push the rear window defogger switch to operate the rear window
defogger.
Q: Does the defogger work normally?
YES: Go to Step 2.
NO: Because malfunction of the rear window defogger, carry out the
troubleshooting (Refer to MANUAL A/C DIAGNOSIS
).
STEP 2. Check joint connector (2) C-104 and junction block connector C-
211 for loose, corroded or dama
ged terminals, or terminals
pushed back in
the connector
.
2004 Mitsubishi Endeavor LS
2004 BODY & ACCESSORIES Door Mirror - Endeavor