Page 69 of 442

69 Safety and Security
Occupant safety
Installation of infant and child restraint
systems
This vehicle is equipped with tether an-
chorages for a top tether strap at each of
the rear seating positions.Not foldable rear seat backrest
1Cover
�
Remove cover1 from anchorage ring.
�
Guide tether strap between head re-
straint and top of the seat back.
�
Head restraint must be positioned such
that the top tether strap can pass freely
between the head restraint and the top
of the seat back.
Make sure the tether strap is not twist-
ed.
Warning!
G
When using a BabySmart
TM compatible
child seat on the front passenger seat, the
passenger front airbag will not deploy only if
the PASSENGER AIRBAG OFF indicator lamp
remains illuminated.
Please be sure to check the indicator every
time you use the special system child seat.
Should the light go out while the restraint is
installed, please check installation. If the
light remains out, do not use the
BabySmart
TM restraint to transport children
on the front passenger seat until the system
has been repaired.
Warning!
G
Do not place powered-on laptops, cell
phones and like electronic devices on the
front passenger seat. Signals from such de-
vices may interfere with the BabySmart
TM
system. Such signal interference may cause
the PASSENGER AIRBAG OFF indicator lamp
not to come on during self-test or be contin-
uously lit, indicating that the system is not
functioning.
��
Page 70 of 442
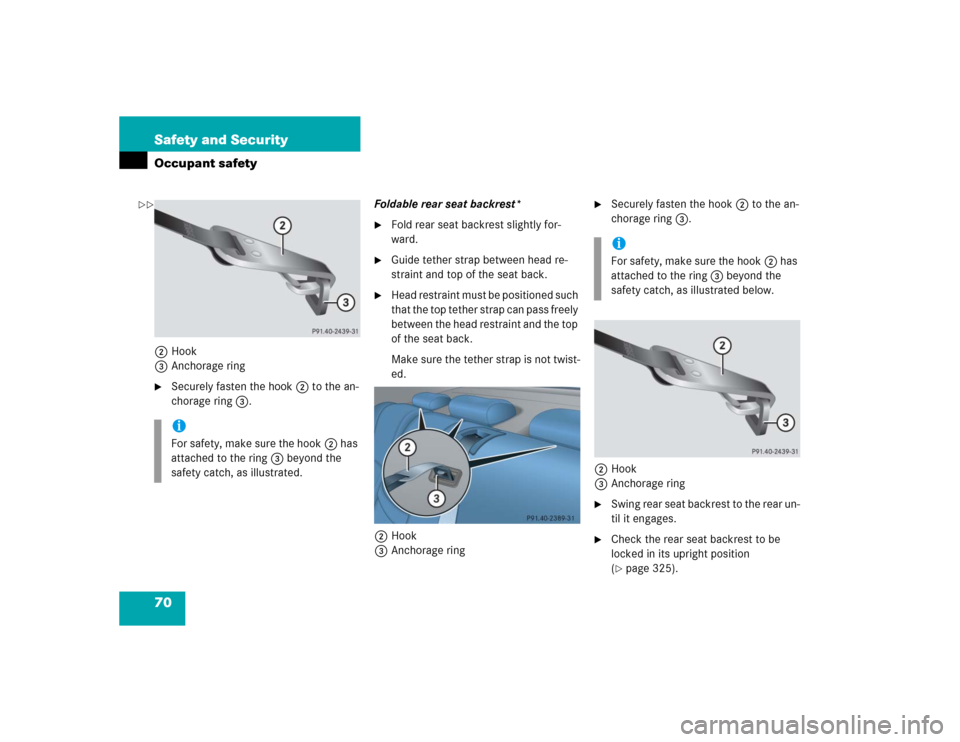
70 Safety and SecurityOccupant safety2Hook
3Anchorage ring�
Securely fasten the hook2 to the an-
chorage ring3.Foldable rear seat backrest*
�
Fold rear seat backrest slightly for-
ward.
�
Guide tether strap between head re-
straint and top of the seat back.
�
Head restraint must be positioned such
that the top tether strap can pass freely
between the head restraint and the top
of the seat back.
Make sure the tether strap is not twist-
ed.
2Hook
3Anchorage ring
�
Securely fasten the hook2 to the an-
chorage ring3.
2Hook
3Anchorage ring
�
S w i n g r e a r s e a t b a c k r e s t t o t h e r e a r u n -
til it engages.
�
Check the rear seat backrest to be
locked in its upright position
(�page 325).
iFor safety, make sure the hook2 has
attached to the ring3 beyond the
safety catch, as illustrated.
iFor safety, make sure the hook2 has
attached to the ring3 beyond the
safety catch, as illustrated below.
��
Page 72 of 442

72 Safety and SecurityOccupant safety
Blocking of rear door window operation
1Override switch
2Indicator lamp�
Press override switch1.
Indicator lamp2 comes on. The rear
door windows can no longer be operat-
ed using the switches located in the
rear doors.For more information on power windows,
see the “Controls in detail” section
(
�page 197).
Warning!
G
Children too big for child restraint systems
must ride in back seats using regular seat
belts. Position shoulder belt across chest
and shoulder, not face or neck. A booster
seat may be necessary to achieve proper
belt positioning for children from 41 lbs until
they reach a height where a lap/shoulder
belt fits properly without a booster.
Install child seat according to manufactur-
er’s instructions.
T h e c h i l d s e a t m u s t b e f i r m l y a t t a c h e d i n t h e
right and left side anchors2.
An incorrectly mounted child seat may come
loose during an accident which could result
in serious injury or death to your child.
Damaged or impact damaged child seats or
child seat mounting fittings must be re-
placed.
Do not leave children unattended in the ve-
hicle, even if the children are secured in a
child restraint system.
!Operation of the rear door windows
with the switches located on the door
control panel of the driver’s door is still
possible.
Warning!
G
Activate the override switch when children
are riding in the back seats of the vehicle.
The children may otherwise injure them-
selves, e.g. by becoming trapped in the win-
dow opening.
When leaving the vehicle, always remove the
SmartKey from the starter switch, and lock
the vehicle. Do not leave children unattend-
ed in the vehicle, or with access to an un-
locked vehicle. Unsupervised use of vehicle
equipment can cause an accident and/or
serious personal injury.
Page 88 of 442

88 Controls in detailLocking and unlocking
�In the “Controls in detail” section you will
find detailed information on how to oper-
ate the equipment installed on your vehi-
cle. If you are already familiar with the
basic functions of your vehicle, this section
will be of particular interest to you.
To quickly familiarize yourself with the ba-
sic functions of the vehicle, refer to the
“Getting started” section of this manual.
The corresponding page numbers are giv-
en at the beginning of each segment.
Locking and unlocking
SmartKey
Your vehicle comes supplied with two
SmartKeys, each with remote controls and
a removable mechanical key. The locking
tabs for the mechanical key portion of the
two SmartKeys are a different color to help
distinguish each key unit.
The SmartKey provides an extended oper-
ating range. To prevent theft, however, it is
advisable to only unlock the vehicle when
you are in close proximity to it.
The SmartKey centrally locks and unlocks�
the doors
�
the trunk
�
the fuel filler flap
SmartKey 1‹ Lock button
2Š Unlock button for the trunk lid
3Mechanical key locking tab
4ΠUnlock button
5Battery check lamp
6Â Panic button (
�page 73)
Page 90 of 442

90 Controls in detailLocking and unlockingRestoring to factory setting�
Press and hold buttonsŒ and‹
simultaneously for about six seconds
until battery check lamp5 flashes
twice.
Unlocking and opening the trunk lid
You can unlock and open the trunk sepa-
rately.
A minimum height clearance of 5.90 ft
(1.80 m) is required to open the trunk lid.
�
Press buttonŠ until trunk unlocks
and begins to open.The trunk can also be opened from its in-
side in an emergency, see “Trunk lid emer-
gency release” (
�page 104).
!If you can no longer lock or unlock the
vehicle with the SmartKey, then the
batteries in the SmartKey are dis-
charged, the SmartKey is malfunction-
ing or the vehicle battery is drained.�
Check the batteries in the Smart-
Key (
�page 91) and replace them if
necessary (
�page 355).
�
Use the mechanical key to unlock
the doors (
�page 353).
�
Have the vehicle batteries and their
connections checked.
�
Use the mechanical key to lock the
doors (
�page 353) and the trunk
lid (if applicable) (
�page 105).
If the SmartKey is malfunctioning, con-
tact an authorized Mercedes-Benz
Center.
!The trunk lid swings open upwards au-
tomatically. Always make sure there is
sufficient overhead clearance.
Vehicles with trunk lid opening/closing
system*: to stop the opening proce-
dure, press buttonŠ. The trunk lid
stops moving.
iIf the trunk lid does not open, it is still
locked separately (
�page 105).
If the vehicle was previously centrally
locked, the trunk lid will lock automati-
cally when closed (�page 99). The
turn signals will flash three times to
confirm locking.
Page 94 of 442

94 Controls in detailLocking and unlockingFactory setting
Global unlocking�
Grasp the door handle.
The vehicle will lock again automatically
within approximately 40 seconds if neither
door nor trunk is opened.
Global locking
�
Press lock button at door handle
(�page 54) or trunk lid (
�page 96).
Selective setting
If you frequently travel alone, you may wish
to reprogram the SmartKey with KEY-
LESS-GO so when you grasp the driver’s
door handle only the driver’s door and the
fuel filler flap unlocks.
�
Press and hold buttonsŒ and‹
simultaneously for about five seconds
until battery check lamp5 flashes
twice.
The SmartKey with KEYLESS-GO will
then function as follows:
Unlocking driver’s door and fuel filler
flap�
Press buttonΠonce.
Global unlocking
�
Press buttonΠtwice.
Global locking
�
Press button‹.
Restoring to factory setting
�
Press and hold buttonsŒ and‹
simultaneously for about six seconds
until battery check lamp5 flashes
twice.
!If you can no longer lock or unlock the
vehicle with the SmartKey, then the
batteries in the SmartKey are dis-
charged, the SmartKey is malfunction-
ing or the vehicle battery is drained.�
Check the batteries in the Smart-
Key (
�page 91) and replace them if
necessary (
�page 355).
�
Use the mechanical key to unlock
the doors (
�page 353).
�
Have the vehicle batteries and their
connections checked.
�
Use the mechanical key to lock the
doors (
�page 353) and the trunk
lid (if applicable) (
�page 105).
If the SmartKey is malfunctioning, con-
tact an authorized Mercedes-Benz
Center.
Page 109 of 442
.
Front seat hea")
109 Controls in detailSeats
Removing and installing front seat head restraints
Information on head restraint adjustment
can be found in the “Getting started” sec-
tion (
�page 36).
Front seat head restraints
Removing front head restraints
�
Press switch1upwards and hold until
the head restraint is fully extended.
�
Pull out head restraint.Installing front head restraints:
�
Press switch1upwards and hold for
about five seconds.
�
Push the head restraint down until it
engages.
�
Adjust head restraint to desired posi-
tion (
�page 36).
Warning!
G
For your protection, drive only with properly
positioned head restraints.
Adjust head restraint so that the center of
the head restraint supports the back of the
head at eye level. This will reduce the poten-
tial for injury to the head and neck in the
event of an accident or similar situation.
Do not drive the vehicle without the seat
head restraints. Head restraints are intend-
ed to help reduce injuries during an acci-
dent.
iTilt the backrest to the rear for easier
removal and installation of the head re-
straints.
Page 110 of 442
110 Controls in detailSeatsRear seat head restraints
Folding head restraints back with
switch in the center console
The rear seat head restraints can be folded
backward for increased visibility.
1Head restraint release switch
�
Make sure the ignition is switched on.
All the lights in the instrument cluster
come on.
�
Press the symbol-side on rocker
switch1to release the head re-
straints.
The head restraints will fold backward.Placing head restraints upright
�
Pull the head restraint forward until it
locks into position.
!The rear seat head restraints cannot be
adjusted.
Warning!
G
For safety reasons, always drive with the
rear head restraints in the upright position
when the rear seats are occupied.
Keep the area around head restraints clear
of articles (e.g. clothing) to not obstruct the
folding operation of the head restraints.
!Make sure the head restraints engage
when placing them upright. Otherwise
their protective function cannot be as-
sured.