Page 104 of 440

104 Controls in detailLocking and unlockingSeparately locking the trunk
Your vehicle may be equipped with a func-
tion permitting the separate locking of the
trunk using the mechanical key. If present,
this feature can permit you to deny any un-
authorized person access to the trunk by
locking the trunk separately and leaving
the SmartKey less the mechanical key with
the vehicle.
To verify the presence of this feature, use
the mechanical key to lock the trunk and
then attempt to open the trunk by pulling
the trunk lid handle after the vehicle has
been centrally unlocked with the
SmartKey.The lock is located next to the recessed
handle.
1Neutral position
2Locked
�
Close the trunk lid (
�page 97)
�
Pull the mechanical key out of the
SmartKey (
�page 343).
�
Insert the mechanical key in the trunk
lid lock.
�
Turn the mechanical key clockwise to
position2.The trunk remains locked even when the
vehicle is centrally unlocked.
iYou can only cancel the separate trunk
locking mode by means of the
mechanical key.
Page 105 of 440
.
�
Insert the mechanical key in the trunk
lid lock.
�
Turn the m")
105 Controls in detail
Locking and unlocking
Separately unlocking the trunk�
Pull the mechanical key out of the
SmartKey (
�page 343).
�
Insert the mechanical key in the trunk
lid lock.
�
Turn the mechanical key counterclock-
wise to neutral position1.
You can now open the trunk
(�page 96).
A minimum height clearance of 5.71 ft
(1.74 m) is required to open the trunk lid.
Automatic central locking
The doors and the trunk automatically lock
when the ignition is switched on and the
wheels are turning at vehicle speeds of ap-
proximately 9 mph (15 km/h) or more.
You can open a locked door from the in-
side. Open doors only when conditions are
safe to do so.
You can deactivate the automatic locking
using the control system (
�page 149).
For more information on towing the vehi-
cle, see “Towing the vehicle” (�page 368).
Warning!
G
Only drive with the trunk closed. Among oth-
er dangers, such as your view being blocked,
exhaust fumes may enter the vehicle
interior.
iThe doors unlock automatically after an
accident if the force of the impact ex-
ceeds a preset threshold.
The vehicle automatically locks when
the ignition is switched on and the
wheels are turning at vehicle speeds of
approximately 9 mph (15 km/h) or
more. You could therefore lock yourself
out when the vehicle�
is pushed or towed
�
is on a test stand
Page 106 of 440

106 Controls in detailLocking and unlockingLocking and unlocking from the inside
You can lock or unlock the doors and the
trunk from inside using the central locking
switch. This can be useful, for example, if
you want to lock the vehicle before starting
to drive.
The fuel filler flap will not be locked or un-
locked with the central locking switch.The switch is located in the center console.
Central locking switch1Locking
2Unlocking
Locking�
Press upper half1 of the central lock-
ing switch.
If both doors are closed, the vehicle
locks.Unlocking
�
Press lower half2 of the central lock-
ing switch.
The vehicle unlocks.
Warning!
G
When leaving the vehicle, always remove the
SmartKey from the starter switch, take the
SmartKey with KEYLESS-GO* with you and
lock the vehicle. Do not leave children unat-
tended in the vehicle, or with access to an
unlocked vehicle. Unsupervised use of vehi-
cle equipment may cause an accident
and/or serious personal injury.
iYou can open a locked door from the
inside. Open doors only when condi-
tions are safe to do so.
If the vehicle was previously centrally
locked with the SmartKey or the
SmartKey with KEYLESS-GO*, it will
not unlock using the central locking
switch.
If the vehicle was previously locked
with the central locking switch�
while in the global remote control
mode, the vehicle is completely un-
locked when a door is opened from
the inside.
�
while in the selective remote con-
trol mode, only the door opened
from inside is unlocked.
Page 141 of 440
141 Controls in detail
Control system
The table below shows what settings can
be changed within the various menus. De-
tailed instructions on making individual
settings can be found on the following pag-
es.INSTRUMENT CLUSTER
TIME
LIGHTING
VEHICLE
CONVENIENCE
Select temperature dis-
play mode
Set time (hours)
Set daytime running lamp
mode (USA only)
Set station selection
mode (radio)
Activate easy-entry/exit
feature
Select speedometer dis-
play mode
Set time (minutes)
Set locator lighting
Set automatic locking
Set key-dependency
Select language
Exterior lamps delayed
shut-off
Set opening limiter for
trunk lid
Set parking position for
exterior rear view mirror
Select display (speed dis-
play or outside tempera-
ture) for status display
Interior lighting delayed
shut-off
Select display (speed dis-
play or outside tempera-
ture) for standard display
Page 148 of 440

148 Controls in detailControl systemInterior lighting delayed shut-off
Use this function to set whether and for
how long you would like the interior light-
ing to remain lit during darkness after the
SmartKey is removed from the starter
switch.�
Move the selection marker with
theæ orç button to the
Light-
ing
submenu.
�
Press buttonj ork repeatedly
until you see this message in the dis-
play:
Interior lamp delayed
shut-off
.
The selection marker is on the current
setting.
�
Pressæ orç to select the de-
sired lamp-on time period. You can se-
lect:�
0 s
, the delayed shut-off feature is
deactivated.
�
5 s
, 10 s
, 15 s
or
20 s
, the delayed
shut-off feature is activated.
Vehicle submenu
Access the
Vehicle
submenu via the
Set-
tings
menu. Use the
Vehicle
submenu to
make general vehicle settings. The follow-
ing functions are available:Setting station selection mode
Use the
Audio Search function
to select
the manual or memory station selection
mode for the radio (
�page 135).
�
Move the selection marker with
theæ orç button to the
Vehi-
cle
submenu.
�
Press buttonj ork repeatedly
until you see this message in the dis-
play:
Audio Search function
.
The selection marker is on the current
setting.
�
Pressæ orç to select the de-
sired station selection mode. You can
select:�
freq.
�
memory
selects next stored station
Function
Page
Set station selection mode
(radio)
148
Set automatic locking
149
Set opening limiter for trunk lid
149
Page 149 of 440

149 Controls in detail
Control system
Setting automatic locking
Use this function to activate or deactivate
the automatic central locking. With the au-
tomatic central locking system activated,
the vehicle is centrally locked at vehicle
speeds of approximately 9 mph
(15 km/h).�
Move the selection marker with
theæ orç button to the
Vehi-
cle
submenu.
�
Press buttonj ork repeatedly
until you see this message in the dis-
play:
Automatic door lock
.
The selection marker is on the current
setting.
�
Pressæ orç to switch Automatic door lock
on or
off
.Setting trunk lid opening limiter (vehi-
cles with trunk lid opening/closing sys-
tem*)
Use this function to activate or deactivate
the trunk lid opening limiter function. You
can also activate or deactivate the opening
height limitation with the trunk lid closing
switch, see (
�page 99).
�
Move the selection marker with
theæ orç button to the Vehicle
submenu.
�
Press buttonj ork repeatedly
until you see this message in the dis-
play:
Opening limiter Trunk lid
.
The selection marker is on the current
setting.
�
Pressæ orç to switch Opening limiter trunk lid
on or
off
.Convenience submenu
Access the
Convenience
submenu via the
Settings
menu. Use the
Convenience
sub-
menu to change the settings for a number
of convenience features. The following
functions are available:
Function
Page
Activate easy-entry/exit feature
150
Set key-dependency
151
Set parking position for exterior
rear view mirror
151
Page 237 of 440
237 Controls in detail
Loading
�Loading
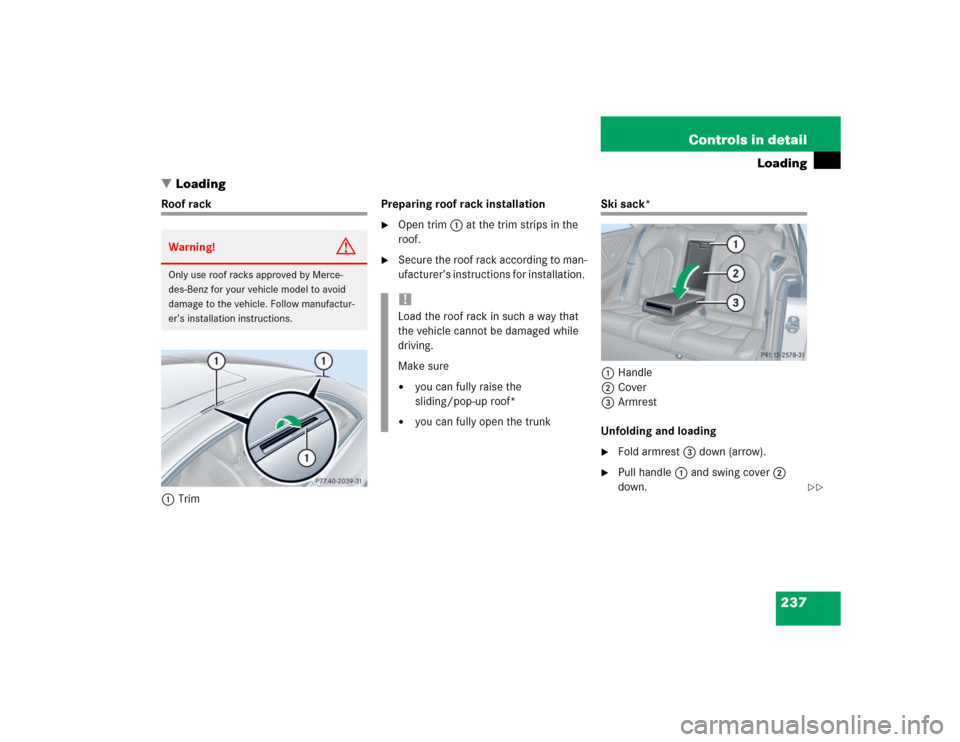
Roof rack
1TrimPreparing roof rack installation
�
Open trim1 at the trim strips in the
roof.
�
Secure the roof rack according to man-
ufacturer’s instructions for installation.
Ski sack*
1Handle
2Cover
3Armrest
Unfolding and loading�
Fold armrest3 down (arrow).
�
Pull handle1 and swing cover2
down.
Warning!
G
Only use roof racks approved by Merce-
des-Benz for your vehicle model to avoid
damage to the vehicle. Follow manufactur-
er’s installation instructions.
!Load the roof rack in such a way that
the vehicle cannot be damaged while
driving.
Make sure�
you can fully raise the
sliding/pop-up roof*
�
you can fully open the trunk
��
Page 238 of 440
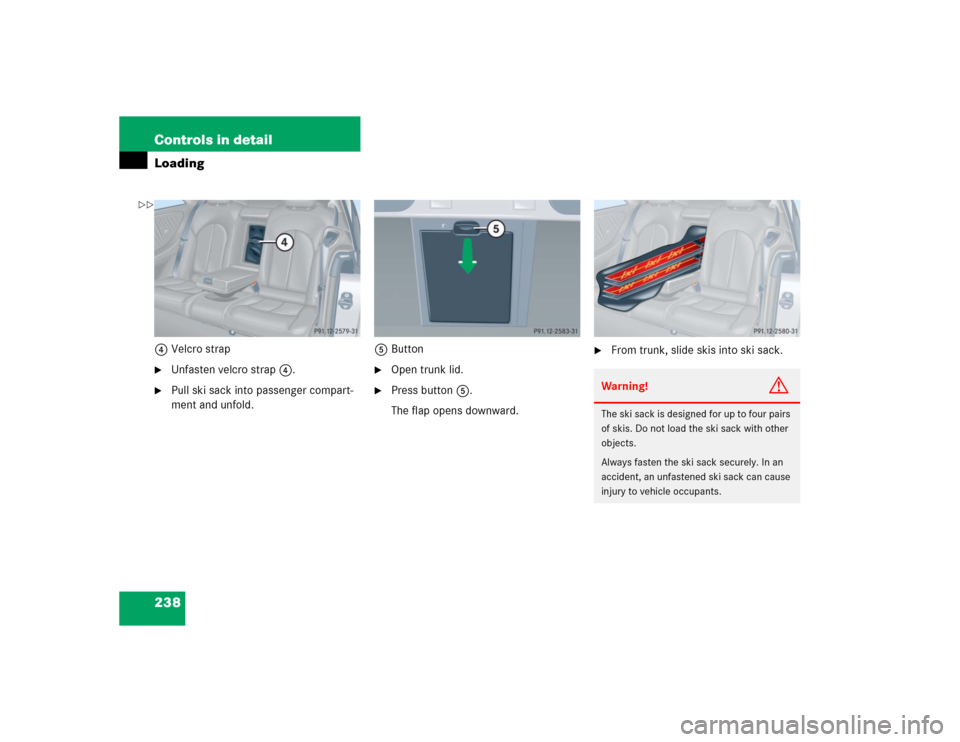
238 Controls in detailLoading4Velcro strap�
Unfasten velcro strap4.
�
Pull ski sack into passenger compart-
ment and unfold.5Button
�
Open trunk lid.
�
Press button5.
The flap opens downward.
�
From trunk, slide skis into ski sack.Warning!
G
The ski sack is designed for up to four pairs
of skis. Do not load the ski sack with other
objects.
Always fasten the ski sack securely. In an
accident, an unfastened ski sack can cause
injury to vehicle occupants.
��