Page 7 of 440

Contents
Maintenance...................................... 296
Clearing the service indicator ...... 296
Service term exceeded ................ 296
Calling up the service indicator .... 297
Resetting the service indicator..... 297
Vehicle care ....................................... 298
Cleaning and care of vehicle ........ 298
Practical hints.................................. 305
What to do if …? ................................. 306
Lamps in instrument cluster ......... 306
Lamp in center console................. 313
Messages in the display ................ 314
Where will I find...? ............................. 337
First aid kit.................................... 337
Vehicle tool kit .............................. 337
Minispare wheel............................ 340
Unlocking/locking in an emergency... 343
Unlocking the vehicle.................... 343
Locking the vehicle ....................... 344
Changing batteries in
the SmartKey/ SmartKey
with KEYLESS-GO* ....................... 345
Fuel filler flap ................................ 347
Manually unlocking
the gear selector lever .................. 347
Opening/closing in an emergency ..... 348
Sliding/pop-up roof* .................... 348Replacing bulbs .................................. 350
Bulbs............................................. 350
Replacing bulbs for front lamps .... 352
Side marker lamp bulb.................. 355
Replacing bulbs for rear lamps ..... 356
Replacing wiper blades ...................... 357
Removing wiper blades ................. 357
Installing wiper blades .................. 357
Flat tire............................................... 358
Preparing the vehicle .................... 358
Mounting the Minispare wheel...... 358
Battery ............................................... 363
Disconnecting the battery ............ 364
Removing the battery ................... 364
Charging and reinstalling battery .. 364
Reconnecting the battery ............. 365
Jump starting...................................... 366
Towing the vehicle.............................. 368
Towing the vehicle ........................ 368
Installing towing eye bolt .............. 370
Fuses.................................................. 372
Fuse box in
passenger compartment ............... 372
Fuse box in engine compartment . 373
Auxiliary fuse box in trunk ............ 374
Page 84 of 440
84 Safety and SecurityAnti-theft systemsDisarming tow-away alarm
To prevent triggering the tow-away alarm
feature, switch off the tow-away alarm be-
fore towing the vehicle, or when parking on
a surface subject to movement, such as a
ferry or auto train.
The switch is located on the center con-
sole.
1Tow-away alarm off switch
2Indicator lamp�
Turn off the ignition and remove the
SmartKey.
�
Press upper half1 of the switch.
Indicator lamp2 in the switch comes
on briefly.
�
Exit and lock your vehicle with the
SmartKey or (vehicles with
KEYLESS-GO*) the lock button at each
door handle.
The tow-away alarm remains disarmed un-
til you lock your vehicle again.Canceling the alarm
To cancel the alarm:
With the SmartKey
�
Insert the SmartKey in the starter
switch.
or
�
Press the Œ or ‹ button on the
SmartKey.
With KEYLESS-GO*
�
Grasp the outside door handle.
or
�
Press the KEYLESS-GO start/stop
button.
iYou cannot disarm the tow-away alarm
while the ignition is turned on.
Page 105 of 440
.
�
Insert the mechanical key in the trunk
lid lock.
�
Turn the m")
105 Controls in detail
Locking and unlocking
Separately unlocking the trunk�
Pull the mechanical key out of the
SmartKey (
�page 343).
�
Insert the mechanical key in the trunk
lid lock.
�
Turn the mechanical key counterclock-
wise to neutral position1.
You can now open the trunk
(�page 96).
A minimum height clearance of 5.71 ft
(1.74 m) is required to open the trunk lid.
Automatic central locking
The doors and the trunk automatically lock
when the ignition is switched on and the
wheels are turning at vehicle speeds of ap-
proximately 9 mph (15 km/h) or more.
You can open a locked door from the in-
side. Open doors only when conditions are
safe to do so.
You can deactivate the automatic locking
using the control system (
�page 149).
For more information on towing the vehi-
cle, see “Towing the vehicle” (�page 368).
Warning!
G
Only drive with the trunk closed. Among oth-
er dangers, such as your view being blocked,
exhaust fumes may enter the vehicle
interior.
iThe doors unlock automatically after an
accident if the force of the impact ex-
ceeds a preset threshold.
The vehicle automatically locks when
the ignition is switched on and the
wheels are turning at vehicle speeds of
approximately 9 mph (15 km/h) or
more. You could therefore lock yourself
out when the vehicle�
is pushed or towed
�
is on a test stand
Page 244 of 440
244 Controls in detailUseful features
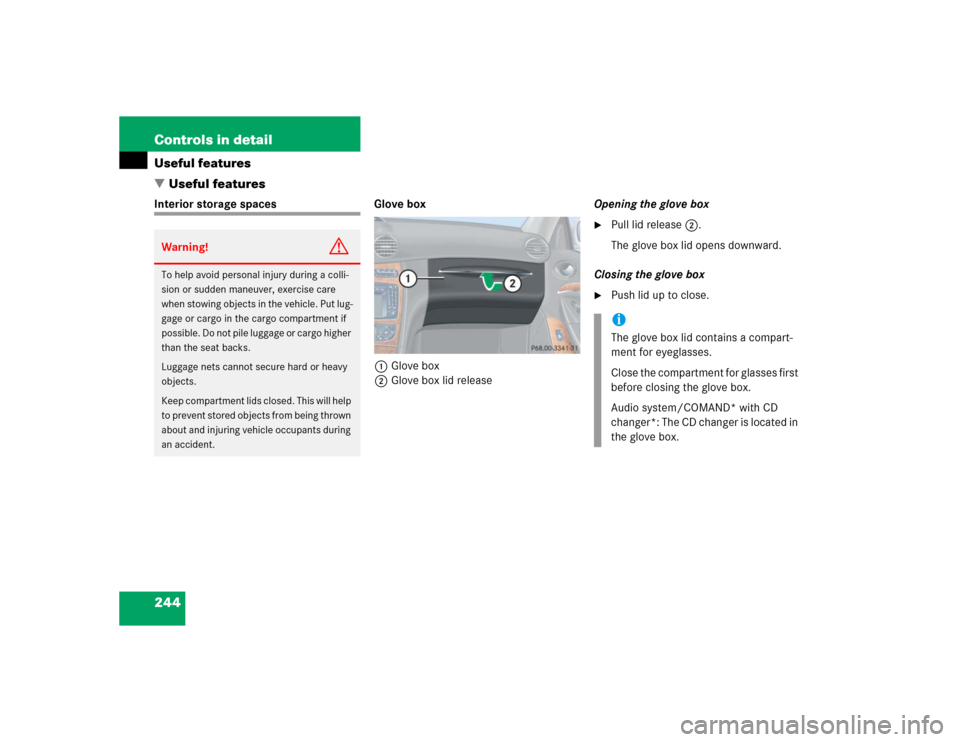
�Useful featuresInterior storage spaces Glove box
1Glove box
2Glove box lid releaseOpening the glove box
�
Pull lid release2.
The glove box lid opens downward.
Closing the glove box
�
Push lid up to close.
Warning!
G
To help avoid personal injury during a colli-
sion or sudden maneuver, exercise care
when stowing objects in the vehicle. Put lug-
gage or cargo in the cargo compartment if
possible. Do not pile luggage or cargo higher
than the seat backs.
Luggage nets cannot secure hard or heavy
objects.
Keep compartment lids closed. This will help
to prevent stored objects from being thrown
about and injuring vehicle occupants during
an accident.
iThe glove box lid contains a compart-
ment for eyeglasses.
Close the compartment for glasses first
before closing the glove box.
Audio system/COMAND* with CD
changer*: The CD changer is located in
the glove box.
Page 246 of 440
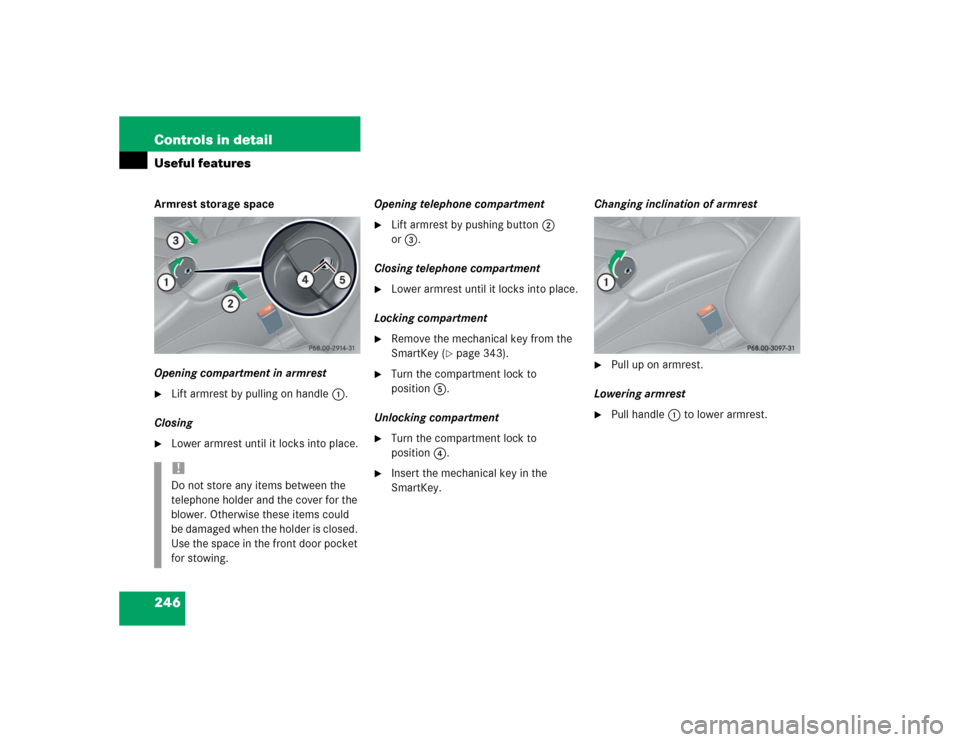
246 Controls in detailUseful featuresArmrest storage space
Opening compartment in armrest�
Lift armrest by pulling on handle1.
Closing
�
Lower armrest until it locks into place.Opening telephone compartment
�
Lift armrest by pushing button2
or3.
Closing telephone compartment
�
Lower armrest until it locks into place.
Locking compartment
�
Remove the mechanical key from the
SmartKey (
�page 343).
�
Turn the compartment lock to
position5.
Unlocking compartment
�
Turn the compartment lock to
position4.
�
Insert the mechanical key in the
SmartKey.Changing inclination of armrest
�
Pull up on armrest.
Lowering armrest
�
Pull handle1 to lower armrest.
!Do not store any items between the
telephone holder and the cover for the
blower. Otherwise these items could
be damaged when the holder is closed.
Use the space in the front door pocket
for stowing.
Page 255 of 440

255 Controls in detail
Useful features
A voice connection between the Roadside
Assistance dispatcher and the occupants
of the vehicle will be established. When a
voice connection is established, the audio
system mutes and the message
Tele Aid
– Roadside Assistance call active
ap-
pears in the multifunction display.
�
Describe the nature of the need for as-
sistance.
The Mercedes-Benz Roadside assistance
dispatcher will either dispatch a qualified
Mercedes-Benz technician or arrange to
tow your vehicle to the nearest authorized
Mercedes-Benz Center. For services such
as labor and/or towing, charges may ap-
ply. Refer to the Roadside Assistance man-
ual for more information.These programs are only available in the
USA:
�
Sign and Drive services: Services such
as jump start, a few gallons of fuel or
the replacement of a flat tire with the
vehicle spare tire are obtainable.
�
Remote Vehicle Diagnostics: This func-
tion permits the Mercedes-Benz Road-
side Assistance dispatcher to
download malfunction codes and actu-
al vehicle data.iThe indicator lamp on the Roadside As-
sistance button• remains illumi-
nated in red for approximately ten
seconds during the system self-check
after turning the ignition (position2) on
(together with the SOS button and the
Information button¡).
See system self-check (
�page 252)
when the indicator lamp does not come
on in red or stays on longer than ap-
proximately ten seconds.
If the indicator lamp on the Roadside
Assistance button• is illuminated
continuously and there was no voice
connection to the Response Center es-
tablished, then the Tele Aid system
could not initiate a Roadside Assis-
tance call (e.g. the relevant cellular
phone network is not available). The
message
Roadside Assistance –
Call failed
appears in the multifunc-
tion display.
Roadside Assistance calls can be ter-
minated using the ìbutton on the
multifunction steering wheel.
Page 305 of 440
305 Practical hints
What to do if …?
Where will I find...?
Unlocking/locking in an emergency
Opening/closing in an emergency
Replacing bulbs
Replacing wiper blades
Flat tire
Battery
Jump starting
Towing the vehicle
Fuses
Page 337 of 440
337 Practical hints
Where will I find...?
�Where will I find...?
First aid kit
The first aid kit is stored in left hand side of
the trunk.�
Loosen Velcro fastener.
�
Remove first aid kit.
Vehicle tool kit
The vehicle tool kit is stored in the com-
partment underneath the trunk floor.
The following is included:�
Towing eye bolt
�
Alignment bolt
�
Wheel wrench
�
Vehicle jack
�
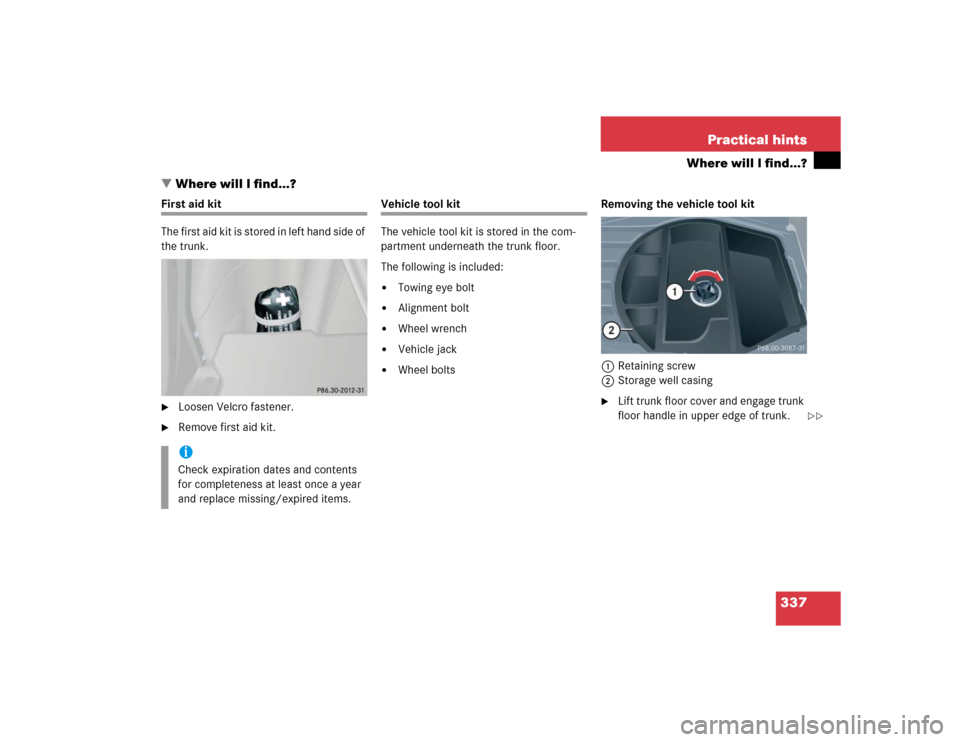
Wheel boltsRemoving the vehicle tool kit
1Retaining screw
2Storage well casing
�
Lift trunk floor cover and engage trunk
floor handle in upper edge of trunk.
iCheck expiration dates and contents
for completeness at least once a year
and replace missing/expired items.
��