Page 368 of 440

368 Practical hintsTowing the vehicle
�Towing the vehicleTowing the vehicle
Mercedes-Benz recommends that the vehi-
cle be transported with all wheels off the
ground using flatbed or appropriate wheel
lift/dolly equipment.When circumstances do not permit the
recommended towing methods, the vehi-
cle may be towed with all wheels on the
ground or front wheels raised only so far as
necessary to have the vehicle moved to a
safe location where the recommended
towing methods can be employed.
!Use flatbed or wheel lift/dolly equip-
ment with SmartKey in starter switch
turned to position0.
Do not tow with sling-type equipment.
Towing with sling-type equipment over
bumpy roads will damage radiator and
supports.
To prevent damage during transport,
do not tie down vehicle by its chassis or
suspension parts.
Switch off the tow-away alarm
(�page 83) and the automatic central
locking (
�page 149).
!If the vehicle is towed with the front
axle raised, the engine must be shut off
(SmartKey in starter switch position0
or1). Otherwise, the ESP will immedi-
ately be engaged and will apply the rear
wheel brakes.
When towing the vehicle with all wheels
on the ground, the gear selector lever
must be in positionN and the
SmartKey must be in starter switch
position2.
When towing the vehicle with all wheels
on the ground or the front axle raised,
the vehicle may be towed only for dis-
tances up to 30 miles (50 km) and at a
speed not to exceed 30 mph
(50 km/h).
Page 369 of 440

369 Practical hints
Towing the vehicle
!
To be certain to avoid a possibility of
damage to the transmission, however,
we recommend the drive shaft be dis-
connected at the rear axle drive flange
for any towing beyond a short tow to a
nearby garage.
Warning!
G
Prior to towing the vehicle with all wheels on
the ground, make certain that the SmartKey
is in starter switch position
2.
If the SmartKey is left in starter switch posi-
tion
0 for an extended period of time, it can
no longer be turned in the switch. In this
case, the steering is locked. To unlock, re-
move SmartKey from starter switch and re-
insert.
If circumstances require towing the vehicle
with all wheels on the ground, always tow
with a tow bar if:
�
the engine will not run
�
there is a malfunction in the power sup-
ply or in the vehicle’s electrical system
as that will be necessary to adequately con-
trol the towed vehicle.
Warning!
G
With the engine not running, there is no
power assistance for the brake and steering
systems. In this case, it is important to keep
in mind that a considerably higher degree of
effort is necessary to brake and steer the ve-
hicle. Adapt your driving accordingly.iTo signal turns while being towed with
the hazard warning flasher in use, turn
SmartKey in starter switch to
position2 and activate the combina-
tion switch for the left or right turn sig-
nal in the usual manner – only the
selected turn signal will operate.
Upon canceling the turn signal, the haz-
ard warning flasher will operate again.
Page 370 of 440

370 Practical hintsTowing the vehicle
Installing towing eye bolt
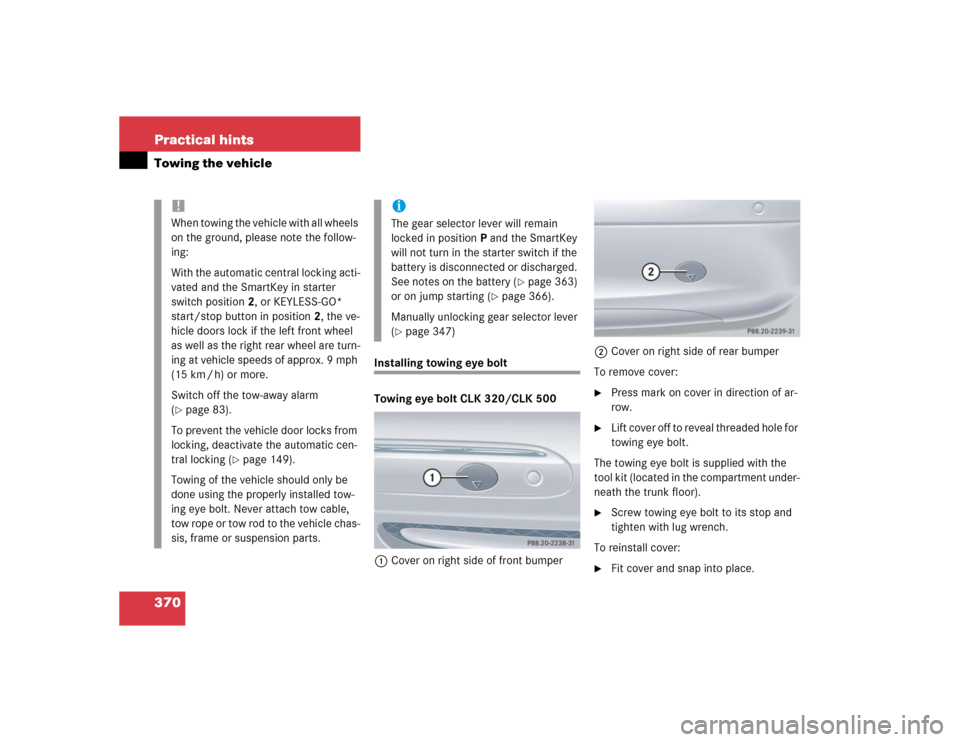
Towing eye bolt CLK 320/CLK 500
1Cover on right side of front bumper2Cover on right side of rear bumper
To remove cover:
�
Press mark on cover in direction of ar-
row.
�
Lift cover off to reveal threaded hole for
towing eye bolt.
The towing eye bolt is supplied with the
tool kit (located in the compartment under-
neath the trunk floor).
�
Screw towing eye bolt to its stop and
tighten with lug wrench.
To reinstall cover:
�
Fit cover and snap into place.
!When towing the vehicle with all wheels
on the ground, please note the follow-
ing:
With the automatic central locking acti-
vated and the SmartKey in starter
switch position2, or KEYLESS-GO*
start/stop button in position2, the ve-
hicle doors lock if the left front wheel
as well as the right rear wheel are turn-
ing at vehicle speeds of approx. 9 mph
(15 km / h) or more.
Switch off the tow-away alarm
(�page 83).
To prevent the vehicle door locks from
locking, deactivate the automatic cen-
tral locking (
�page 149).
Towing of the vehicle should only be
done using the properly installed tow-
ing eye bolt. Never attach tow cable,
tow rope or tow rod to the vehicle chas-
sis, frame or suspension parts.
iThe gear selector lever will remain
locked in positionP and the SmartKey
will not turn in the starter switch if the
battery is disconnected or discharged.
See notes on the battery (
�page 363)
or on jump starting (
�page 366).
Manually unlocking gear selector lever
(
�page 347)
Page 371 of 440

371 Practical hints
Towing the vehicle
Towing eye bolt CLK 55 AMG
Towing eye bolt in front bumper
The cover for the towing eye bolt in the
front bumper is identical to the cover on
the models CLK320/CLK500.
To remove and to reinstall cover,see “Tow-
ing eye bolt CLK 320/CLK 500”
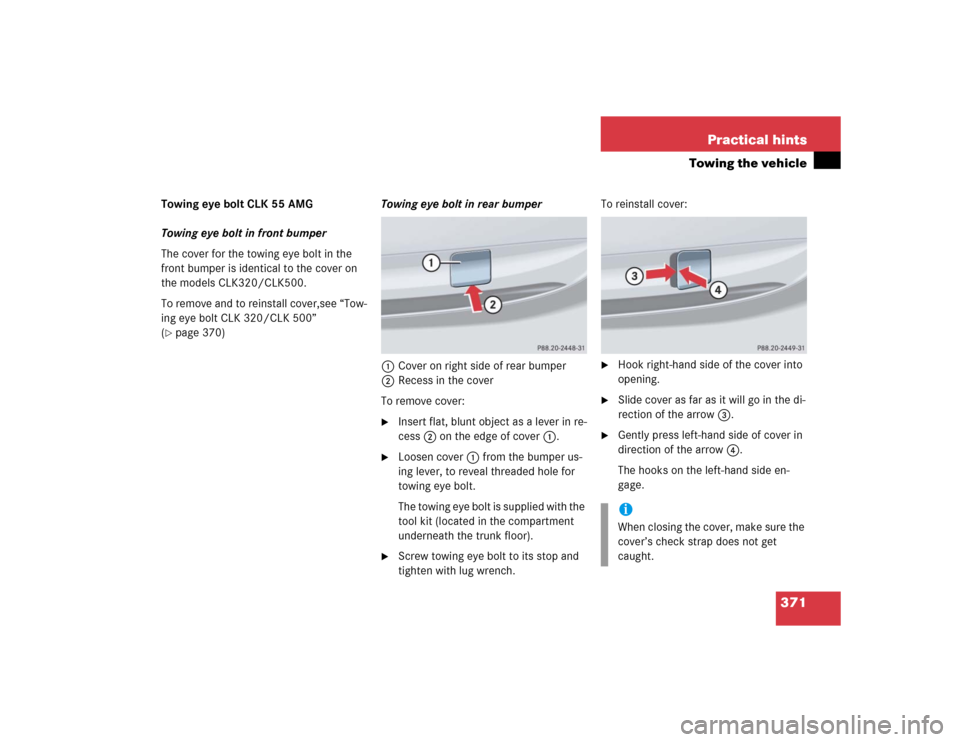
(�page 370)Towing eye bolt in rear bumper
1Cover on right side of rear bumper
2Recess in the cover
To remove cover:
�
Insert flat, blunt object as a lever in re-
cess 2 on the edge of cover 1.
�
Loosen cover 1 from the bumper us-
ing lever, to reveal threaded hole for
towing eye bolt.
The towing eye bolt is supplied with the
tool kit (located in the compartment
underneath the trunk floor).
�
Screw towing eye bolt to its stop and
tighten with lug wrench.To reinstall cover:
�
Hook right-hand side of the cover into
opening.
�
Slide cover as far as it will go in the di-
rection of the arrow3.
�
Gently press left-hand side of cover in
direction of the arrow4.
The hooks on the left-hand side en-
gage.iWhen closing the cover, make sure the
cover’s check strap does not get
caught.
Page 415 of 440

415 Index
High beam bulb for high beam flasher
(Bi-Xenon*)
Replacing bulbs 354
High beam flasher 48, 123
Replacing bulbs (Bi-Xenon*) 351
Replacing bulbs (Halogen) 351
High beam headlamps
Messages in display 330
Replacing bulbs (Bi-Xenon*) 351
Replacing bulbs (Halogen) 351, 353
Switching on 123
High mounted brake lamp 351
Hood 281
Closing 282
Message in display 328
Opening 281
Hydroplaning 271I
Identification labels 378
Ignition 31, 33
Switching on 44
Immobilizer 81
Activating 81
Deactivating 81
Indicator lamps see
Lamps, indicator and warning
Infant and child restraint systems 68
Installing 72
LATCH child seat anchors 73
Information
About service and warranty 10
Button for Tele Aid 256
Installing
Floormates* 249
Infant and child restraint systems 72
Towing eye bolt 370
Towing eye bolt (CLK 55 AMG) 371
Wiper blades 357Instrument cluster 22, 126, 399
Cleaning 303
Coolant temperature indicator 127
Illumination 126
Lamps in 306–312
Multifunction display 129
Outside temperature indicator 128
Selecting language 143
Instruments and controls see Cockpit
Interior lighting 124
Activating automatic control 124
Deactivating automatic control 125
Delayed switch-off 148
Manual operation 125
Interior rear view mirror
Adjusting 38
Antiglare 167
Interior storage spaces 244
Armrest 246
Glove box 244
Parcel net 247
Storage bags 247
Page 422 of 440

422 IndexPassenger compartment 274
Fuse box in 372
Interior lighting 124
Interior rear view mirror 38
Parcel net in
front passenger footwell 247
Storage bags, rear side
of the front seats 247
Passenger safety see Occupant safety
Pedals 267
Phone book*
Loading 155
Quick search 156
Phone number*
Dialing 155
Redialing 156
Plastic and rubber parts
Cleaning 304
Playing
CDs 201
Poly-V-belt drive 400
Layout 379Positions (Memory function)
Recalling from memory 117
Storing into memory 117
Power assistance 267
Power seat
Adjusting backrest tilt 36
Adjusting head restraint height 36
Adjusting head restraint tilt 36
Adjusting seat cushion tilt 36
Adjusting seat height 36
Front seat head restraints 108
Seat fore and aft adjustment 35
Power train 400
Power washer 299
Power windows 210
Blocking of rear window operation 74
Side windows 210
Synchronizing 213Practical hints
First aid kit 337
Fuses 372
Lamp in center console 313
Lamps in instrument cluster 306
Messages in the display 314
Minispare wheel 340
Minispare wheel bolts 342
Towing the vehicle 368
Unlocking/locking
in an emergency 343
Vehicle jack 339
Vehicle tool kit 337
Premium unleaded gasoline 391
Problems
While driving 50
With vehicle 17
Product information 9
Program mode selector switch 400
Automatic transmission 163
Automatic transmission, CLK 55
AMG 164
Page 430 of 440

430 IndexTele Aid 251
Emergency calls 252
Information 256
Initiating an
emergency call manually 254
Messages in display 334
Remote door unlock 258
Roadside Assistance 254
Stolen vehicle tracking services 259
System self-check 252
Tele Aid System 251
Upgrade signals 257
Tele Aid System 402
Telematics* 402
Telephone* 24, 250
Answering a call 155
Dialing a number
from the phone book 155
Emergency call 208
Ending a call 155
Hands-free microphone 27
Loading phone book* 155
Messages in display 336
Operating 154
Operation 203
Redialing 156Temperature
Display mode 142
Grades of tires 396
Setting interior temperature 175
Setting units in display 142
Tires 292
Tie-down rings (Trunk) 243
Tightening torque 402
Tightening torque (Wheel bolts) 362
Time
Setting hours 144
Setting minutes 145
Tire inflation pressure
Checking 280, 292
Tire speed rating 272, 402
Tire traction 271Tires 381
Consumer information 395
Direction of rotation 291
Driving instructions 270
Retreads 290
Rims and tires 381
Service life 291
Temperature 292
Temperature grades 396
Tires and wheels 290
Tread depth 294
Wear pattern 293
Winter 294
Tools 337
Tow-away alarm 25, 83
Arming 83
Disarming 83
Disarming for transport 83
Towing eye bolt (vehicle tool kit)
CLK 320/CLK 500 370
CLK 55 AMG 371
Installing 370
Installing (CLK 55 AMG) 371
Towing the vehicle 368
Page 432 of 440

432 IndexUpgrade signals
Tele Aid 257
Uphill driving
Cruise control 219
Upholstery
Cleaning 304
Upshifting
Manual shift program mode
(CLK 55 AMG) 165
One-touch gearshifting 158
Steering wheel gearshift control
(CLK 55 AMG) 162
Useful features 244
Ashtray (Center console) 247
Ashtray (Rear seat) 248
Cigarette lighter 248
Floormats* 249
Interior storage spaces 244
Tele Aid 251
Telephone* 250V
Vehicle
Individual settings 139, 141
Locking 25
Locking in an emergency 344
Lowering 362
Service battery 363
Towing 368
Unlocking 25
Unlocking in an emergency 343
Vehicle battery 363Vehicle care 298
Cup holder 303
Distronic* system sensor cover 301
Engine cleaning 300
Gear selector lever 303
Hard plastic trim items 303
Headlamps 300
Instrument cluster 303
Leather upholstery 304
Light alloy wheels 303
Nubuck leather upholstery 304
Ornamental moldings 300
Paintwork 299
Parktronic* system sensor 301
Plastic and rubber parts 304
Power washer 299
Seat belts 303
Steering wheel 303
Tail lamps 300
Tar stains 299
Turn signals 300
Upholstery 304
Vehicle washing 300
Window cleaning 302
Wiper blades 302
Wood trims 304